Pages

Tuesday, December 22, 2015

Turkey with Turnip and Pear

My CSA challenge has really been a challenge.  I have to say that the true challenge came when I was confronted with turnips ... and turnips ... and turnips.  They came with every shipment.  I had more turnips than I knew what to do with.  The reason for my situation came not only due to the number of turnips, but also from the fact that I have rarely cooked with the root vegetable.  

Sure, I could have boiled them, pureed them into a smooth nothingness, and, voila, an alternative to mashed potatoes or with mashed potatoes.  And only that.  I have never cooked with turnips.  So I needed to come up with another use for them.   So, I did what I often do and that is to consult the Internet.  I searched for various recipes for turnips. There a lot of recipes, as there are for pretty much any ingredient.  However, there was one recipe that caught my eye, because it called for a combination of ingredients which appealed to my stomach ... turnips and pears.  The recipe was from Bon Appetit, but I decided to give it my own twist.

The twist involved combining the turnips and pears with turkey, which works on so many levels. Turkey is a very good protein to work with because its its flavor is complementary to so many fruits, vegetables and starches.  This goes well beyond cranberries and potatoes.  Both the turnips and the pears paired very well with the turkey.  For this dish, I used a turkey thigh, rather than the breast or cutlets.  The reason is the preparation.  Given the top of the stove treatment, which involves higher heat over a shorter period of time, the added fat content in the turkey thighs helped to keep the meat moist.

This was a very good dish for turnips, and a great alternative to simply mashing them like potatoes.  While my plating still needs some work, this is the type of dish that I think could look fancy enough to appear on restaurant menus.  


TURKEY WITH TURNIP AND PEAR
Adapted from recipe by Bon Appetit
Serves 4

Ingredients:
3 tablespoons olive oil, divided
1 turkey thigh, about 1 1/2 pounds, cut into
     four even sized pieces
Kosher Salt
Freshly ground black pepper
1 large onion, thinly sliced
1 medium pear, peeled, cored and chopped
1 medium turnip, peeled and chopped
4 garlic cloves, finely chopped
1/2 cup dry white wine
1 teaspooin fresh thyme leaves, plus more for serving
1/2 cup salted, roasted macadamia nuts, chopped

Directions:
1.  Brown the chicken.  Heat 1 tablespoon of oil in a large skillet over medium-high heat.   Season turkey with salt and pepper and cook, skin side down, until skin is browned and crisp 10-12 minutes.  Transfer turkey to a plate.

2. Prepare the sauce.  Heat remaining 2 tablespoons of oil in same skillet over medium high heat.  Add onion, pear, turnip and garlic, season with salt and pepper, and cook, stirring ocassionally until pear and turnip are soft and starting to turn golden brown, about 15-20 minutes.  Carefully add wine and thyme, then return chicken to skillet, skin side up.  Cook until wine is almost completely evaporated and turkey is cooked through, about 8-10 minutes.

3.  Complete the dish.  Plate the dish and serve topped with macadamia nuts.

ENJOY!

Wednesday, December 16, 2015

Classic Gremolata

It has been said that, "you can't have a fancy food blog without a recipe that has something topped with gremolata."   While I don't have a fancy food blog, I still felt it was necessary to include a recipe with something with this flavorful topping.  A classic gremolata consists of three ingredients: flat leaf parsley, garlic and lemon zest.  There are other optional ingredients, such as salt and pepper.

The origin of gremolata is lost to history, although it is suggested that the term originates from the French word, gremolade.  Notwithstanding its obscure history, the gremolata has a key place in Italian cuisine.  It is the key accompaniment to Osso Bucco alla Milanese, where it tops a braised veal shank.  Gremolata has also found its way onto other Italian dishes.  Indeed, over time, it seems that Gremolata has become to Italian cuisine what Chimichurri is to Argentine cuisine or a Persillade is to French cuisine.  

The key to a Gremolata, as it is to a Chimichurri or Persillade is to use  the freshest ingredients available.  If that flat leaf parsley looks a little limp, set it aside for another use. If the garlic has been sitting around a little too long, turn it into roast garlic for a different dish.  If you lemons have been sitting in the basket for too long, make lemonade, not gremolata.  

Once you have the freshest ingredients, make the topping right before you plan on serving it.  It only takes about 5 minutes to make and then use it right away.  I used it on a steak that I cooked under a broiler.  The steak was rubbed with complimentary flavors (ground onion, ground garlic, kosher salt and some freshly ground black pepper).  If you don't have a steak, you can still use this topping on any number of dishes, from grilled or braised meats such chicken, lamb or pork to grilled fish.  The simplicity of this recipe translates into a flexible condiment that can add a lot of flavor to a wide range of dishes.

If you happen to have left over gremolata, you can use it within a day.   That should be enough inspiration to cook something else.  If you don't use it within a day, the topping will start to go bad because of the wilting of the parsley.


CLASSIC GREMOLATA
Recipe from The Kitchn
Makes 1/3 cup

Ingredients:
1 small bunch of parsley, washed and dried (1 cup loosely packed)
1 clove of garlic, skin removed
2 organic lemons, washed and dried

Directions:
1.  Prepare the parsley.  Remove the leaves from the parsley until you have enough to make 1 cup when loosely packed.  Chop the parsley until it is nearly finely chopped.  The parsley should be less than 1/2 cup.

2.  Add the garlic.    Use a microplane or fine toothed grater to grate the garlic clove over the parsley.

3.  Add the lemon.  Usingthe same microplane or grater, zest two lemons on top of the garlic.

4.  Finish the chopping.  Continue to chop the parsley, mixing in the garlic and lemon until the parsley is chopped very fine.

5.  Use the gremolata.  Use the gremolata right away.   Serve it on Ossobucco alla Milanese, or any grilled or braised meat dish.   You can store it in an airtight container in the refrigerator for up to one day.

Tuesday, December 1, 2015

Mobile Style Oysters

As the chronological archive on the right demonstrates, I have not posted as many recipes this year as I have in previous years.  This is due in part to a very busy schedule, both at work and at home.  It does not mean that I am not cooking or that I am not trying out new recipes.  It just means that those recipes sit in a queue, waiting for me to write a few pithy paragraphs about them.

This recipe -- Mobile Style Oysters -- was one that waited a long time in that queue.  A really long time.  The reason why it waited so long was not necessarily due to my schedule, but the fact that I wanted to make this dish for my very beautiful Angel, Clare.  However, I was unable to do so for days, weeks and months.  The reason is that Clare was pregnant with our little girl.  I was unsure about serving oysters, even when cooked, so I held off making this recipe.  This restraint was very difficult.  Many a night I wanted to buy a half-dozen oysters and make this dish.  I held off, and it was well worth it.

This dish, as its name suggests, heralds from Mobile, Alabama, where local restaurants have a ready supply of oysters from the Gulf of Mexico.  There are at least eight commercial oyster farms in Alabama.  In addition to these farmers, there are local fishermen who harvest the variety of oyster species in the bay, most notably the Eastern Oyster.  Once the harvests reach the shore or the store,  the oysters find their way to restaurants like Bluegill.  The chefs and cooks then grill or broil oysters in their shell filled with a bath of butter, garlic and parmesan cheese.  The end result is  Mobile Style Oysters.

There are two things that make this recipe work.  First, the combination of those three flavors -- garlic, butter, and parmesan -- always work together in a delicious harmony.  This is true no matter the dish.  Nevertheless, what makes the harmony work in this case is that it does not drown out the star ... the oysters.  The briny flavor of the oysters are still able to stand out, surrounded by the supporting elements.

The other thing that works with this recipe is that the oysters are cooked just enough.  Often times, oysters can be overcooked, which takes such a beautiful ingredient and turns it into trash.  The five minutes under the broiler (which I did) or on the grill provides just enough heat and cooking time to give the bivalves the opaqueness one expects from cooked seafood without turning them into a chewy mess.

It was definitely worth the wait.  Both Clare and I loved these oysters, almost as much as eating them raw.  


MOBILE STYLE OYSTERS
Recipe from Saveur
Serves 4

Ingredients:
12 tablespoons of unsalted butter, softened
6 tablespoons of finely grated Parmesan
2 tablespoons of fresh parsely, minced
1/4 teaspoon crushed red chile flakes
3 cloves garlic, minced
1 shallot, minced
Zest of 1 lemon and juice of 1/2 lemon
Tabasco sauce
Worcestershire sauce
Kosher salt
Freshly ground black pepper
24 medium oysters, shucked and left in bottom shell
Crusty bread, for serving.

Directions:
1.  Prepare the grill or stove.  Build a medium-hot fire in a charcoal grill or heat a gas grill to medium high.  Alternatively arrange an oven rack 6 inches from the heating element and heat the oven to broil.

2.  Prepare the topping.  Combine the butter, Parmesan, parsley, chile flakes, garlic, shallots, lemon zest and lemon juice in a medium bowl. Season with Tabasco, Worcestershire, salt and pepper.  Spoon about 1 tablespoon of the mixture over each oyster.

3.  Grill or broil the oysters.  Grill or broil the oysters until the edges of the oysters begin to curl, about 5 minutes.  Serve with the bread.

ENJOY!

Monday, November 23, 2015

Iowa Loose Meat Sandwiches

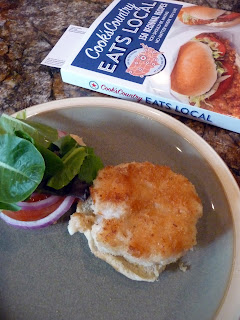
Recently, I decided to make Iowa Loose Meat Sandwiches for my family.  I found the recipe in one of my most recent cookbook purchases, Cook's Country Eats Local.  The recipe seemed unbelievably simple. Ground meat, onion, mustard, water, salt and pepper.  Yet, the cookbook authors guaranteed a lot of taste.  

In Iowa, the loose meat sandwiches are known as "Maid-Rite" sandwiches, named after the chain of restaurants, that has been proudly serving the sandwiches since 1926.  I've never set foot in a Maid Rite restaurant, so I have nothing to compare the Cook's Country recipe to an authentic loose meat sandwich.  Nevertheless, the Cooks Country recipe boasted about being a simplified version of what seemed like a fairly simple sandwich.  Given my hectic schedule at work and home, simple seemed like a very good selling point.

To be sure, the recipe took very little time to make.  All of the ingredients go into the pan and you cook until the meat is done.  It took about 5 minutes, plus another couple of minutes to "prepare" the buns.  I prepared the sandwiches as directed and then served them.

The end result was as advertised: the sandwiches were very tasty.  The cooking of onions and mustard with the meat provide additional flavors just beyond beef.  Everyone enjoyed these sandwiches and, given the simplicity of the recipe, this is a good dish for people who have very little time to cook ... or make their way to Iowa to buy one.


IOWA LOOSE MEAT SANDWICHES
Recipe from Cook's Country Eats Local, pg. 175
Serves 4

Ingredients:
1 pound 85 percent lean ground beef
1/4 cup water
1 tablespoon yellow mustard, plus extra for serving
1 teaspoon sugar
1 teaspoon salt
1 teaspoon pepper
1/2 cup finely chopped onion
4 hamburger buns
Sliced pickles

Ingredients:
1.  Cook the meat.   Combine beef, water, mustard, sugar, salt and pepper in a 10 inch skillet.  Bring to simmer over medium heat, breaking up meat with a spoon.  Reduce heat to medium low to maintain a gentle simmer and cook, stirring frequently until meat is no longer pink, about 5 minutes.  Stir in onion, cover, and remove from heat, keep warm while preparing buns.

2.  Finish the dish.  Spread extra mustard on buns, then using slotted spoon, mound beef mixture on top.  Cap with pickles and bun tops.  Serve.

ENJOY!

Sunday, November 15, 2015

Mashed Sweet Potatoes with Ginger, Cardamom and Honey

If one were collecting cardinal rules of cooking, my suggestion would be that "cardamom makes just about everything better."  Not butter.  Not bacon.  But cardamom.  Any type of cardamom: black, green or Madagascar.  If anyone were to question this cardinal rule, then my response would be to direct him or her to this recipe: Mashed Sweet Potatoes with Ginger, Cardamom and Honey.

Before this recipe, I did not like sweet potatoes.  If given the option between regular fries and sweet potato fries, I would choose the former over the latter.  If my only option was sweet potato fries, I would grimace and look for the nearest bottle of hot sauce to mask the taste of the sweet potatoes.  If presented with the choice of mashed sweet potatoes, that would a choice I would avoid.  The bottom line: I would rather have an empty space on my plate.  

All of that changed with this one recipe.  We had a couple of large sweet potatoes, which were given to us as part of our CSA share.  The sweet potatoes sat on our counter, and in our refrigerator, for a while as I pondered what I would do with them.  Eventually, I had to confront them and prepare them in some manner.  I once again went to the Internet to find some recipe that would intrigue me.  It did not take long before a recipe caught my eye.  The eye-catching feature of this recipe was the word "cardamom."  

I am no stranger to cardamom.  There are over a dozen recipes on this blog that feature the spice, but I used the spice to cook dishes with ingredients that I loved to eat.  The problem with using cardamom is its price.  It is very expensive, second only to saffron.  The price is worth it, because the warm, pungent aromas of the cardamom pod and the unique flavors that it contributes to the dish are without measure.

This recipe marks the first time that I used cardamom to prepare a dish with an ingredient that, as I mentioned above, I did not like to eat.   Now, I love sweet potatoes ... at least with cardamom.


MASHED SWEET POTATOES WITH GINGER, CARDAMOM AND HONEY
Recipe from Chowhound
Serves 4

Ingredients:
2 pounds of sweet potatoes
8 ounces of russet potatoes
4 tablespoons of unsalted butter
1/4 cup peeled, finely grated fresh ginger
1 teaspoon ground cardamom
2 tablespoons of honey
1 teaspoon Kosher salt
Freshly ground black pepper

Directions:
1.  Prepare the steamer.  Fill a large pot with 1 inch of water and bring to a boil over high heat.  Set a steamer basket inside and set to low so the water is simmering.

2.  Prepare the potatoes.  Peel and cut the sweet potatoes and russet potatoes into large dice.  Place them into a steamer and cover with a tight lid.   Steam until fork tender, about 20 minutes.    Meanwhile, place the remaining measured ingredients into a small saucepan over low heat, season with pepper and stir until the butter and honey have melted. Remove from heat and set aside.

3.  Finish the dish.  When the potatoes are ready, transfer them to a large bowl and drizzle with the butter mixture.  Mash with a potato masher until you get the desired consistency.  Taste and season with salt and pepper.  

ENJOY!

Monday, November 9, 2015

South Carolina Shrimp Burgers

Almost any protein can be made into a burger.  Beef may reign supreme, but lamb and turkey have made their inroads. However, some of the best burgers are those made with fish.  In the past, I have prepare dishes such as Salmon Burgers and Rockfish Burgers, both of which were paired with variations of guacamole.  I actually prefer those types of burgers over a beef burger (but not a lamb burger).  

Given the myriad of possibilities when it comes to proteins and burgers, I am always on the lookout for something new and different.  A few months back, my beautiful wife, Clare, and I -- along with our kids -- went to the Library of Congress' book festival  At that festival, I picked up the Cook's Country Eats Local.  It was a great purchase, because the book has all sorts of interesting recipes from around the country, including one for South Carolina Shrimp Burgers.

The connection between South Carolina and shrimp is an obvious one, especially for a food lover such as myself.  There is a long history of shrimping in the low country, with generation after generation plying the waters catching one of the three types of shrimp that thrive in the area.  Each type corresponds to a color.  There is the brown shrimp or Farfantepenaeus Aztecus.  There is the white shrimp or Litopenaues Setiferus.  And there is the pink shrimp or Litopenaue Duorarum.  Three types of shrimp, that all basically taste the same. 

The true difference in shrimp comes from using fresh shrimp and frozen shrimp.  Unless you live in the low country, or by a body of water where shrimpers ply their trade, you are most likely eating frozen shrimp.  This is even true if you buy them at the seafood counter of your local grocery store. (The shrimp arrive at the store frozen, but the store's seafood staff takes care of that whole defrosting thing.)  While fresh shrimp are definitely the best, you can use frozen shrimp provided that those shrimp did not have to travel half of the globe to make it to your local supermarket.  In other words, look for shrimp that is as "local" as you can get.  If you are in a city such as Charleston, South Carolina, or Chicago, Illinois, you are better off if your shrimp is from the United States, as opposed to Thailand or Ecuador.  While it may cost more to buy shrimp harvested in the United States, you are at least supporting local fishermen and shrimpers, which is a good thing.  

The authors of the Cook's Country book also recommend that you should use "untreated shrimp," that is, shrimp that does not have added sodium or preservatives, such as sodium tripolyphosphate (STPP).  This would pretty much rule out most, if not all, of the shrimp that you find in the freezer section of your grocery store.  Once the freezer section declared off limits, you are left with the seafood counter, where you can buy some seemingly-fresh-but-previously-frozen shrimp for this burger recipe. You will not regret it.

In the end, this is a great recipe. I have already made these shrimp burgers for family and friends.  The recipe is quickly becoming a family favorite, which ensures it will be made again and again.  Too bad we don't live closer to the shore where we could get our shrimp right off of the boat.  


SOUTH CAROLINA SHRIMP BURGERS
Recipe from Cook's Country Eats Local, pages 114-115
Serves 4

Ingredients (for the burgers):
1 cup of panko bread crumbs
1 1/4 pounds of large shrimp (26/30 count),
     peeled, deveined, and tails removed
2 tablespoons mayonnaise
1/4 teaspoon pepper
1/8 teaspoon salt
3 scallions, chopped fine
3 tablespoons of vegetable oil
4 hamburger buns
4 leaves Bibb lettuce

Ingredients (for the tartar sauce):
3/4 cup mayonnaise
3 tablespoons finely chopped dill pickles
1 small shallot, minced
1 teaspoon capers, rinsed and chopped fine
1/4 teaspoon pepper

Directions:
1.  Make the tartar sauce.   Combine all of the ingredients in a bowl and refrigerate until needed.

2.  Begin making the burgers. Pulse the panko crumbs until finely ground, about 15 pulses, transfer to a shallow dish.  Place one-third of shrimp (1 cup), mayonnaise, pepper, salt, and cayenne in the now-empty and pulse until shrimp are finely chopped, about 8 pulses.  Add remaining two-third of shrimp (2 cups) to shrimp mixture in processor and pulse until coarsely chopped, about 4 pulses, scraping down sides of bowl as needed.  Transfer shrimp mixture to a bowl and stir in the scallions. 

3.  Make the patties.  Divide shrimp mixture into four 3/4 inch thick patties (about 1/2 cup each).  Working with 1 patty at a time, dredge both sides of batties in panko, pressing lightly to adhere, and transfer to plate. 

4.  Cook the burgers.  Heat oil in 12 inch non-stick skillet over medium heat until shimmering.  Place patties in skillet and cook until golden brown on first side, about 3 to 5 minutes.  Carefully flip  and continue to cook until the shrimo registers 140 to 145 degrees and second side is golden brown, 3 to 5 minutes longer.  Transfer burgers to paper towel-lined plate and let drain, about 30 seconds each side.  Spread tartar sauce on bun bottoms, then place burgers on top.  Cover with lettuce and bun tops.  Serve.

ENJOY!

Saturday, November 7, 2015

Roasted Spaghetti Squash with Mushroom, Garlic & Sage

Ever since we joined a local community supported agriculture program, or CSA, I have been challenged by a variety of vegetables that I never cooked with before.  I previously posted my challenge with acorn squash, which resulted in a very delicious soup.  Ever since that time, I have decided to challenge myself with the other vegetables that come with each shipment.

We had other squash in our shipment, including a spaghetti squash.  The concept of spaghetti + squash seemed a little ridiculous.  Pasta comes from flour, water and eggs, like my most favorite dishes, Maccheroni alla Chitarra and Paglia e Fieno.  Pasta does not come from something associated with gourds and pumpkins.  Needless to say, I have always been skeptical of spaghetti squash.  The skepticism kept me from cooking with the ingredient.  Why cook with a spaghetti squash when I could make or have real spaghetti. 

I have to admit that kind of thinking creates limitations, which, in turn, inhibit creativity.  So I set aside my skepticism and sought out a recipe that I could use to make spaghetti squash.  I found a recipe on a blog called Feasting at Home that incorporated some traditional Italian flavors, such as garlic, sage and mushrooms.  With that recipe, I set out to make my first dish using spaghetti squash.

The recipe was definitely a good entry into cooking with this squash.  If there was any issue with the recipe, it was the cooking times.  The recipe calls for cooking the squash 40 to 50 minutes.  I would definitely go with the 50 minutes, to ensure the whole squash is cooked.  

This recipe is categorized as a side dish, but add a few meatballs and you can have a main course.  I just made some simple turkey meatballs because my beautiful wife, Clare, loves turkey.  


ROASTED SPAGHETTI SQUASH WITH MUSHROOMS, GARLIC AND SAGE
Recipe by Feasting at Home
Serves 2

Ingredients:
1 small spaghetti squash
1 tablespoon butter
2 tablespoons olive oil
1/2 onion, chopped
12-16 ounces of mushrooms, sliced
4-6 garlic cloves, finely chopped
3 tablespoons fresh sage, chopped
Salt, to taste
Freshly ground black pepper, to taste
Generous pinch of nutmeg
1/4 cup grated cheese (pecorino or parmesan)
Drizzle truffle oil, optional

Directions:
1.  Prepare the spaghetti squash.  Preheat the oven to 400 degrees Fahrenheit.  Cut the spaghetti squash in half (either way) and place open side down on a parchment lined baking sheet.  Bake 40 to 50 minutes.

2.  Saute the onion, mushroom, garlic and sage.  While the squash is baking, heat the oil and butter in a large skillet over medium high heat.  Saute the onions until just tender, about 2 to 3 minutes.  Add mushrooms, turn heat to medium and saute until they begin to release their liquid, about 5 to 7 minutes.  Add garlic and sage and continue cooking until mushrooms brown, about 4 minutes.  Season generously with salt, pepper and nutmeg. 

3.  Finish the dish.  Check squash by piercing with the tip of a sharp knife to see if it is done.  When tender, take out of the oven, turn over and let it cool slightly until cook enough to handle.  Then scoop out seeds and scoop out the spaghetti squash into the saute pan with the mushrooms and stir to incorporate.  Taste for salt and add more if necessary.  Stir in most of the grated cheese, saving some for garnish.  Place in serving bowl, top with the remaining cheese and a drizzle of truffle oil. 

ENJOY!

Sunday, November 1, 2015

Acorn Squash Soup

Recently, we joined a community supported agriculture program, also known as a CSA.  We get a box of fruit and vegetables every week.   This box presents a lot of challenges for me, given that my cooking tends to be more meat-centric than vegetable centric.  Therefore, I am using this CSA as a cooking challenge for me -- a CSA challenge -- to make dishes based on the fruits and vegetables that we get each week in our box.

Given the time of year, the box contains a lot of winter vegetables, such as potatoes, squash, and yams.  Over the past couple of weeks, the box has contained acorn squash.  That is one ingredient that, until recently, I had never prepared before. 

As I always do, I looked for a recipe.  I am quite familiar with butternut squash soup, because Clare has made that before and it was very tasty.  So, a soup seemed like a good start.  I reviewed a handful of acorn squash recipes before I came across one from Mario Batali.  The most appealing thing about this recipe is its simplicity.  A handful of ingredients, boiled together, blended together.  The result is a creamy, earthy soup with a lot of flavor from the nutmeg and a little kick from some crushed red pepper.

Not only have I not cooked with acorn squash, I don't believe that I had ever tasted it before.  However, I think I can say that I am very impressed with the taste of this soup.  Given how easy it is to make, and the availability of acorn squash during this time of year, I have a feeling that we will be eating a lot more of this soup over the coming weeks and months.


ACORN SQUASH SOUP
Recipe by Mario Batali
Serves 6

Ingredients:
2 acorn squash (peeled, seeded and cut into large cubes)
1 onion, diced
2 carrots, sliced
Chile flakes, to taste
1/2 teaspoon freshly grated nutmeg
2 cloves garlic, minced
5 cups of water
Chives, minced
Salt
Freshly ground black pepper
Extra virgin olive oil
Creme Fraiche 

Directions:
1.  Saute the squash, onions and carrots.  In a large heavy bottomed pot over medium-high heat, add about 4 tablespoons of olive oil.  Add the squash, onions, carrots, chile flakes, nutmeg and season with a generous pinch of salt.  Cook for 15 minutes or until the vegetables are tender and have broken down a bit and are soft. 

2.  Continue cooking.  Add the garlic and cook for a minute longer.  Add the water and bring to a boil and then reduce to a simmer.  Cook for 15 to 20 minutes more.  

3.  Blend the soup.  Use a hand blender to blend the soup until smooth and creamy.  Adjust the seasoning.  

4.  Finish the dish.  Serve with a drizzle of good olive oil, a dollop of Creme Fraiche, and a sprinkle of chives. 

ENJOY!

Saturday, October 3, 2015

Iron Chef Night -- RADISH SPROUTS

It has been more than five years since I submitted myself to an Iron Chef challenge.  The challenge is just what the name suggests (assuming you watched either the original Iron Chef show or the American version).  I would give myself one ingredient -- the not so secret ingredient (after all, I have to decide what to use) -- and then come up with three to four dishes that feature the ingredient in some way.  

To date, I have posted five such challenges.  The secret ingredients for these events were corn, mussels, beef bone marrow, mushrooms and Vidalia onions.  With each challenge, the goal was to make dishes based on my thoughts and ideas, with little to no help from recipes.  Some challenges were successful.  Other challenges were less so.  Still, it was a chance for me to enjoy my hobby in a way that I enjoyed watching the Iron Chef show (the original version, as well as the American version, at least for a while).  

Iron chef challenges take a lot of work, both with respect to formulating ideas and the actual execution.  If you watched either show, you would know that the chefs have 1 hour to make their dishes. In reality, if I recall correctly, the chefs are given a few ingredients ahead of time to start the mental process of coming up with dishes.  

For my most recent challenge, I had a little advanced notice of the ingredient.  I received a Back to the Roots Water Garden, which is an aquarium on top of which you can grow herbs and small plants.  The kit came with seeds for radish sprouts and wheatgrass, which I used to plant my first "crop."  The planting went very well and I ended up with a lot of radish sprouts and wheatgrass.  The question was what to do with all of that.  

Hence, the first Iron Chef challenge in more than five years.  Given the fact that I had never cooked with radish sprouts before, I had to rely a little more on recipes than in the past. 

FIRST COURSE

The first dish is a watermelon salad with cilantro, radish sprouts and feta cheese.  This dish is based on a recipe from Saveur.  That recipe called for the use of Cotija, a Spanish cheese.  I could not find any of that cheese at my local store, so I went with an ingredient that I thought would come somewhat close in at least texture ... feta cheese.  Overall, this was probably the best dish of the night. 


WATERMELON SALAD WITH CILANTRO, 
RADISH SPROUTS AND FETA CHEESE
Recipe adapted from Saveur
Serves 6-8

Ingredients:
1 small seedless watermelon (3-4 pounds), rind removed,
     cut into 1 inch cubes
1/4 cup olive oil
2 teaspoons sugar
1/2 teaspoon red chile powder
Zest and juice of 1 lime
Kosher salt, to taste
6 ounces of Feta cheese cut into 1/2 inch cubes
Freshly ground black pepper, to taste
1 cup lightly packed cilantro leaves
2 1/2 ounces radish sprouts

Directions:
Place watermelon pieces in a large bowl.  Whisk olive oil, sugar, chile powder, lime zest, and juice, salt and pepper in a bowl.  Pour over watermelon.  Add remaining ingredients, tossing to coat.  Adjust salt and pepper as needed.


SECOND COURSE

The second course (and the third one) tested my challenge to adjust recipes on the fly.  The second dish was supposed to be Mexican Avocado Spread Sandwiches.  To make a sandwich, you need bread.  I thought I had bread at home so I did not buy any at the store.  Turns out, no bread at home.  However, Clare bought a flatbread from Costco, which meant that we had a lot of flatbread.  So, I went with a flatbread concept, rather than a sandwich.

MEXICAN AVOCADO SPREAD FLATBREAD 
WITH SPROUTS
 Recipe adapted from Foodfaithfitness
Serves 2

Ingredients:
1/4 cup avocado, mashed, about 1/2 small avocado
2 tablespoons of salsa
1 teaspoon of fresh lime juice, plus additional for serving
1 teaspoon garlic, minced
1/2 teaspoon cumin powder
1/4 teaspoon chile powder
Salt, to taste
Freshly ground pepper, to taste
2 flatbread pieces, toasted
1 large tomato, sliced
1/2 cucumber, sliced
1 cups sprouts
1/4 cup cilantro, roughly chopped

Directions:
1.  Prepare the avocados.  In a medium bowl, mash together the avocado, salsa, lime juice, garlic, cumin, chile powder and a pinch of salt and pepper.

2.  Prepare the sandwiches.  Divide the avocado mixture evenly between two slices of bread, spreading evenly.  Divide the tomato slices between 2 slices of bread, followed by the cucumbers and sprouts.  Squeeze fresh lime juice over the sprouts and top each slice of bread with chopped cilantro.  Add more salt and pepper, to taste.  Cover with remaining slices of bread, cut, and serve.


THIRD COURSE

For my last course, I wanted to do something a little "fancy."  Unfortunately, it was a little flat.  The dish was supposed to be Sesame Marinated Salmon with a Radish Sprout Relish.   I wanted to incorporate the wheatgrass into the relish, so I decided to juice the wheatgrass with some radish sprouts and ginger.  It was at this point that the relish went out the door quickly. I still can't tell you what exactly I was thinking but I quickly had to turn the relish into a broth.  And that really did not work because the broth got lost in the rice, leaving only the bits of wheatgrass and radish sprouts along the edges. 


SESAME MARINATED SALMON
WITH RADISH SPROUT BROTH
A Chef Bolek Original
Serves 2

Ingredients:
1/8 cup mirin (sweet Japanese rice wine)
1 tablespoons unseasoned rice vinegar
1 tablespoon minced green onions
3/4 tablespoons minced fresh ginger
1 teaspoon sesame seed oil
1 teaspoon ground ginger
2 six-ounce fillets of Sockeye Salmon
1/2 cup of radish sprouts
1/2 cup wheatgrass
1/4 cup sweet onion, minced 
1/4 tomato, minced

Directions:
1.  Prepare the marinade.  Whisk the mirin, rice vinegar, green onions, ginger and sesame seed oil together.  Add salmon, turn to coat.  Cover and chill for at least 30 minutes.

2.  Prepare the broth.  Put wheatgrass, a small amount of sprouts and ginger in a blender.  Add 1/4 cup of water.  Liquify the ingredients and transfer to a small pot.  Add a little more water to make the amount of broth that you need and turn the oven on to medium to heat.  

3.  Cook the salmon.  Preheat broiler.  Line baking sheet with foil, spray with non-stick spray.  Line up fillets, skin side up.  Broil 5 to 6 inches from heat source until skin is crisp, about 2 minutes.  Use metal spatula, turn salmon over.  Broil until salmon is just cooked through and golden brown on top, about 4 minutes.

4.  Plate the dish.  Place some rice in the middle of the dish.  Place the salmon over the rice and pour the broth gently around the edges of the rice.

*        *         *

With the cooking at an end, it reminded me that I am a little rusty when it comes to the Iron Chef Challenge.  Some of the difficulty could be due to the ingredient.  It is hard to think of dishes that use radish sprouts.  However, I also need to work on my flexibility when it comes to cooking on the fly.  I used to be fairly good at it, but just like anything else, it becomes a little rigid when not properly exercised. So, I hope that I will be able to do another Iron Chef Night soon.  And with an ingredient that is more in my wheelhouse ... like porterhouse steaks.

ENJOY!

Sunday, September 27, 2015

Spencer Trappist Ale

With the visit of Pope Francis to the United States, it seems appropriate to post a review of a Trappist beer.  A trappist beer is one that is brewed by or under the strict supervision of monks from the Order of the Cisterians of the Strict Observance.  I have posted a few reviews of Trappist beers, including the Orval Ale, the La Trappe Quadrupel, and the Westmalle Tripel.  Each one of those reviews was propelled by a fascination and curiousity of the notion of monks brewing beer.

Until just a few years ago, trappist beers were brewed from only a handful of breweries that had been registered with the International Trappist Associaiton.  All of those breweries were located in either Belgium and the Netherlands.   As the craft movement has grown, so has Trappist beer, with new breweries in Italy and the United States.  And, it is the one in the United States -- operated by St. Joseph's Abbey in Spencer, Massachusetts -- that provides the United States with its first officially recognized Trappist beer, which is conveniently named the Spencer Trappist Ale.  

St. Joseph's Abbey is a community of Trappist monks who follow the Benedictine tradition of ora et labora (prayer and work), the monks pursue a simple life of contemplative prayer, manual labor and hospitality.  A few years ago, some of the Brothers at the monastery expressed an interest in brewing beer, and even received some training at a local craft brewery.  The brothers then toured all of the existing Trappist breweries, to see how those beers were produced.  After completing thieir learning, the monks at the Spencer abbey began procuding their own trappist ale.

The Spencer pours a nice golden color, with an even foam across the entire surface. The aroma has a variety of mild, pleasant notes, including some bread, honey and herbal tones.  The beer is a very good example of a trappist ale, with some grass and clove up front,  There are also some biscuit and caramel notes from the malts that follow, but are not as prominent in the beer. 

Overall, this is a very good beer, and, an excellent first effort by the monks at the Spencer Abbey.  This beer sells for $11.99 for a 22 ounce bottle or $19.99 for a four pack of 12 ounce bottles.  It is definitely worth a try, especially if you, like me, were looking for a beer to toast the visit of Pope Francis to the United States. 

ENJOY!

Sunday, September 6, 2015

Mongolian Lamb with Green Scallions

When I think of Mongolian cuisine, I think of meat and vegetables cooked over preheated stones, whether in a sealed milk can (which is known as khorkhog) or in the cavity of a dead animal (which is known as boodog).  I don't normally associate Mongolian lamb with Mongolian cuisine.  Perhaps that is because whenever I see this dish, it is on the menu of a Chinese restaurant, not a Mongolian one. 

And, I have to admit that I am not a very big fan of Mongolian lamb served by Chinese restaurants.  I order the dish, but what I get served is usually a heapful of overcooked lamb drowned in a sauce that is reminiscent of MSG and high fructose corn syrup.  The dish is almost always a let-down, which is sad because I really love lamb.  I have always wanted to find a better Mongolian lamb dish.  Perhaps my quest should have begun with finding a better Chinese restaurant.  However, I am a cook; and, for me, a better starting place is in front of my own stove.

It begins with trying to find a good recipe.  I get some e-mails from various websites, like Food & Wine, Saveur and About Food, which suggest recipes.  One day, About Food had a recipe for Mongolian lamb.  The recipe seemed simple and straightforward, which is a bonus these days with two small children to look after.  The other bonus with respect to this recipe is that the sauce is thinner, a combination of soy sauce, sesame oil, rice vinegar and rice wine or dry sherry.  

I set about to make this recipe.  The dish itself was very delicious; however, the pictures provide two helpful suggestions for the future.  First, despite my best efforts, I need to slice the lamb a little thinner.  Thinner lamb equals an even quicker cooking time.  It also provides a possibility of crisping the lamb around the edges, which adds some texture to the dish.  The other suggestion is to thicken the sauce.  This recipe went a little too far in the other direction.  The sauce, which was very tasty, was a little too thin and it was somewhat lost in the dish.  While I would not add corn syrup, I think something was needed to thicken the sauce just a little bit.  

On the whole, this dish is far better than any Mongolian beef that I have ordered at any Chinese restaurant.  Nevertheless, it could still use some minor tweeking.  This is what I love about cooking.  It opens the possibility for experimentation the next time I make this dish.  And, when I do that, I will either update this post or create a whole new one.  Until then ...


MONGOLIAN LAMB WITH SCALLIONS
Recipe from About Food
Serves 4

Ingredients (for the lamb):
1 1/2 pounds of boneless leg of lamb
2 cloves garlic, chopped
2 scallions, cut into 3 inch lengths and then sliced thinly
Salt
Freshly ground black pepper

Ingredients (for the marinade):
1 tablespoon soy sauce
1 tablespoon Chinese rice wine or dry sherry

Ingredients (for the sauce):
5 teaspoons dark soy sauce
5 teaspoons Chinese rice wine or dry sherry
4 teaspoons sesame oil
1 teaspoon granulated sugar
2 teaspoons rice vinegar

Directions:
1.  Prepare the lamb.  Cut the lamb into thin strips. Marinate the lamb for 25 minutes. 

2.  Prepare the sauce. While the lamb is marinating, combine the sauce ingredients in a small bowl.  Set aside.

3.  Stir fry the lamb.  Heat a wok over medium to high heat.  Add 2 tablespoons oil.  When the oil is hot, add the garlic. Stir fry until aromatic (about 30 seconds).  Add the lamb.  Stir fry very briefly until the lamb changes color (about 1 to 2 minutes).  Add the sauce and bring to a boil.  Stir in the scallions.  Taste and season with salt and pepper if desired.  Stir-fry for 1 more minute or until sauce is absorbed.  Remove from the heart, stir in the sesame oil, and serve immediately with rice.

ENJOY!

Sunday, August 16, 2015

Turkish Style Turkey Kebabs

It seems somewhat of a paradox ... the cuisine of the country called Turkey does not have any recipes for the animal, turkey.  This paradox has its root in history.   The country occupies a peninsula known as Anatolia, and, the people who lived there have been referred to as Turks since as early as the 1300s.  The Turks lived in a rather strategic place, situated at the cross-roads of commerce.

At one end, there were the British.  They began to import a bird known by scientists as Numida meleagris, or the helmeted guinea fowl.  While the birds originated from Madagascar, it was Turkish merchants who sold the birds to the British.  After a while, the British referred to the merchants as "Turkey merchants," and then referred to the birds themselves as "turkeys."  Mark Forsyth, The Turkey's Turkey, New York Times (11/27/13). 

A couple centuries later, Spanish explorers encountered strange birds in the New World.  These birds, known to scientists as Melagris pellolavo, were soon exported to the Old World, including the British Isles.  Although this bird differed from the helmeted guinea fowl, the distinctions were lost upon the Europeans, who thought the bird tasted as good, if not better than the turkeys from the Turkey merchants.  Thus, they gave the New World bird the same name as the Old World bird, "turkey." 

This brings be back to the paradox.  The country, Turkey, has a cuisine that is rather devoid of any turkey recipes.  I now offer up my contribution, in some respect, with a recipe for Turkish Style Turkey Kebabs.  Turkish cuisine is renowned for its kebabs, and, there is no shortage of recipes for Turkish kebabs on the internet.  For this turkey kebab, I poured over many different recipes to find ingredients that would work well together.  In the end, I settled on a recipe that featured cumin, coriander, nutmeg and red pepper.   These flavors worked very well as a rub and, more importantly, it did not require any marinating for hours or overnight.

This was a very good recipe and it could work very well with other meats, most notably chicken.  If I happen to come across any helmeted guinea fowl, a/k/a the original turkeys, then I might just try this recipe to cook that bird.


TURKISH STYLE TURKEY KEBABS
Recipe adapted from Today's Parent
Serves 4

Ingredients:
1 1/2 pounds of boneless, skinless turkey thighs, cut into 1 inch cubes
1 teaspoon ground cumin
1 teaspoon ground coriander seed
1 teaspoon salt
1 teaspoon ground nutmeg
1/2 teaspoon red pepper flakes
Bamboo skewers
1 tablespoon of olive oil

Directions:
1.  Prepare the skewers.  Mix the ground cumin, coriander, nutmeg, salt and pepper together.  Brush the cubes with some olive oil and then sprinkle the spice mixture onto the turkey.  Rub the mixture in well.  Thread the turkey onto the bamboo skewers, leaving room between each piece to ensure uniform cooking.  Cover the skewers and refrigerate for at least one hour.

2.  Grill the skewers.  Approximately fifteen minutes before grilling, remove the skewers out of the refrigerator.  Heat a gas or charcoal grill over high heat.  Brush some olive oil carefully onto the grates to prevent sticking.  Thereafter, place the skewers on the grill.  Cook the skewers for 2-3 minutes, then turn the skewers.  Cook for an additional 1-2 minutes and turn the skewers again.  Repeat this process until the turkey is cooked through.

ENJOY!

Monday, August 10, 2015

Grilled Broccoli

I hate broccoli.  I really hate broccoli.  I hate it so much that I find myself repeating how much I hate broccoli.  If I could, I would ban broccoli from plates across the country.  That desire is the one and only position that I share in common with the 41st President, George Herbert Walker Bush.  

Over 15 years ago, President George H.W. Bush banned broccoli from the plates served at the White House.  According to the New York Times, President Bush not only declared that he did not like broccoli, but he stated, "And I haven't liked it since I was a little kid and my mother made me eat it. And I'm President of the United States, and I'm not going to eat any more broccoli!"  Many a time I have made that same declaration!

But alas, I live with my beautiful Angel, who loves the flowering cabbage that the Italians call "broccolo" and, hence, what we call "broccoli."  She has rightfully pointed out that I do not eat enough vegetables (a fact that is somewhat reflected in this rather meat-centric blog).  Broccoli has a lot of health benefits, including the ability to help lower cholesterol, as well as provide some important vitamins and phytonutrients.

I think that my opposition to broccoli comes from eating steamed broccoli.  I have never really been a fan of the taste of steamed broccoli.  Even knowing the health benefits of broccoli cooked in this fashion, I still figuratively hold my nose whenever I eat it.  

Nevertheless, I wanted to make some broccoli for my beautiful wife, so I went searching for a recipe.  That search led me back to the the New York Times.

Sam Sifton of the New York Times provided a very simple recipe for grilled broccoli.  Just a few ingredients -- balsamic vinegar, tamari or soy sauce, olive oil, and salt -- come together for a very interesting "marinade" that goes on the broccoli just before grilling.  This recipe produces some very tasty broccoli that ultimately led to a caveat to my previous declaration: "I am not going to eat any more broccoli, unless it is grilled." 

GRILLED BROCCOLI
A recipe from the New York Times
Serves 4

Ingredients:
1 head of broccoli, about 2 pounds, cored and cut 
     into 1 inch florets
3 tablespoons of balsamic vinegar
3 tablespoons of tamari or soy sauce
1 tablespoon of extra virgin olive oil, plus more for drizzling
1 tablespoon of flat leaf parsley, finely chopped
Kosher salt, to taste
Flaky sea salt (optional)

Directions:
1.  Prepare the grill. Heat the grill, either charcoal or gas, to high.

2.  Prepare the "marinade." In a large bowl, whisk the tamari or soy sauce and the balsamic vinegar together. Add the olive oil while whisking vigorously.  Add the broccoli and toss to coat.   Sprinkle lightly with kosher salt.

3.  Grill the broccoli.  Place a grill basket on the grill and add the broccoli to it.  Grill, tossing frequently, until the florets are crisp and tender with just a little bite to them, approximately 10 to 12 minutes.  If you don't have a grill basket, lay the florets out on the grill in a single level and use tongs to turn them frequently.  More work, same result.

4.  Finish the dish.  Transfer the cooked broccoli to a platter or bowl, drizzle with a little olive oil, sprinkle with parsley, and, if using, a pinch or two of sea salt.

ENJOY!  

Saturday, August 8, 2015

Cellar Rats Russian Imperial Stout

The use of a hammer and sickle on a label for a Russian Imperial Stout seems to be somewhat of a paradox.  A historical contradiction.  After all, the Russian Imperial Stout style emerged in the court of the Czar Peter the Great.  British brewers increased the alcohol and hops in their porters to create a beer that could be transported to St. Petersburg.  The beer continued to thrive in the courts of successor Czars, such as Catherine the Great.  According to one historian, "The Empress of all Russia is so partial to Porter that she has ordered repeatedly very large quantities for her own drinking and that of her court."  The History and Antiquities of the Parish of St. Saviour, Southwark.

Yet, the hammer and sickle is the emblem of the Soviet Union, whose founders overthrew the Czarist court, executed the Czar, and implemented a version of communism that lasted over eight hundred years.  While Soviet leader may have been preoccupied in Western imperialism, that focus was not on British beers.  One could safely assume that most Soviet leaders drank vodka, and a lot of it.    

This discussion is prompted by Cellar Rats Brewery's Black Rat Imperial Stout, whose label contains that historical contradiction.  According to the Beer Judge Certification Program, a Russian Imperial Stout should appear a very dark reddish brown to jet black, with a rich and complex aroma that should feature roasted malts, hops, and alcohol and a taste that could be reminiscent of bitter or unsweetened chocolate, cocoa or roasted coffee.  

The brewers at Cellar Rats have produced a Russian Imperial Stout that fits comfortably within the style.  The stout pours a jet black color, and a thick, puffy foam.  It has aromatic elements of roasted coffee.  Those earthy notes carry over to the taste, which is full of mellow, roasted malt notes wrapped in a thin sheet of booziness.  There is a little bitterness on the palate, most likely from the roasted malts, but also from the hops.  This bitterness is not overwhelming and does not detract from the overall smooth, mellow nature of this beer. 

I have to say that this is one of the better Russian Imperial Stouts that I have tasted.  I was given a bottle of this beer to try by my father, so I don't know the price of the beer or where to find it.  Given Cellar Rats Brewery is based on Madison, Ohio, I am sure that you can find the beer in Ohio.   If you see it on a menu or see a bottle in the store, it is worth trying.  

ENJOY!