Showing posts with label Sage. Show all posts

Sunday, July 5, 2026

Nanticoke Catfish

"The Black watermen of the Chesapeake Bay have the same kind of impact as the Tuskeegee Airmen, the same impact as the Buffalo Soldier. But their story is just beginning to be told." 

-- Vincent O. Leggett, Author

African-American watermen were pioneers. Yet, unlike the Tuskeegee Airmen and the Buffalo Soldier, the story of these watermen is as old as the story of the United States. As the British brought slaves to the Chesapeake Bay area, slave-owners put them to work on vessels that plied the waters to catch fish, along with harvesting oysters and crabs. Yet, the waters were more than work, they were a way to freedom and economic independence. 

As early as 1796, the federal government began issuing Seaman Protection Certificates. Such a certificate declared that its holder, an African-American, was a citizen of the United States. Certificate holders were often referred to as "Black Jacks." They were free from the bondage of slavery (as illustrated by Frederick Douglass, who borrowed a certificate from a friend to make his way out of the slave-owning, eastern shore of Maryland to the freedom of Philadelphia, Pennsylvania). But, they were not free from the discrimination and oppression of a racist society, economy and government.  African-Americans still suffered under unjust laws that restricted what they could do on the water. For example, Maryland passed a law that prohibited African-Americans from owning a boat large enough that it had to be registered (and, of course, large enough to engage in oystering, finfishing, crabbing, and other work). They often depended upon lax enforcement, or white bosses, to make it possible to work. 

The Civil War freed African-Americans from the bonds of slavery, but not the racist discrimination and segregation that remained and reconstituted itself under Jim Crow laws. Yet, even under these awful conditions, African Americans found freedom and independence, both on the water and adjacent to it. African American watermen continued to serve as captain and crew on vessels, many of which had white owners, but the watermen were able to earn enough to support themselves and their families. They benefited from a larger economic environment, one in which oysters and fish from the bay were in high demand. 

Downes Curtis

African-Americans were also able to establish their economic independence along the coasts, setting up their own businesses related to the seafood industry. Take, for example, the story of Downes Curtis, one of the only African-American sailmakers in the Chesapeake Bay region. Downes and his brother learned the craft from Dave Pritchett, an English sailmaker, in Oxford, Maryland. After Pritchett died, the Downes Curtis continued the business. They cut sails for log canoes and oysterboats in a building that once served as a school for African-American children.  (Today, the building is a private residence). Curtis built up a business that not only served African-Americans working on the bay, for vessels that raced its waters, like the Island Blossom. Curtis continued this work until 1996, when he died at age 85.

African-American Watermen working on a
fishing boat outside of Alexandria, VA 
Back on the waters, African-American watermen continued to captain and work on vessels up and down the Bay. They also developed their work methods, including the use of work songs or shantys. The use of such songs can be traced to early customs of African slaves working on plantations. Watermen used work songs to coordinate their work pulling up fish nets, such as the nets used to catch menhaden. As explained by William Hudnall, who organized a group of watermen who sing the shantys: The harmony brings everyone together on the same chord at the same time, and that's what made the work easier." The songs are sung by leaders and workers, with the former calling first followed by the response of the latter. Together, they would haul in the large purse seine nets, inch by inch, until the menhaden were on board. This tradition disappeared with the advent of mechanical equipment that could haul the nets onboard. The songs went silent for years and then decades.

During that time and thereafter, the maritime industry on the Chesapeake Bay plummeted with the populations of oysters, finfish and blue crab. It became harder for African-American watermen, and, indeed all watermen, to continue their trade. That has resulted not only in fewer fishing vessels working the bay, but also in the potential loss of a very rich history. Given the significant contribution that African Americans have made to the Chesapeake Bay seafood industry, both on and off the water, its preservation has become an important issue. Their history is American history. The only difference is that it is not widely taught, if taught at all, in schools and universities. If you want to learn about it, as I did, you have to spend a lot of time on the Internet or visiting museums to learn their stories. 

After spending a lot of time reading on this subject, I decided to prepare a dish that honored the history of African-American watermen on the Chesapeake Bay. I turned my search to finding an appropriate dish. My search led me to Vincent Leggett, a person who dedicated his life to preserving the history of these watermen and telling their story to present day audiences. Leggett wrote a book, The Chesapeake Bay Through Ebony Eyes, which inclued recipes. One of those recipes is Nanticoke Catfish. The name references the Nanticoke River, a tributary of the bay that runs through the eastern shore of Maryland. (Nanticoke comes from the Algonquin word nantaquak, which means "tidal people."). It is a basic fried fish dish, using catfish that could be found along the eastern shore. While such a dish would have been typically prepared with the indigenous catfish, like a brown bullhead, it can be enjoyed today by using blue catfish, an invasive species that is wreaking havoc in the bay. 

NANTICOKE CATFISH

Recipe from Vincent O. Leggett, The Chesapeake Bay Through Ebony Eyes 

and available here

Serves 8

Ingredients:

  • 1 1/2 cups all purpose flour
  • 1/4 cup cornmeal
  • 1 tablespoon rubbed sage
  • 1 tablespoon cayenne pepper, or to taste
  • 1 teaspoon garlic powder 
  • 1 teaspoon onion powder
  • 1/2 teaspoon nutmeg
  • 1 teaspoon salt
  • 1 teaspoon black pepper
  • 4 large eggs
  • 8 catfish fillets
  • Vegetable oil

Directions:

1. Prepare the batter or breading. Mix the flour, cornmeal, sage, cayenne pepper, garlic powder, onion powder, nutmeg, salt and pepper in a shallow bowl or pie plate. In another shallow bowl or pie plate, whisk the eggs until well beaten. 

2. Prepare the fish. Rinse the catfish fillets under cold running water and pat them dry. 

3. Prepare the oven. Preheat the oven to 250 degrees Fahrenheit. Set a wire rack inside a rimmed baking sheet lined with paper towels. 

4. Prepare the oil. Pour vegetable oil to a depth of 1/2 inch in a large, deep skillet. Heat theoil over medium-high heat until shimmering but not smoking. 

5. Prepare the fillets. Dip the fillets into the eggs and let the excess drip off. Dredge them in the flour mixture and gently shake off the excess.

6. Fry the fillets. Working in batches to avoid overfilling the skillet, slip the fillets into the hot oil. Fry the fillets, turning once, about 4 minutes on each side, until the coating is crisp and golden brown and the fish is opaque in the center. Transfer the cooked fish to the wire rack and keep them warm in the oven until all of the fish fillets are fried. Serve hot with lemon wedges.

*     *     *

Post Script: William Hudnall organized the Northern Neck Chantney Singers, a group of African-American watermen who would do a lot to preserve these work songs used in the menhaden fishing industry for future generations. To listen to their work, as well as learn about their history, check out this YouTube video:

PEACE.

Saturday, December 6, 2025

Roast Turkey, Wild Onions, and Maple Squash

"We will be known forever by the tracks we leave." 
-- Words of wisdom from the Dakota People

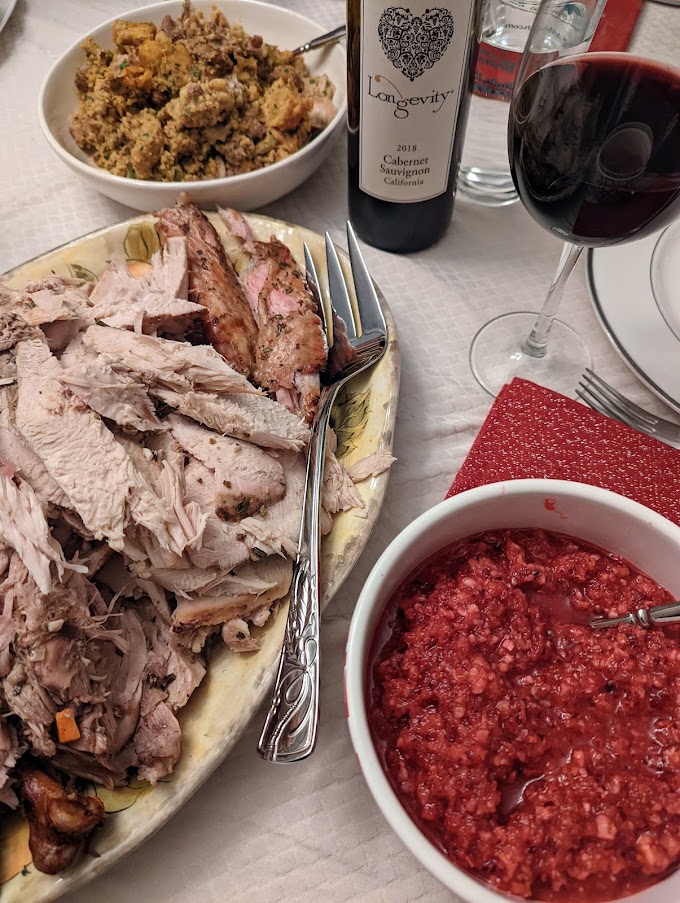
Thanksgiving is supposed to be a day in which we give thanks for all of our blessings over the past year. The holiday draws inspiration from events, partly historical and partly fictional, that transpired in the fall of 1621. The pilgrims of the Plymouth colony (that is, white colonizers) organized a feast to celebrate their successful harvest, giving thanks for the cultivation of food that would support them through the winter. 

That's where the history ends and much of the fiction begins. Subsequent generations would be taught that the feast was one shared by grateful pilgrims and their neighbors, the indigenous Wampanoag people. That is not entirely accurate. The feast was initially a white person, pilgrim/colonizer affair, because they did not initially invite the Wampanoag to the feast. Rather, the Wampanoag arrived after hearing gunshots fired off by celebratory pilgrims, thinking that the pilgrims were under an attack. Only after they arrived were the indigenous people allowed to stay and join in the feast. 

Thanksgiving was, and continues to be, built upon a myth of celebration and cooperation between white colonists and the indigenous people. The actual history -- over four hundred years of it -- defined what would become the United States. That definition includes the forced displacement and death of a majority of the indigenous people, removed from the land upon which their ancestors built not only comunities but also entire cultures and societies. Much of those civilizations have been lost, as the United States established itself, and expanded itself, at the expense of the indigenous peoples, nation after nation. 

Those are the tracks that we have left as a country and as "the American people." It is a path hardly discussed because holidays like Thanksgiving have us looking anywhere but down at our feet. So, for this particular Thanksgiving in 2025, I thought I would do something other than express gratitude for my blessings. I am looking down at my feet, at the ground.

The particular context of my feast unfolded in the city of Crisfield, Maryland, where my beautiful Angel and my wonderful family took a short trip during the holiday weekend. I found a lovely house in Crisfield, Maryland (more about that in another post), where I would prepare our holiday feast with help from our family. The city of Crisfield lies on a peninsula that was originally the home of the Annamessex people, who, in turn, were part of the Pocomoke Paramountcy. As an aside, the colonizers who reached this penninsula referred to it as the "Annamessex Neck." 

It is difficult to find much about the Annamessex people, but there is more out there about the greater Pocomoke nation. That nation stretched across the eastern shore, particularly along the Annamessex, Manokin, and Pocomoke rivers. They were organized into communities, with women and younger children growing corn, beans and squashes, while men and older boys hunted, trapped and fished. The Pocomoke were also traders, producing wampum, which are the shell beads and belts, and peake, which are darker beads made from clams. In addition to trading wampum and peake, the Pocomoke also crafted dug-out canoes that they used for transport and trade. 

As European colonizers settled in Annamessex Neck, the indigenous people were driven from their lands. The colonizers claimed the territory, refused to allow indigenous people to hunt on the land, and, with the assistance of the local and state governments, forced the Annamessex onto a reservation located at Askiminokonson, near present day Snow Hill, Maryland. Eventually, the white colonizers claimed that territory, leaving the Annamessex, along with the greater Pocomoke nation, with nothing. 

I have been unable to locate any Annamessex or even Pocomoke recipes for a turkey. This particular roast turkey recipe comes from Sean Sherman, an Ogala Lakota chef who has made it his mission to preserve and advance indigenous cuisine. He focuses upon both the ingredients and cooking processes used by indigenous cooks across Turtle Island. (I also used his recipe for wojape to serve alongside the turkey). 

I have to admit that I had some concerns, because the recipe did not call for a stuffing. I have always prepared roast turkeys with stuffings, using the latter to help regulate temperatures and add flavors to the meat. Fearful that I would overcook the bird without a stuffing, I decided to utilize a stuffing from Renewing America's Food Traditons, a book written by Gary Paul Nabhan. A first-generation Lebanese-American, Nabhan is an Agricutural Ecologist, Ethnobiologist, and Franciscan brother. He has worked with indigenous peoples, particularly in the southwestern United States and Mexico to preserve their foodways and advocate for their sovereignty. This particular stuffing comes from the opposite side of the United States, with a recipe offered in connection with a discussion of the endangered Naragannsett Turkey. The stuffing is not a traditional one that would be served alongside the bird. Instead, it consists of ingredients intended to provide additonal flavors to the meat. 

With these recipes in hand, I proceeded with Chef Sherman's Roast Turkey, Wild Onions and Maple Squash recipe. The overall dish provided a great example of indigenous foods could be prepared by indigenous peoples like the Annamessex. Wild turkeys are found across the State of Maryland; and, as noted above, the Annamessex cultivated squash. They could have easily gathered wild onions from around their village, along with other ingredients, such as juniper berries, which could have been gathered from the eastern red cedar trees or perhaps the common juniper (before it went locally extinct in the State of Maryland). 

In sum, this dish and my heart is with honoring those who were originally present and thriving here, long before any Spanish explorer or English colonizer ever set foot on dry land in this hemisphere. I also want to acknowledge the tracks that have been left over the centuries, and, for what that means when it comes to the United States. Our greatness (if it can be called that) came with a tremendous cost, a price not paid by those who benefitted the most, year after year, decade after decade, generation after generation. If we want to truly be known as a great country (however that could be defined), then that requires us to come to terms with our past. Otherwise, we can never truly achieve greatness as a country.  

ROAST TURKEY, WILD ONIONS AND MAPLE SQUASH

Recipe from Sean Sherman, The Sioux Chef's Indigenous Kitchen, pg. 107

Additional cavity stuffing recipe from Gary Paul Nabhan, Renewing America's Food Traditions, pg. 125

Serves 8

Ingredients (for the roast turkey):

  • 1 small turkey (about 10-12 pounds)
  • 1/4 cup hazelnut oil
  • 2 tablespoons chopped sage
  • Coarse salt
  • Crushed juniper
  • 2 cups corn, wild rice, or turkey stock
  • 4 wild onions or 2 large onions, quartered
  • 1 cup wild mushrooms, chopped
  • 2 cups winter squash, cubed
  • 1/4 cup maple syrup

Ingredients (for the cavity stuffing):

  • 2 tablespoon sea salt
  • 1 teaspoon freshly ground black pepper
  • 1 tablespoon dried marjoram or sweet basil leaves
  • 1/4 cup finely chopped flat-leaf parsley
  • 1/2 cup whole wheat bread crumbs
  • 1 tablespoon unsalted butter
  • 1/4 cup chopped celery stalks
  • 1 small white onion, chopped

Directions:

1. Prepare the turkey. One hour before roasting, remove the turkey from the refrigerator and bring to room temperature. In a blender, puree the hazelnut oil and sage and rub over the turkey. Season with salt and juniper.

2. Prepare the cavity. Rub the cavity with a mixture of 1 tablespoon of salt, 1/2 teaspoon of pepper, all of the basil or marjoram, and some of the chopped parsley. Combine the bread crumbs, lump of butter (mixed with salt and pepper), the rest of the parsley, chopped celery and onion. Stuff the mixture into the cavities of the turkey. 

3. Roast the turkey. Preheat the oven to 450 degrees Fahrenheit. Place the turkey in a roasting pan, add the stock and put in the oven. Roast until the turkey is a light golden brown, about 45 minutes. Reduce the oven temperature to 350 degrees Fahrenheit and continue roasting. After about 1 1/2 hours, scatter the onions, mushrooms and squash into the roasting pan and baste the turkey and vegetables occasionally with the pan juices. Continue cooking until the an instant-read thermometer inserted into the thigh reads 160 degrees Fahrenheit, about 30 minutes to 1 hour longer. Brush the turkey with the maple syrup. 

4. Finish the dish. Remove the turkey from the oven and transfer to a cutting board. Arrange the vegetables on a platter. Carve the turkey and arrange over the vegetables. Drizzle the pan juices over all. Serve with wild rice and cranberry sauce or wojape.  

PEACE.

Monday, May 6, 2024

On Count Rostov's Plate: Chicken Saltimbocca

1922, sometimes referred to as the "year that sealed the fate of Russia." It had been five years since the October Revolution, which led to the overthrow (and execution) of the Tsar and his family. The revolution turned into a civil war between the "reds" (the Bolsheviks, who supported Marxism) and the "whites" (those who favored other ideologies). However, by 1922, the civil war was over and the Bolsheviks and their Communist Party had control over Russia for almost one year. The leader of the Communist Party, Vladimir Lenin, had been looking back over the year and making plans for the future. the tide clearly favored the reds by 1922; and, their leader, Vladimir Lenin, was making plans for the future. He laid out those plans at the 11th Congress of the Russian Communist Party met between March 27 and April 2, 1922. 

It was also at the 11th Congress that Josef Stalin began his rise through the ranks, being appointed as the Communist Party's first Secretary General.  One month later, Lenin would suffer a stroke, and Stalin would take over Lenin's health care. Thus, by May 1922, Russia's path toward a communist economy and totalitarian state was sealed, as was its fate. 

Just one month later, so was the fate of the (fictional) Count Alexander Iliych Rostov. Summoned before the Emergency Committee of the People's Commissariat for Internal Affairs, the Count had to answer for his past and his status. The committee ultimately found that the Count guilty of succumbing to the corruptions of his class, and, it sentenced him to house arrest. (For more details, you should buy and read the book.) The Count would live out the rest of his life at the Metropol hotel.

After returning to the hotel, and after having been shown his new arrangements, the Count made his way to the Boyarsky restaurant. The restaurant had Moscow's "most elegant decor, its most sophisticated waitstaff, and its most subtle chef de cuisine," Chef Emile Zhukovsky. The maitre d' sat Alexander at a table and he waited for his first meal since being confined to the hotel. 

The Boyarsky

Sitting at his table, Alexander waited for his first meal. Yet, to put it in context, Author Amor Towles excellently laid the groundwork for readers as they also waited. As Towles wrote: 

In the Revolution's aftermath - with its economic declines, failed crops, and halted trade - refined ingredients became as scare in Moscow as butterflies at sea. The Metropol's larder was depleted bushel by bushel, pound by pound, dash by dash, and its chef was left to meet the expectations of his audience with cornmeal, cauliflower, and cabbage - that is to say, with whatever he could get his hands on.

(Pg. 27.) That was the life of most everyone in 1922. Still reeling from years of war, the early days of Communist Russia were often characterized by shortages, especially when it came to food. 

This scarcity meant that, while Alexander may have ordered a specific dish, the meal he received may not be entirely consistent with his expectations. This point was underscored by Towles' description of the meal served to the Count:

a saltimbocca fashioned from necessity. In place of a cutlet of veal, Emile had pounded flat a breast of chicken. In place of prosciutto de Parma, he had shaved a Ukrainian ham. And in place of sage, that delicate leaf that binds the flavors together? He had opted for an herb that was as soft and aromatic as sage, but more bitter to the taste.... It wasn't basil or oregano, of that the Count was certain, but he had definitely encountered it somewhere before....

(Pg. 27.) The herb was nettle. Substitution became an essential part of cooking and eating. Unable to get the necessary ingredients, due to the lack of trade, the chef had to make due with what he could find. Rather than complain, the Count made the best of his circumstances and enjoyed the dish.  

Stinging Nettle Leaves (Source: Food52)

For my first post, I wanted to prepare the chicken saltimbocca in the same manner as Chef Zhukovsky. The chef had to make three substitutions: (1) chicken for veal; (2) Ukrainian ham for prosciutto; and (3) nettle for sage. I found myself in the identical position as the Chef, but for entirely different reasons. I did not face any shortages of veal, prosciutto or sage. I could easily go to any store and purchase those ingredients. I faced a shortage of what Chef Zhukovsky had on hand, namely Ukrainian ham and nettles. I made some efforts to find these ingredients, but with no success.

In the end, I decided to take a chicken saltimbocca recipe from the New York Times and made some modifications to produce a recipe that, if I had the ingredients, I could make. I nevertheless made the recipe anyways, using what I have on hand. Hence, a saltimbocca made with chicken, prosciutto and sage. 

CHICKEN SALTIMBOCCA

Recipe adapted from The New York Times

Serves 4 to 6

Ingredients:

  • 1.5 pounds of boneless chicken breast cut into 4 ounce pieces
  • Kosher salt
  • Freshly ground black pepper
  • 1 tablespoon of chopped nettle, plus 24 large nettle leaves (substitute sage)
  • 2 garlic cloves, smashed to a paste
  • 1 pinch crushed red pepper (optional)
  • Olive oil
  • 6 thin slices Ukrainian ham (substitute prosciutto or other thinly sliced ham)
  • 6 slices of fontina cheese

Directions:

1.  Prepare the chicken. Using a meat mallet, pound the chicken to flatten a bit. Salt and pepper each piece on both sides and place on a plater. Sprinkle with chopped nettle (or sage), garlic, red pepper flakes (if using) and olive oil. Massage in the seasoning to distribute, cover and marinate at room temperature for one hour, or refrigerate for up to several hours). 

2. Crisp the nettle (sage). Heat a wide skillet over medium heat and add 3 teaspoons olive oil. When the oil looks wavy, add the nettle (sage) leaves and let them crisp for about 30 seconds. Remove and drain. 

3. Brown the chicken. Brown the chicken breasts in the oil for about 2 minutes per side, then transfer to a baking dish large enough to fit them in one layer.

4. Broil the chicken. Top each piece with 2 sage leaves, a slice of Ukrainian ham (or prosciutto) and a slice of cheese. Broil for 2 to 3 minutes, until the cheese is bubbling. Garnish with the remaining nettle (or sage) leaves. 

Postscript: I know the chicken breast is a little thick for chicken saltimbocca. I could not find my meat mallet. Apparently, it had been seized as property of the people and now it is lost. 

Post-Postscript: On a more serious note, by the end of 1922, the Soviet Union emerges with the compact between Russia, Belarussia, Ukraine and the Caucusus states (Armenia, Georgia and Azerbaijan). Stalin is also on his way to consolidating power. 

Until next time...

PEACE.

Friday, November 26, 2021

Arista-Style Turkey with Tuscan Chestnut Stuffing (Savage Boleks' Thanksgiving 2021)

It is interesting how a decision to depart from a tradition could, itself, turn into a tradition.  Nearly two years ago, I decided to try prepare a Christmas dinner that was different than what the traditional Italian holiday meal that my family has prepared for more than fifty years. I prepared a turkey in the style of a Tuscan pork roast. That experience gave rise to a blog post, Turkey in the Arista Style with Tuscan Bread Stuffing. My beautiful Angel loved the meal so much, both the turkey and the stuffing, that I have made the dish a few times since that holiday dinner. And, now, it has officially become the traditional Thanksgiving dinner for the Savage Boleks. 

Yet, a turkey in the arista style is itself a departure from tradition in another sense. Since the dawn of the thirteenth century, an arista has always been a pork roast. That roast evolved over time to what it is today: a mass of porcine goodness covered in a rub consisting primarily of rosemary and garlic, along with other ingredients, such as lemon, cloves and/or fennel seeds. While recipes change, the one constant is that the protein used in an arista comes from some part of a pig, either a roast or the loin. The use of a turkey is a break from that tradition. Yet, it is a good break. The reason is simple: much like pork, turkey meat provides a tableau upon which all of the flavors used in the rub come together to provide a culinary image of Tuscan flavors.  If pork is the other white meat, then turkey is the other, other white meat.

The arista-style turkey is just the beginning of this new Savage-Bolek tradition. Another important aspect is the stuffing and, because I make so much of it, the dressing. (As you may know, it is stuffing if it is stuffed in the bird; it is dressing if it is baked alongside the bird.) This stuffing is a culinary mélange of Tuscan flavors and aromas. It begins with the bread, which is focaccia. The bread is cut up and toasted until the moisture is removed. One then adds in diced pancetta (or, if that person is me cooking for my beautiful Angel, diced turkey bacon), along with diced turkey heart, liver and gizzard (that is, all of the giblets in the package provided with the turkey). This step is followed by the addition of the traditional elements of a stuffing, namely, diced onion, celery and carrots. Finally, just before the liquid (turkey stock) is added, one adds a heaping 1/4 cup of rosemary, sage and the chestnuts. after the liquid is added, the ingredients are mixed well, left to marry for an hour and then stuffed into the bird or placed in a dish to be baked.

This stuffing or dressing is perhaps the best stuffing that I have ever made. One does not have to take my word for it, my beautiful Angel has made similar proclamations. This stuffing or dressing pairs perfectly with the ingredients used to make the arista-style turkey. There are major connections in terms of flavor, with the use of turkey bacon and rosemary. Yet, the stuffing or dressing adds to the flavors of the turkey with the use of sage and chestnuts. 

The recipe set forth below is not the same recipe that I used back in 2019. I have made some modifications based upon my subsequent efforts to make this dish. The two major changes are as follows: (1) I have incorporated the juice from the zested lemons into the marinade, as a way to utilize all of the ingredients; (2) I increased the amount of times that I baste the turkey with the juices and butter from once every hour to once every 40 minutes; and (3) I added an uncovered/covered/uncovered sequence to roasting the bird. While this additional work extends the cooking time a little, it is definitely worth it if you are trying to get crispy, brown skin on  the bird. 


ARISTA-STYLE TURKEY
WITH TUSCAN CHESTNUT STUFFING
Turkey recipe adapted from Reinhardt Hess & Sabine Salzer, 
Regional Italian Cuisine, pp. 148-49
Tuscan Bread Stuffing Recipe adapted from Tasting Table
Serves many

Ingredients (for the turkey):
1 whole turkey (about 12 pounds)
4 lemons, zested and juiced
8 to 10 sprigs of rosemary
10 cloves of garlic
4 teaspoons of fennel seeds
4 pinches of ground cloves
Kosher salt
Freshly ground black pepper
Olive oil
1 stick of unsalted butter

Ingredients (for the stuffing):
1 1/2 pounds ciabatta bread, cut into 1 inch cubes
8 ounces pancetta, small dice
1 package turkey liver and gizzards (from 1 large turkey)
2 medium carrots, peeled and small dice
2 celery stalks, small dice
1 large yellow onion, small dice
2 sticks unsalted butter
1/4 cup heavy cream
3 cups turkey stock + 2 cups of turkey stock
1 cup roasted chestnuts, roughly chopped
1/4 cup minced sage
1/4 cup minced rosemary
Kosher salt, to taste
Freshly ground black pepper, to taste

Directions:
1.  Prepare the turkey.  Rinse the turkey well.  Pat the turkey dry.  Separate the skin from the turkey so that you can apply the rub directly onto the meat. Combine the lemon zest, rosemary, fennel seeds, ground cloves, garlic, salt and black pepper into a small bowl.  Mix well. Juice the lemons and pour into a separate bowl.  Whisk in olive oil with the lemon juice and then add it to the small bowl with the dry ingredients to create a paste. Add additional olive oil, if necessary, to create that paste.  Continue to mix.  Once the paste has the desired consistency, apply it to all parts of the turkey, including under the skin.  Reserve some of the rub for basting. Allow the turkey to rest for at least 2 hours in the refrigerator.

2.  Prepare the stuffing.  Preheat the oven to 225 degrees Fahrenheit.  Lay out the bread on a baking sheet and bake until dry, about 25 to 30 minutes.  Transfer the bread to a huge bowl.  While the bread is baking, heat the pancetta in a medium skillet over medium-high heat. Cook, stirring often until the pancetta is crispy and the fat has rendered, about 8 to 10 minutes. Using a slotted spoon, transfer the pancetta to the bowl with the bread.  Drain the fat into a separate bowl. Add back 1 to 2 tablespoons of the fat to the pan and add the liver and gizzards.  Cook the ingredients, turning as needed until golden and cooked through, about 4 to 5 minutes for the liver and 8 to 10 minutes for the gizzard.  Transfer to a cutting board and roughly chop, then add to the stuffing bowl.

3.  Continue to prepare the stuffing.  Add a little more of the pancetta fat back to the pan.  Add the carrots, celery and onion to the pan.  Sweat the ingredients until softened, 6 to 8 minutes.  Transfer the vegetables to the stuffing bowl.   Add the butter to the pan and cook until it begins to brown and has a nutty aroma.  6 to 8 minutes.  Turn off the heat and stir in the cream to warm through.  Add the butter mixture to the stuffing bowl with the remaining ingredients (namely, the turkey stock).  Using your hands, mix the stuffing to incorporate.  Let sit at room temperature for 1 hour. 

4.  Prepare to roast the turkey.  Preheat the oven to 400 degrees Fahrenheit. Stuff the turkey's cavities with the stuffing, and place the remaining stuffing in a baking dish.  Roast the turkey for about 3 hours or until the turkey's internal temperature reaches 160 degrees. I roast the turkey uncovered for about the first hour and twenty minutes, cover the bird for the next hour and twenty minutes, and then leave the bird uncovered for the rest of the time. Baste the turkey approximately every 40 minutes with melted butter that has some of the rub mixed into it.  Once the turkey reaches that temperature, remove the turkey from the oven and cover it.  Place the baking dish full of dressing in the oven and cook for about 30 minutes to 45 minutes, or until the dressing begins to crisp on the surface.  Remove the stuffing and set on the stove to cool.

5.  Prepare the au jus.  Drain the liquid from the roasting pan into a separator.  Pour the juices into a pot, along with 2 cups of the turkey stock. Taste and adjust the seasonings with salt and pepper if necessary.  Bring to a boil under medium high heat and reduce to a simmer.  Allow to simmer until you are ready to serve. 

6.  Finish the dish.  Spoon the stuffing and dressing into a serving bowls (one for the stuffing and another for the dressing).  Slice the turkey and place on a serving dish.  Serve immediately.

ENJOY!

Saturday, April 24, 2021

Wesley Jones' Barbecue and Antebellum Sauce

Federal Project Number 1. The moniker for a government program that employed upwards of 40,000 writers, musicians, artists and actors during the Great Depression.  The Federal government hired all of these individuals because, as the then-Secretary of Commerce Harry Hopkins bluntly put it, "Hell, they've got to eat too." However, there was two important principles underying Federal One, as the project became known: (1) in the time of need, the artist - no less than the manual worker - is entitled to employment as an artist, even at the public expense; and (2) the arts - no less than business, agriculture, and labor - are the immediate concern of the country. 

One of the initiatives of Federal One was the Federal Writers Project. This project within a project employed thousands of writers, historians, researchers, editors and others to do what they do best: preserve the American experience. They did what was asked of them; and, in the process, demonstrated the important contributions that they could make to our country. 

Most notably, the Federal Writers Project produced, Slave Narratives: A Folk History of Slavery in the United States from interviews with Former Slaves.  This work is a literary opus, bringing together 2,300 individual interviews of former slaves and 500 original pictures that span nearly 10,000 pages. My introduction to this literary composition placed me squarely in its middle. It was Volume XIV (of thirty-three parts).  This volume is entitled, South Carolina Narratives, Part 3. It includes the interviews of approximately 75 former slaves.

One of those slaves was Wesley Jones, who was interviewed on June 21, 1937. 

Wesley was born in 1840 on a plantation somewhere in Union County, South Carolina. During his interview, Wesley talked about what he would do for the plantation owner, such as driving him to church or goiong to a store in Sardis, South Carolina to pick up papers (or letters).  Today, the town of Sardis appears to be little more than a crossroads just south of an exit on Interstate 95. However, back in the 1850s, a lot more was apparently going on in that little town, especially at that store. According to Wesley, there were "big barbecues" at the Sardis store. 

As it turns out, Wesley had a role at those barbecues. He worked as the pitmaster.  Wesley recounted that, "on his 'karpets' (pit stakes), ... I had whole goats, whole hogs, sheep and de side of a cow." He also discussed how he prepared these meats:

Night befo' dem barbecues, I used to stay up all night a-cooking and basting de meats wid barbecue sass (sauce). It made of vinegar, black and red pepper, salt, butter, a little sage, coriander, basil, onion and garlic. Some folks drop a little sugar in it.  On a long pronged stick, I wraps a soft rag or cotton fer a swab, and I swabs dat meat 'till it drip into de fire. Dem drippings change de smoke into seasoned fumes dat smoke de meat.  We turn de meat over and swab it da way all night long 'till it ooze seasoning and bake all through.

This excerpt from the Slave Narrativees provides a first hand account of how African-American slaves prepared barbecue.  However, let's be honest, it is an account of how those slaves prepared barbecue for the white plantation class. Slaves would not have had access to whole goats, whole hogs, sheep and a side of a cow to prepare their own meals or meals for their families. They often only had the discarded cuts, the tough portions of an animal that required a slow cook over low temperatures in order to make them tender enough to eat.  

Yet, the story of Wesley Jones remains important.  It provides a starting point on an educational journey to explore the true roots of barbecue. Those roots originated with the enslaved and persecuted.  The problem is that much of the history of barbecue is not written by those who did the work. 

The picture shown above is a good metaphor for this point. It shows a person working the pit, mopping the meat as it smokes. You can see who is doing the work, except for his face. Countless African Americans and Native Americans, whose identities have been ignored or forgotten by history, contributed to what we all enjoy today when we eat some pulled pork or sliced brisket. It was their cooking traditions, along with those of the Native Americans, that constitute the origin story of American barbecue.

I want to learn more about their work. That is my goal with this post. I decided to recreate what Wesley Jones would prepare for the barbecues in Sardis. Thanks to the Federal Writers Project, and one of the Project's editors named Elmer Turnage, I have the words of Wesley Jones for a starting point.  

Wesley said that he spent the night "basting de meats wid barbecue sass" and "all night long I swabs dat meat...." These passages suggest that he used something that modern pitmasters could refer to as mop sauce.  It is basically a thin liquid - usually vinegar (if you are trying to tenderize the meat) or beer (if you want to add flavor) - with spices.  Wesley basically provided the ingredients for this sauce: vinegar, black pepper, red pepper, salt, butter, a little sage, coriander, basil, onion and garlic.  He also provided one additional tidbit of information.  Wesley noted that some people added sugar, which suggests that what he was describing was a fairly typical barbecue sauce for the time period. 

A mop sauce is applied during the cook.  The question remained what happens before the cook.  Wesley did not say how the meat was initially prepared. He made no mention of applying salt or spices to the meat in advance of cooking it. I gave it a lot of thought and I came up with two options. First, I could do a simple salt and pepper seasoning. Second, I could prepare a rub, using the ingredients for the barbecue sauce as a guide. I chose the second option. I used the dry ingredients and substituted onion powder and garlic powder for onions and garlic.  

As for the meat itself, I don't have access to whole goats, hogs, sheep or even a side of beef.  I did have a pork butt.  I applied the rub to the meat and let it rest for a while, as I got the smoker going.  Once the cook began, I used the mop sauce basically every hour. I decided to wrap the pork about half way through the cook to help maintain the moisture. I applied a lot of the mop sauce before I wrapped it to help keep the meat moist during the final hours of the cook.  

WESLEY JONES' BARBECUE

Adapted from the Slave Narratives, Vol. XIV, pg. 73 (1937)

Serves many

Ingredients (for the meat):

  • 1 pork butt (between 6 to 9 pounds)
  • 2 tablespoon of kosher salt
  • 1 tablespoon onion powder
  • 1 tablespoon garlic powder
  • 1 teaspoon of black pepper
  • 1 teaspoon of red pepper flakes
  • 1 teaspoon dried rubbed sage
  • 1 teaspoon of dried basil leaves
  • 1/2 teaspoon crushed coriander seed
Ingredients (for the mop sauce):
  • 1 cup of apple cider vinegar
  • 1/2 cup of unsalted butter
  • 2 tablespoon of kosher salt
  • 1 tablespoon onion powder
  • 1 tablespoon garlic powder
  • 1 teaspoon of black pepper
  • 1 teaspoon of red pepper flakes
  • 1 teaspoon dried rubbed sage
  • 1 teaspoon of dried basil leaves
  • 1/2 teaspoon crushed coriander seed
  • 1 tablespoon sugar (optional)
Directions:

1. Prepare the pork.  Combine the dry ingredients in a bowl. Season the pork butt with the rub on all sides until well covered. Cover the pork and allow it to rest for at least a few hours, if not overnight. 

2. Prepare the smoker.  Prepare a fire in the smoker, and, allow it to burn until the temperature reaches approximately 275 degrees Fahrenheit. Soak wood chunks (preferably hickory or oak) in water for at least an hour before smoking the pork. 

3. Smoke the pork.  Once the smoker is ready, oil the grates and place the pork in the smoker. Add a few chunks of wood, such as hickory or apple wood to the fire to create the smoke.  You may want to wrap the pork about halfway through the cook to help retain the moisture. 

4. Prepare the mop sauce. Combine all of the ingredients for the mop sauce and stir well.  With a barbecue mop, apply the mop sauce at least every hour to the pork. Smoke until the pork reaches an internal temperature of at least 185 degrees Fahrenheit. 

One caveat: the foregoing recipe is experimental.  After all, this was the first time that I tried to make this recipe.  It needs some refinement, especially with respect to the rub. I hope to be able to cook it again and make some improvements.  When I do, I will update this post. 

Finally, a reknown writer, culinary historian and educator -- Michael Twitty -- recreates a barbecue sauce that is based upon Wesley Jones' mop sauce. Twitty recommends applying this sauce toward the end of the cook as a light mop sauce or glaze.  I used it as a barbecue sauce that could be mixed in with the pork once it was chopped or pulled.   

ANTEBELLUM BARBECUE SAUCE

Recipe from Afroculinaria

 Ingredients:

  • 1/2 stick of unsalted butter
  • 1 large yellow or white onion, well chopped
  • 2 cloves garlic, minced
  • 1 cup of apple cider vinegar
  • 1/2 cup of water
  • 2 tablespoon of kosher salt
  • 1 teaspoon of black pepper
  • 1 teaspoon of red pepper flakes
  • 1 teaspoon dried rubbed sage
  • 1 teaspoon of dried basil leaves
  • 1/2 teaspoon crushed coriander seed
  • 1/4 cup dark brown sugar or 4 tablespoons of molasses
Directions:

Melt the butter in a large saucepan over medium high heat. Add the onion and garlic until translucent.  Turn the heat down slightly and add vinegar, water, optional ingredients (sugar or molasses), salt and spices.  Stir and allow the mixture to cook gently for about 30 minutes to an hour.  Use this sauce as a light mop sauce or glaze during the last 15 to 30 minutes over the pit of coals and as a dip for the cooked meat. 

Michael also offers to options for this sauce.  The first option is to add 1/2 up of brown mustard and a bit more sugar to create a Carolina Mustard Sauce. The second option is to create a "red sauce" by adding two cans of tomato paste or 4 very ripe red or purple heirloom tomatoes (Large Red, Cherokee Purple, Brandywine or Amish Paste), and then cook it down for several hours on low heat to a comparable consistency, adding two tablespoons of Worcestershire sauce. 

*        *        *

As I noted above, this post is a starting point on a journey to explore the original roots of barbecue in America. I plan on doing more research on this subject and, over time, to continue posting what I have learned.  Thank you for taking the time to research this post; and, as always,

ENJOY!

Saturday, May 30, 2020

Chef Bolek's Half Turkey Breast

This is a basic recipe.  It is something that I go to when I am very busy and need something that requires very little prep.  The only thing that needs to be done is the rub.  And, even the rub is simplified so that it can be prepared in a couple of seconds.

The base of the rub is onion powder and garlic powder.  The flavor elements include thyme, coriander and fennel seeds.  (I have recently been on a big fennel kick, especially in roasting, grilling and even barbecue.) All of those ocmponents are just 1 teaspoon.  Additional flavor comes from some stronger herbs, both rosemary and sage. I reduced the amounts for each of these two herbs to half teaspoons each. The rub is completed with a teaspoon of salt and freshly ground black pepper.  The work is complete. 

This is a great recipe to make on the weekend.  Once the breast is roasted and sliced, then you can make turkey sandwiches for lunch during the week.  It is a great way to skip the processed meats in the deli section of the local grocery store. 


CHEF BOLEK'S HALF TURKEY BREAST
A Chef Bolek Original 
Serves 8

Ingredients:
1 half turkey breast, about 3 to 4 pounds
1 teaspoon onion powder
1 teaspoon granulated garlic powder
1 teaspoon dried thyme
1 teaspoon fennel seeds
1 teaspoon ground coriander
1 teaspoon freshly ground black pepper
1 teaspoon kosher salt
1/2 teaspoon dried rosemary, cracked
1/2 teaspoon dried sage
1/2 cup of wateror more if needed
1/8 cup of olive oil, more if needed

Directions;
1.  Prepare the turkey breast.  Combine all of the dried ingredients and mix well.  Brush olive oil all over the turkey breast.  Sprinkle the herb/spice mix all over the turkey breast.

2.  Roast the turkey breast.  Preheat the oven at 350 degrees Fahrenheit.  Place the breast in a roasting pan, add 1/2 cup to 1 cup of water around the edge of the breast. Roast the turkey breast in the oven until it reaches 160 degrees Fahrenheit. The end temperature is 165 degrees, but the breast will continue to cook for several minutes afer being removed from the oven. Remove from the oven, cover and let rest for 15 minutes.  Slice thinly and serve immediately or refrigerate for use in sandwiches later.

ENJOY!

Friday, December 27, 2019

Turkey in the Arista Style, with Tuscan Bread Stuffing

For this holiday season, I decided that I would try something different.  Christmas Eve dinner is a well established tradition in my family, with the antipasta plate and wedding soup, followed by pasta with meatballs and sausage. That tradition has produced many great memories for me going back to my childhood. 

Traditions are good, in fact, they are great.  But, at least for me, I felt that I could be missing something if I didn't take a chance and try something different. There was only one question: what to make?

Recently, my beautiful Angel's parents traveled to Italy, spending time in Lazio, Tuscany and Liguria.  I too spent time in Tuscany, which provided me with the inspiration for the dinner.  I spent a lot of time researching main courses, but I wanted to make something that everyone could enjoy.  I ultimately decided to do an Arista, which is a dish that I previously made. Arista is a roast pork dish that is quintessential Tuscan cuisine. The problem with an Arista is that it is roast pork, and, my beautiful Angel does not eat pork.  My Angel does eat turkey, so I decided to apply the ingredients and cooking techniques of an Arista to a turkey.

To be sure, there are not very many turkeys gobbling around Tuscany. (Although, interestingly, there is a highly challenged study that says the ancient Etruscans, who called the area of Tuscany their home around 900 B.C. came from Anatolia, which is currently known as Turkey.) But, the use of a rub of rosemary, garlic, fennel seed and clove pretty much made this turkey smell like a Tuscan pork roast. 

Additional Tuscan flavor and character was added to the bird with the stuffing.  I searched far and wide  on the Internet for a "Tuscan stuffing."  I came across one recipe for a Tuscan Bread Stuffing. This recipe incorporated many classic Tuscan ingredients, such as rosemary, sage and chestnuts.  The use of pancetta is also key, as its fat provides flavor at every level and stage of preparation.  

Overall, this is perhaps the best turkey that I have ever made; and, according, to my beautiful Angel, the stuffing is the best that she has ever had.  This recipe is now the Savage Boleks' standard for a stuffed turkey dinner.  This may be the beginning of a new tradition ... for now.


TURKEY IN THE ARISTA STYLE
WITH TUSCAN BREAD STUFFING
Turkey recipe adapted from Reinhardt Hess & Sabine Salzer, 
Regional Italian Cuisine, pp. 148-49
Tuscan Bread Stuffing Recipe adapted from Tasting Table
Serves many

Ingredients (for the turkey):
1 whole turkey (about 12 pounds)
4 lemons, zested
8 to 10 sprigs of rosemary
10 cloves of garlic
4 teaspoons of fennel seeds
4 pinches of ground cloves
Kosher salt
Freshly ground black pepper
Olive oil
1 stick of unsalted butter

Ingredients (for the stuffing):
1 1/2 pounds ciabatta bread, cut into 1 inch cubes
8 ounces pancetta, small dice
1 package turkey liver and gizzards (from 1 large turkey)
2 medium carrots, peeled and small dice
2 celery stalks, small dice
1 large yellow onion, small dice
2 sticks unsalted butter
1/4 cup heavy cream
3 cups turkey stock + 2 cups of turkey stock
1 cup roasted chestnuts, roughly chopped
1/4 cup minced sage
1/4 cup minced rosemary
Kosher salt, to taste
Freshly ground black pepper, to taste

Directions:
1.  Prepare the turkey.  Rinse the turkey well.  Pat the turkey dry.  Separate the skin from the turkey so that you can apply the rub directly onto the meat. Combine the lemon zest, rosemary, fennel seeds, ground cloves, garlic, salt and black pepper into a small bowl.  Mix well.  Add enough olive oil to create a paste.  Continue to mix.  Once the paste has the desired consistency, apply it to all parts of the turkey, including under the skin.  Reserve some of the rub for basting. Allow the turkey to rest for at least 2 hours in the refrigerator.

2.  Prepare the stuffing.  Preheat the oven to 225 degrees Fahrenheit.  Lay out the bread on a baking sheet and bake until dry, about 25 to 30 minutes.  Transfer the bread to a huge bowl.  While the bread is baking, heat the pancetta in a medium skillet over medium-high heat.  Cook, stirring often until the pancetta is crispy and the fat has rendered, about 8 to 10 minutes.  Using a slotted spoon, transfer the pancetta to the bowl with the bread.  Drain the fat into a separate bowl.  Add back 1 to 2 tablespoons of the fat to the pan and add the liver and gizzards.  Cook the ingredients, turning as needed until golden and cooked through, about 4 to 5 minutes for the liver and 8 to 10 minutes for the gizzard.  Transfer to a cutting board and roughly chop, then add to the stuffing bowl.

3.  Continue to prepare the stuffing.  Add a little more of the pancetta fat back to the pan.  Add the carrots, celery and onion to the pan.  Sweat the ingredients until softened, 6 to 8 minutes.  Transfer the vegetables to the stuffing bowl.   Add the butter to the pan and cook until it begins to brown and has a nutty aroma.  6 to 8 minutes.  Turn off the heat and stir in the cream to warm through.  Add the butter mixture to the stuffing bowl with the remaining ingredients (namely, the turkey stock).  Using your hands, mix the stuffing to incorporate.  Let sit at room temperature for 1 hour. 

4.  Prepare to roast the turkey.  Preheat the oven to 400 degrees Fahrenheit. Stuff the turkey's cavities with the stuffing, and place the remaining stuffing in a baking dish.  Roast the turkey for about 3 hours or until the turkey's internal temperature reaches 160 degrees. Baste the turkey approximately every hour with melted butter that has some of the rub mixed into it. Fahrenheit. Once the turkey reaches that temperature, remove the turkey from the oven and cover it.  Place the baking dish full of stuffing in the oven and cook for about 30 minutes to 45 minutes, or until the stuffing begins to crisp on the surface.  Remove the stuffing and set on the stove to cool.

5.  Prepare the au jus.  Drain the liquid from the roasting pan into a separator.  Pour the juices into a pot, along with 2 cups of the turkey stock. Taste and adjust the seasonings with salt and pepper if necessary.  Bring to a boil under medium high heat and reduce to a simmer.  Allow to simmer until you are ready to serve. 

6.  Finish the dish.  Spoon the stuffing into a serving bowl.  Slice the turkey and place on a serving dish.  Serve immediately.

ENJOY!

Wednesday, September 6, 2017

Chicken Saltimbocca

As the story goes, the dish known as Saltimbocca originated in Rome.   The story seems kind of sketchy, because one of the featured ingredients - Prosciutto - does not hail from Rome or the province of Lazio, where the capital is located.  Prosciutto comes from two places.  First, there is Prosciutto di Parma, which comes from the region of Emilia Romagna.  Second, there is Prosciutto di San Daniele, which comes from Friuli-Venezia-Giulia.  Given that prosciutto comes from places other than Rome, it made me a little skeptical of the story. 

So, I did my research.  According to one source, the dish of Saltimbocca came from Brescia, which is in Lombardy.  That source also traced the recipe to its first written origin, which was an "influential book" published toward the end of the 19th century by Pellegrino Artusi, an Italian chef.  Chef Artusi included a recipe for "Saltimbocca alla Romana" as Recipe No. 222 in his book.  He also claimed to have the dish at a trattoria named "La Venete" in Rome. 

On additional note about the history of Saltimbocca.  In Rome, Saltimbocca is most commonly prepared with veal.  The recipe adapted as it made its way to America with Italian immigrants, who prepared it with chicken instead of veal.  Chicken is far more commonplace in the United States and is far cheaper than veal. 

I found a recipe for Chicken Saltimbocca in a cookbook by Mario Batali, America Farm to Table.  The recipe looked simple enough to prepare on a busy weekday night, and it included a pan sauce with mushrooms that looked delicious.   

As I made this recipe, I would note a couple of observations.  First, the marsala wine.  One could buy a nice bottle of Marsala wine, which I am sure would make a difference in the final product.  I did not want to spend a lot of money on a wine that I don't drink and, to be honest, don' t cook with very often.  So, I got a store-bought version that probably barely resembles marsala wine.  The cheaper version worked just fine.  Second, the recipe calls for cremini and oyster mushrooms.  That is definitely a good pairing of mushrooms, but I could not find any oyster mushrooms when I went shopping.   The thing about fungi is that they are, for the most part, fungible.  I bought some shiitake mushrooms and they worked just as well as the oyster mushrooms.  

In the end, I can see why Chicken Saltimbocca is a very popular dish.  The flavors from the chicken, sage and prosciutto, enhanced by the sauce and, in this preparation, the tender mushrooms, made for a very enjoyable dinner.   


CHICKEN SALTIMBOCCA
Recipe from Wedge Oak Farm
Printed in Mario Batali, America Farm to Table, pg. 176
Serves 4

Ingredients:
1 cup all purpose flour
Kosher salt
Freshly ground black pepper
8 boneless, skinless chicken thighs,
8 large fresh sage leaves
8 large slices prosciutto
1/4 cup extra-virgin olive oil
1 pound of a mix of cremini and oyster or shiitake mushrooms, 
     cut into 1/4 inch pieces
1 cup sweet marsala wine
1/2 cup of chicken stock
2 tablespoons unsalted butter
1 bunch fresh, flat leaf parsley, finely chopped (1/4 cup)

Directions:
1.  Prepare the chicken. Place the flour in a small bowl and season with salt and pepper.  Lightly pound the chicken thighs to 1/4 inch thickness.  Season with salt and pepper and lay a sage leaf on each thigh.  lay 1 slice of prosciutto over each thigh and fold in half like a book.  Secure the two sides with a toothpick and dredge the whole piece in the seasoned flour. 

2.  Saute the chicken.  In a 12 to 14 inch saute pan, heat the oil until just smoking.  Add the chicken and saute until golden brown on both sides, then transfer to a plate.  Add the mushrooms to the pan and cook until the mushrooms have sweated out their liquid, 5 to 6 minutes.  Add the marsala and chicken stock and cook over high heat until reduced by half.  Return the chicken thighs to the an with the sauce and simmer for 3 minutes.  Swirl in the butter, add the parsley and serve. 

ENJOY!

Saturday, November 7, 2015

Roasted Spaghetti Squash with Mushroom, Garlic & Sage

Ever since we joined a local community supported agriculture program, or CSA, I have been challenged by a variety of vegetables that I never cooked with before.  I previously posted my challenge with acorn squash, which resulted in a very delicious soup.  Ever since that time, I have decided to challenge myself with the other vegetables that come with each shipment.

We had other squash in our shipment, including a spaghetti squash.  The concept of spaghetti + squash seemed a little ridiculous.  Pasta comes from flour, water and eggs, like my most favorite dishes, Maccheroni alla Chitarra and Paglia e Fieno.  Pasta does not come from something associated with gourds and pumpkins.  Needless to say, I have always been skeptical of spaghetti squash.  The skepticism kept me from cooking with the ingredient.  Why cook with a spaghetti squash when I could make or have real spaghetti. 

I have to admit that kind of thinking creates limitations, which, in turn, inhibit creativity.  So I set aside my skepticism and sought out a recipe that I could use to make spaghetti squash.  I found a recipe on a blog called Feasting at Home that incorporated some traditional Italian flavors, such as garlic, sage and mushrooms.  With that recipe, I set out to make my first dish using spaghetti squash.

The recipe was definitely a good entry into cooking with this squash.  If there was any issue with the recipe, it was the cooking times.  The recipe calls for cooking the squash 40 to 50 minutes.  I would definitely go with the 50 minutes, to ensure the whole squash is cooked.  

This recipe is categorized as a side dish, but add a few meatballs and you can have a main course.  I just made some simple turkey meatballs because my beautiful wife, Clare, loves turkey.  


ROASTED SPAGHETTI SQUASH WITH MUSHROOMS, GARLIC AND SAGE
Recipe by Feasting at Home
Serves 2

Ingredients:
1 small spaghetti squash
1 tablespoon butter
2 tablespoons olive oil
1/2 onion, chopped
12-16 ounces of mushrooms, sliced
4-6 garlic cloves, finely chopped
3 tablespoons fresh sage, chopped
Salt, to taste
Freshly ground black pepper, to taste
Generous pinch of nutmeg
1/4 cup grated cheese (pecorino or parmesan)
Drizzle truffle oil, optional

Directions:
1.  Prepare the spaghetti squash.  Preheat the oven to 400 degrees Fahrenheit.  Cut the spaghetti squash in half (either way) and place open side down on a parchment lined baking sheet.  Bake 40 to 50 minutes.

2.  Saute the onion, mushroom, garlic and sage.  While the squash is baking, heat the oil and butter in a large skillet over medium high heat.  Saute the onions until just tender, about 2 to 3 minutes.  Add mushrooms, turn heat to medium and saute until they begin to release their liquid, about 5 to 7 minutes.  Add garlic and sage and continue cooking until mushrooms brown, about 4 minutes.  Season generously with salt, pepper and nutmeg. 

3.  Finish the dish.  Check squash by piercing with the tip of a sharp knife to see if it is done.  When tender, take out of the oven, turn over and let it cool slightly until cook enough to handle.  Then scoop out seeds and scoop out the spaghetti squash into the saute pan with the mushrooms and stir to incorporate.  Taste for salt and add more if necessary.  Stir in most of the grated cheese, saving some for garnish.  Place in serving bowl, top with the remaining cheese and a drizzle of truffle oil. 

ENJOY!