Friday, January 23, 2015

Fennel, Apple and Celery Salad with Cilantro and Lemon

Generally, I have never been a big fan of salads.  I consider myself an alpha carnivore, preferring to eat meat over leafy greens.  If I have to have a side, it is usually a starch, such as potatoes or rice.  To be sure, I eat salads and cook vegetable side dishes, but  not as much as I should.

My beautiful Angel has made tremendous strides in opening me and my diet to salads.  This recipe is an example of that.  Before I met my Angel, I would not have thought of making a salad of fennel, apple and celery.   However, a few weeks back, we had dinner with Clare's parents and her father made a salad that included fennel.  The salad was very delicious.  It also got me to thinking about different salads that I could make for Clare which feature fennel.

Fennel is a very interesting ingredient.  The white bulbs with straight, green branches and feathery leaves sets this vegetable apart from others on a grocery shelf.   One would think it was related to any number of vegetables that sprout from bulbs.  However, fennel is from the Umbellifereae family, which means it is closely related to parsley, carrots, dill and coriander.  Yet, the taste of fennel -- with its strong notes of anise -- is completely different than parsley, coriander and the like.  

The anise flavor of fennel pairs well with a variety of ingredients, most notably apples.  This basic pairing is what makes the salad work.  The use of celery, cilantro and lemons add levels of flavor to the salad.  The result is a delicious salad that has helped to further focus my attention to vegetables.


FENNEL, APPLE, AND CELERY SALAD WITH CILANTRO AND LEMON
Recipe from Food Network
Serves 8

Ingredients:
1/4 cup, plus 2 tablespoons of lemon juice
1 tablespoon extra virgin olive oil
2 large apples, julienned
1 medium head of fennel, cored and thinly sliced
3 large ribs of celery, sliced (about 1 cup)
1/2 cup cilantro leaves, roughly chopped

Directions:
In a large non-reactive bowl, combine the lemon juice, olive oil, salt and pepper.  Add the apples, fennel, celery and cilantro.  Toss until well combined.  Taste and adjust the seasonings. 

ENJOY!

Sunday, January 4, 2015

Sweet Pepper and White Bean Soup

Mario Batali introduces a recipe for sweet pepper and white bean soup in words that are seemingly quintessential Mario: "The creamy bass notes of white beans play perfectly against the high-hat brightness of the peppers' sweet acidity, extending the spectrum of flavor to the perimeter of yum."

The thing about Mario Batali is that he is exactly on point when it comes to this recipe.  The white beans have a creamy note that fulfills the base of this dish.  I expected the beans to do this, so it is not a great surprise.  What shocked me is the range of those red bell peppers.  I have always known that bell peppers are sometimes called "sweet peppers," because, quite frankly, most other peppers are considered "hot peppers."  However, the red peppers provided an unexpected, yet completely welcomed, sweetness that did, in fact, elevate the soup to levels that I did not expect.

The one thing that Mario left out about the recipe is its versatility.  I made this recipe for my beautiful Angel, who is no fan of pancetta and does not eat chicken.  I substituted turkey bacon for the pancetta and vegetable stock for the chicken stock.  The only difference was the color, which became a more deep red (due to the vegetable stock).  I am sure that other substitutions could be made, such as different beans or even the use of chickpeas in the place of the beans.

In the end, my soup differed from Mario's recipe.  The vegetable stock and turkey bacon provide different flavors than chicken stock and pancetta.  However, Mario's description is still appropriate because the main stars of this soup -- the sweet pepper and white beans -- still perform flawlessly, providing the sweetness and creamy bass notes as Mario suggests.


SWEET PEPPER AND WHITE BEAN SOUP
Recipe adapted from America Farm to Table by Mario Batali at pg. 73
Serves 6 to 8

Ingredients:
4 cups of chicken or vegetable stock (homemade or low sodium-store bought)
1/4 cup extra virgin olive oil, plus more for serving
1 large Spanish onion, cut into 1/4 inch dice
4 fresh sage leaves
1/4 pound pancetta or bacon, cut into 1/4 inch dice
2 tablespoons of tomato paste
3 red bell peppers, seeded, and cut into 1/2 inch dice
2 (15 ounce) cannellini beans, drained and rinsed
Kosher salt
Freshly ground black pepper

Directions:
1.  Saute the pancetta, onions and peppers.   In a medium pot, bring the chicken stock to a boil.  In a Dutch oven, heat the extra virgin olive oil over medium heat until almost smoking.  Add the onion, sage and pancetta.  Cook, stirring frequently, for 5 minutes or until the onion is slightly browned.  Mix in the tomato paste and the bell peppers and continue to cook, stirring, for about 2 minutes more.  

2.  Make the soup.  Add the boiling chicken stock to the Dutch oven and return to a boil.  Reduce the heat to maintain a simmer and cook for 5 minutes.  In small batches, transfer the mixture to a blender or food processor and puree until smooth, then pour into the pot in which you heated the stock.  Add the white beans and bring to a boil, then reduce the heat to maintain a simmer and cook for 5 minutes.  Season with salt and pepper.  

3.  Serve the soup.  Ladle the soup into bowls and serve with a drizzle of extra virgin olive oil and freshly cracked pepper.

ENJOY!  

Thursday, January 1, 2015

A New Year


People say that the New Year is a time of reflection and resolution.  When it comes to this blog, I can look back and see how my love of cooking has developed over the years.  I can read how I have challenged myself, as well as the results.  There have been many failures and many successes, which is to be expected from someone who does not cook professionally and does not have any culinary training.

As much as I love to cook, I cannot help but notice that, looking back over the couple of years, there have been fewer and fewer posts.  There are many reasons for this trend.   My beautiful Angel and I have an amazing little guy, and I spend a lot of my free time with him and my wife, leaving less time for experimenting and cooking.  My work has also gotten much busier, and, the free time that I had (such as before my day or during my lunchtime) has largely been taken up with more work.  As a result, the number of posts has declined month to month and year to year.  

I have been cooking.  I just have not been blogging as much about what I cook.  

Turning to the resolutions, I am not one for making New Year's resolutions.  My track record of keeping such resolutions is rather poor.  It is abysmal.

As the door to 2015 opens, I can see a lot of opportunities for my adventures through food and drink. For example, there are many more cuisines to explore as part of my culinary challenge, Around the World in 80 Dishes. As with that challenge, there is much more to learn, not only about cooking, but also about the ingredients that are used to create the dishes.

Rather than write "it is my resolution," I will write that it is my hope that I will be able to continue with this blog over the course of the coming year. I am also working on some changes to the blog, including this update to its appearance.

I am not exactly sure how many people actually read this blog or my posts, but, if you are one of them, I hope you will come back and see what has been cooking!

I hope everyone has a safe and happy new year!

Until next time ...

ENJOY!

Wednesday, November 12, 2014

Stalking Hops

"We're a couple of hop stalkers here."  So said Fat Head's brewer, Matt Cole, to Rick Armon of Ohio's Breweries.  Cole described his trips out west, at least twice a year to the State of Washington.  The principal purpose of these trips is to scout hops.  Cole reminisced about one trip, "We were out in a really late harvest in Yakima one year and we were driving around and chasing around some of the hop trucks to follow them back to the harms."  Stalking hops that would ultimately be used in beers such as the Hop Stalker, a Fresh Hop IPA.

According to Armon, the Fresh Hop IPA comes from the fact that the hops are in a kettle approximately 48 hours after they have been picked.  "Fresh hop" beers are apparently in vogue, with a lot of brewers snatching hops practically straight off the farm in order to brew various types of IPA beers.  However, it takes a true hop stalker, like Matt Cole, to produce one of the best beers that, in a style that he truly owns, packs one of the higher IBUs of any "fresh hop" beers. (At this point, I should disclose that Fat Head's is one of my favorite brewers, if that wasn't obvious by now.)

The Hop Stalker pours a copper color, with a thin foam across the surface of the beer.  The aroma of this beer is straightforward ... pine and more pine.  Those are the notes that one would expect from a beer that has 80 IBUs.  It is also what hopheads and fans of Matt Cole's beers come to expect when he brews any kind of pale ale.  

The taste of this beer provides an excellent example of how the hop stalker can get the best out of those little cones.  The Hop Stalker Fresh Hop IPA is very bitter, with strong pine and resin notes.  Those elements wrap themselves around your tongue stretching the hop experience to its natural limits, which should please anyone who is a hop head like myself.  The alcohol of this 7% ABV beer becomes a little more present as you drink it, but it can never overtake the central focus of this beer -- the hops.

Although this beer is available in cans, it is most likely sold out by the time this post goes to air.  If it becomes available again, it can be bought at the Fat Head's restaurants or tap room, which is where my Dad found this beer.

According to the Craft Beer Restaurant, a fresh hop beer pairs well with pork belly or leg of lamb, because the fresh nature of the beer contrasts well with these rich pieces of meat.  The beer can complement an endive and arugula salad or a casserole of brussel sprouts, mushroom and "floral cheese."  I'll never be able to verify that last one, because a casserole with brussel sprouts just seems too unappetizing.  I'll just have the beer.

ENJOY!

Friday, November 7, 2014

Grilled Opah, Garlic Shrimp, and Avocado-Mango Salsa

I stood at the seafood counter of a grocery store staring at four letters.  That is right, four letters, which comprised one word. That one word gave raise to a whole lot of thoughts.   The four letters - O ... P ... A ... H.  That word -- Opah -- is an amazing and interesting fish that I had only heard of but which I never seen either whole or fileted.  Now, I had it within my grasp and I was lucky enough to have the opportunity to cook with this amazing fish.

I am not the only one to feel lucky when I set my sight upon an Opah.  These deep water fishes are sometime bycatch on tuna boats.   For a tuna fisherman, to catch an Opah brings good luck.  The fisherman never sold the Opah, perhaps because they believed that would tarnish the good luck.  Instead, they would give it away, giving those who would ordinarily never come across the fish the opportunity to learn about it and cook with it. 

The Opah in all of its glory.
Very little is known about this oddly shaped fish.  What is known is that these fish appear to live their entire lives in the open ocean.  Opah do not swim in schools; instead, they choose to swim around tuna and billfish.  The Opah stands out from the slimmer and sleeker fish.  The round, silver bodies are highlighted by reddish-orange hues and fins.  It should be noted that those round bodies are rather large, with the average weight being approximately 100 pounds.

According to Hawaiian Seafood, an opah has three types of flesh, each with a different color. Behind the head and along the backbone is an attractive orange colored flesh. Toward the belly, the flesh pales to a pink color. The fish's cheeks yield dark red flesh. These types of flesh all cook to a white color. Opah is a rich source of protein, niacin, vitamin B6, vitamin B12, phosphorus, and selenium. It also provides about 1800 mg of omega-3’s (DHA and EPA) per 4 ounce serving of fresh fish.

As I stood at that seafood counter, I was most likely looking at the belly flesh, as it was rather pale in color.  The opah flesh is very meaty, almost tuna like appearance.  This bodes well for the use of rubs or other flavors, but I decided to keep it simple.  Sea salt and freshly ground black pepper. I decided to make a salsa that could top the fish.  Recipes suggested an avocado-mango salsa, which I decided to use as a guide for the salsa in this recipe.  I also garnished the fish with a few shrimp marinated with garlic and other spices.  


GRILLED OPAH, GARLIC SHRIMP, AND
AVOCADO-MANGO SALSA
A Chef Bolek Original
Serves 4
Ingredients (for the Opah):
1 pound of Opah
1 pound of asparagus
1/2 lemon juiced
Sea salt
Freshly ground black pepper
1/4 cup of olive oil

Ingredients (for the Garlic Shrimp):
1 pound of 16-20 count shrimp, deveined, but with shells
1/2 lemon juiced
2 teaspoons garlic powder
2 teaspoons onion powder
1/4 teaspoon crushed red pepper
Sea salt
Freshly ground black pepper
1/3 cup of olive oil

Ingredients (for the Avocado-Mango Salsa):
1 mango, pitted, peeled and diced
1 avocado, pitted, peeled and diced
1 jalapeno pepper, seeded and diced
1 clove of garlic, minced
1 lime juiced
1/4 cup cilantro, roughly chopped
Sea sealt
Freshly ground black pepper

Directions:
1.  Prepare the shrimp and asparagus.  Add the olive oil, lemon juice, garlic powder, onion powder, and crushed red pepper in a ziploc bag..  Add the shrimp and marinate for 10 minutes.  Add the olive oil, lemon juice and asparagus to another ziploc bag.  Season the shrimp and the asparagus with sea salt and freshly ground black pepper.

2.  Prepare the salsa.  Combine all of the ingredients for the salsa in a non-reactive bowl.  Gently stir to mix the ingredients.  Set aside in the refrigerator.  

3.  Grill the opah, shrimp and asparagus.  Heat the grill on high.  Skewer the shrimp on wooden skewers.  Oil the grates.  When the grill is ready, add the opah, shrimp and asparagus.  The opah should be grilled until just cooked through, about 3 to 6 minutes per side.  The shrimp should be grilled until just cooked through, about 2-3 minutes per side.  And the asparagus should be grilled for about 2 to 3 minutes per side.  

4.  Plate the dish.  Place the asparagus in the middle of the plate.  Place the Opah on top of the asparagus and spread the shrimp around the Opah. Spoon the salsa over the Opah and the shrimp.  

ENJOY!

Tuesday, November 4, 2014

Torii Mor Pinot Noir (2008)

As much as I love pinot noir wines, it is the one varietal that I perhaps drink the least.  The reason is not due to a lack of wines, as any grocery store, wine store or any store is usually stocked with a lot of different pinot noir wines. Yet, I walk by all of them.  Or, I should say almost all of them.  When it comes to pinot noir wines, I am very selective.  The reason is that, as I have written about a couple of times on this blog, pinot noir wines embody some of the greatest memories of my life ... namely, my honeymoon with my beautiful Angel in the Willamette Valley.  

I have reviewed many of the wines from vineyards and winemakers that we visited during our vacation, including Prive Vineyards, Sokol Blosser, Bergstrom, and Stoller.  One vineyard that we did not visit and whose wines we did not taste, is Torii Mor.  This winery was established by Dr. Donald Olson in 1993, and, it has increased its production from about 1,000 cases at its start to more than 15,000 cases now.

I bought a bottle from one of those cases of Torii Mor Pinot Noir wine and set it aside for us to enjoy.  The bottle sat in our wine rack for quite a while until we opened it.  The wine poured a dark red, almost earthy crimson color.  As the pinot noir opened, there were notes of cherries, raspberries and some minerality.  These are the elements that I come to expect and enjoy from pinot noir wines.   They are also the elements that set aside an Oregon pinot noir from its Californian and French relatives.  

As for the taste, the Torii Mor wine proudly displays round, ripe cherries in the forefront.  There is a little darkness to these cherries, but it is very interesting and very good.  There is some slate and earthiness in the background, which lingers long after the cherries have passed.  

The earthiness of this wine allows for it to be paired with more than what one would traditionally pair pinot noir wines.  I would even pair this dish with some red meat, perhaps a grilled steak or even some lamb.  The nice thing about Oregon Pinot Noir wines is their ability to pair with somewhat more substantial dishes.  

I have seen Torii Mor wines in wine stores and grocery stores with large wine selections. I don't recall what the price of the wine, but it was probably in the mid $20 range.  

ENJOY!

Sunday, November 2, 2014

Around the World in 80 Dishes: India

It has been well over a year since I completed a dinner for my personal culinary challenge, Around the World in 80 Dishes. The last challenge was to prepare Mauritian Duck Curry, along with Chana Masala, dishes from the island country of Mauritius.   The cuisine of Mauritius is heavily influenced by immigrants, especially those from India.  For the next challenge, I'll will travel from Mauritius to India.

The timing could not be better.  I undertook and completed this challenge during Diwali, the Hindu festival of lights, an important festival for Hindus, Jains and Sikhs.  Diwali unfolds over five days, with the third day being celebrated as the main festival or "Festival of Lights." The lights were originally clay lamps, lit for reasons that vary with the celebrants.  For example, lighting lamps represents the victory of knowledge of ignorance.  Darkness represents ignorance, as well as wickedness, violence, anger, bigotry, injustice and suffering.  The lighting of lamps allows light to overcome darkness, which is not only a metaphor for knowledge overcoming ignorance, but also illustrates how light reveals the beauty that surrounds us.

Of course, the Diwali celebration involves far more than lighting of clay or electric lamps.  Families decorate their houses, set off firecrackers and, of course, partake in a feast of food.  The feast of food that I prepared included two main courses and a side dish, all of which are part of this culinary challenge.
 
MAIN COURSE

While I made two main courses, only one can satisfy the challenge.  That dish is Rogan Josh, an aromatic and very tasty lamb stew or curry.  The dish originated in Persia, which gave the red curry its name.  According to Wikipedia, Rogan means "clarified butter" or "fat" in Persian, while Josh basically means to heat or boil in an intense or passionate way.  The dish was introduced to the subcontinent by the Mughal Empire, where it became very popular in the Kashmir region. 

The Kashmiri version features braised lamb chunks cooked with a gravy based on browned onions or shallots, yogurt, garlic, ginger and aromatic spices, such as cloves, bay leaves, cardamom and cinnamon. The red color of Rogan Josh traditionally comes from liberal amounts of dried, de-seeded Kashmiri chilies.  These chiles are more akin to paprika than the cayenne chiles used by Indian cuisine.  

Personally, I love Rogan Josh and this dish has been on my "to do list" for some time. This version is a simplified curry based upon a recipe by Vikram Sunderam, the chef and owner of the very popular Washington, D.C. restaurant Rasika.


ROGAN JOSH
Recipe from Food and Wine
Serves 4

Ingredients:
1/4 cup canola oil
2 pounds boneless lamb shoulder, cut into 1 inch pieces
Kosher salt
2 onions, thinly sliced
2 tablespoons, minced fresh ginger
2 garlic cloves, minced
1 tablespoon plus 1 teaspoon Madras curry powder
1 teaspoon turmeric
1/2 teaspoon cayenne pepper
2 bay leaves
1 14 ounce can tomato puree
1 cup plain whole milk yogurt
1 cup plain whole-milk yogurt
2 cups water
1 teaspoon garam masala
Cilantro leaves, for garnish
Basmati rice and warm naan for serving.

Directions:
1.  Brown the lamb.  In a large, enameled cast-iron casserole, heat the oil. Season the lamb with salt and cook over high heat, stirring occasionally, until the lamb is browned, about 12 minutes; using a slotted spoon, transfer to a plate.

2.  Add the remaining ingredients.  Add the onions to the casserole and cook over moderate heat until lightly browned, 4 minutes. Add the ginger, garlic, curry, turmeric, cayenne and bay leaves and cook for 2 minutes. Add the tomato, yogurt and water; bring to a boil. Season with salt.

3.  Simmer the stew.  Return the lamb and any juices to the casserole. Cover partially and simmer over low heat until the lamb is very tender, 1 hour. Stir in the garam masala; cook for 5 minutes. Discard the bay leaves. Garnish with cilantro. Serve with rice and naan.

SIDE DISHES

Although the Rogan  Josh satisfies the culinary challenge, I try to make some other dishes, whether appetizers, side dishes or desserts as part of the Around the World in 80 Dishes.  Since I have not done a challenge in awhile, I decided to do another main or side dish.  This dish -- Daal Saag -- features yellow split lentils and spinach.  I have to admit that I do not cook very much with lentils, so this presented a whole different type of challenge.


DAAL SAAG
Recipe from Merilees Parker and
Available on the BBC's Food Website
Serves 4

Ingredients:
8 ounces of yellow split lentils (moong dal)
3 1/2 cups of water
2-3 tablespoons of vegetable oil
1 teaspoon black mustard seeds
1/4 teaspoon ground turmeric
1/4 teaspoon ground cumin
1/4 teaspoon asafoetida or fennel seeds
2 tablespoons of fresh ginger, grated
2 green chiles, de-seeded and chopped
8 curry leaves
3 1/2 ounces of spinach
2 spring onions, trimmed and chopped

Directions:
1.  Prepare the lentils.  Put the daal in a heavy based saucepan, pour in the water and bring to a boil.  Reduce the heat and simmer for about 1 hour until the lentils are really soft.

2.  Heat the spices.  Heat oil in a large pan.  Add the mustard seeds, turmeric, cumin, asafoetida or fennel sides, ginger, chilies and curry leaves.  Fry for 2 to 3 minutes.

3.  Add the daal.  When the daal is cooked, add to the pan and stir in spinach and spring onions.  Heat for an additional two minutes.  Season and then serve.

Whenever you make a curry, whether Rogan Josh or Daal Saag, you should always have a pullao, or rice.  This particular rice dish includes carrots, potatoes and green beans. 


VEGETABLE PULLAO
Recipe from Merilees Parker and
Available on the BBC's Food Website
Serves 4

Ingredients (for the garam masala):
1 tablespoon of cardamom seeds
1 teaspoon of black peppercorns
1 teaspoon black cumin seeds (or regular cumin seeds)
1 teaspoon whole cloves
1/3 whole nutmeg
1 medium stick of cinnamon, broken into pieces

Ingredients (for the pullao):
Basmati rice, measured to the 1 pint level (2 cups)
Thumb piece of fresh ginger, grated
3 tablespoons of olive oil
1/2 teaspoon brown mustard seeds
1 hot green chile, finely chopped
1/4 pound of potatoes, peeled and cut into dice
1/4 carrot, peeled, cut into dice
1 1/2 ounces of green beans, cut into segments
1/2 teaspoon ground turmeric
1 teaspoon garam masala
1 1/4 teaspoon salt
1 pint water

Directions:
1.  Prepare the garam masala.  Put all of the spices in a clean coffee grinder or other spice grinder and grind as finely as possible. Store in a tightly lidded jar, away from heat and sunlight. This makes about three tablespoons.

2.  Prepare the rice. Wash the rice in several changes of water then drain. Put the rice in a bowl, cover with water and leave to soak for 30 minutes, then drain again.

3.  Heat the spices.  Heat the oil in a heavy-based pan (with a tight-fitting lid) set over a medium-high heat. When it's hot, add the mustard seeds.  As soon as they begin to pop - a matter of seconds - add the chilli, potato, carrot and green beans and stir. Add the turmeric and garam masala and stir for one minute.  Add the ginger and saute, stirring, for another minute.

4.  Add the rice and other ingredients.  Drain the rice and add it to the pan. Reduce the heat to medium-low and stir the rice very gently to mix it into the other ingredients and coat it with the oil and spices. Cook this way for two minutes.  Add the 570ml/1 pint water and the salt and bring to the boil. Cover the pan with a very tight-fitting lid (if you don't have a very tight-fitting lid then cover the pan with foil then a lid) then turn the heat to very low and cook for 25 minutes. After this time try a grain of rice to see if it's cooked - cook for a few more minutes if necessary.

5.  Finish the dish.  Once it's cooked you can leave it with the lid on and the heat turned off for up to half an hour before serving. Or serve at once on a serving plate.

*     *     *

I have to say that I completed the challenge successfully.  The Rogan Josh was amazing and I can understand why it is a very popular dish in India.  I also learned that I still have a lot of work to do when it comes to making large amounts of rice.  The pullao was good, but I have difficulties getting the right texture with the rice.  I can do it in small batches.  However, when cooking for large crowds, it is a little more difficult, at least for me. The one thing is that I still have over fifty challenges to go.  I am sure that there will be many more opportunities to make rice.  

Until next time ...

 ENJOY!

Saturday, October 18, 2014

Wine Club - A Diwali Inspired Dinner

It has been a little while since we hosted our last wine dinner.  The last dinner was back in April, America in Miniature, when we took a culinary tour around the State of Maryland.  As we prepare for our next wine dinner, the big question was (as it always is), what should be the theme?  The first thing that came to my mind was a celebration.  I checked the calendar (and, of course, the Internet), and I came across a website that listed all of the international festivals in the month of October.  After some more research, I decided upon a theme that should be perfect for the Wine Club ... a Diwali inspired dinner.

Initially, this theme offers an opportunity to learn a little more about Diwali, an important festival for Hindus, Jains and Sikhs.  Diwali unfolds over five days, with the third day being celebrated as the main festival or "Festival of Lights." The lights were originally clay lamps, lit for reasons that vary with the celebrants.  For example, lighting lamps represents the victory of knowledge of ignorance.  Darkness represents ignorance, as well as wickedness, violence, anger, bigotry, injustice and suffering.  The lighting of lamps allows light to overcome darkness, which is not only a metaphor for knowledge overcoming ignorance, but also illustrates how light reveals the beauty that surrounds us. 

Of course, the Diwali celebration involves far more than lighting of clay or electric lamps.  Families decorate their houses, set off firecrackers and, of course, partake in a feast of food.  For this wine club, the feast will be a three course meal, with appetizers, two main courses (served together) and a dessert.

FIRST COURSE
Onion and Sweet Potato Bhajji

The first course will feature a duo of Onion Bhajji and Sweet Potato Bhajji.  A bhaji is a type of pakora or fritter that is a common street food in Maharashtra.  And, from what I have read, bhajji are also commonly served as part of Hindu festivals, such as Dwali.  I hope to have a couple of chutneys to serve with the bhajji; however, due to a lack of time, those may not be homemade. 

SECOND COURSE
Rogan Josh, Daal Saag, and Vegetable Pulao

The main course features two dishes - Rogan Josh and Daal Saag -- served with a vegetable pulao or rice dish.  The dishes accommodate meat eaters, as the Rogan Josh is a traditional lamb dish that, although of Persian origin, is a staple of Kashmiri cuisine.  They also accommodate vegetarians, as Daal Saag, which is a lentil dish that includes spinach.  And, for omnivores, you can have booth. 

THIRD COURSE
Goan Coconut Pancakes

The last course will be Goan Coconut Pancakes, which will have a stuffing of coconuts, raisin, cardamom and nutmeg.  The pancakes will be served with a little vanilla ice cream.

See you soon!

ENJOY!


Wednesday, October 15, 2014

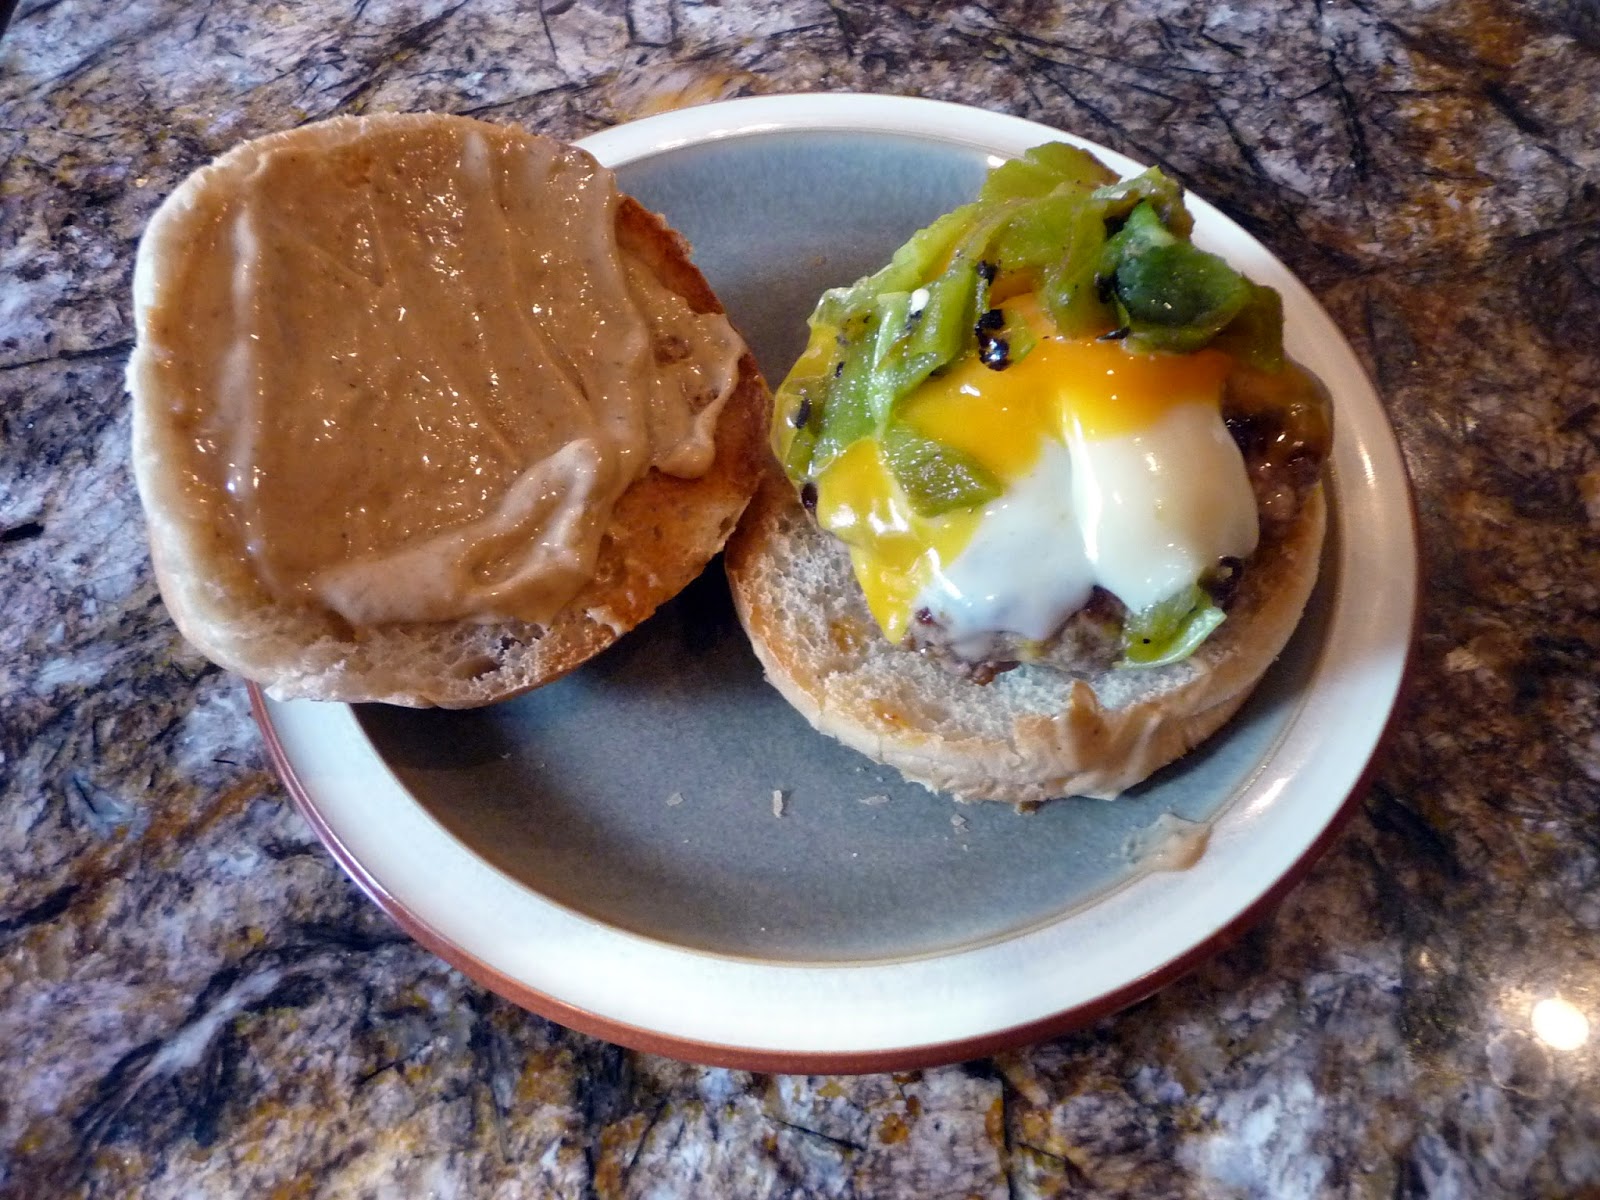
Green Chile Turkey Burgers

Lately, it has been difficult finding the time (and, quite frankly, the desire) to cook.  The past few months have been some very busy times in the Chef Bolek household.  While I continue to cook, the opportunities have been far less in number than I would like.  Sometimes, we are just too tired or it is just too late to make dinner, especially with a little toddler running circles around us.  

All of these challenges have led to an evolution of sorts in terms of my cooking.  Rather than looking for complicated recipes by which to challenge my skills, my focus has turned to simpler recipes.   Recipes that can be completed in 1/2 to 1 hour. These are not recipes that would pave my way onto shows such as Master Chef, but they are ones that fill our stomachs with some good and tasty food.  

Take, for example, a recipe for Green Chile Burgers that I found on Saveur's website. The recipe initially caught my eye because of the use of green New Mexico or Hatch chiles, which happen to be among my favorite chiles.  However, it is the fact that this is an easily and quick recipe that led to the making of these burgers.  The bulk of the preparation time spent on creating a very delicious chile sauce, which includes the roasting of the peppers and the combination of the ingredients.  In the end, you have some great burgers.

Finally, I decided to make one big change to the recipe.  Rather than use beef, I decided to make these burgers with turkey.  I wanted a leaner option, but I ensured there would still be sufficient flavor and moisture by using ground turkey thighs.  The thighs have a higher fat content that serves both purposes well.  There you have it ... Green Chile Turkey Burgers.  


GREEN CHILE TURKEY BURGERS
Recipe adapted from Saveur
Serves 4

Ingredients:
2 pounds of ground turkey (preferably thigh meat)
1 tablespoon, plus 1 teaspoon of Hatch chile powder
1 1/2 teaspoon of ground cumin
Kosher salt
Ground black pepper
1/3 cup mayonnaise
2 tablespoons of ketchup
4 cloves roasted garlic, mashed to a paste
2 tablespoons of canola oil
6 roasted Hatch chiles, peeled, stemmed, seeded and chopped
4 slices of cheddar cheese
4 slices of Swiss cheese
4 brioche buns, split and toasted

Instructions:
1.  Make the burgers.  In a bowl, combine the ground turkey, 1 tablespoon of chile powder, cumin, salt and pepper.  Form into four 8 ounce patties and chill in a refrigerator.

2.  Make the chile sauce. Whisk remaining chile powder, mayonnaise, ketchup, garlic, salt and pepper in a small bowl.  Refrigerate the sauce until needed.

3. Cook the burgers.  Heat oil in 12 inch cast iron skillet over medium heat; work in 2 batches.  Cook patties, turning once until a thick crust develops on both sides, about 10 to 15 minutes.  Top each with 1/4 of the roasted chiles, and 1 slice of each cheese.  Cover with lid to melt cheese.  To serve, place 1 patty on each bottom bun and spread the top buns with some of the sauce.  Cover burgers with the top bun and serve immediately.

ENJOY!

Sunday, September 14, 2014

Malabar Mussels

When one thinks of strength, the first thing that comes to mind is muscles.  However, for many women in the southern Indian state of Kerala, it is mussels that give them strength.  Green mussels or perna viridis, to be exact. Back in the 1990s, local villages along the Indian Ocean coastline began to start farming mussels as a way to make a living.  Mussel farming exploded in the region and, overall, India rose to become one of the largest producers of green mussels in the world.  

The most important thing about mussel farming in Kerala, at least to me, is found in a study by V. Kripa and K.S. Mohamed.  Their study is entitled "Green Mussel, Perna Viridis, Farming in Kerala, India - Technology Diffusion Process and Socioeconomic Impacts" (2008).   As Kripa and Mohamed report, there were three types of ownership when it came to mussel farms.  There were individual ownership and family ownership, both of which are self-explanatory.  And, there was "self-help group" ownership or SHG ownership.  There were only about 17 to 20 SHG mussel farms, all of which were located in one district (the Kasgorod district) of Kerala  

The SHG mussel farms are the key to empowering women.  As both Kripa and Mohamed found, "[t]he biggest outcome of mussel farming in Kerala was the empowerment of women with 87% of the SHG farms owned by women." The SHG is a formal organization, with officers and group meetings.  This organization makes it easier for women to obtain financial assistance and support from local banks and the government. Those 17 to 20 SHG mussel farms have enabled as many as 2,000 women to become active in an economic activity, which enables them to better support themselves and their families.  The SHGs not only help to alleviate poverty, but they also empower women not only in the economic workplace, but also when it comes to decision-making in their homes.

This recipe demonstrates what can be made with those green mussels, as well as blue and black mussels that are traditionally found in the Atlantic and Pacific Oceans.  It incorporates a wide range of ingredients, especially in the Malabar Masala.  (One note: don't let the fact that you can't find some of the masala ingredients -- like the curry leaf powder -- stop you from making the dish.  The masala will still be great.)  Along with the masala, the combination of fresh chiles, ginger, garlic, and red onions also provide an interesting array of range of tastes and flavors.  The sauce was so good that I decided to serve the dish with some rice, which could help to soak up some of the sauce.  I hated to see that sauce go to waste.   


MALABAR MUSSELS
Adapted from Smita Chandra's recipe published by Saveur
Serves 2-4

Ingredients (for the mussels):
3 tablespoons of canola oil
6 cloves of garlic, thinly sliced
2 small green Thai chiles or 1 serrano, thinly sliced
1 two-inch piece of ginger, peeled and thinly sliced
1/2 small red onion, thinly sliced
2 tablespoons of Malabar Masala (recipe below)
3 plum tomatoes, chopped
1 14 ounce can of coconut milk
Kosher salt, to taste
2 1/2 pounds of mussels, debearded, rinsed and scrubbed
1/4 cup roughly chopped cilantro
Cooked white rice, for serving (optional)

Ingredients (for the Malabar Masala):
1/4 cup of coriander seeds
2 tablespoons of cumin seeds
2 tablespoons of fennel seeds
1 tablespoon of green cardamom pods
1 tablespoon of whole cloves
1 teaspoon of black mustard seeds
1 teaspoon of fenugreek seeds
1 teaspoon of whole black peppercorns
2 star anise
2 sticks of cinnamon
2 tablespoons of dessicated coconut
2 tablespoons of dried fenugreek leaves
1 tablespoon of crushed red chile flakes
1/3 cup of curry leaf powder
1 teaspoon of ground ginger
1 teaspoon ground turmeric

Directions:
1.  Prepare the Malabar Masala.  Heat a 10 inch skillet over medium high heat.  Cook coriander, cumin, fennel, cardamom, cloves, mustard seeds, fenugreek seeds, peppercorns, star anise, and cinnamon sticks until fragrant and toasted, about 3-4 minutes.  Add coconut, fenugreek leaves and chile flakes, cook until the coconut is golden, 2 minutes.  Let cool and then transfer to a spice grinder along with curry leaf powder, ginger, and turmeric.  Grind into a powder and store in an airtight container for up to 6 months.  

2.  Prepare the base.  Heat oil in a 6 quart saucepan over medium high heat.  Cook garlic, chiles, ginger, and onion until golden, about 4 to 6 minutes.  Add masala and tomatoes. Cook, stirring occasionally until the tomatoes begin to break down, about 5 to 7 minutes. 

3.  Cook the mussels.  Add coconut milk, salt, and 1/4 cup of water and bring to a boil.  Add the mussels.  Cook covered, occasionally shaking pan until all mussels are opened, about 5 minutes.  Garnish with cilantro and serve with rice.

ENJOY!