Saturday, February 24, 2024

Lunu Miris

I love the cuisine of Sri Lanka, which is known to curry almost everything. One particular aspect of this cuisine has really gotten my attention: the sambols. A sambol is a freshly made condiment or relish that typically incorporates chiles to add not just spice, but other flavors to whatever one is eating.

The history of sambols takes us to Indonesia, where they are referred to as sambals. Indonesians prepared these condiments using cabya, also known as the Javanese long pepper, which is native to the island of Java. The earliest references to cabya go back to the 10th century C.E. Although not technically a chile, the cabya provided a spicy element to the dishes prepared by Indonesian cooks. However, by the 16th century C.E., Spanish and Portuguese explorers and colonizers brought the traditional chiles from the new world to the Indonesian islands. Soon, cooks started using chiles over cabya. From there, the Dutch colonizers exported sambals to other countries, including Sri Lanka. 

Sambols (or sambals) have chiles as the central ingredient, around which a range of secondary ingredients are added. For example, pol sambol includes green chiles combined with coconut, shallots, Maldive fish chips, and lime juice. Dried shrimp sambol uses red chiles combined with dried shrimp (obviously), dried coconut, onions, garlic and lime juice.  

Lunu miris translates into onion chile. However, there are no onions in this recipe, but there are three different chiles: long red chiles, chile flakes and chile power, as well as freshly ground black pepper. I found this recipe in O Tama Carey's Lanka Food, which describes the sambol as more of a paste. When I prepared it, the final product was more like a salsa, but a very thick and extremely fiery one. Carey advises that this sambol is "[n]ot for the faint hearted." That is definitely an understatement. This recipe should only be prepared by people who order their food at the highest level of spice for those who ordinarily prepare it.


LUNU MIRIS

Recipe from O Tama Carey, Lanka Food, pg. 222

Serves 4-6

Ingredients:

  • 7/8 ounces Maldive fish flakes
  • 1/8 ounce chile flakes
  • 1/8 ounce salt flakes
  • 3 long red chiles, cut into thin rounds
  • 2.5 ounces of shallots, finely sliced
  • 1/8 ounce chile powder
  • 1/10 ounces of freshly ground black pepper
  • 2 limes juiced

Directions:

Using a mortar and pestle, or a food processor, pound (or process) the Maldive fish flakes, chile flakes and salt until the flakes are finely ground. Add the long red chiles and shallots and pound (or process) to a paste like consistence. It does not have to be super smooth. Mix through the pepper and chile powder and season to taste with lime juice. Service at room temperature. 

PEACE.

Friday, February 16, 2024

Rohingyan Beef Curry

We all miss home, but we cannot go back to the same fear. -- Nur Anya 

For decades, the Rohingyans -- a Muslim minority group --  have suffered under dehumanizing discrimination in Myanmar. The government refused to grant citizenship to the Rohingyan people, denying legal status to an entire ethnic group. Yet, the government passed laws that placed significant restrictions upon the Rohingya. For example, in the northern towns of Mungdaw and Buthidaugn, the authorities limited Rohingyan couples to two children. The government also requires Rohingyans to get approval before they can marry, as well as to travel or move outside of their home towns. These conditions are exacerbated by the fact that the area where most Rohingyans call "home," the Rakine State, is the least developed of Myanmar's states and has a poverty rate of 78%, which is more than double the national rate of 37.5% percent. 

The discrimination and repression led to violence in 2017, after a militant group known as the Arakan Rohingya Salvation Army attacked police and army posts. The military cracked down on the Rohingyan people. As the United Nations would later find in an after-the-fact investigation, the Myanmar military showed "genocidal intent" and, in a 2018 report, the UN determined that Myanmar found that the military engaged in "clear patterns of abuse" that included, among other things, the systematic targeting of civilians, promoting discriminatory rhetoric against the Rohingya and establishing a "climate of impunity" for the government's security forces. After approximately one year, it is estimated that the Myanmar military and security forces killed nearly 24,000 Rohingyans.

Fleeing Death and Destruction

The violence and death led to mass displacement of Rohingyans, significant numbers of whom fled as refugees to other countries. I previously touched upon the Rohingyan refugee crisis as part of my culinary challenge involving Myanmar. Approximately 740,000 Rohingyans fled into neighboring Bangladesh. Many more fled to Thailand, Malaysia and Indonesia. It was, at the time, the world's fastest growing humanitarian crisis.

Rohingyan refugees. Source: UNHR Australia

The stories of those who became refugees is heart-wrenching. As Nur Anya recounted from a refugee camp in Bangladesh: 

In Myanmar, we had our lands where we grew flowers, vegetables and many plants. We had a big house where all the family members lived together. The violence and the killing drove us to leave our homes. They brunt houses in my neighbourhood. They shot and killed a lot of people in my village. We were living with fear every day.  When we decided to leave, we had no other option.

It was the most difficult journey of my life. We walked 13 days and nights. To cross the river, my family used a handmade bamboo raft. There were a lot of people with us -- I could not say what the number was, it was so huge. 

As Rohingyans became refugees, many of their villages were abandoned and even more were distroyed. At one point, 176 of 471 Rohingyan villages -- or more than 1/3 of the villages -- had been abandoned.  The Myanmar government cleared entire Rohingyan villages and farms. The government then built homes, infrastructure and military bases in their place. 

Preserving the Rohingyan Culture

The end result, and perhaps the government's objective, was to eliminate the Rohingya people from Myanmar.  The government sought to take the legal status of the people -- that is, no recognition of the Rohingyans -- and make that a factual reality. This creates a clear and present danger to the Rohingyan identity and their culture, including their cuisine. The stories from the refugees include accounts where they had to leave everything behind, including all of their cooking utensils, which makes it harder for them to prepare food for themselves and their families. This leaves the people dependent upon food aid, which has become more difficult to obtain, leading to smaller meals or even skipped meals.

Rohingyan refugees eating a meal. Source: UNHCR

There are efforts to preserve that culture and its cuisine. One example involves the Endangered Material Knowledge Program (EDKM), which provides grants to conduct research on critically endangered knowledge. One project that was under consideration in 2023 was entitled, Rohingya Recipes and Food Practices of stateless Rohingya Community in Camps of Bangladesh. The project description noted the historical difficulty of the Rohingyan people when it came to food: they struggled to maintain the needed nutritional demands, whether it was at their homes in Myanmar or in the refugee camps in Bangladesh. The objective of this project is, among other things, to document recipes and practices of the Rohingyan people. 

This research is sorely needed, as there are few resources and research available on the Internet about the Rohingyan people, their culture and their cuisine. I was able to find a few recipes (which was more than my previous research when I was working on my Around the World challenge). I found a couple of recipes, including one for Rohingyan beef curry.

This recipe is a very interesting one. It calls for beef with bones. When I went to the grocery store, I had to improvise: I purchased some stew meat and some marrow bones. The "masala" for this curry -- turmeric, red chile powder, coriander, cumin, and garam masala -- provided for an aromatic cooking experience and a lot of flavor to build upon the garlic/ginger paste. 

The end result is a delicious beef curry with a slight kick. (I used Kashmiri chiles for the ground red chile powder.) I could not escape the thoughts about how this dish is just a memory for nearly a million Rohingyan refugees who have been forced from their homes and subjected to even greater poverty than what they previously experienced. I feel incredibly fortunate to be able to prepare this dish and prepare this post, as my effort to help publicize the Rohingyan culture and cuisine. More of this is needed so that the world does not forget the tragedies that unfolded over six years ago. 


ROHINGYAN BEEF CURRY
Recipe from SBS Food
Serves 4

Ingredients:
  • 2 large onions, diced
  • 1 kg diced beef, with bones
  • 1 large tomato, diced
  • 2 potatoes, diced
  • 1 tablespoon garlic paste
  • 2 tablespoons ginger paste
  • 1 teaspoon turmeric powder
  • 1 tablespoon red chile powder
  • 1 tablespoon coriander powder
  • 1/2 tablespoon cumin powder
  • 3 teaspoons garam masala powder
  • 4 tablespoons cooking oil
  • Coriander, as garnish
  • Green chiles, as garnish
Directions:

1.    Saute the vegetables and brown the meat. Heat oil on high heat in a large pot. Add onions, garlic paste and ginger paste. Stir for 2 to 3 minutes until brown. Add diced beef and bones and stir-fry for 2 minutes. Add turmeric powder, red chile powder, coriander and cumin. Stir-fry for 2 more minutes. Add the garam masala and stir-fry for another 2 minutes. 

2. Add the liquid and tomatoes. Add 1 cup of water and diced tomatoes and cook on high heat for 5 minutes. Add the potatoes in the last half an hour. 

3. Finish the dish. Garnish with coriander (cilantro) and green chiles. Serve with hot steamed rice.

PEACE.

Friday, February 9, 2024

Morning Tsampa

In a prior post, I began the exploration of tsampa, one of the most fundamental aspects of the Tibetan foodways. The cultivation of barley, along with the roasting of barley berries, gave rise to a foodstuff that provided sustenance to the Tibetan people, allowing them to expand their culture and civilization across the high, arid Tibetan plateau. As part of this journey, I made my own tsampa, roasting the barley and grinding it down into the finest powder that I could with what I have. 

Now it is time to go further down those foodways, to explore the uses of tsampa. A British adventurer and food writer, Peter Fleming, once recounted a basic way of preparing breakfast with tsampa: 

You fill your shallow wooden bowl with tea, then you let the butter melt in the tea (the butter is usually rancid and has a good cheesy flavor); then you put a handful of tsampa in. At first it floats; then like a child's castle of sand, its foundation begins to be eaten by the liquid. You coax it with your fingers until it is more or less saturated and has become a paste; this you knead until you have a kind of doughy cake in your hand and the wooden bowl is empty and clean. Breakfast is ready.

Fleming provides quite the description, and, maybe someday I will try to prepare breakfast in that manner. That date may have to wait until I have some rancid butter. 

More recent accounts, such as one by Barbara Hazelton, who visited Tibet in 2016, provide a similar glimpse into how tsampa is eaten at breakfast. Hazelton wrote: 

The trip to Tibet is long and arduous, and over these many trips to Tibet, I have found I have developed my wits and ways of adapting to this fierce world. In the monastery, the food, tiresome, over-fried and boiled vegetables and tasteless white rice which the kind, bow-legged cook Karma carefully prepares for the "foreigners," Rinpoche's guests, I discovered one gloomy cold morning, can be avoided by taking refuge in the warm cozy kitchen, where one finds the dzo yogurt from the nunnery and the leather bag of tsampa from the cook's family, hanging on a post by the kitchen stove and in the decorated wooden bowl, dried cheese, and sugar. This is where the monks gather and laugh and chat, as they make their morning tsampa balls and slurp the heavy nourishing butter tea, in the kitchen y the long black metal stove filled with fragrant wood, that snaps and spreads out its waves of welcome heat. 

This account -- with its dzo yogurt and tsampa -- provides a tie-in to what I decided would become my attempt to make a breakfast meal using tsampa. 

The recipe, Morning Tsampa, comes from the Beyond the Great Wall cookbook, which was written by Jeffery Alford and Naomi Duguid. That cookbook taught me how to make tsampa in the first place, so it seemed only appropriate that it should guide my on my next step: to incorporate the roasted barley flour into a dish. 

The Morning Tsampa recipe, like many tsampa recipes, is very simple. It involves up to four ingredients, namely, tsampa, yogurt, berries and some sugary ingredient like maple syrup or honey. Those ingredients are combined in a bowl and eaten. The combination of tsampa (which is high in fiber, has important minerals, and promotes the growth of healthy gut bacteria), along with the yogurts and berries, probably represents the healthiest breakfast that I have ever had in my life time. 

For that reason, I have resolved that this dish will constitute the start of my day whenever possible. It also represents a significant step forward on my Mindfulness Foodways, as it not only represents a notable improvement in my diet, but one based upon an ingredient and foodstuff that has an important place in our world. 

MORNING TSAMPA

Recipe from Jeffrey Alford and Naomi Daguid, 

Beyond the Great Wall, pg. 181

Ingredients:

  • About 1/2 cup whole milk yogurt, plain or sweetened
  • 3 tablespoons Tsampa, or to taste
  • Handful of berries or chopped fruit (optional)
  • Honey, sugar or maple syrup, to taste

Directions:

Place the yogurt in  bowl and stir in the tsampa thoroughly so it is all moistened. Add fruit and a sweetener (honey, sugar or maple syrup) if you wish.

PEACE.

Friday, February 2, 2024

Chargrilled Hmong Black Pig Skewers with Sesame Salt

"I would tell people that Hmong food is not just a type of food. It's not about the product. It's a philosophy.... If you want to know our people you have to know our food. By knowing our food, you will know our story. You'll know where we been and it will show the trajectory of where we're going.  

-- Chef Yia Vang

To the extent people know about the Hmong, that knowledge comes more from political history. The Hmong are an indigenous ethnic group that has lived for centuries as a minority in eastern and southeastern Asia. During the Vietnam War, the United States Central Intelligence Agency recruited and trained the Hmong living in Laos for a "secret war" against the North Vietnamese Army. The Hmong harassed the North Vietnamese along the Ho Chi Minh trail, safeguarded U.S. radar installations, and rescued downed American pilots. After the war, the communist governments of Vietnam and Laos declared that the Hmong were "traitors." The governments persecuted the Hmong. They arrested the Hmong, who were sent to hard labor camps. They sprayed Hmong villages with chemicals, including napalm.  Nearly ten percent (10%) of the Hmong population was killed and around 100,000 Hmong sought refuge in neighboring Thailand and beyond. 

The culinary history of the Hmong is far less known. Before the Vietnam War, the Hmong had a strong agrarian tradition in the mountains of northern Laos and Vietnam. They grew rice and other produce, as well as raised livestock, such as pigs. The Hmong practiced animism, believing that objects, plants animals, and even places have their own spirit. These beliefs underlie the respect that the Hmong hodl for what they have. It also informs their traditions. 

For example, there is a Hmong tradition -- called Noj Tsiab (nee-al jia) -- that centers around the butchering of a pig. During the last week of December, each family would select a pig from their herd to be butchered. Every family member had a role in the process, being taught by the elders how to prepare the pig, how it would be cut, and how to ensure that all of the pig would be used with nothing going to waste. This knowledge was important, and it was passed on from generation to generation. The end products would be used to prepare a meal for the community for the new year. It enabled everyone to participate in a tradition that gives thanks for what they have been given and to their ancestors for watching over them.

This tradition was lost, at least temporarily, for those Hmong who fled their homes and found themselves in refugee camps. Even after they escaped those camps, making their way to the United States or elsewhere, many of their new lives did not include the raising of pigs, let alone the opportunity to butcher them in accordance with their traditions. 

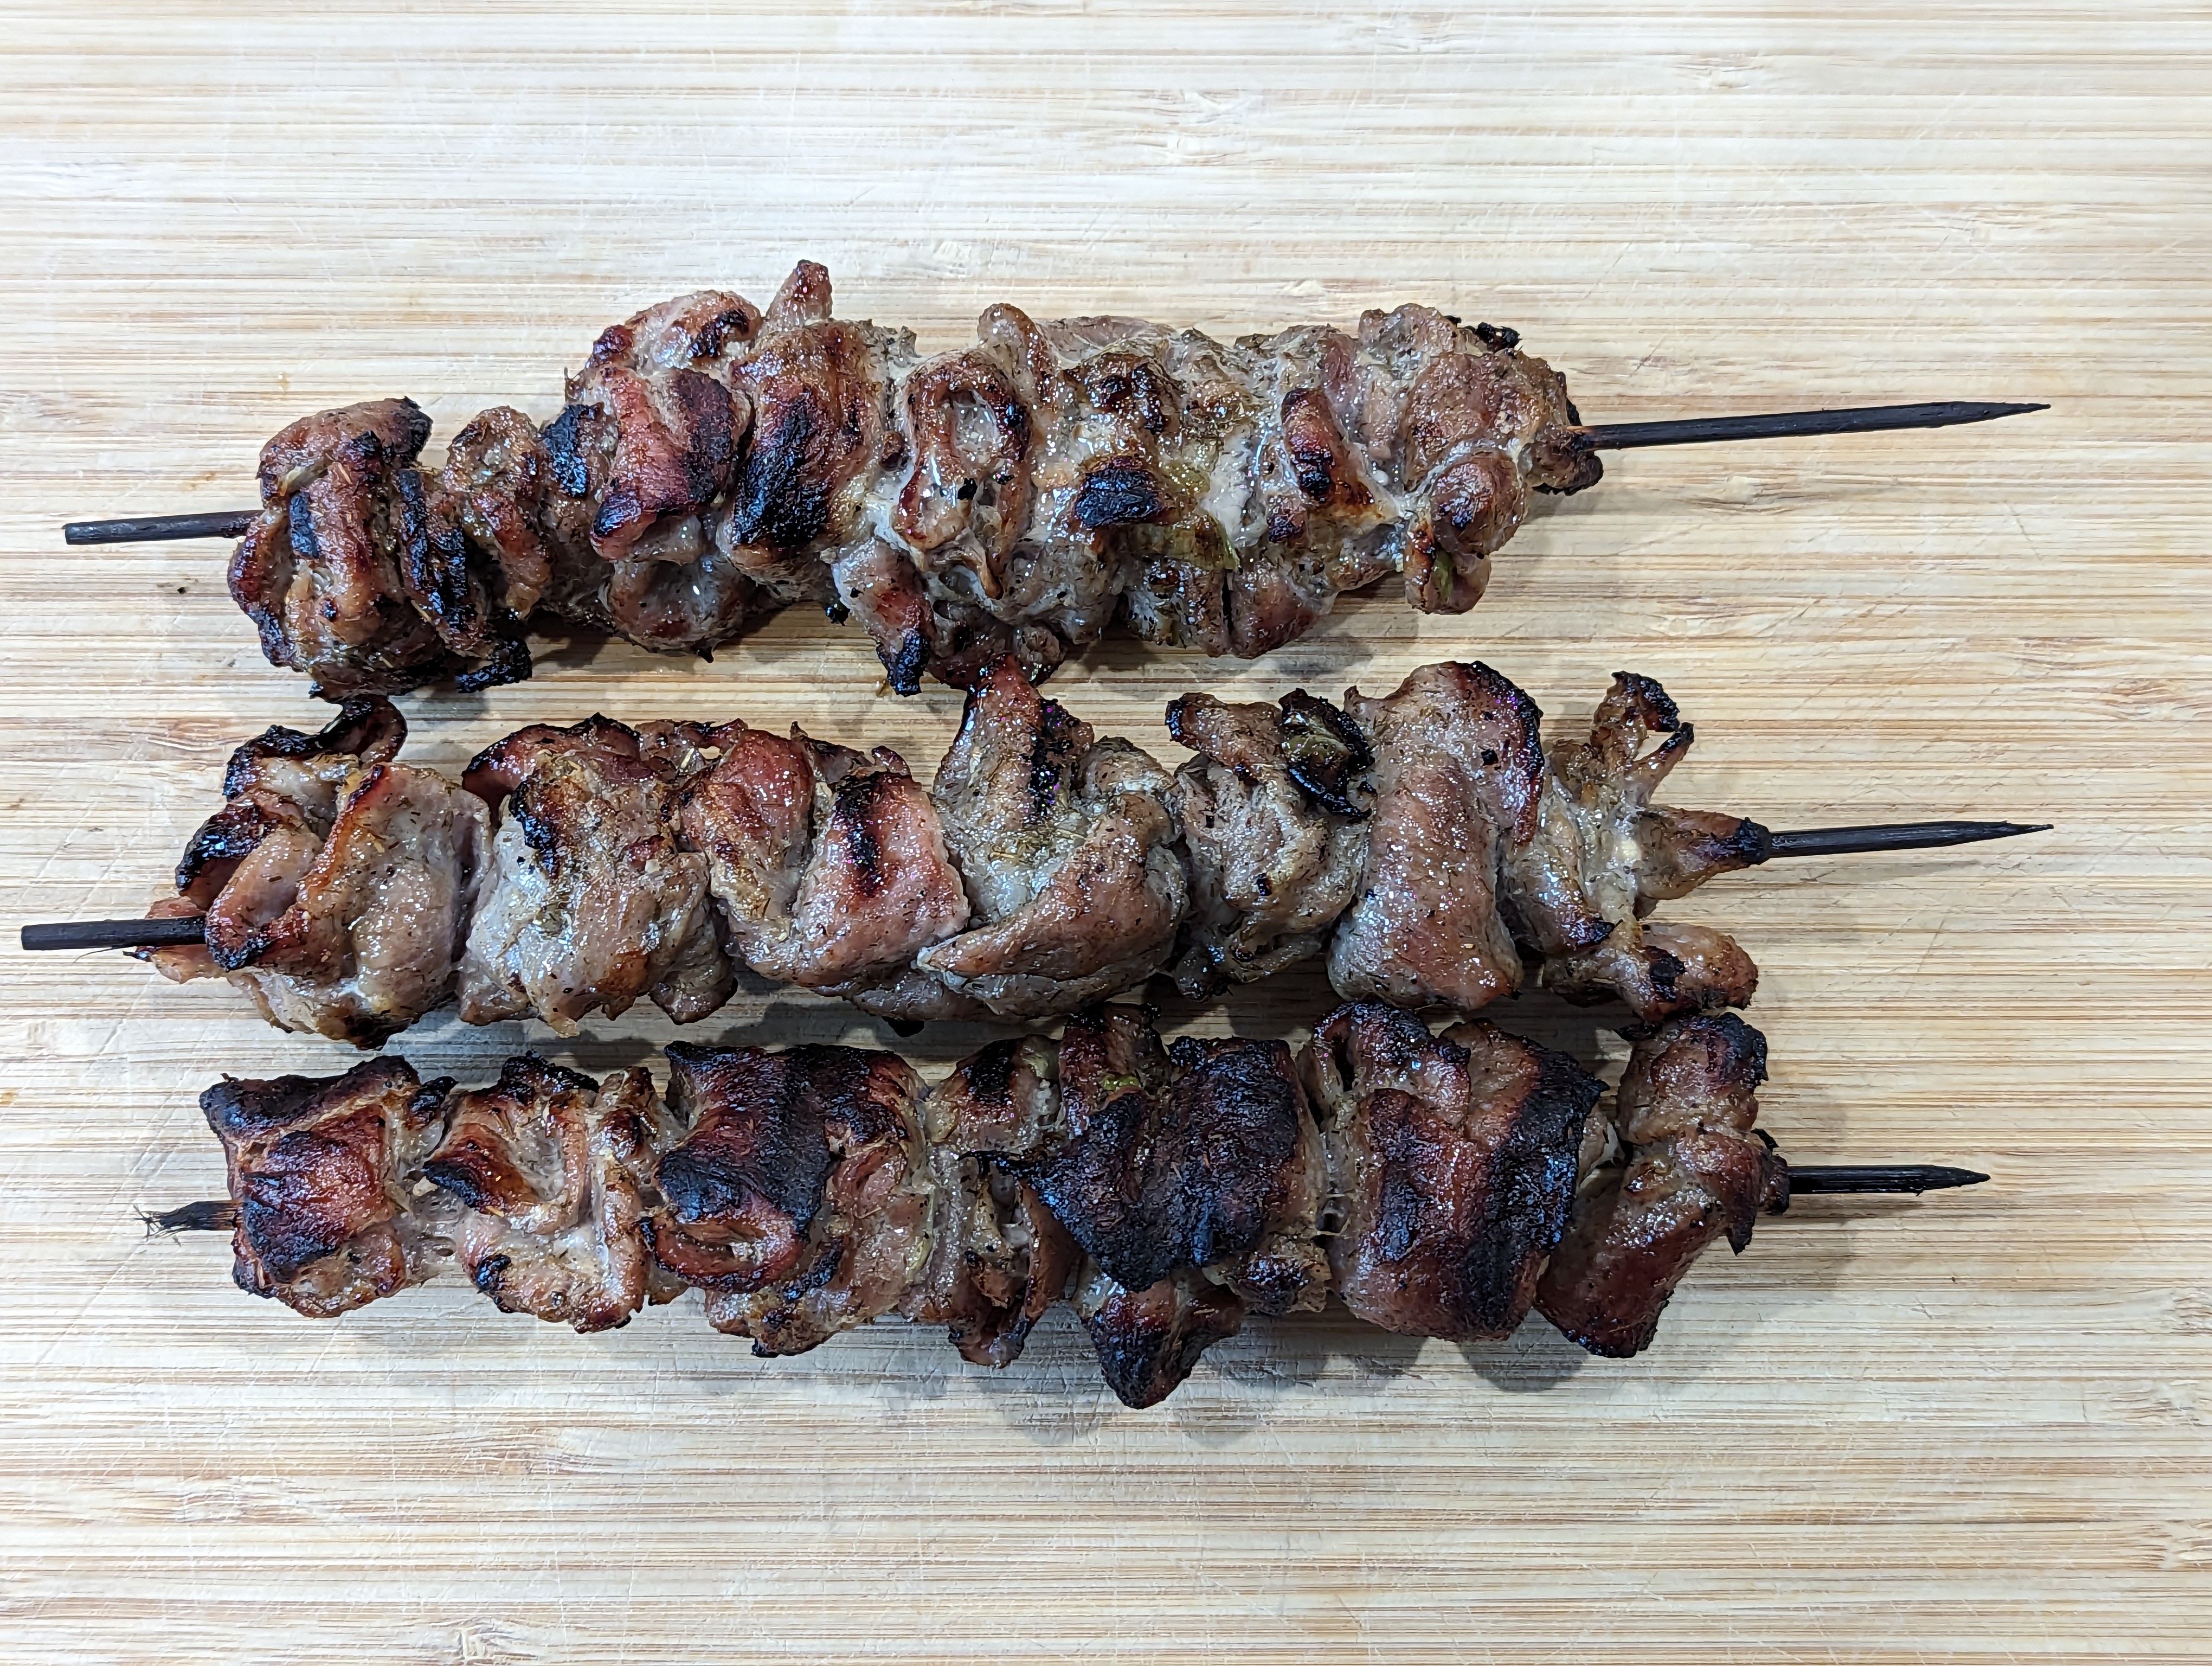
I knew none of this when I came across a recipe for Chargrilled Hmong Black Pig Skewers with Sesame Salt.  It was in a cookbook called the Food of Vietnam. The author, Luke Nguyen, is a Vietnamese-Australian chef who was part of a television show, Luke Nguyen's Vietnam, that I watched on public television. Every episode fascinated me, both with respect to the people, the surroundings, and, of course, the food. When I got this cookbook, as well as another Vietnamese cookbook, I spent a lot of time paging through the recipes. This one caught my eye because of the reference to the Hmong people. 

Roasted sesame seeds with salt
According to Chef Nguyen, the Hmong raised black pigs in the hills and mountains of Vietnam. The cuts from the necks would be used for this dish. I had access neither to those particular black pigs, or, more generally, to pig necks. Instead, I looked for any cut of pork that would enable me to slice thinly or that came sliced thinly. 

There are two things that I really like about this recipe. The first thing is the marinade. The recipe calls for a combination of scallions, lemongrass, fish sauce, oyster sauce, black pepper, and honey, for a marinade. This particular combination of ingredients imparts a lot of flavor into the meat, which is facilitated by the fact that the meat has been thinly sliced.  The second thing is the ease of preparing this dish. Once the marinade is complete, the rest of this recipe is easy: just thread some pre-soaked skewers, place on a heated grill, flip the skewers a few times and you are done. 

These skewers are very delicious and, given the ease of preparing this dish, I will very likely make this recipe again. The next time will take on a little more meaning now that I have some understanding of the traditions of the people behind the recipe. 

CHARGRILLED HMONG BLACK PIG SKEWERS WITH SESAME SALT

Recipe from Luke Nguyen, The Food of Vietnam, pg. 318

Serves 4-6

Ingredients:

  • 300 grams (10.5 ounces) pork neck, thinly sliced
  • 2 tablespoons toasted sesame seeds
  • 3 spring onions, sliced then bashed to release the flavor
  • 4 tablespoons finely diced lemongrass, white part only
  • 3 tablespoons fish sauce
  • 1 teaspoon oyster sauce
  • 1 teaspoon sugar
  • 1 tablespoon honey
  • 1/2 teaspoon freshly ground black pepper
  • 3 tablespoons vegetable oil

Directions:

1. Prepare the marinade. Combine the onions, lemongrass, fish sauce, oyster sauce, sugar honey and black pepper in a mixing bowl and mix well. Add the pork and toss until well coated. Cover and marinate in the refrigerator overnight. 

2. Prepare the skewers. Soak 12 bamboo skewers in water for 30 minutes to prevent scorching. Thread the pork on to the skewers and chargrill on each side for 3 minutes. Mix the sesame seeds with a pinch of sea salt. Serve on the side for dipping the skewers into. 

PEACE. 

Wednesday, January 24, 2024

Romesco Sauce

As the story goes, it all began in El Serralo, a neighborhood along the port of Tarragona. During the 1700s, fishermen would take ingredients that they had lying around -- such as almonds, bread, dried peppers, olive oil, salt and wine to create a sauce. That sauce would be served alongside whatever was left of their catch. 

As with most recipes, there may be as many variations on a romesco sauce as there are chefs and cooks who prepare it. However, there are three basic common rules. First, the base of the sauce usually consists of roasted tomatoes or roasted peppers (roasting the latter is slightly easier than roasting the former. Second, the peppers and tomatoes are pureed, thickened by the addition of almonds, and toasted bread. Third, the sauce is then emulsified with olive oil.  These rules get you to a sauce, which will be rich, and smoky, but it is what comes next that provides you with a truly wonderful sauce.

The variations in a romesco sauce relate to the additional ingredients that may make their way into the recipe. Ingredients such as garlic, chile flakes, and sherry vinegar. All of these ingredients add depth of flavor or heighten the piquancy of the sauce. One may also add paprika or smoked paprika, the latter if you really want to underscore the smokiness of the roasted peppers or tomatoes. 

One final note about this sauce: while its origins may lie with fishermen using the sauce to flavor fish and other seafood, a romesco sauce basically works with anything and everything. It is a great accompaniment to beef, chicken, turkey, and vegetables, as well as most fish and seafood. I prepared this sauce years ago to accompany grilled seafood, but the sauce showed its true versatility when I prepared it for our fondue dinner on New Year's Eve. 


ROMESCO SAUCE
Recipe from Gordon Ramsay's Cookery Course
Serves 4

Ingredients:
2 red peppers
1 thick slice of ciabatta or farmhouse white bread,
     crusts removed and torn into chunks
Olive oil
3 garlic cloves, peeled and roughly chopped
3 vine ripe tomatoes (like plum)  on the vine
1 teaspoon smoked paprika
1 teaspoon chile flakes
4 tablespoons of blanched almonds, toasted
     and roughly chopped
1 lemon, juiced
1-2 tablespoons of sherry vinegar
Sea salt, to taste
Ground black pepper, to taste

Directions:
1.  Prep the bell peppers.  Heat a grill until very hot.  Put the peppers on a foil lined baking tray and place under the grill.  Cook for 5 minutes turning regularly until he skin is blackened and blistered all over.  Transfer to a bowl and set aside to cool.  

2.  Continue making the romesco sauce.  Cook the bread chunks for 2 minutes in a small frying pan with a dash of oil, then add the garlic and cook for a further minute until the garlic is tender and the bread toasted.  By this stage, the peppers should have cooled and it will be easy to peel and rub off the charred skins.  Peel, deseed and roughly chop them, then place in a blender.  Roughly chop the tomatoes and add to the peppers with the bread and garlic.  Blitz to form a rough paste.

3.  Continue making the romesco sauce.  Add the smoked paprika, chile flakes, almonds, lemon juice, vinegar and a pinch of salt and pepper to the blender and blitz until well mixed.  Taste and adjust the seasoning.  With the motor running, slowly pour in 6 tablespoons of olive oil.  Taste and adjust the seasoning again if necessary.  Allow the sauce to come to room temperature and stir well before serving. 

PEACE.

Monday, January 15, 2024

Mrefisa

What is past is gone, what is hoped for is absent, for you is the hour in which you are. -- Sahrawi proverb.

The word Sahrawi translates to "inhabitants of the desert."  The particular inhabitants are a people of Berber, Arab and sub-Saharan ancestry who live in the western reaches of the Sahara.  Those reaches include parts of Algeria, Morocco, and Mauritania, They also include an area that historically known as Western Sahara. The nearly 105,000 square miles of this area, which is roughly equivalent to the square mileage of the State of Nevada, tell a story that few people know about. It's a past that has been difficult to tame. It's hope may be absent, but there is a potential for it to materialize. And, as for hour in which it finds itself, that part has yet to be written.

Western Sahara involves a stretch of northwestern Africa coastline running from the southern border of Morocco to the northwestern border of Mauritania. The area stretches inward in a Tetris-like shape past oases, such as Amgala and Meharrize, as well as cities like Laayounde, Bir Anzerane and Tifariti the actual western reaches of the Sahara Desert. 

This region has a long history, dating back to at least the Phoenician empire, which established settlements along the Atlantic coastline. Some of those settlements dated back to the 5th century B.C.E. They have since faded into history, as the Phoenicians were followed by the Romans, then the Berbers and the Arabs. 

During the 13th and 14th centuries, the area was known as bled es-Siba or the "land of dissidence." There was little centralized control over the region, which was occupied by tribes that raided the trade routes that ran east through the desert. 

Then, in 1887, the Spanish established a protectorate over what is present day Western Sahara, which became one of the last additions to the Spanish Empire. The protectorate was first referred to as the Spanish Possessions in the Sahara and later as the Province of the Sahara. As the Spanish tried to establish control over the region, they learned first-hand about bled es-Siba. The Sahrawi fought against the colonialists. Spain responded, as most colonial powers did, by repressing the local populace. However, repression is never a long term strategy. A resistance group known as the Polisario Front emerged in 1973, fighting against the Spanish rule. Less than two years later, the Spanish left the Western Sahara, with Morocco and Mauritania dividing the territory between themselves. 

The Polisario Front continued its guerrilla warfare, leading to a treaty with Mauritania, which recognized the right of the Sahrawi Democratic Arab Republic to Western Sahara. On the other hand, Morocco proceeded to seize most of the land given up by Mauritania, annexing that land in 1979. Morocco proceeded to build a wall between what it controlled and what was left for the Sahrawi Arab Democratic Republic. Morocco began the wall in 1980 and finished the seventh segment in 2020. 

A Sahrawi woman with the Sahrawi flag. Source: Michelle de Mello

That troubled political history obscures the cultural history of Sahrawi people. The people are a mix of Arab and Berber descendants, as well as some sub-Saharan peoples.  These influences are also apparent in the cuisine of the Sahrawi, which also has some Spanish influences resulting from colonization. Setting on the western reaches of the Sahara desert, agriculture is limited to what can be grown around oases, or what can be raised in those areas. The principal proteins of Sahrawi cuisine include goat, lamb and even camel. For those who live along the Atlantic Coast (most of which is still occupied by Morocco), the Sahrawi are able to add fish to their diet. 

Sahrawi recipes are hard to find. Most of the recipes are fairly simple, reflecting the difficult life of living in a desert and the limited ingredients for preparing dishes. Couscous is one staple that finds its way into many dishes, including one that is prepared with meal paste, meat and vegetables. There is also El Aych, which is prepared with the use of milk and cereals. 

And, then there is Mrefisa. This recipe is a traditional stew, often made with lamb, rabbit or camel meat, along with onions and garlic. The ingredients are then cooked together in a stew, with added water. Once the meat is very tender and the stew has cooked down, it is served upon a traditional unleavened bread that the Sahrawis prepare by cooking it in the sand. I don't have any sand where I live, let alone sand hot enough to bake bread. I went to a local Persian market, where I purchased some Taboon. Although it is leavened bread (it contains yeast), it is nevertheless a flatbread that could work as a substitute. (In some ways, I liked it more because there was more bread to absorb the lamb stock.) If you can find traditional unleavened bread such as Arboud, which is prepared by the Bedouin, then you are good to go. If you can't, then any flatbread will work. 

In the end, this is a very simple meal. Five ingredients -- onions, garlic, lamb, oil and water -- are combined to prepare a very tasty dish. It is a change from what I have been cooking, such as curries, in which there are often more ingredients that go into the masala, than there are in this entire recipe. It also demonstrates how a people who have little to work with given their circumstances and surroundings are able to produce something that is delicious to eat.

MREFISA

Recipe adapted from Book of Day's Tales

Serves 4

Ingredients:

  • 1 pound of lamb, cut into 1 inch chunks
  • 2 onions, sliced
  • 2 cloves of garlic, sliced
  • 2 tablespoons vegetable oil or olive oil
  • Water
Directions:
1. Sauté the onions and garlic. Heat the oil in a pot over medium high heat.  When the oil is hot, add the onions and garlic and sauté them for about five minutes.  

2.  Add the lamb.  Add the lamb and proceed to brown the lamb on all sides.  

3.  Add the water. Add enough water to barely cover the lamb and the onions. Bring to a boil and reduce the heat to a simmer. Stew the lamb for a couple of hours, adding water as necessary. 

4. Finish the dish.  Once the lamb meat can be easily shred, remove the stew from the heat. Place the bread at the bottom of the bowl. Add the lamb, onions and garlic over the bread. Spoon the lamb stock over the meal and serve immediately.  

PEACE.

Sunday, January 7, 2024

Tsampa

Tsampae-drima kha (Having a Tibetan quality) - Tibetan proverb

At its simplest, tsampa is roasted barley flour. Hulled barley grains are roasted over fire until they turn a golden, slightly brownish hue. The grains are then removed from the heat, ground into a flour, and then set aside to cool.

Tibetans then combine tsampa in a bowl with butter and tea, rolling the mixture into small balls to be eaten. One may also see Tibetans combine tsampa with other ingredients to create a porridge called jham-thoo. 

However, tsampa is more than a fundamental staple food for Tibetans. It has a very meaningful story to tell. To understand this story, one needs to walk in the boots or shoes of the Tibetans themselves. If you are like me, and unable to actually travel to Tibet, then the next best way to traverse that path is to read about those who have done so. In the end, you learn that tsampa is not just any food, it is a fundamental aspect of the Tibetan identity.  This post represents the first of a few posts in which I explore tsampa and its connection to the Tibetan people. These posts will be available as part of my Beyond Borders project and my Mindfulness Foodways project. 

The Tibetan Tsampa Path

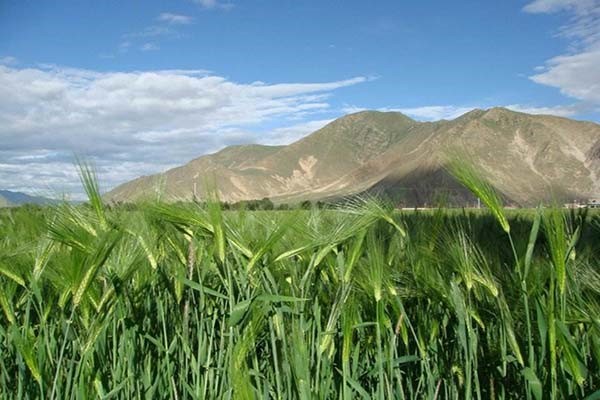
I have never traveled to Tibet, which rests mostly on the world's highest and largest plateau; but, from what I have read, the area is beautiful - with towering mountain ranges enclosing valley with rivers, plains, and lakes. The altitude, combined with the dry climate (Tibet receives only about 18 inches of precipitation annually), limits what vegetation can grow on the plateau. Grasslands cover nearly two-thirds of the Tibetan region, which provide areas for livestock -- from chickens to yaks -- to graze, but limit the types of crops that can be grown. The principal agricultural crop grown by Tibetans is barley.

Barley growing in Tibet. Source: Go To Tibet

Barley played a pivotal role in the settlement of the Tibetan plateau. The grain is hardy, with a high tolerance for frost and dehydration. Thus, Tibetans could grow barley with little effort or resources (like water). Once harvested, they could also turn the barley grains into tsampa, because the process (as outlined above) is relatively quick and requires little fuel. All of these factors led to an agricultural system that was built predominantly around that single grain.  

Thus, the singular importance of barley to the Tibetans also provides an important starting point on the map for the Tibetan food pathway. 

The Preparation of Tsampa

The preparation of tsampa.
Source: Ravencywoodpress

The traditional process of turning barley into tsampa is often described as long or arduous; and, before many of the modern conveniences, I can understand that characterization. If one were a Tibetan living out on the plateau during the 19th century through the mid-twentieth century, the process was, in fact, time-consuming. The process can be broken down into four basic steps: (1) acquiring the barley; (2) prepping the barley, if necessary; (3) roasting the barley; and (4) grinding the barley. While the first step would seem to be easy, given the availability of barley in Tibet, the rest of it required time and resources. Some of those resources, like fuel for the fire, are precious given their scarcity on the plateau.

During my research, I came across a personal account of how a Tibetan nun, Choe-la, prepared tsampa. According to the account: 

My mother would get barley grown at high altitude from Manali or Ladakh. [Manali is a city in India and Ladakh is region within India, so the account comes from someone whose family had left Tibet.] Once it arrived, Choe-la would get one or two helpers and they would start the washing process - which is tedious and time-consuming. Then comes my favorite part, which is the roasting. The washed and dried barley is roasted in hot sand until the barley is cooked through - like popcorn, one can smell the roasted barley or "yoe" as we call it, from a distance and Choe-la would allow us kids to fill our pockets with fresh "yoe" to eat on the way to school. Next is the final step of grinding the roasted barley into Tsampa flour .... Choe-la always said, the best Tsampa comes from the "chu-tha" - water mill.

This account tells us a lot about how tsampa was made. From the purchase of the barley, to the washing and drying of the seeds, and ending with the roasting over hot sand. 

Tsampa on the Tibetan Table

The roasted barley flour - having already been "cooked" - became a very flexible ingredient that could be used in a variety of ways. As the British travel writer, Peter Fleming, recounted during a trip in the Tibetan region: 

Tsampa ... is sustaining, digestible and cheap. For nearly three months we had tsampa for breakfast, tsampa for lunch and the diet was neither as unappetizing nor as monotonous as it sounds. One of the great virtues of tsampa is that you can vary the the flavour and the consistency at will. You can make it into a cake or you can make it into a porridge; and either can be flavored with sugar, salt, pepper, vinegar or (on special occasions for you only had one bottle) Worcester Sauce. And, if that were not enough, you can make it with cocoa instead of with tea. I would not go so far as to say that you never get tired of tsampa, but you would get tired of anything else much quicker. 

This food finds itself not only on the Tibetan Table, but in religious ceremonies as well. Some Buddhist rituals call for the throwing of pinches of tsampa into the air as a "mark of joy and celebration." Throwing tsampa has made its way into other occasions, such as throwing it on the new year, while chanting verses calling for good luck. To round out the occasions, Tibetans also throw tsampa at funerals, where, according to Buddhist ritual, it is intended to release the soul of the departed. 

The Mindfulness of Tsampa Preparation

Recently, I decided that I would prepare tsampa myself. Fortunately, I have a ready source for hulled barley and a ready fuel (namely, my stove). I also had a recipe in a cookbook, Beyond the Great Wall, which was written by Jeremy Alford and Naomi Duguid. While this book was given to me as a present, I had become familiar with Duguid's work exploring cuisines such as those in Burma or Persia (that is, Iran and the Caucuses). 

The process was not long or arduous to prepare tsampa, thanks to many modern conveniences. I did not have any barley on hand, but with the advent of the Internet, it was not hard to find a bag of organic, hulled barley berries. I also did not need any sand, I just used a good, solid pan on a stove. With the berries literally in hand, along with that heated pan, I began the roasting process. Once the berries were in the pan, things began to change. 

I look for moments in the day when I can use my mindfulness techniques. Some of those moments are forced, such as when I am dealing with a lot of stress, uncertainty or conflict. Other moments - such as my preparation of tsampa - come naturally. As I looked down at the seeds in the pan, I began to view them as one may view grains of sand. My pan had itself become a kind of sand garden. I took deep breaths and focused on the tasks presently before me. 

The recipe directed me to use a wooden spoon to move the seeds, so that they would not become scorched or burnt. As I moved the spoon, I focused on the movement of the seeds, as they were pushed ahead or fell to either side of the spoon. I moved the spoon in circular motions, occasionally flipping the seeds to bring the ones from the bottom to the top. As I did these moves, my sand began to slowly turn more golden and eventually a little browner in color. When the barley was roasted, I turned off the heat, moved the pan, and made some final stirs with the spoon. 

For that brief period of time, I felt as if I had a mindfulness moment. One that was quiet, where I could focus on the present, without thinking about what I had done previously or what I had left to do after the recipe was completed. The ability to take some deep breaths gave me a break during a relatively stressful holiday season. It also reinforced in me the need to find more such moments going forward. 

TSAMPA

Recipe from Jeffrey Alford and Naomi Daguid, 

Beyond the Great Wall, pg. 180

Ingredients:

  • 2 cups barley berries (whole grain)

Directions:

1. Roast the barley berries. Place the barley berries in an 11 to 12 inch heavy skillet (cast iron works very well) and dry roast over medium heat. Stir constantly with a flat-ended spatula or wooden spoon, moving the grains off the hot bottom surface and rotating them from center to the outside, to ensure an even roast with no scorching. The grains will crackle a little as they expand in the heart, will start to give off a toasted grain aroma and will change color. Keep on stirring and turning until all of the grains have darkened to more than golden, about 10 to 14 minutes. 

2. Check the barley berries. Test for doneness by trying to bite into one of the grains - it should yield easily. Times will vary depending on the amount you are roasting, the size of your pan and the heat. Remove the pan from the heat and keep stirring for another minute or two to prevent scorching.

3. Grind the berries. If you are using a coffee or spice grinder to grind the grain, you will need to work in batches. A flour mill works well if you have one, no need for small batches and your grind will be finer and more even. Transfer about 1/2 cup of the toasted grains to a clean, dry coffee or spice grinder and grind to a fine flour-like texture (you will hear the sound change as the granules get reduced to a powdery texture.) Turn out into a bowl and repeat until all the grain has been ground to flour. If you want to perfect your grind, pass the milled powder through a fine sieve and then regrind any remaining larger pieces. 

4. Finish the Tsampa.  Let cool completely, then store in a well-sealed wooden or glass container in a cool place. Tsampa keeps indefinitely in the refrigerator.

*     *     *

Postscript (05.25.26): I continue to make Tsampa, usually for my morning breakfast, which I highly recommend. The recipe above provides an option for "perfect[ing] your grind," which involves passing the powder through a fine sieve and regrinding the remainder. I have done that on occasion and decided to post a picture of both types of Tsampa. The regular grind of tsampa, which is on the left, and the more perfected grind of tsampa, which is on the right. I love both kinds. 

PEACE.

Monday, January 1, 2024

A Chef Bolek Fondue

Fondue originated in Switzerland, most likely in the Valais region through which the Rhone River flows in southern Switzerland. The tradition emerged as Swiss farm families gathered around a hearth over which they melted hardened cheese in a pot called a caquelon. The family members would then dip pieces of stale bread into the cheese, which softened the bread and made it easier to eat. It was a way for these poor farming families to make the most out of what little they had. 

Although originating as a cucina povera dish, fondue made its way into cookbooks, with the first known written recipe dating back to 1699. That recipe was published in a cookbook under the recipe name of Kass mit Wein zu Kochen or "to cook cheese with wine."  Fondue even made its way into the cookbooks for the Swiss military. Over time, the farm family tradition would be elevated beyond as a national dish of Switzerland (or so the Schweizerische Kaseunion - or Swiss Cheese Union - wanted everyone to believe because it would lead to the sale of more cheese).  And, as the dish spread across the world, it would take on new preparations and new ingredients.

Nothing says Switzerland like an "envelope" of Lipton's Onion Soup Mix.

Indeed, the passage of time gave rise to other versions of fondue. One popular one is fondue au chocolat, which involves dipping those food bites (usually bread, cheese or fruit) in a pot of melted chocolate. To be sure, my kids love chocolate fondue because they love anything that has a nice, chocolate coating. Another version is known as fondue bourguignonne, also known as beef fondue. The cheese or chocolate is replaced with hot oil, which is perfect for dipping bite sized pieces of your favorite protein or, on occasion, a vegetable or mushroom. 

Apparently, a guitar is required for fondue.

It is this latter version of fondue that became part of my family's New Year's Eve tradition. We would gather around a pot of hot oil, which was also encircled with dishes containing raw pieces of beef, chicken, sausage, mushrooms, broccoli and other foods. We pierced each bite and dipped it into the oil, becoming our own cook for a few minutes. Over the years, it became clear that dipping a bunch of things in hot peanut oil is not necessarily the healthiest way to ring in the New Year. So the tradition evolved to using vegetable broth, which cooked the food without the added consequence of clogging an artery. 

Fast forward to today, my beautiful Angel suggested that we have a fondue to ring in the new year. After clarifying that cheese and chocolate would not be involved, the Chef Bolek began to emerge. Rather than unhealthy oil or plain vegetable broth, what if I made a court bouillon for the fondue pot? A court bouillon is a flavorful liquid that is often used to poach proteins, such as fish or seafood. It would provide a healthy alternative in which I could control the ingredients and, by extension, the flavors. I quickly found a good court bouillon recipe as a starting point. Then my mind started thinking about the sauces. 

The tradition in my family, as is the tradition typically for a fondue bourguignonne, would be to serve about three to four sauces as part of the meal. These sauces typically included a Béarnaise sauce, a Bordelaise sauce, and, if I recall correctly, a horseradish sauce. However, I wanted to take those sauces to the next level. I wanted to serve sauces from around the world. So, for a Chef Bolek Fondue, I drew upon my experience and made the following sauces: 

Argentinian Chimichurri: I recently completed the Around the World in 80 Dishes challenge for Argentina, which had me prepare chimichurri in two different ways. I decided to prepare one of those chimichurris, because the garlicky sauce goes well with beef, chicken and vegetables.

Catalan Romesco Sauce: This sauce goes well with just about any food, with the smoked paprika, almonds and sherry vinegar providing different flavors for the meal. I borrowed from a recipe that I prepared more than ten years ago, but I will post a new one in the near future.  

Sri Lankan Lunu Miris: An extremely fiery sambol with three chiles and freshly ground black pepper from the cuisine that curries everything, which is why I love Sri Lankan food. This sauce is really just for me; it is too spicy for everyone else. I will post the recipe in the near future. 

Vietnamese Nuoc Cham: I have spent a lot of time this year learning about Vietnamese cuisine. I have become a huge fan of nuoc cham because of how it balances the different flavor elements. I used this recipe in which I paired the sauce with raw oysters in place of a mignonette. 

With these sauces, one has a fondue Chef Bolek style. The recipe for the court bouillon is set forth below. 


COURT BOUILLON

Recipe from Rouxbe

Ingredients:

  • 5 cups cold water
  • 1 cup white wine
  • 2 ribs celery
  • 1 leek (white part only)
  • 1 small onion
  • 1 lemon
  • 1 bay leaf
  • 1 teaspoon whole peppercorns (white or black)
  • 2 teaspoons Kosher salt (or to taste)
  • 1 sprig fresh parsley

Directions:

Place the cold water and wine in a pot. Slice the celery into 1/8 inch slices. Cut the leek in half, wash, and thinly slice the white part. Dice the onion and add everything to the liquid. Cut the lemon and squeeze the juice into the liquid (keep the seeds out of the liquid). Add the bay leaf, peppercorns and parsley and bring to a simmer. Once the liquid comes to a simmer, turn off the heat. Cover with a lid and let steep for about 30 minutes. Strain the liquid and transfer to the fondue pot.  

Once the court bouillon is prepared, then it can be used for a fondue, with the sides served alongside all of the cut meats and vegetables. 

PEACE.

Friday, December 22, 2023

Pad Kaprow

My culinary journeys around the world have often led me to "national dishes." Generally speaking, these are meals that have a strong connection to a particular country. This connection may arise in one of several ways. It may involve an ingredient that is produced locally or prepared in way only done in that area. It may form part of a cultural tradition. Or, it may be actively promoted by a government as part of an effort to create a national identity. 

Take, for example, the country of Thailand. At one point in its history, roughly corresponding to the beginning of World War II, the military dictatorship of Thailand promoted a national Thai identity. Field Marshal Plaek Phibunsongkram issued twelve (12) cultural mandates from 1939 to 1941. Each mandate set forth objectives for the people. For instance, the third cultural mandate -- On referring to the Thai people -- prohibited Thais from referring to themselves inconsistently based upon preferred group, region or religion (for example, don't refer to oneself as a southern Muslim Thai). It also required the people to refer to themselves as the Thai people. The fifth mandate also had multiple requirements, including Thai people should make an effort to consume food made only from Thai products. Such an edict is often said to be the basis for some of Thailand's national dishes, such as Pad Thai and Pad Kaprow. 

Thai Basil
While Pad Thai is perhaps the most popular and well-known dish, Pad Kaprow comes in a close second. The name translates into basil stir fry. It is not just any basil, but Thai Basil (or Holy Basil) that makes this a Thai dish. 

The history of this dish is a little unclear. The main ingredient -- Thai Basil -- had been introduced into Thailand centuries ago (approximately around 2,450 B.C.E. or 2,500 B.C.E.). Yet, the dish of stir frying basil with chicken (or other protein), chiles and other ingredients goes back only a few or several decades. Indeed, I could not find anything in my research that would enable me to trace this dish back to the time when Field Marshal Phibunsongkram was issuing his edicts. Then again, while there are a lot of articles about the greatness of Pad Kaprow, few of those articles actually delve into how the dish came into existence or how it has evolved over the years. 

Nevertheless, the research does point out a couple of key things about Pad Kaprow. First, the dish represents a Thai version of the five tastes: salty, sweet, sour, hot (spice) and bitter. (I have talked about the five tastes before, check out this post and this post for more.) One Thai chef, Chakkrit Chuma, once said that Pad Kaprow or "Pad kaphrao has to be salty first, sweet after and then feeling hot and spicy in your mouth." Chef Chuma lamented that "sometimes people just make it too spicy and you don't taste anything else." (The Chef also acknowledges that he uses seven chiles in his recipe.)  Second, Pad Kaprow is flexible when it comes to the protein. It is most commonly made with chicken -- Pad Kaprow Gai -- but it can also be made with beef, pork, vegetables and seafood. For this dish, I made it with turkey, because that is the only meat that my beautiful Angel will eat. Also, while many recipes used ground meat, I used turkey thighs because I think that the bite-sized pieces are better. (Also, the use of ground meat reminds me too much of laab or larb, which is considered the national dish of neighboring Laos.) 

PAD KAPROW

Recipe from All Recipes

Serves 2

Ingredients:

  • 1/3 cup chicken broth
  • 1 tablespoon oyster sauce
  • 1 tablespoon soy sauce, or more as needed
  • 2 teaspoons fish sauce
  • 1 teaspoon white sugar
  • 1 teaspoon brown sugar
  • 2 tablespoons vegetable oil
  • 1 pound boneless, skinless chicken thighs, chopped
  • 1/4 cup shallots, sliced
  • 4 garlic cloves, minced
  • 2 tablespoons Thai chiles, minced or sliced
  • 1 cup basil, thinly sliced
  • 2 cups rice, cooked

Directions:

1. Prepare the broth. Whisk the chicken broth, oyster sauce, soy sauce, fish sauce, white sugar and brown sugar together until well blended. 

2. Sauté the chicken. Heat a large skillet over high heat. Drizzle in oil. Add chicken and stir fry until it loses its raw color, 2 to 3 minutes. Stir in shallots, garlic and chiles. Continue cooking on high heat until some of the juices start to caramelize in the bottom of the pan, about 2 to 3 more minutes. Add a tablespoon of the sauce mixture to the skillet; cook and stir until the sauce begins to caramelize, about 1 minute. 

3. Continue to cook the chicken. Pour in the rest of the sauce. Cook and stir until the sauce has deglazed the bottom of the pan. Continue to cook until the sauce glazes onto the meat, about 1 to 2 minutes more. Remove from heat. 

4. Finish the dish. Stir in basil. Cook and stir until the basil is wilted, about 20 seconds. Serve with rice. 

PEACE.