Thursday, December 12, 2013

A Brief Break ...

As followers of the blog have probably noticed, the posts have become fewer and fewer.  It is not that I have not been cooking or that I don't have posts, it is just that I have not had enough time to write the posts about my cooking.  There is a backlog, but I have been very busy with my beautiful Angel and my little big guy.  I have also been very busy at work. 

I have decided to take a brief break from posting on this blog until the new year.  I hope that this will give me some time to work on some posts.  

I hope everyone has a happy holiday! See you after the new year.

Monday, November 25, 2013

Grilled Cherry Tomato Chutney

A while back, I was making a grilled-theme dinner for my beautiful Angel.  The main course was Masaledar Macchi, or Spicy Grilled Fish.  I needed a couple of side dishes to complete the meal.  I wanted to do a grilled side dish.  I also wanted to make an Indian side dish.  This limited the number of available recipes.  Nevertheless, I found quite a few.  I went through those recipes and chose one from the most unlikely of sources.

The source was Bobby Flay.  The chef who is practically synonymous with Southwestern American cuisine had a very interesting and tasty Indian side dish.  The recipe was for a grilled cherry tomato chutney.  Interestingly, according to Wikipedia, chutneys can be traced back to approximately 500 B.C.  It was first used by northern Europeans during the Roman period to preserve food.  This process was exported by Europeans, such as the British, during the colonial period.  When the British arrived in India, for example, they brought various chutneys and marmalades to the subcontinent.  From there, as they say, the rest is history. 

Some variant of tomato chutneys can be found across the Indian subcontinent, from Assam to Karnataka.  Bobby Flay does not describe where he draws the inspiration from this particular chutney.  Nevertheless, the combination of spices (cumin and coriander) with fresh herbs (mint and cilantro) makes for more than just a condiment.  It makes a great side dish.


GRILLED CHERRY TOMATO CHUTNEY
Recipe by Bobby Flay and available at
Serves 6

Ingredients:
1 pint grape tomatoes
Canola oil
Kosher salt and freshly ground black pepper
1 cup cider vinegar
2 tablespoons light brown sugar
1/2 teaspoon coriander seeds
1/2 teaspoon cumin seeds
2 tablespoons chopped cilantro
2 tablespoons chopped mint
Zest of 1 lime

Directions:
1.  Prepare the grill.  Prepare a charcoal grill for direct grilling, high heat.  If you are using a gas grill, heat to high heat. 

2.  Grill the tomatoes.  Toss the tomatoes with oil and season with salt and pepper. Transfer to a grill basket and grill until charred and slightly soft, tossing occasionally, about 5 minutes. 

3.  Prepare the spice and herb mixture.  Combine the vinegar, sugar, coriander and cumin seeds in a small saucepan and bring to a boil. Reduce the heat and simmer until thickened to a glaze, about 10 minutes. Let cool slightly, then pour over the tomatoes. Toss, mashing the tomatoes slightly. Add the herbs and the zest, toss again, taste and season.

ENJOY!

Thursday, November 21, 2013

Prive Vineyard's Mélange (2008)

The label reads, as you stroll past the winery, the lavender gardens draw you toward the old world brick oven.  The chimney fills our patio with the aroma of cherry wood embers.  Rustic pizzas and breads appear begging for a great bottle of wine and friends to share it with.  Those words bring back memories for myself, because I have visited the winery, strolled around the patio and seen that old world brick oven.

The winery is Privé Vineyard, a small family-owned vineyard in the Willamette Valley of Oregon.  Both Clare and I visited the vineyard as part of our honeymoon, which included a two day, chauffeured trip to over a dozen vineyards in the valley.  While we can say that our experience at each of those vineyards was amazing, the one that probably left the biggest impression upon us was Privé.

I have previously wrote about Privé when I reviewed a couple of their wines in the past, like the Le Nord (2006) and Le Sud (2008).  Both of those wines were estate-wines, produced only with grapes grown on the property.  However, the demand for Le Nord and Le Sud, as well as the limited amount of grapes grown on the estate (it is only a couple acres in size), the winemakers have branched out to produce wines with grapes grown elsewhere.  One of these wines is the Mélange, which is the winemaker's nod to a Bordeaux-style blend.

The Mélange is produced Cabernet Sauvignon, Cabernet Franc, Merlot and Malbec grapes.  All of the grapes are cultivated in Washington State.  The winemakers blend the grapes together and then age the wine in 15% new French oak barrels.  The result is a substantial red wine that can cellar for up to 12 years.  Neither Clare nor myself were patient enough to let the bottle of Mélange (2008) age until 2020.  We lasted only about five years.  

The Mélange pours a nice magenta or crimson red color.  The aromatic elements of the wine suggest dark red fruit, something that carries over into the taste of the wine.  I definitely sensed the pleasing aroma and taste of both blackberries, dark cherries and plums.  There was also a nice hint of spice and pepper, which often came through in the finish.  The wine itself is somewhat dry, with manageable tannins that are not overwhelming.  

The winemakers describe this wine as having been blended for the pizzas that come out of their old world brick oven.  This wine is far more versatile, and could be paired with a range of proteins (beef, lamb, chicken and pork) that are roasted, braised or grilled.  It could also be paired heartier vegetable dishes.  

Overall, the Mélange is another excellent wine made by a very small, boutique vineyard.  As we drank this wine, Clare and I were reminded of why we like Privé so much.  The wine sold for about $28.00 a bottle; however, Privé is no longer producing the Mélange.  The winemakers are looking to transition from a Bordeaux style blend to a Rhone style blend.  Both Clare and I will definitely looking for that wine when it comes out.

ENJOY!

Monday, November 11, 2013

Baby Chef: Three Apple Medley

Recently, I decided to take a day off from work (and, it just happened that the day-off coincided with a federal holiday, which meant that the office was closed).  I decided to spend a good part of that day cooking.  I first began making food for our little guy.  I made some more pear puree, but I also decided to make a "Chef Bolek" original for my little guy ... a Three Apple Medley Puree.

To be sure, our little guy has already had a good amount of pureed apples.  We went to an apple farm in northern Ohio and bought a bag of apples, most of which went to puree for his breakfast, lunch and dinner.  We have also bought apples on occasion thereafter to make puree.  In making this food, however, we have limited ourselves to just one kind of apple for the puree.

So, this is where the "originality" comes in, to the extent there is any originality at all.  I was pursuing the selection of organic apples at our local store.  I decided that, rather than buying all of one type of apple, I would buy a couple of a few different apples and then combine them together.  This presented a minor challenge: what apples to choose?  I immediately ruled out Granny Smith apples, because I was a little unsure about introducing tartness at this stage.  I ultimately chose Honeycrisp, Gala and Fuji apples. I selected each for a reason.  

First, Fuji apples are bigger, with denser flesh and sweetness.  These apples -- which derive their name from the town of Fujisaki, and not Mount Fuji -- were developed as a cross between two American apples, the Red Delicious and the Virginia Ralls Genet.  The Fuji apples, which were first grown in the Aomori Prefecture of Japan, are the most popular apples in Japan.  They are also some of the hardiest apples, with longer shelf lives than others.  I chose these apples because I wanted to add some some substance and texture to the medley puree.  Given their size, this also ensured that there would be more of the medley when I was finished pureeing the apples. 

Second, the Gala apples are very sweet and have a lighter, grainy texture.  These apples are very popular in the United States, primarily because they are fairly versatile. The Gala apple originated as a cross between the Golden Delicious and Kidd's Orange Red apple.  The first Gala apples were cultivated in New Zealand, although they are now the second most popular apple in the United States (behind the Red Delicious apple).  I selected the Gala apples because of their sweetness.  These apples are the primary contributor of sweetness to the medley, with the Fuji apples providing some additional sweetness.  

Finally, there are the Honeycrisp apples.  These apples are known for their sweetness and tartness.  These apples originated from a hybrid of the Macoun and Honeygold apples.  I chose these apples specifically for their balance between sweetness and tartness.  I wanted to introduce a little tartness into the medley so that our little guy could get just a little hint of it.  Babyfood cookbooks tell you to steer clear from tart apples, like Granny Smith apples, because the tartness is likely to be off-putting to the infant.  However, the balance of Honeycrisp apples, with the reinforcing sweetness of the Gala and Fuji apples, offered an opportunity to introduce a very little amount of tartness under the cover of the sweetness.  I want to expand my little guy's palate as early as possible, without turning him off of any food. 

Overall, I think the puree came out very well. Of course, my opinion does not matter.  It is all about the little guy.


THREE APPLE MEDLEY
A Chef Bolek Original

Ingredients:
2 Honeycrisp apples, quartered, cores and seeds removed
2 Gala apples, quartered, cores and seeds removed
2 Fuji apples, quartered, cores and seeds removed

Directions:
1.  Steam the apples.  Steam all of the apples in accordance with the directions of a steamer (or, create your own steamer by placing a steamer basket over a pot of boiling water and then cover the pot).  The apples should be tender after about fifteen to twenty minutes.  Remove the apples from the steam and let them cool. 

2.  Puree the apples.  Remove the skins and place the apples in a food processor. Blend until you reach your desired consistency, adding water, breast milk or formula to get that consistency.

ENJOY!

Thursday, November 7, 2013

Paardebloem

If one were to ask what ingredient would seem to be the most unlikely to be used in brewing beer, I think dandelion greens would be near the top, if not at the top, of the list.  The leaves of seemingly ubiquitous weed are earthy and minerally in taste, but they are also very bitter.  I would think that a lot of work would need to be done to balance that bitterness, and, it would take some very adept brewers to achieve that balance.

Enter the brewers of New Belgium Brewing and Red Rock Brewery, who teamed up to brew the Paardebloom, an ale brewed with dandelion greens.  The brewers not only used those bitter greens, but also grains of paradise. This ingredient, which goes by a more formal name ... Aframomum Melegueta, is the seeds from a plant that is principally grown in western Africa.  Those seeds impart a peppery taste.  While pepper can complement and curtail the tartness of the greens, still more work needs to be done to produce a balanced beer, let alone a great beer.

Once again, the New Belgium and Red Rock brewers did that work.  Along with a wild Belgian yeast and some wood-aged beer, the brewers produced a Belgian-style ale with Pale, German Pilsner, Dark Wheat, Rye and Munich malts, with Target Hops.  All of these ingredients helped to balance the bitterness of the greens and grains, while allowing those ingredients to contribute to the overall taste.

The Paardebloem pours a golden color, with a thin light foam.  The brewers describe the aroma as having peach, fresh baked bread, fresh greens, white wine, slight pepper and clove, with a hint of that funky barnyard esters.  I definitely got the peach, bread, greens and white wine.  There was also some pepper and clove. I did not get that barnyard ethers, perhaps because I have had one too many Brettanomyces beers and "barnyard' for me literally means two feet in the middle of a pigpen.   As for the taste, many of those aromatic elements find their way onto the tongue.  The brewers suggest a slight tannic bitterness from the dandelion greens, which is definitely present.  However, the malts provide some sweetness that counters the bitterness of the greens, as well as provides some freshness.

When it comes to pairing, the brewers suggest Hawaiian Short Ribs and Citrus Fennel Salad.  This recommendation sheds light on good pairings.   This beer can pair well with any beef and pork, even chicken, although a more substantial dish would work well.  A lighter dish may not tame the bitterness of the beer enough. 

I found this beer at a local grocery store.  I do not remember the cost of the beer, but it should be about $10 a bottle.

ENJOY!

Sunday, November 3, 2013

Blue Crabcake Algonquian

The Chesapeake Blue Crab is a very special animal.  Its scientific name -- Callinectes sapidus --  is Latin for beautiful, savory swimmer.  I have worked with these beautiful creatures when I was a steam cook for a local seafood restaurant.  The crab are not only beautiful to look at, but their meat is very delicious.  It is so prized that the Blue Crab has been one of the most valuable, if not the most valuable, fishery in the Chesapeake Bay.

For the locals, eating the crab right out of the shell is a timeless ritual.  There used to be, and there still are, many crab houses that dot the region.  Dozens of crabs can be ordered, served on brown, butcher-type paper.  Mallets are handed out to everyone and the feast begins.  

Apart from these crab feasts, the second most popular way for locals to enjoy the meat of the blue crab is the crabcake.  According to Renewing America's Food Traditions, the first recipe for a crabcake was published back in 1685, and, was first recorded twenty-five years earlier when chef Robert May told readers in 1660 that one could: "take the meat out of the great claws being first boiled, flour and fry them to take the meat out of the body, strain half of it for sauce and the other half to fry, and mix it with grated bread, almond paste, nutmeg, salt and yolks of eggs, fry in clarified butter, being first dipped in batter, put in a spoonful at a time; then make a sauce with wine-vinegar, butter, or juice of orange, and grated nutmeg, beat up the butter thick and put some of the meat that was strained into the sauce, warm it and put it in a clean dish, lay the meat on the sauce, slices of orange over all and run it over with beaten butter, fried parsley, round the dish bring and the little legs round the meat."

It would take more than 250 years before the term "crabcake" would bed used for the first time in 1930.  Over that period of time, the historic recipes for crabcakes -- like Chef May's recipe -- continued to evolve.  At the same time, the once bountiful populations of blue crab began to decline.  The reasons are varied: overfishing, chemical runoff (like PCBs and mercury), disease, and other reasons.  Another problem has been the algae blooms, which damage and kill the sea grasses that are vital to the diet of the blue crab.  

This recipe -- Blue Crabcake Algonquian -- comes from the Renewing America's Food Traditions book.  It is a straightforward, traditional recipe for a Maryland crabcake that has been adapted from a couple of recipes used by restaurants and chefs along the Chesapeake Bay.  The recipe calls for the use of "lump" crab meat, which is okay.  If you can find "jumbo lump" crab meat, that would be even better.  Both lump and jumbo lump crab meat provide big pieces of crab that stand out from the binding that keeps the crabcake together.  A great crabcake is one where the crab is the star, not the binding. 


BLUE CRABCAKE ALGONQUIN
Recipe from Renewing America's Food Traditions, edited by
Gary Paul Nabhan at page 163
Serves 3

Ingredients:
1 pound of jumbo lump blue crab meat, preferably local
4 tablespoons of minced onion
1/2  teaspoon of dry mustard
1/2 teaspoon of paprika
4 tablespoons of bread crumbs (such as panko)
1 egg, beaten
2 dashes of Worcestershire sauce
4 tablespoons of butter
2 ounces of white wine
Sea salt, to taste
Ground black pepper to taste

Directions:
1.  Make the crab cakes.  In a mixing bowl, use your hands to combine the crab meat with the minced onion, dry mustard, paprika, breadcrumbs, and egg.  Form six small balls of crabcakes.  Refrigerate for about 15 minutes.

2.  Saute the crab cakes.  Heat the butter in a skillet.  Saute the crabcakes over medium heat until brown and bubbly.  Fluff up and turn over with a spatula without disturbing the lumps of crab, then brown on the other side.  Next remove the skillet from the heat and quickly pour the white wine over the edges of the crabcakes.  While they are still sizzling and bubbling, serve in the skillet.

ENJOY!

Thursday, October 31, 2013

The Spooky Tooth

To some, Spooky Tooth is an English rock band that played in the 1970s and 1980s.  A version of the band is still around, singing songs like "Don't Keep Shouting at Me" and "Straight Down to the Bottom."  However, for people who love craft beer, the name "Spooky Tooth" means something completely different ... it's Fat Head's Imperial Pumpkin Ale.

I had the opportunity to sample this beer when I was back in the Cleveland, Ohio area.  Fat Head's Brewery and Saloon is on my very short list of places that I have to visit whenever I am back in Cleveland.  The reason is simple ... Fat Head's Head Brewmaster, Matt Cole, makes some very great beers.

Most craft brewers now brew a pumpkin ale or imperial pumpkin ale.  The style is somewhat of an afterthought, with the Beer Judge Certification Program lumping it in the rather broad category of "spice, herb or vegetable beer." However, as with most of Matt's beers, the Spooky Tooth transcends broad categories and stands out as a really good pumpkin beer.  (This coming from someone who, until recently, never really cared for that style of beer.)

The Spooky Tooth pours a rich dark orange or amber color.  Fat Head's describes the aroma as being "sweet pumpkin pie and savory spices with hints of sweet malt."  To be sure, there is a lot of sweetness in the aroma, which is balanced with some of those pie spices, such as cinnamon, nutmeg or allspice.  Many of those aromas carry into the taste of the beer.  Fat Head's describes those flavors as "pumpkin up front then sweet malt, pie crust, spice, hints of brown sugar and a clean finish."  To be sure, there was the flavor of pumpkin, sweet malt, spice and brown sugar.  I did not have as much of a sense of the pie crust, but that did not matter.  Overall, the Spooky Tooth was one of the better, if not the best pumpkin ales that I have ever tasted.

To be sure, both my beautiful Angel, Clare, and I were comparing the Spooky Tooth to other pumpkin beers.  To date, none of them have matched up to this beer.

Given the beer is a seasonal, it is probably no longer in production.  If bottles are still available, they can be purchased at Fat Head's in North Olmsted, Ohio or at their new production brewery in Middleburg Heights, Ohio.  The beer costs about $10.99 for a four pack.

ENJOY!

Tuesday, October 29, 2013

Masaledar Macchi (Spicy Grilled Fish)

Cooking with a whole fish is always a great experience. Whenever I go grocery shopping, I always pause to look at the whole fish.  Branzino, striped bass, rockfish, mackerel, trout., flounder.  Each fish has a different size, texture and flavor.  

I have made a few recipes using whole fish, such as Pesce al Palermitana and Sauteed Sheephead, Savage Boleks' Style. A while back, I wanted to cook with whole fish again.  I decided to make it a part of a dinner with a theme ... an Indian grill. After a search, I found a recipe for Masaledar Macchi or Spicy Grilled Fish.

While I had the recipe in hand, I could not find any background to the recipe.  I don't know where this dish originated and how it reflects a particular cuisine from the subcontinent.  Nevertheless, the recipe calls for the marinating of fish in a mixture that is reminiscent of Indian dishes that I have both cooked and eaten.  The combination of turmeric, ginger, lemon juice, chiles, garam masala and coconut milk creates a very tasty marinade that adds a lot to the fish itself.

While the paste added flavor to the fish, it presented a problem when it came to grilling the fish.  The recipe calls for flipping the fish while it grills and, toward the end of the cooking, to leave the fish alone so that it could develop a crust.  Although I tried to get that crust, it never really developed, as you can see from the pictures.   Still, the grilled fish served as a delicious centerpiece to a dinner that included tomato chutney and grilled naan with a cucumber raita.


MASALEDAR MAACHI (SPICY GRILLED FISH)
Recipe from RecipesLib
Serves 2-4

Ingredients:
2 whole fish, such as trout
3 tablespoons of lemon juice
1/4 cup of onion, coarsely chopped
2 cloves garlic, coarsely chopped
1 fresh hot green chile, sliced
2 inch piece of ginger root
1 teaspoon of cilantro
1/4 teaspoon of ground turmeric
1 teaspoon of garam masala
1/4 teaspoon of chile powder
1 6 ounce can of coconut milk, well stirred
Vegetable oil

Directions:
1. Prepare the fish.  Wash and dry fish.  Cut 3-4 deep diagonal slits across both sides of the fish.  Rub with 1/2 teaspoon of salt and 1 tablespoon of lemon juice.  Set aside.  

2.  Marinate the fish.  Combine and blend the remaining lemon juice, 1/4 teaspoon salt, onion, garlic, cilantro, turmeric, garam masala and chile powder into a smooth paste.  Empty paste into a shall large dish large enough to hold the fish  Add coconut milk and mix.  Leave fish in the paste and milk for 10 minutes.  Flip and let rest for 10 minutes more. 

3.  Grill the fish.  Preheat the grill and oil grilling rack with vegetable oil.  The rack should be placed about 6 inches from the heat source.  Lift fish out of marinade and place it on the rack.  Grill for about 25 minutes. Turn fish once about half way through.  If fish is browning too fast, distance it more from the heat. Do not baste fish toward the end of cooking, so that it can form a crust.

ENJOY!

Sunday, October 27, 2013

Wine Club ... Pairing Wine with Lebanese Mezze

The latest wine dinner was a first for one of the couples.  It was their first time preparing a dinner for everyone.  They decided to prepare and serve a multiple course dinner of Lebanese dishes that were drawn from family recipes.  From sambousek bi jibne to  kibbe nayee, it provided us with an opportunity to experience the culinary heritage that is an important part of their family.  

I volunteered to do the wine pairing, which was quite the task.  I wanted to make sure that there were at least a couple of Lebanese wines.  Lebanon has a long wine-making history, and, it may be one of the oldest wine production sites in the world.  The cultivation of grape vines dates back principally to the Phoenicians, who were primarily responsible for the planting of the vines along the coast and in the interior valleys.  The production of wine continued to grow while the lands were under the control of the Romans and Greeks.  However, once Lebanon became part of a caliphate, wine production decreased.   Wine production was tolerated only insofar as it was used in Christian religious ceremonies.  It was not until the mid nineteenth century that wine production began to increase once again.   This renaissance was led by Jesuits, who along with the French occupation, helped to increase wine consumption there.  

I managed to find several Lebanese wines at a local store; however, I decided to pair Lebanese wines to two of the four courses. I decided that I would try to pair a couple other wines for the remaining dishes.  
 
Chateau Ksara Blanc de Blanc (2012)
Paired with Syrian Olives, Jibn (mild white cheese), Syrian Bread, Stuffed Grape Leaves, Tabouleh, and Hummus

The first course was a variety of mezze dishes ... Syrian olives and Jibn, stuffed grape leaves, tabouleh, and hummus, all of which was served with Syrian bread.  All of these mezze provided different flavors and textures, which makes pairing a little dififcult.

Still, there is some common themes.  One of those themes was that the best wine for pairing would be a white wine.  There was one white wine from Lebanon.  It was a white blend from Chateau Ksara.  This winery was established by Jesuit monks in 1857 in the Bekaa Valley.  The vineyard and estate is located near Baalbeck.  Its name is drawn from "ksar" or fortress, because it was the site of a fortress during the Crusades.

There are several other interesting facts with respect to Chateau Ksara.  For example, the wine cellar used by the winemakers is a grotto that was discovered by the Romans, who dug tunnels from the cave.  The Jesuit monks enlarged the tunnels during World War I, using local people to dig the tunnels in order to create employment and alleviate famine.  The Jesuits eventually sold the estate and the wine production to a private concern, which has continued to produce the wines in the tradition of their predecessors.

This particular wine -- the Blanc de Blanc -- is a blend of 50% Sauvignon Blanc, 25% Chardonnay and 25% Sémillion.  This wine is aged for four months in French oak barrels. The aromas of this wine were described as floral, which is true to a certain degree.  The taste of this wine evolved as it warmed up.  At first, I was not sure I could describe it, but, over time, it opened up and elements of citrus, like grapefruit, and melon began to make their presence known.  There was also some elements of nuts and spice in both the aroma and the taste.

While I may not be a big fan of Sauvignon Blancs, the blending of the grape with Chardonnay and Sémillion really helped to produce a relatively light, smooth wine.   This wine was a very good start because it was not overly fruity, which allowed for it to pair well with all of the different flavors -- from the chickpeas in the hummus to the parsley in the tabouleh.  A bottle of this wine sells for about $11.99.

Henri Bourgeois Petite Bourgeois Rosé de Pinot Noir (2012)
Paired with Eggplant Slices, Pomegranite, Yogurt and Tahini

There was only one dish for the second course ... Eggplant Slices with Pomegranite, Yogurt and Tahini.  The eggplant slices were baked in the oven and then topped with the pomegranate seeds and a yogurt sauce.  

For this course, I had my sights set on a white wine or perhaps a rosé.  I ultimately chose the latter, and began looking for a French rosé.  The rosé style is produced in many different appellations in France, from the Loire Valley to Provence.  I chose a rosé wine from the Loire Valley, which is one of my favorite appellations in France.

The wine is the Petit Bourgeois, which is produced by Henri Bourgeois.  The vineyard is in Chavignol, which is located in Sancerre is almost equidistant from both Tours and Dijon.  The winemakers at Henri Bourgeois focus upon two varietals: Sauvignon Blanc and Pinot Noir.   Those Pinot Noir grapes are used to produce the Petit Bourgeois.  

This salmon-colored wine was described as offering up light red cherries on the nose, followed by red berries and dill on the palate.   The description is fairly accurate.  The aroma of this wine was full of strawberries, raspberries and cherries.  Those strawberries carried over into the taste of the wine as well.  The body of the wine is particularly light and easy to drink.

This wine paired very well with the eggplant dish.  The wine was light enough to contrast with the baked eggplant and the tartness of the pomegranate seeds.  This wine served as a great transition from the Blanc de Blanc to the next wine.  This wine sells for about $10.99 a bottle.

Massaya Classic (2010)
Paired with Sambousek bi Jibne, Fatayer, 
Kibbee Nayee, Kibbee Sunnee and Koosa

The third course was a return to multiple mezze.  The dishes include Sambousek bi Jibne (cheese pies), Fatayer (spinach pies), Kibbee Nayee (raw beef with burghul and onion), Kibbee Sunnee (a baked version of Kibbee Nayee) and Koosa (squash stuffed with a lamb mixture).   These courses would naturally seem to suggest that a red wine, but the cheese pies presented a pairing challenge, because of the spices created some amount of heat.  That type of heat will often intensify the tannins in red wine, which is something that may not be pleasant for some (but it is fine with me).

This is where I chose to pair a second Lebanese wine.  I could have chosen another wine from Chateau Ksara, as there were at least four different reds from that winemaker at the store.  Whenever I do the pairing, I try to use choose different winemakers.  So that eliminated all of those Ksara wines.

There were two other red wines from Lebanon, and, I chose the Massaya Classic (2010).  Like the Blanc de Blancs, this wine is a blend produced in the Bekaa Valley. The particular blend is 60% Cinsault, 20% Cabernet Sauvignon and 20% Syrah.  The wine is first fermented in stainless steel tanks and then in concrete vats, which the winemaker says helps to promote the "suppleness" of the wine.

The Massaya is very reminiscent of a French blend, such as a Bordeaux or a Cotes du Rhône.  It wine pours a dark red, and, there is a very solid aroma of red berries and fruits, from strawberries to red cherries.  The body of this wine is much fuller and bigger than the first two wines, which is to be expected.  The taste of the wine is very fruit-forward, with a good amount of strawberries and ripe cherries.  There is also some spice and tannins in the wine (which, as I expected, were heightened a little when eating the cheese pies.  However, it paired very well with both types of kibbe.  (By the way, I really liked the Kibbe Nayee, which was the first time that I ever had it.) This wine can be found for about $14.99 a bottle.

Bagrationi Classic Brut
Paired with Rice Pudding

The final course, which was the dessert, was rice pudding.  The original recipe included an apricot compote, but, apricots are not in season.  However, the rice pudding was made with orange water, which added a nice flavor to the dessert.

I knew what I wanted to pair with this dish ... a sparkling wine.  However, I did not want a prosecco or cava; instead, I wanted a different sparkling wine.  The store where I did my shopping had a couple of interesting wines from Georgia.  While Lebanon may have some of the oldest vinicultural sites, some sites in Georgia date back to 6000 B.C.  As with Lebanon, wine became more important in Georgia when its people converted to Christianity.  More recently, Georgian wine was produced and solid throughout the Soviet Union, and, the wine remained popular in Russia. However, recent political troubles led to the ban of Georgian wine in Russia, which meant that the winegrowers had to look elsewhere to sell their wine.  Hence, the sparkling wines on the shelves of the store where I was shopping.  


This particular wine -- Bagrationi Classic Brut -- comes from one of the more popular winemakers in Georgia. Georgian Prince Ivane Bagrationi-Mukhraneli began producing sparkling wine in Georgia in 1882 using the méthode Champenoise.  This sparkling wine is made from grapes that are indigenous to Georgia, such as Chinebuli, Mtsvane, and Tsitska.  The Chinebuli is a grape varietal that produces clusters with big, cylindrical and thin-skinned berries that have a fleshy, juicy pulp.  The Chinebuli used in this wine come from vineyards located in the Kartli region, which is near the capital of Georgia, Tbilisi.  The Mtsvane varietal is a white grape that is used for white wines.  The Mtsvane grapes come from Kartli, as well as Kakheti region in the eastern Caucasus mountains.  Finally, the Tsitska grape is a varietal that is used in sparkling wines and is cultivated in the Imereti region in western Georgia.

The Bagrationi Brut pours a light straw color, with a good amount of carbonation at the outset.  The wine is as its name suggests ... brut or dry.  The winemakers describe the wine as having aromas of citrus and flavors of honeydew.  Those descriptions are accurate, although I would add that there is some melon and cantaloupe in the taste of this wine.  The effervescence of the wine worked well with the creaminess of the rice pudding.  This wine was a good pairing, although other pairings, such as the Massaya and the Blancs de Blancs worked a little better.  Still, a bottle of the Bagrationi costs $11.99.

ENJOY!

Sunday, October 20, 2013

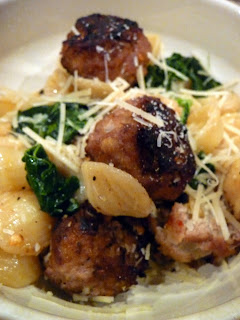
Meatballs with Orecchiette, Kale and Pine Nuts

I am not the only one who cooks in our family.  My beautiful wife, Clare, is also a great cook and a great baker.  Every once in a while, I ask my Angel to provide a guest blog post so that I can share some of the amazing and delicious things that she makes for family, friends and, of course, me.  She has already provided guest blog posts about Cuban Bread, Loyalist Bread, Salmon Burgers, Peach Cobbler and Parmesan Soufflé with White Wine Butter Sauce.   So, without further ado,

A Guest Blog Post by Clare ...

This dish -- Meatballs with Orecchiette, Kale and Pine Nuts -- was the second dish from our recent wine club dinner.  As Keith previously explained in connection with the first dish, Grilled Seafood with Romesco Sauce, we hosted a wine dinner based on the recipes of Chef Gordon Ramsay.  Keith has watched a lot of Gordon Ramsay's shows, like Hell's Kitchen and Master Chef; however, we did not want this dinner to be like either of those shows.  Instead, the recipes were chosen to reflect Gordon Ramsay's interest in various cuisines.

This recipe is a both a display of Southern Italian cuisine and a twist with the flavors.  Orecchiette is a traditional pasta from Apulia, a region in southern Italy.  In Apulia, this pasta may be served with broccoli, anchovies and chiles.  The twist comes from Chef Ramsay's substitution of meatballs, kale and pine nuts.   

We decided to add our own little twist to Chef Ramsay's recipe.  His recipe calls for the use of beef meatballs; however, I do not eat red meat.  So, Keith suggested that we substitute ground turkey for ground meat.  I do eat turkey, so that substitution worked well.

Both Keith and I really liked this dish; and, I think we will make this recipe again ... if at the very least to ensure that Keith gets enough greens in his diet. 


MEATBALLS WITH ORECCHIETTE, KALE AND PINE NUTS
Recipe from Gordon Ramsay's Cookery Course
Serves 4

Ingredients (for the pasta):
2 cups of dried orecchiette pasta
2 garlic cloves, peeled and sliced
Slightly less than 1 cup of kale
4 tablespoons of pine nuts, toasted
Freshly grated Parmesan cheese

Ingredients (for the meatballs):
1 small onion, peeled and finely diced
2 garlic cloves, peeled and finely sliced
Olive oil
1 teaspoon of dried chile flakes
1 pound of minced beef (or turkey)
1/3 cup of fresh breadcrumbs
3-4 tablespoons of milk
Sea salt
Freshly ground black pepper

Directions:
1.  Prepare the meatballs.  Saute the onion and garlic with seasoning in a hot oiled frying pan for about 5 minutes until soft and lightly colored, adding the chile flakes after a minute or two.  Place the mince in a large bowl and add seasoning.  Put the breadcrumbs in a separate bowl and moisten with the milk.  Add seasoning, then stir the breadcrumbs and onion mixture into the mince and combine well.  With wet hands, shape the mince mixture into small balls about 2 centimeters wide.  Transfer to a lightly greased plate or tray and chill for 30 minutes until firm. 

2.  Cook the pasta.  Cook the pasta in boiling salted water until al dente, according to packet instructions.  

3.  Prepare the meatballs and kale.  Heat a large frying pan over a medium heat and add a little olive oil.  Brown the meatballs for 6 minutes until colored on all sides.   Add the garlic to the pan and cook for 2 minutes until tender, then add the kale and season.  Sweat the kale over medium heat for 5 minutes with a couple of tablespoons of the cooking water from the pasta.  Taste and adjust the seasoning as necessarty, then stir in the pine nuts.

4.  Finish the dish.  Drain the pasta, reserving a few tablespoons of the cooking water.  Tip the pasta into the pan with the meatballs and stir over a medium-low heat until well mixed.  Add a good handful of finely grated Parmesan, and mix well with a little cooking water to help coat the pasta.  Taste and adjust the seasoning as necessary.  Serve garnished with another grating of Parmesan.

And, as Keith says ...

ENJOY!

Wednesday, October 16, 2013

The Oompa Loompas

They herald from Loompaland, those Oompa Loompas with their orangish and greenish features and their song.  That song.  Oompa, Loompa, doom-pa-dee-do.  I have a perfect puzzle for you.  Oompa, Loompa, doom-pa-dee-dee.  If you are wise, you'll listen to me.  The song goes on and on, with puzzles referencing the guzzling of sweets, the chewing of gum, spoiled Siamese cats, and a glut of TV.  

There is another Oompa Loompa, and the only puzzle it offers is a song for the taste buds.  It is a rather unique brew ... a chocolate cream stout.  The stout was brewed by Fat Head's Brewery & Saloon in North Olmsted, Ohio.  The not-so eccentric, but rather down-to-earth "Willy Wonka" in this "chocolate factory," is head brewer Matt Cole, who is behind some of my favorite beers, including the (now GABF, gold-medal winning) Hop Juju.  Within the past year, Fat Heads recently opened a production brewery, which greatly increased the availability of Matt's beer.  In turn, this has allowed for me to enjoy the beers more often (as I do not live within easy driving distance of North Olmsted) and even review some of those beers, like the Hop JuJu and the Head Hunter Imperial IPA

The Ooompa Loompa loosely falls into the category of a "sweet stout."  This style most likely originated in England, where the beers were referred to as milk stouts or cream stouts . (Interestingly, according to the Beer Judge Certification Program (BCJP), these designations are no longer permitted in England.) The reference is not to the use of milk or cream in the brewing process, but rather to the use of lactose or milk sugar, which helps to sweeten the beer.  In this case, Matt and his fellow brewers at Fat Head's used Belgian Dark Chocolate and Madagascar vanilla beans to produce the Oompa Loompa.  

The end result is one very good beer that fits well within the expectations of a cream stout.  Such stouts are expected to have a deep brown, almost black color.  The Oompa Loompa obliges on that score.  According to the BCJP, one should expect aromatic elements of mild roasted grains, with some coffee or chocolate. The stout has aromas of the roasted malts, together with chocolate, cream and vanilla.  After enjoying the aroma, one finds that the beer itself fits perfectly into the body of a cream stout, with a medium body and a noticeable creaminess.  That creaminess envelopes the elements of chocolate, caramel, molasses and vanilla in the taste of the beer.  Any bitterness from the roasted malts or the hops is lost in the chocolate and vanilla.

This beer is definitely one that is paired with desserts, especially as a complement to a dessert that includes some chocolate.  Although it may be possible to pair this beer with a main course, the sweetness would present some complications.  For example, Beer Advocate suggests that the beer could be paired with barbecue, shellfish or grilled meat.  (I am always a little curious about how these pairings are derived.)  Rather than take the effort to create the pairing, simplicity is best, go with a chocolate dessert and just enjoy the beer.

This "whimsical, Snozzwanger concoction" -- as the brewers at Fat Heads have dubbed it -- was available in bottles from the brewery and brewpub.  Given it was a seasonal beer that was released back in February, I do not think that it is currently available now.  If it should become available next February, it is definitely worth a try.

ENJOY!

Monday, October 14, 2013

Grilled Seafood with a Romesco Sauce

A few weeks back, my beautiful Angel and I hosted our wine club dinner.  The theme of the Wine Club was "The F Word," or the recipes of Chef Gordon Ramsay.  I really wanted to focus on some of the cooking that inspires the Chef.  I have watched a lot of his shows, including The F Word and Gordon Ramsay's Great Escapes.  I also searched through many of his recipes to make sure each course would have distinct flavors and ingredients.

For the first course, we made Grilled Seafood with a Romesco Sauce.  The recipe is heavily influenced by Spanish cuisine.  With all of its coastline, from the Bay of Biscay to the Mediterranean Ocean, Spain is particularly well known for its seafood.  I have watched many a food show about Spanish cuisine, only to see the fresh seafood, such as sardines, tuna and squid.  

I was able to find some very large squid at a local Asian supermarket.  These squid were perfect because their thick bodies would stand up well to the grilling.  There are a couple drawbacks to using these large squid.  First, they are whole squid, which means they have to be cleaned.  The best thing to do is to first chop off the head, remove the beak and set aside the tentacles. After that, take a pair of poultry shears (or scissors) and cut down the top of the body very carefully.  You have to do your best not to disturb the internal organs.  (If you do, you could end up with a big mess.)  Once you have cut down the length of the body, you can remove the internal organs and everything else until you have a large squid steak.  You should then score the inside of the squid to make a hatch-like pattern.  This helps with the second problem.  The large squid tend to be tougher and a little chewier than the smaller ones that you usually find in a grocery store.  It is said that scoring the squid helps to make the large squid more tender to eat.  

As for the other principal component, romesco sauce originated in the Catalonian city of Tarragona. It is said that local fishermen made the sauce to be served with their catch.  The principal ingredients of the sauce -- roasted peppers, almonds, vinegar and olive oil -- are combined to produce a sauce that is not only perfect for seafood, but also works with any other protein (especially chicken or pork).  Romesco sauce even goes well with just some crusty, rustic bread.

Overall, this recipe produced a very good start to our wine club dinner.  While it may not have reached the standards of a Michelin star chef like Chef Ramsay, I think it both the flavors and the plating were fairly good for me.  


GRILLED SEAFOOD WITH A ROMESCO SAUCE
Recipe from Gordon Ramsay's Cookery Course
Serves 4

Ingredients (for the seafood):
4 medium to large squid, prepared and cleaned
12 king prawns, shell on
2 tablespoons of parsley, chopped (for garnish)

Ingredients (for the romesco sauce):
2 red peppers
1 thick slice of ciabatta or farmhouse white bread,
     crusts removed and torn into chunks
Olive oil
3 garlic cloves, peeled and roughly chopped
3 vine ripe tomatoes (like plum)  on the vine
1 teaspoon smoked paprika
4 tablespoons of blanched almonds, toasted
     and roughly chopped
1 lemon, juiced
1-2 tablespoons of sherry vinegar
Sea salt, to taste
Ground black pepper, to taste

Directions:
1.  Make the romesco sauce.  Heat a grill until very hot.  Put the peppers on a foil lined baking tray and place under the grill.  Cook for 5 minutes turning regularly until he skin is blackened and blistered all over.  Transfer to a bowl and set aside to cool.  

2.  Continue making the romesco sauce.  Cook the bread chunks for 2 minutes in a small frying pan with a dash of oil, then add the garlic and cook for a further minute until the garlic is tender and the bread toasted.  By this stage, the peppers should have cooled and it will be easy to peel and rub off the charred skins.  Peel, deseed and roughly chop them, then place in a blender.  Roughly chop the tomatoes and add to the peppers with the bread and garlic.  Blitz to form a rough paste.

3.  Continue making the romesco sauce.  Add the smoked paprika, chile flakes, almonds, lemon juice, vinegar and a pinch of salt and pepper to the blender and blitz until well mixed.  Taste and adjust the seasoning.  With the motor running, slowly pour in 6 tablespoons of olive oil.  Taste and adjust the seasoning again if necessary.  Allow the sauce to come to room temperature and stir well before serving. 

4.  Grill the seafood.  Heat a griddle pan over high heat until hot.  Lightly score one side of the squid in a diamond pattern before cutting into strips.  Toss the prawns and squid together in a little olive oil and season with a little salt and pepper.  Place the prawns on the hot griddle and cook for 2 1/2 to 3 minutes.  Starting diamond side up, cook the squid for about 1 minute on each side.  Leave it to curl up and give it a furhter minute until just cooked.

5.  Plate the dish.   Serve the seafood hot, garnished with parsley, and with the romesco pepper sauce alongside.

ENJOY!

Thursday, October 10, 2013

Baby Chef: Pear Puree

Several months ago, I announced a new part to Chef Bolek, which coincided with a major change in the lives of my beautiful Angel and myself.  We were welcoming a new addition to our family, a baby Chef Bolek.  I pledged early on to make baby food for our little guy once he was ready to eat something more than breast milk or formula.

Well, he has reached that point and, even with our very busy schedules, we have managed to make our own baby food.  The focus has been organic fruits and vegetables.  To this point, our little guy has eaten pea puree, sweet potato puree and peach puree.  At first, he did not care for the peas, which was obvious from the many funny faces that he made when he ate them.  He eventually came around and eats his peas.   It was also clear that our little guy did not like sweet potatoes; and, to this date, he has not changed his mind.  But, our little guy loves his peaches, which he eats with delight.

Our latest recipe -- and the first of the Baby Chef recipes for Chef Bolek is a pear puree.  This puree could be made with Bartlett, Anjou or Bosc pears.  Given that pears are in season right now, I bought four good sized, organic Bartlett pears and got to work.

The great thing about baby food recipes is that they are very easy to make.  It is important to make sure everything you use (including your hands) is very clean.  It is also important to make sure that the food is "clean" as well.  This means that the food is either organic (meaning that pesticides are not used) or, if organic food is too expensive or unavailable, that the food is washed thoroughly.


PEAR PUREE
Recipe adapted from from  
The Best Homemade Baby Food on the Planet, page 29

Ingredients:
4 pears, washed, peeled and quartered
1 to 2 cups of water (if using the stovetop method)

Directions:
1.  In a microwave.  Place the pears on a plate.  Microwave the pears for 5 minutes each or until soft.  Allow the pears to cool, then blend them for about 30 seconds or until the pear is completely pureed.

2.  On a stove.  Heat the water in a saucepan until it begins to boil.  Add the pear to the water, reduce heat and simmer the pears for about 10 minutes or until they are soft.  Remove the pears from the water and let them cool.  Reserve the water.  Puree the pears until they reach the desired consistency.  You can use some of the reserved water to achieve that consistency.

ENJOY!

Sunday, October 6, 2013

D.O.R.I.S. The Destroyer

The frogs are strong and hopping in northeastern Ohio.  They go by names like B.O.R.I.S. and D.O.R.I.S.  Those names are actually acronyms for Barrel-Aged Oatmeal Russian Imperial Stout and Double Oatmeal Russian Imperial Stout.  Both of the beers are part of the lineup from Hopping Frog Brewery, which, along with Fat Heads Brewing and Great Lakes Brewing, rates as one of my favorite craft breweries in Ohio.

I have known about Hopping Frog for a long time; however, I cannot find their beers in stores around where I live.  I have always kept a lookout for their beers, but to no avail.  However, about a year ago, my beautiful Angel and I visited Monticello, the home of Thomas Jefferson.  We stopped for lunch at a local beer store/deli in Charlottesville, Virginia.  As I roamed the aisles of beer, I came across a couple of Hopping Frog's beers ... including D.O.R.I.S. the Destroyer.

The brewers describe the D.O.R.I.S. in rather bold terms: "This extreme Double Oatmeal Russian Imperial Stout will overwhelm, satisfy, and destroy your taste buds like no other!! D.O.R.I.S. is even darker, hoppier, and stronger than our gold medal winning B.O.R.I.S. The Crusher Stout.  Dry-hopped  and first wort hopped with the finest American hops for a great Imperial Stout experience! Enjoy the darkness!"  That description is very enticing!

The D.O.R.I.S. pours pitch black, blocking the passage of any light through the beer.  The darkness of the beer even carries over to the foam, which has a light milk chocolate tone.  The aromatic element includes aspects of chocolate, cocoa and even some coffee.  There is a little booziness hiding in the murky aromas, which gives hints of the 10.5% ABV to come.  As for the beer's taste, the D.O.R.I.S. can be described as drinking alcoholic a double chocolate cake ... and I mean that in a good way.  The chocolate is strong and well-defined.  Certain additional elements help to round out the taste, including some roasted malts and oatmeal, along with a little molasses and some of that alcohol. 

Overall, this is probably one of the best oatmeal stouts that I have had.  The only thing is that I cannot offer any food pairings, because this beer is best enjoyed as a digestif, long after the meal has been finished.

This beer is available in Ohio, and, elsewhere (including Charlottesville, Virginia).  I cannot remember what I paid for the beer, but I think it is between $16.99 and $19.99 a bottle. 

ENJOY!

Friday, October 4, 2013

Mtuzi wa Samaki (East African Fish Curry)

One of the greatest things about having a hobby or interest around cooking is that there are always new opportunities to learn about ingredients, recipes, cuisines and even whole cultures.  This particular recipe -- Mtuzi wa Samaki or East African Fish Curry -- provided such an opportunity for all three.

The combination of "East African" and "curry" would seem out of place.  For many people, curries are dishes one would find in South Asia or Southeastern Asia. Think Pakistan, India or Thailand, for example.  Yet, it is the Pakistanis, Indians, Bangladeshi and others who took those dishes with them when they emigrated to other countries, including those in Eastern Africa that line the Indian Ocean, like Tanzania.

In particular, there is the small island of Zanzibar, which is home to a minority of Indians who brought their cuisine with them.   Mtuzi wa Samaki is an Indian-style curry that first emerged on the island and, later, made its ways into kitchens and restaurants on the mainland of both Tanzania and Kenya.  The dish is made with white fish and coconut milk, along with garam masala, which underscores the Indian influence in the recipe.  

This leads to the the ingredients themselves, namely the fish.  The recipe that I found simply called for fish fillets.  In theory, any fish would seem to be okay.  In reality, that is not the case.  The recipe calls for the "searing" of the fish -- the use of high heat and a hot pan to create a form of "crust" on the fish.  There are many fish that are not suitable for searing, because the high heat will just basically cook the fish and cause it to flake and break.  Therefore, when a recipe calls for searing a fish, one must look for a firm fleshed, or "meaty" fish.  I found a fish that is perfect for the recipe ... Plaice. 

Plaice is a flatfish, akin to flounder or fluke, which can be found from the Barents Sea to the Mediterranean ocean, as well as the northern Atlantic Ocean.  It is a very popular fish, particularly in European cuisines, which subjects it to the threat of overfishing.   Recent efforts to manage the populations of plaice, both in the United States (where is it also known as "dab") and in Europe have made the fish somewhat more sustainable, even getting "A Good Alternative" designation by Seafood Watch.

This marks the first time that I have ever cooked with plaice (although I have cooked with flounder many times before).  I was able to find thick pieces of plaice at my local grocery store, which were perfect for searing ... getting just enough of a crust without being cooked all the way through at the initial stages of the cooking process. This allowed for the fish to finish the cooking process while in the pan with the curry.  If you cannot find plaice in the store, look for any other firm fleshed fish, such as bluefish, rockfish (striped bass), or even monkfish.  Just make sure that those fish are sustainable.  You can always check Seafood Watch to verify the sustainability of any particular fish, along with most other seafood.


MTUZI WA SAMAKI (EAST AFRICAN FISH CURRY)
Recipe from Whats4Eats
Serves 4 to 6

Ingredients:
3 tablespoons of oil
2 to 2 1/2 pounds of fish fillets (such as plaice or bluefish)
1 onion, chopped or sliced
1 green or red bell pepper, chopped or sliced
6-8 cloves of garlic, minced
1 cup of tomatoes, seeded and chopped
1 1/2 cups of coconut milk
2-3 teaspoons of garam masala
1-2 tablespoons of tamarind paste or lemon juice
Salt, to taste
Ground pepper to taste.

Directions:
1.  Sear the fish.  Heat the oil over medium high heat in a large skillet or pot.  Season the fish with salt and pepper.  Sear the fish fillets on both sides and remove to a plate.  Do not cook through.

2.  Saute the vegetables.  Lower the heat to medium and add the onions and peppers.  Saute until the onion is translucent.  Add the garlic and saute for 1 to 2 minutes more.  

3.  Continue making the curry.  Add the tomatoes, coconut milk, garam masala, tamarind paste or lemon juice, salt and pepper.  Bring to a boil and reduce heat to low and simmer for 6 to 8 minutes.  Add the fish fillets, cover and continue to simmer until the fish is cooked through, about another 5 to 10 minutes. 

4.  Finish the dish.  Serve the curry with rice, boiled potatoes, or boiled cassava.

This is a great recipe, that is very simple to make.  I have already made it a couple times and it is being added to my shortlist of recipes to make on a busy evening. 

ENJOY!

Sunday, September 22, 2013

Josh Cabernet Sauvignon (2011)

This wine -- a Cabernet Sauvignon from Josh Cellars, introduced a new term for me ... "vin de garage."  Those words represent a wine that winemakers make for themselves.  Put another way, it is a fancy, French-way to say "a winemaker's wine."

The wine, which is eponymously named "Josh," is described as a vin de garage.  This got me to thinking about what makes a "winemaker's wine."  The Josh is produced exclusively with Cabernet Sauvignon grapes grown and cultivated in the North Coast of California.  The grapes are punched down three times a day.  According to Josh Cellars, this helps to maximize flavor extraction.  The grapes are then subjected to a 10-15 day extended maceration until the juice is fermented and aged in a combination of new American oak and French oak for sixteen months. 

The Josh pours a dark, burgundy red, which signifies a more earthy Cabernet Sauvignon, at least in my opinion.  And, in this case, my opinion was confirmed by the wine.   The aromatic elements of this wine are very full and somewhat dark ... currants, black cherries or plums.  The taste of this wine is also substantial.  The winemaker describes the flavor as having black currants and deep dark fruits (those plums and dark cherries), along with smoke and spice.  I clearly sensed the dark fruit and the spice.  The smoke was a little more elusive. 

A full bodied, dark Cabernet Sauvignon like this one calls for a substantial pairing.  Beef, pork or lamb, either grilled or roasted would be a perfect pairing.  As I write this post, my thoughts turned to a nice grilled ribeye steak or New York strip steak, seasoned with just salt and pepper.  A simple steak would be a very masterful complement to this wine.

A simple pairing like this suggests something about the wine.  The winemakers describe the Josh as a wine that is bold and expressive, but unassuming, and approachable. I would agree with that characterization.  I found this wine at a local grocery store. It costs about $15.99 a bottle. 

ENJOY!

Sunday, September 15, 2013

Savage Boleks' Smoked Turkey

When people think of barbecue, thoughts turn to pork shoulders, ribs and beef brisket.  My thoughts turn to a wide range of meats when it comes to smoking.  Many of the more interesting barbecue projects have been done in collaboration with my father-in-law, Frank.  These projects include our smoked salmon fillets and smoked mullet spread.  

Recently, I collaborated with Frank on another BBQ project: smoked turkey.  My beautiful Angel eats turkey at Thanksgiving, and, more recently, has eaten some of my turkey dishes.  So, we decided to smoke a turkey so that everyone -- Clare's parents, Clare and myself -- could have something to eat.  

The meat was chosen, which then raised several questions.  First, do we smoke a whole turkey or just parts of a turkey (like a turkey breast, or turkey thighs)?  We seriously considered smoking an entire turkey.  This posed some serious issues, given the white meat and dark meat cook at different speeds and need to reach different temperatures.  There is also the secondary question of whether to cook the bird as is, or spatchcock the bird (that is, remove the backbone so the entire bird lays flat).  If we spatchcocked the turkey, we would have to cut it into two halves in order to fit into the smoker. All of these questions became moot, however, because I could not find a good sized, fresh turkey.  The best turkey was a whopping 21 pounds, which was way to big for our endeavor.

A couple of the smoked turkey thighs.
Thus, we decided to smoke a turkey breast and turkey thighs. The use of cut turkey parts would definitely shorten the cooking time, which would allow us to speed up the cooking time and allow us to enjoy the meat sooner rather than later.

Second, there is the question of using a brine.  A brine is a solution of water and salt.  Placing meat into this solution for a period of time helps to add moisture to the meat.  This added moisture is particularly helpful when it comes to cooking or smoking meats that have a low fat content, like turkey.  We decided to use a brine and, because we were using cut turkey parts, we decided to brine the turkey for about an hour.

The smoked turkey breast.
Third, there was the question of the rub and/or sauce.  We decided to do just a rub.  Frank searched for various turkey rubs, and, then he came across one that had a list of rather unusual ingredients ... at least for turkey.  Cardamom, ginger, turmeric, allspice, cloves, coriander and fenugreek.  All of those ingredients sounded like the perfect components of a rub.  After all, I have previously experimented with spices and turkey, making turkey thighs rubbed with an Egyptian Baharat spice mixture.  So, we decided to use the rather unusual combination of spices as the rub for the turkey.  This was perhaps the best decision we made in our preparations, because that spice mixture produced an amazingly, flavorful meat.

Finally, there was the question of the two additional flavor elements.  There are three elements to consider: wood, liquid and basting sauce.   When it comes to wood, the general rule calls for fruit woods, like apple or cherry.  So, we chose apple wood. When it came to the liquid bowl (that is, the bowl that is between the meat and the coals), we used a combination of apple juice and water, along with some keffir lime leaves.  The leaves were inspired by the ingredients in the rub.   The basting sauce also was very simple: just some apple juice.  We began the basting after the meat had been in the smoker for two hours.

In the end, the turkey turned out perfect.  The turkey thighs were delicious, with the rub providing an interesting array of flavors.  As for the turkey breast, the use of the brine ensured that the breast meat did not dry out during the cooking process and remained juicy with a lot of moisture notwithstanding the hours of smoking.   This barbecue project worked out so well that I have since smoked some more turkey thighs using the same brine and rub process.  The results were the same: delicious, flavorful and juicy turkey, which did not need any sauce.

SAVAGE BOLEKS' SMOKED TURKEY
A Chef Bolek Collaboration
Serves Many

Ingredients (for the Brine):
16 cups of water
1/2 cup of salt

Ingredients (for the Spice Rub):
3 tablespoons of ground cardamom
3 tablespoons of ground ginger
2 tablespoons of ground turmeric
2 tablespoons of ground coriander
1 tablespoon of ground allspice
3 tablespoons of ground black pepper
2 tablespoons of ground cayenne pepper
1 teaspoon of ground cloves
3 tablespoons of ground fenugreek

Ingredients (for the turkey):
8 pounds of turkey (1 four pound breast and 4 pounds of thighs)
Kaffir lime leaves
2 cups of apple juice
Chunks of apple wood

Directions:
1.  Brine the turkey.  Add the water to a large pot.  Add the salt and stir until it dissolves.  Add the turkey breast and thighs.  Allow the meat to brine for one hour.  After an hour has passed, remove the meat, rinse well, and dry thoroughly.

2.  Prepare the rub for the turkey.   Add all of the ingredients for the rub in a small bowl.  Apply the rub to all surfaces of the turkey. 

3.  Prepare the smoker.  Get a fire going for the smoker.  Once the coals are ready, add the liquid bowl, which should be filled with water and kaffir lime leaves.  Add the grates.

4.  Smoke the turkey.  If you have two levels, place the breast on the lower level with the skin side up.  Place the thighs on the higher level with the skin side up.  Smoke until the white meat reaches 160 degrees Fahreneheit and the dark meat reaches 170 degrees Fahrenheit.  It will take approximately one half hour for every pound of meat.  After about two hours, baste the turkey with some apple juice.  Once the meat reaches the desired temperature, wrap the meat in foil and allow it to sit for at least 15 minutes but preferably 30 minutes.  During that time, the meat should cook another 5 to 10 degrees and be ready for slicing or pulling.  Serve immediately.

ENJOY!