Showing posts with label Sugar. Show all posts

Sunday, June 2, 2024

Pizzelles

The pizzelle may be one of the oldest known cookie recipes. There are recipes that are said to date back to the 8th century B.C.E., which would go as far back as the founding of Rome (which took place around 753 B.C.E.). Yet, these cookies did not emerge on the streets of the city founded by Romulus and Remus. Instead, the cookies originated on the other side of the peninsula, in an area that would become known as Abruzzo. 

The story of the pizzelle is said to have begun in the village of Culcullo. The village and its residents were overrun with poisonous snakes. A man named Dominic rendered all of the snakes harmless. To thank that man, a celebration was held, which became known as the Festival of Snakes. Pizzelle cookies were made and eaten as part of the celebration. The man would later become Saint Dominic. The Festival of Snakes, as well as the Feast Day of San Dominico, continue to this very day to celebrate that story. Now, as people eat their pizzelles, they can watch snakes slither up and down a statute of Saint Dominic. (It is said if the snakes wrap themselves around the statue's head, it will be a good year for the crops.)

Over time, pizzelles were also made and eaten for other celebrations, notably Christmas and Easter. Indeed, my Italian ancestors - who came from Abruzzo - had a yearly tradition to make stacks and stacks of the waffle-like cookies at Christmas time. It was as much a part of the tradition as the holiday meals themselves. 

The process of making pizzelles is as old as the wafer-like cookies. Centuries ago, people used iron presses. The presses were usually adorned with some design, such as a snowflake; however, families could have irons decorated with the family crest, or other meaningful designs. The iron presses had a long handle, which one could use to hold the irons over hot coals. The batter was placed in the center, the press was closed. and pressure was applied for a very short time until the cookie was done. Fast forward several centuries and one can still find people using iron presses to make these cookies, just with electricity rather than coal. 

This recipe is relatively easy to make, but it takes a little time getting used to the pizzelle iron. Generally speaking, I find that using a small ice cream scoop works best, placing the batter in the middle of each part of the iron. I also find that holding the iron closed (rather than relying on the clip), gets better results. If the batter sticks to the iron, try a little spritz of olive oil to grease the irons. That also helped immensely in terms of making the cookies, although it did make it a little messier. A little mess is worth it in the end.

PIZZELLES

Recipe from Food Network

Serves many

Ingredients:

  • 3/4 cup sugar
  • 1/32 cup unsalted butter, melted
  • 2 tablespoons milk
  • 1 teaspoon vanilla extract
  • 1/2 teaspoon anise extract
  • 3 large eggs
  • 1 2/3 cups all-purpose flour
  • 1 1/2 teaspoons baking powder

Directions:

1. Whisk together the ingredients. Whisk together the sugar, butter, milk, vanilla, anise and eggs in a large bowl. Add the flour, baking powder and salt, and continue to whisk until the batter is smooth. Allow to stand at room temperature for at least 1 hour so the batter can hydrate.

2. Cook the pizzelles. Heat the pizzelle iron. Once the iron is hot, use a small ice cream scoop to place one scoop in the center of each side of the iron. Close the iron firmly and hold close for 30 seconds. Remove the cookies immediately and place to the side to cool. 

PEACE.

Friday, February 2, 2024

Chargrilled Hmong Black Pig Skewers with Sesame Salt

"I would tell people that Hmong food is not just a type of food. It's not about the product. It's a philosophy.... If you want to know our people you have to know our food. By knowing our food, you will know our story. You'll know where we been and it will show the trajectory of where we're going.  

-- Chef Yia Vang

To the extent people know about the Hmong, that knowledge comes more from political history. The Hmong are an indigenous ethnic group that has lived for centuries as a minority in eastern and southeastern Asia. During the Vietnam War, the United States Central Intelligence Agency recruited and trained the Hmong living in Laos for a "secret war" against the North Vietnamese Army. The Hmong harassed the North Vietnamese along the Ho Chi Minh trail, safeguarded U.S. radar installations, and rescued downed American pilots. After the war, the communist governments of Vietnam and Laos declared that the Hmong were "traitors." The governments persecuted the Hmong. They arrested the Hmong, who were sent to hard labor camps. They sprayed Hmong villages with chemicals, including napalm.  Nearly ten percent (10%) of the Hmong population was killed and around 100,000 Hmong sought refuge in neighboring Thailand and beyond. 

The culinary history of the Hmong is far less known. Before the Vietnam War, the Hmong had a strong agrarian tradition in the mountains of northern Laos and Vietnam. They grew rice and other produce, as well as raised livestock, such as pigs. The Hmong practiced animism, believing that objects, plants animals, and even places have their own spirit. These beliefs underlie the respect that the Hmong hodl for what they have. It also informs their traditions. 

For example, there is a Hmong tradition -- called Noj Tsiab (nee-al jia) -- that centers around the butchering of a pig. During the last week of December, each family would select a pig from their herd to be butchered. Every family member had a role in the process, being taught by the elders how to prepare the pig, how it would be cut, and how to ensure that all of the pig would be used with nothing going to waste. This knowledge was important, and it was passed on from generation to generation. The end products would be used to prepare a meal for the community for the new year. It enabled everyone to participate in a tradition that gives thanks for what they have been given and to their ancestors for watching over them.

This tradition was lost, at least temporarily, for those Hmong who fled their homes and found themselves in refugee camps. Even after they escaped those camps, making their way to the United States or elsewhere, many of their new lives did not include the raising of pigs, let alone the opportunity to butcher them in accordance with their traditions. 

I knew none of this when I came across a recipe for Chargrilled Hmong Black Pig Skewers with Sesame Salt.  It was in a cookbook called the Food of Vietnam. The author, Luke Nguyen, is a Vietnamese-Australian chef who was part of a television show, Luke Nguyen's Vietnam, that I watched on public television. Every episode fascinated me, both with respect to the people, the surroundings, and, of course, the food. When I got this cookbook, as well as another Vietnamese cookbook, I spent a lot of time paging through the recipes. This one caught my eye because of the reference to the Hmong people. 

Roasted sesame seeds with salt
According to Chef Nguyen, the Hmong raised black pigs in the hills and mountains of Vietnam. The cuts from the necks would be used for this dish. I had access neither to those particular black pigs, or, more generally, to pig necks. Instead, I looked for any cut of pork that would enable me to slice thinly or that came sliced thinly. 

There are two things that I really like about this recipe. The first thing is the marinade. The recipe calls for a combination of scallions, lemongrass, fish sauce, oyster sauce, black pepper, and honey, for a marinade. This particular combination of ingredients imparts a lot of flavor into the meat, which is facilitated by the fact that the meat has been thinly sliced.  The second thing is the ease of preparing this dish. Once the marinade is complete, the rest of this recipe is easy: just thread some pre-soaked skewers, place on a heated grill, flip the skewers a few times and you are done. 

These skewers are very delicious and, given the ease of preparing this dish, I will very likely make this recipe again. The next time will take on a little more meaning now that I have some understanding of the traditions of the people behind the recipe. 

CHARGRILLED HMONG BLACK PIG SKEWERS WITH SESAME SALT

Recipe from Luke Nguyen, The Food of Vietnam, pg. 318

Serves 4-6

Ingredients:

  • 300 grams (10.5 ounces) pork neck, thinly sliced
  • 2 tablespoons toasted sesame seeds
  • 3 spring onions, sliced then bashed to release the flavor
  • 4 tablespoons finely diced lemongrass, white part only
  • 3 tablespoons fish sauce
  • 1 teaspoon oyster sauce
  • 1 teaspoon sugar
  • 1 tablespoon honey
  • 1/2 teaspoon freshly ground black pepper
  • 3 tablespoons vegetable oil

Directions:

1. Prepare the marinade. Combine the onions, lemongrass, fish sauce, oyster sauce, sugar honey and black pepper in a mixing bowl and mix well. Add the pork and toss until well coated. Cover and marinate in the refrigerator overnight. 

2. Prepare the skewers. Soak 12 bamboo skewers in water for 30 minutes to prevent scorching. Thread the pork on to the skewers and chargrill on each side for 3 minutes. Mix the sesame seeds with a pinch of sea salt. Serve on the side for dipping the skewers into. 

PEACE. 

Friday, December 22, 2023

Pad Kaprow

My culinary journeys around the world have often led me to "national dishes." Generally speaking, these are meals that have a strong connection to a particular country. This connection may arise in one of several ways. It may involve an ingredient that is produced locally or prepared in way only done in that area. It may form part of a cultural tradition. Or, it may be actively promoted by a government as part of an effort to create a national identity. 

Take, for example, the country of Thailand. At one point in its history, roughly corresponding to the beginning of World War II, the military dictatorship of Thailand promoted a national Thai identity. Field Marshal Plaek Phibunsongkram issued twelve (12) cultural mandates from 1939 to 1941. Each mandate set forth objectives for the people. For instance, the third cultural mandate -- On referring to the Thai people -- prohibited Thais from referring to themselves inconsistently based upon preferred group, region or religion (for example, don't refer to oneself as a southern Muslim Thai). It also required the people to refer to themselves as the Thai people. The fifth mandate also had multiple requirements, including Thai people should make an effort to consume food made only from Thai products. Such an edict is often said to be the basis for some of Thailand's national dishes, such as Pad Thai and Pad Kaprow. 

Thai Basil
While Pad Thai is perhaps the most popular and well-known dish, Pad Kaprow comes in a close second. The name translates into basil stir fry. It is not just any basil, but Thai Basil (or Holy Basil) that makes this a Thai dish. 

The history of this dish is a little unclear. The main ingredient -- Thai Basil -- had been introduced into Thailand centuries ago (approximately around 2,450 B.C.E. or 2,500 B.C.E.). Yet, the dish of stir frying basil with chicken (or other protein), chiles and other ingredients goes back only a few or several decades. Indeed, I could not find anything in my research that would enable me to trace this dish back to the time when Field Marshal Phibunsongkram was issuing his edicts. Then again, while there are a lot of articles about the greatness of Pad Kaprow, few of those articles actually delve into how the dish came into existence or how it has evolved over the years. 

Nevertheless, the research does point out a couple of key things about Pad Kaprow. First, the dish represents a Thai version of the five tastes: salty, sweet, sour, hot (spice) and bitter. (I have talked about the five tastes before, check out this post and this post for more.) One Thai chef, Chakkrit Chuma, once said that Pad Kaprow or "Pad kaphrao has to be salty first, sweet after and then feeling hot and spicy in your mouth." Chef Chuma lamented that "sometimes people just make it too spicy and you don't taste anything else." (The Chef also acknowledges that he uses seven chiles in his recipe.)  Second, Pad Kaprow is flexible when it comes to the protein. It is most commonly made with chicken -- Pad Kaprow Gai -- but it can also be made with beef, pork, vegetables and seafood. For this dish, I made it with turkey, because that is the only meat that my beautiful Angel will eat. Also, while many recipes used ground meat, I used turkey thighs because I think that the bite-sized pieces are better. (Also, the use of ground meat reminds me too much of laab or larb, which is considered the national dish of neighboring Laos.) 

PAD KAPROW

Recipe from All Recipes

Serves 2

Ingredients:

  • 1/3 cup chicken broth
  • 1 tablespoon oyster sauce
  • 1 tablespoon soy sauce, or more as needed
  • 2 teaspoons fish sauce
  • 1 teaspoon white sugar
  • 1 teaspoon brown sugar
  • 2 tablespoons vegetable oil
  • 1 pound boneless, skinless chicken thighs, chopped
  • 1/4 cup shallots, sliced
  • 4 garlic cloves, minced
  • 2 tablespoons Thai chiles, minced or sliced
  • 1 cup basil, thinly sliced
  • 2 cups rice, cooked

Directions:

1. Prepare the broth. Whisk the chicken broth, oyster sauce, soy sauce, fish sauce, white sugar and brown sugar together until well blended. 

2. Sauté the chicken. Heat a large skillet over high heat. Drizzle in oil. Add chicken and stir fry until it loses its raw color, 2 to 3 minutes. Stir in shallots, garlic and chiles. Continue cooking on high heat until some of the juices start to caramelize in the bottom of the pan, about 2 to 3 more minutes. Add a tablespoon of the sauce mixture to the skillet; cook and stir until the sauce begins to caramelize, about 1 minute. 

3. Continue to cook the chicken. Pour in the rest of the sauce. Cook and stir until the sauce has deglazed the bottom of the pan. Continue to cook until the sauce glazes onto the meat, about 1 to 2 minutes more. Remove from heat. 

4. Finish the dish. Stir in basil. Cook and stir until the basil is wilted, about 20 seconds. Serve with rice. 

PEACE.

Friday, May 5, 2023

Oysters with Nuoc Cham

There was a point in time when I was experimenting with all sorts of mignonette sauces, seeking out the best ones to serve alongside raw oysters. The sauces include a Green Sauce, as well as ones made with balsamic vinegarbeer, or champagne. The experimentations continued; but, honestly, none of them stood out as something that I really wanted to make again, and again, and again. 

Recently, I got to thinking about a sauce that I really do love ... nuoc cham. My introduction to this sauce came about from my efforts to learn more about Vietnamese cooking. The sauce caught my attention because of how it balances sweet, sour, salty, bitter, and spicy. In addition, the backbone of nuoc cham is fish sauce, which adds umami to that balance.

Indeed, the history of nuoc cham is inextricably tied to the history of fish sauce. And, that history appears to be subject to some debate. There is quite a bit of literature about the development of fish sauce in the West, whether by the ancient Greeks (who called it garos) or the Ancient Romans (who referred to it as garum). Some of that literature (such as the one I have linked) suggest that fish sauce traveled east to Eastern and Southeastern Asia. However, there are other sources that propose the idea that fish sauce developed independently in Asia, rather than being an import from the West. 

Regardless of where it originated, there is no doubt that fish sauce - and nuoc cham - are very popular in Southeast Asia. Every country's cuisine has some form of the sauce, but it goes by a variety of names, including not only nuoc cham (Vietnam), but also tuk trey (Cambodia), nam pla prik (Thailand), budu (Malaysia), and ngan-pye-ye (Myanmar). 

In any event, my recent use of nuoc cham got me to thinking that it might make a great "mignonette" to be served alongside raw oysters. It is definitely a different taste, but the balance of flavors works well, especially with larger, meatier oysters. For this dish, I used Chincoteague Salts, which come from the Chesapeake Bay. These oysters tend to be more on the briny side. The brininess worked well with the sauce. The other flavors, namely the fish sauce, the chile and lime juice, still balanced the added saltiness from the oysters.  

Needless to say, I may dispense with mignonette sauces altogether and just prepare nuoc cham whenever I have or serve raw oysters. It is that good.


OYSTERS WITH NUOC CHAM

Nuoc Cham recipe from Luke Nguyen, The Food of Vietnam, pg. 358

Serves 3-4

Ingredients:

  • 2 dozen oysters, rinsed and shucked
  • 3 tablespoons fish sauce
  • 3 tablespoons white vinegar
  • 2 tablespoons sugar
  • 2 garlic cloves, chopped
  • 1 red bird's eye chile, thinly sliced 
  • 2 tablespoons lime juice

Directions:

1. Heat the liquid ingredients. Put the fish sauce, vinegar and sugar in a small saucepan with 1/2 cup of water. Place over medium heat, stir well and cook until just before boiling point is reached. Remove the pan from the heat and allow to cool. 

2. Finish the dish. Just before serving, stir in the garlic, chile and lime juice. Store in a tightly sealed jar in the fridge for up to five days.

ENJOY!

Tuesday, November 1, 2022

Yakitori Negima

Good food is very often, even most often, simple food.

- Anthony Bourdain

Bourdain's words provide an apt description for one of the simplest, but perhaps, greatest kebabs in the world ... Yakitori. Even the word is simple, translating to "grilled bird." Small bite sized pieces grilled over a charcoal grill, sometimes basted with a particular sauce or other times just a sprinkle of salt. These particular chicken skewers a truly a unique culinary experience. 

The history of yakitori dates back to the middle of the Meiji Period, around the 1880s and 1890s. (However, there are references to grilled chicken dishes going as far back as the Kamakura Period, the fourteenth century, and the term "yakitori" is said to have appeared in the oldest Japanese cookbook, Ryori Monogatari, which was produced during the Edo Period in 1643.)

Yet, it may have been pigs who led the way. Before yakitori become widespread, there was yakaton, which was pork offal skewers, which were first made in the Kanto Region of Japan (which includes, among others, the city of Tokyo). It is said that these pork offal skewers led the way for the chicken skewers that became yakitori. Food stalls -- or yatai --started popping up across Japan, from which vendors offered skewers of grilled innards from the expensive game birds served by from restaurants. The grilled skewers became a way for Japanese to enjoy grilled birds, which were often too expensive to bun the restaurants.

It took some time to get used to the smells of these stalls. For many Japanese, the smells of roasted or grilled meat was distasteful. Vendors began grilling their skewers using a particular type of coal, binchotan coal. This coal gets very hot, burns cleanly, but produces its own smoky aromas, which not only mask the smell of the grilled fowl, but also provide a smoky taste to the skewers. Vendors also started applying a tare, a sweet and salty sauce that added more aromas and flavors to the meat. 

There are many different types of yakitori, with each type focusing on a particular part of the bird or chicken. The most common yakitori is Yakitori Negima (ねぎま), which consists of bite sized pieces of chicken thigh skewered along with pieces of scallions or long onions. This particular yakitori includes the preparation of a tare, which is a sauce consisting of soy sauce, mirin, sake and sugar. The sauce is brushed on the skewers during the grilling process, as well as served alongside the skewers.

This recipe seemed like the perfect start for the trifecta of yakitori recipes that will serve as the latest installment of my Kebab-apalooza series. Come back and check as I head further back into the origins of yakitori, including the preparation of kebabs using chicken offal (like hearts and gizzards). 

YAKITORI NEGIMA

Recipe from Curious Cuisinere

Serves 4

Ingredients (for the chicken):

  • 8 bamboo skewers
  • 1 pound chicken thighs, cut in 1 inch pieces
  • 6 scallions, cut in 1 inch pieces

Ingredients (for the tare):

  • 1/2 cup soy sauce
  • 1/2 cup mirin
  • 1/4 cup sake
  • 2 tablespoons sugar

Directions:

1. Prepare the grill and the skewers. Preheat the grill to a medium-high to high heat, roughly 450 degrees Fahrenheit. Soak the skewers in water for 10 minutes.

2. Prepare the tare. In a small saucepan, mix the soy sauce, mirin, sake and sugar. Bring the mixture to a boil over high heart. Reduce the heat to medium heart and set it aside to cool slightly. Once cool, divide the sauce between two small bowls. One will be used for brushing the raw meat, one will be used for serving. 

3. Prepare the skewers. While the sauce is simmering and resting, remove the skewers from the soaking water and skewer the chicken and scallion pieces, leaving a little room at each end for easy turning.

4.  Cook the skewers. Cook the yakitori skewers over a hot grill for 2 minutes on the first side. Flip the skewers and cook for an additional 2 minutes on the second side. Flip the skewers again and brush them with the yakitori sauce. Flip and brush the skewers once more. At this point, the chicken should be firm and the sauce should be beginning to caramelize and create a nice glaze on the chicken.

5. Finish the dish. Transfer the cooked yakitori to a platter and brush them once more with the yakitori sauce (using a clean brush and the second bowl of yakitori sauce that has not been used for the chicken as it cooked).

Tuesday, March 1, 2022

African Chicken (Galinha a Africana)

If one wanted African Chicken, the journey would take them to an unexpected place. It would not be a restaurant in Dakar or Kigali. It would not be to a home in Nairobi or Gabarone. Instead, that journey would transport the person to a small island off of a continent. The continent is Asia and that island is Macau.

The dish of African Chicken -- or, as it may appear on menus, Galinha a Africana -- embodies the essence of the cuisine of Macau. That essence is fusion. For more than 450 years, chefs and cooks on Macau have incorporated European, African and Asian ingredients, cooking methods and recipes to create the dishes that grace the tables of today.  So much so, that the cuisine of Macau has been recognized by the United Nations Educational, Scientific and Cultural Organization or UNESCO as the world's first fusion food

The story of Macanese food, as their people, begins with the colonization of the island by Portugal in the 16th century.  Portuguese sailors and merchants came to the island as part of their voyages across the world. The Portuguese who remained on Macau began to intermarry with the Chinese, which gave rise to the Macanese people. The Macanese even had their own language, Patua, which is a form of Portuguese Creole. However, when the Portuguese returned control of Macau to China, the Macanese people began to disperse. Presently, the Macanese constitute about 10% of the population of the island at best, and, their language is deemed critically endangered, with only about 50 speakers as of 2000 (and that was 20 years ago).  

Like the people, Macanese cuisine is basically a fusion of Portuguese and Chinese cuisines, but it incorporates ingredients, cooking processes, and recipes from around the world, including Brazil, Angola, Mozambique, Goa and Timor. This is where African Chicken provides a perfect example of Macau's fusion cuisine because that fusion can be found on multiple levels. For example, the dish incorporates chiles, which were brought to Macau by the Portuguese from Angola and Mozambique. It also incorporates fish sauce, that wonderful umami flavor that can be found in southeastern Asian cuisine. The fusion involves more than just ingredients, it also includes cooking processes. The chicken is first grilled until the skin becomes crispy and brown, and then the chicken is braised in its marinade. The end result is everything that is best about each African, Asian and European cuisine, namely fiery piri chiles, the smell and taste of fish sauce and the juiciness of braised chicken.

The one other fascinating aspect about this dish is that, according to some, "you never know what you are going to get" when you order African Chicken in Macau. Sometimes the chicken is grilled and served without sauce. Other times it is presented as a stew. Some versions are fiery hot because of the chiles (as was the version I prepared), others have sweeter notes brought about by the coconut. The malleable nature of this dish may be just simply another level of fusion, enabling cooks and chefs to add their own personal touches to what is truly a global dish.

Finally, this post would not be complete without a mention of the Africans who were and are still present in Macau. During the colonial period, Africans served in the galleys of ships or as servants at the houses of the rich in Macau and southeastern China. After slavery was abolished, Portugal continued to bring Africans from Angola and Mozambique to serve as soldiers in Macau. After the 1974 Portuguese revolution, many of these African soldiers returned to their countries. Some remained, as well as others who came to the island and to China to study. They remain an important part of the community on the island.

AFRICAN CHICKEN

Recipe adapted from SCMP and Omnivore's Cookbook

Serves 4

Ingredients:

  • 8 bone-in chicken thighs or breasts
  • 3 1/2 ounces shallots, peeled
  • 1 3/4 ounce garlic, peeled
  • 1 ounce ginger, peeled
  • 1/2 to 3/4 ounce of red bird's eye chiles
  • 3 1/2 ounces red banana chiles
  • 7/8 ounce fresh cilantro
  • 1/2 teaspoon black peppercorns
  • 2 tablespoons and 1 teaspoon granulated sugar
  • 2 teaspoons chile powder
  • 3/4 teaspoons paprika
  • 5 teaspoons fish sauce
  • 1 tablespoon vinegar
  • 5 teaspoons fresh lime juice
  • 2/3 cup coconut milk

Directions:

1. Prepare the chicken. Dry the chicken with paper towels.  Sprinkle salt on both sides of the chicken and place it into a bowl.

2. Prepare the marinade. Roughly chop the shallots, garlic and ginger, placing them into a bowl for a food processor or blender. Mince the bird's eye chiles, shaking out as many seeds as possible. Roughly chop the banana chiles and cilantro. Add the chiles and cilantro to the blender or food processor. Add the peppercorns, sugar, chile powder, paprika and 10 grams of salt to the food processor or blender and process the ingredients to a coarse paste. Add the fish sauce, vinegar and lime juice. Process the ingredients to a rough puree. Stir in the coconut milk into the puree and then pour the marinade into the bowl holding the chicken. Mix well to ensure the pieces are coated with marinade and refrigerate for three to eight hours, mixing occasionally. Take the bowl from the fridge an hour before cooking the chicken. 

3. Cook the chicken. Preheat the oven broiler. Take the chicken out of the bowl and wipe off as much marinade as possible. Place the pieces skin side up in one layer on a baking tray. Grill the chicken on high until the skin is deep brown and slightly charred in spots, then turn the oven to 390 degrees Fahrenheit and continue baking for eight minutes for the breasts, 10 minutes for thighs. 

4.  Prepare the sauce. While the chicken is cooking, pour the marinade into a heatproof serving dish (such as enameled cast iron just large enough to fit the chicken pieces a little snugly in one layer. Place over a medium flame and bring to a bowl, then lower the heat and simmer, stirring often, until the sauce is a nice coating consistency. Taste the sauce and correct the seasonings, as necessary. If it is too spicy, add more sugar and/or coconut milk. 

5. Continue cooking the chicken. After baking the chicken, take the pan from the oven. Pour any chicken juices into the serving dish. Place the chicken in the dish and spoon the sauce over the pieces to lightly coat them. Place the dish in the oven and bake for another 8 to 10 minutes. 

6. Finish the dish. Place sprigs of fresh cilantro over the chicken. Serve immediately with rice or potatoes. 

ENJOY!

Saturday, February 5, 2022

Around the World in 80 Dishes: Canada

Once again I find myself trying to design a challenge involving a country that is comprised of multiple provinces, each with its own interesting takes on cuisine. The country is Canada, which has ten (10) provinces and three (3) territories that span the entire northern expanse of North America. Within those thirteen regions, there are the first nations or indigenous peoples, and, those who came during the colonization of the lands, whether English (as in most of Canada) or French (as in Quebec). The range of cuisine is as broad as the geographic range of the country. The only question for me is where do I start?

I decided to approach this challenge as I did my challenge to cook a main course from Spain, that is, I start with a random address. From that point, I could build the challenge. The problem is that the random address generator provided me with half a dozen addresses, spread across the country. When I found a generator that would give me one address, the website put me in Melfort, Saskatchewan. A city in the middle of a Canadian province that itself is close to the middle of Canada. Now that I had my location, I could move on to the next question: what is the cuisine of Saskatchewan? 

For starters, Saskatchewan has the largest proportion of indigenous peoples to the general population of all the Canadian provinces.  There are seventy (70) First Nations in the province, with five linguistic groups: Nehiyawak (Cree), Dakota (Sioux), Dene (Chipewyan), Nakota (Assniboine) and Nahkawininiwak (Salteaux). Those nations have arrived in the area approximately 11,000 years ago.  They established complex societies on the plains, with cultures recognizing that they were a part of, but not central to all that was around them. The closeness to the land and the environment is a critical part of their beliefs and societies, which also included a recognition of the need to share food and other necessities. 

Over the centuries, other groups emigrated and migrated to the Canadian plains. One such group is the Doukhobors, ethnic Russians who, although Christian, rejected the Russian Orthodox church.  Doukhobors practiced a different kind of Christianity, one based more on spiritualism.  Doukhobors believe that the Bible is not enough, that they have to internalize the living spirit of God. They are pacifists who tended to live in their own communities, rejecting materialism but working together. Needless to say, the Russian government mistreated the Doukhobors, leading to their wish to emigrate to other countries.  The government agreed in 1897 to let them leave Russia, but with  three conditions: (1) they never return; (2) they pay their own way; and (3) their imprisoned leaders remained incarcerated before they could leave. Many accepted those conditions and they left for Canada, settling in southern Saskatchewan (as well as southern Alberta and British Columbia). Once they arrived, they established "colonies" in block settlement areas or reserves.  These included the "Thunder Hill Colony," the "Whitesand Colony," the "Good Spirit Lake Annex," and the "Rosthern Colony." 

I have decided that, for this challenge, I would make two recipes from these two ethnic groups. I would first make Bannock, which has its ties to Native American cuisine in the province.  I would then turn to the main course, Shishlik, or the kebabs of the Russian immigrants. This latter dish will satisfy the personal culinary challenge.

BREAD

Bannock is a type of bread that originated in Scotland, where is was known as bannach or "morsel." The Scottish prepared used wheat flour to make this bread, which is really like a big biscuit. They cooked the bread by a fire using a griddle known as a Bannock Stone.  Bannock could be made in other ways, such as frying it or baking it. 

Scottish explorers and traders brought bannock with them as they made their way across the new world, including the United States and Canada.  Some indigenous peoples, such as the Metis, adopted the bread and made it their own. Rather than using wheat, as the Scots did, the indigenous people used corn flour  or flour made from local plants to prepare the bread.  

For this recipe, I wanted to try to recreate the bread using recipes from Saskatchewan. One recipe paired the Bannock with chokecherry syrup. Chokecherries are tart and bitter little berries. The range of these little berries runs from the plains of Canada south to the northern United States. The berries served as an important part of the diet for indigenous nations who lived in that region. While I searched to find chokecherries online, I was unable to do so (most likely because I was making this recipe out of season). If one cannot find chokecherries, the recommended substitute is tart cherries. However, I could not find tart cherries in the store and I did not want to buy them online.  In the end, I decided that I would simply use some cranberries that I had in the freezer, which were left over from the holidays.  

BANNOCK (LUSKNIKN) WITH CHOKECHERRY SYRUP

Recipe from Jenni Lenard, available at Refinery29

Ingredients (for the bannock):

  • 3 cups whole wheat flour
  • 3 cups all-purpose flour
  • 3 tablespoons baking powder
  • 1 teaspoon salt
  • 1/8 cup brown sugar
  • 1/2 cup oil or melted lard
  • 3 to 3 1/2 cups cold water
Ingredients (for the Chokecherry Syrup):
  • 2 cups chokecherries, rinsed well (substitute tart cherries)
  • 2 cups water
  • 3 cups sugar
  • 1 tablespoon lemon juice
Directions:

1. Combine the dry ingredients. In a large bowl, combine both flours, baking powder, salt and brown sugar. 

2. Add the wet ingredients. Add water and oil and mix with your hands until all the dry ingredients are incorporated.  If making bannock on a stick, add the water gradually until the dough is the consistency of a thick biscuit dough. For baked bannock, use 3 1/2 to 4 cups of water. Turn out onto a floured counter and knead for a few minutes.

3. Bake the bannock. Form into a 12 inch by 12 inch circle and bake for 30 to 35 minutes at 375 degrees Fahrenheit until golden brown.

4. Make the Chokecherry Syrup. Take 1/4 cup of the berries and grind them using a mortar and pestle (this releases the flavor of the seeds).  Place a pot with the whole berries and the water.  Bring to a boil then reduce the heat and simmer for 30 minutes. Strain, pressing the berries to release extra juices.  You will need 12 cups to make the syrup, so pour extra hot water over the berries if needed.  Add the sugar and lemon juice to the chokecherry juice and cook over medium heat, stirring occasionally, 25 to 30 minutes until clear and thickened slightly. 

MAIN COURSE

Sometimes it seems inevitable that I would be making a kebab recipe as part of a challenge. Given the ubiquitous nature of skewered meats around the world, the challenge has been to try to find a kebab recipe that sets itself apart from the endless multitude of recipes on the internet.  

This recipe, Shishlik, accomplishes that feat, not because of any specific ingredients or cooking methods, but because of its history. As noted above, this recipe tells the story of a particular group of Russian immigrants, the Doukhobors, who made their way and eventually settled in Saskatchewan. As they built their communities, they continued their culinary traditions. This continuity helped to establish shishliki as a food for both family and community events in southeastern Saskatchewan, around the cities of Yorkton, Kamsack and Canora. 

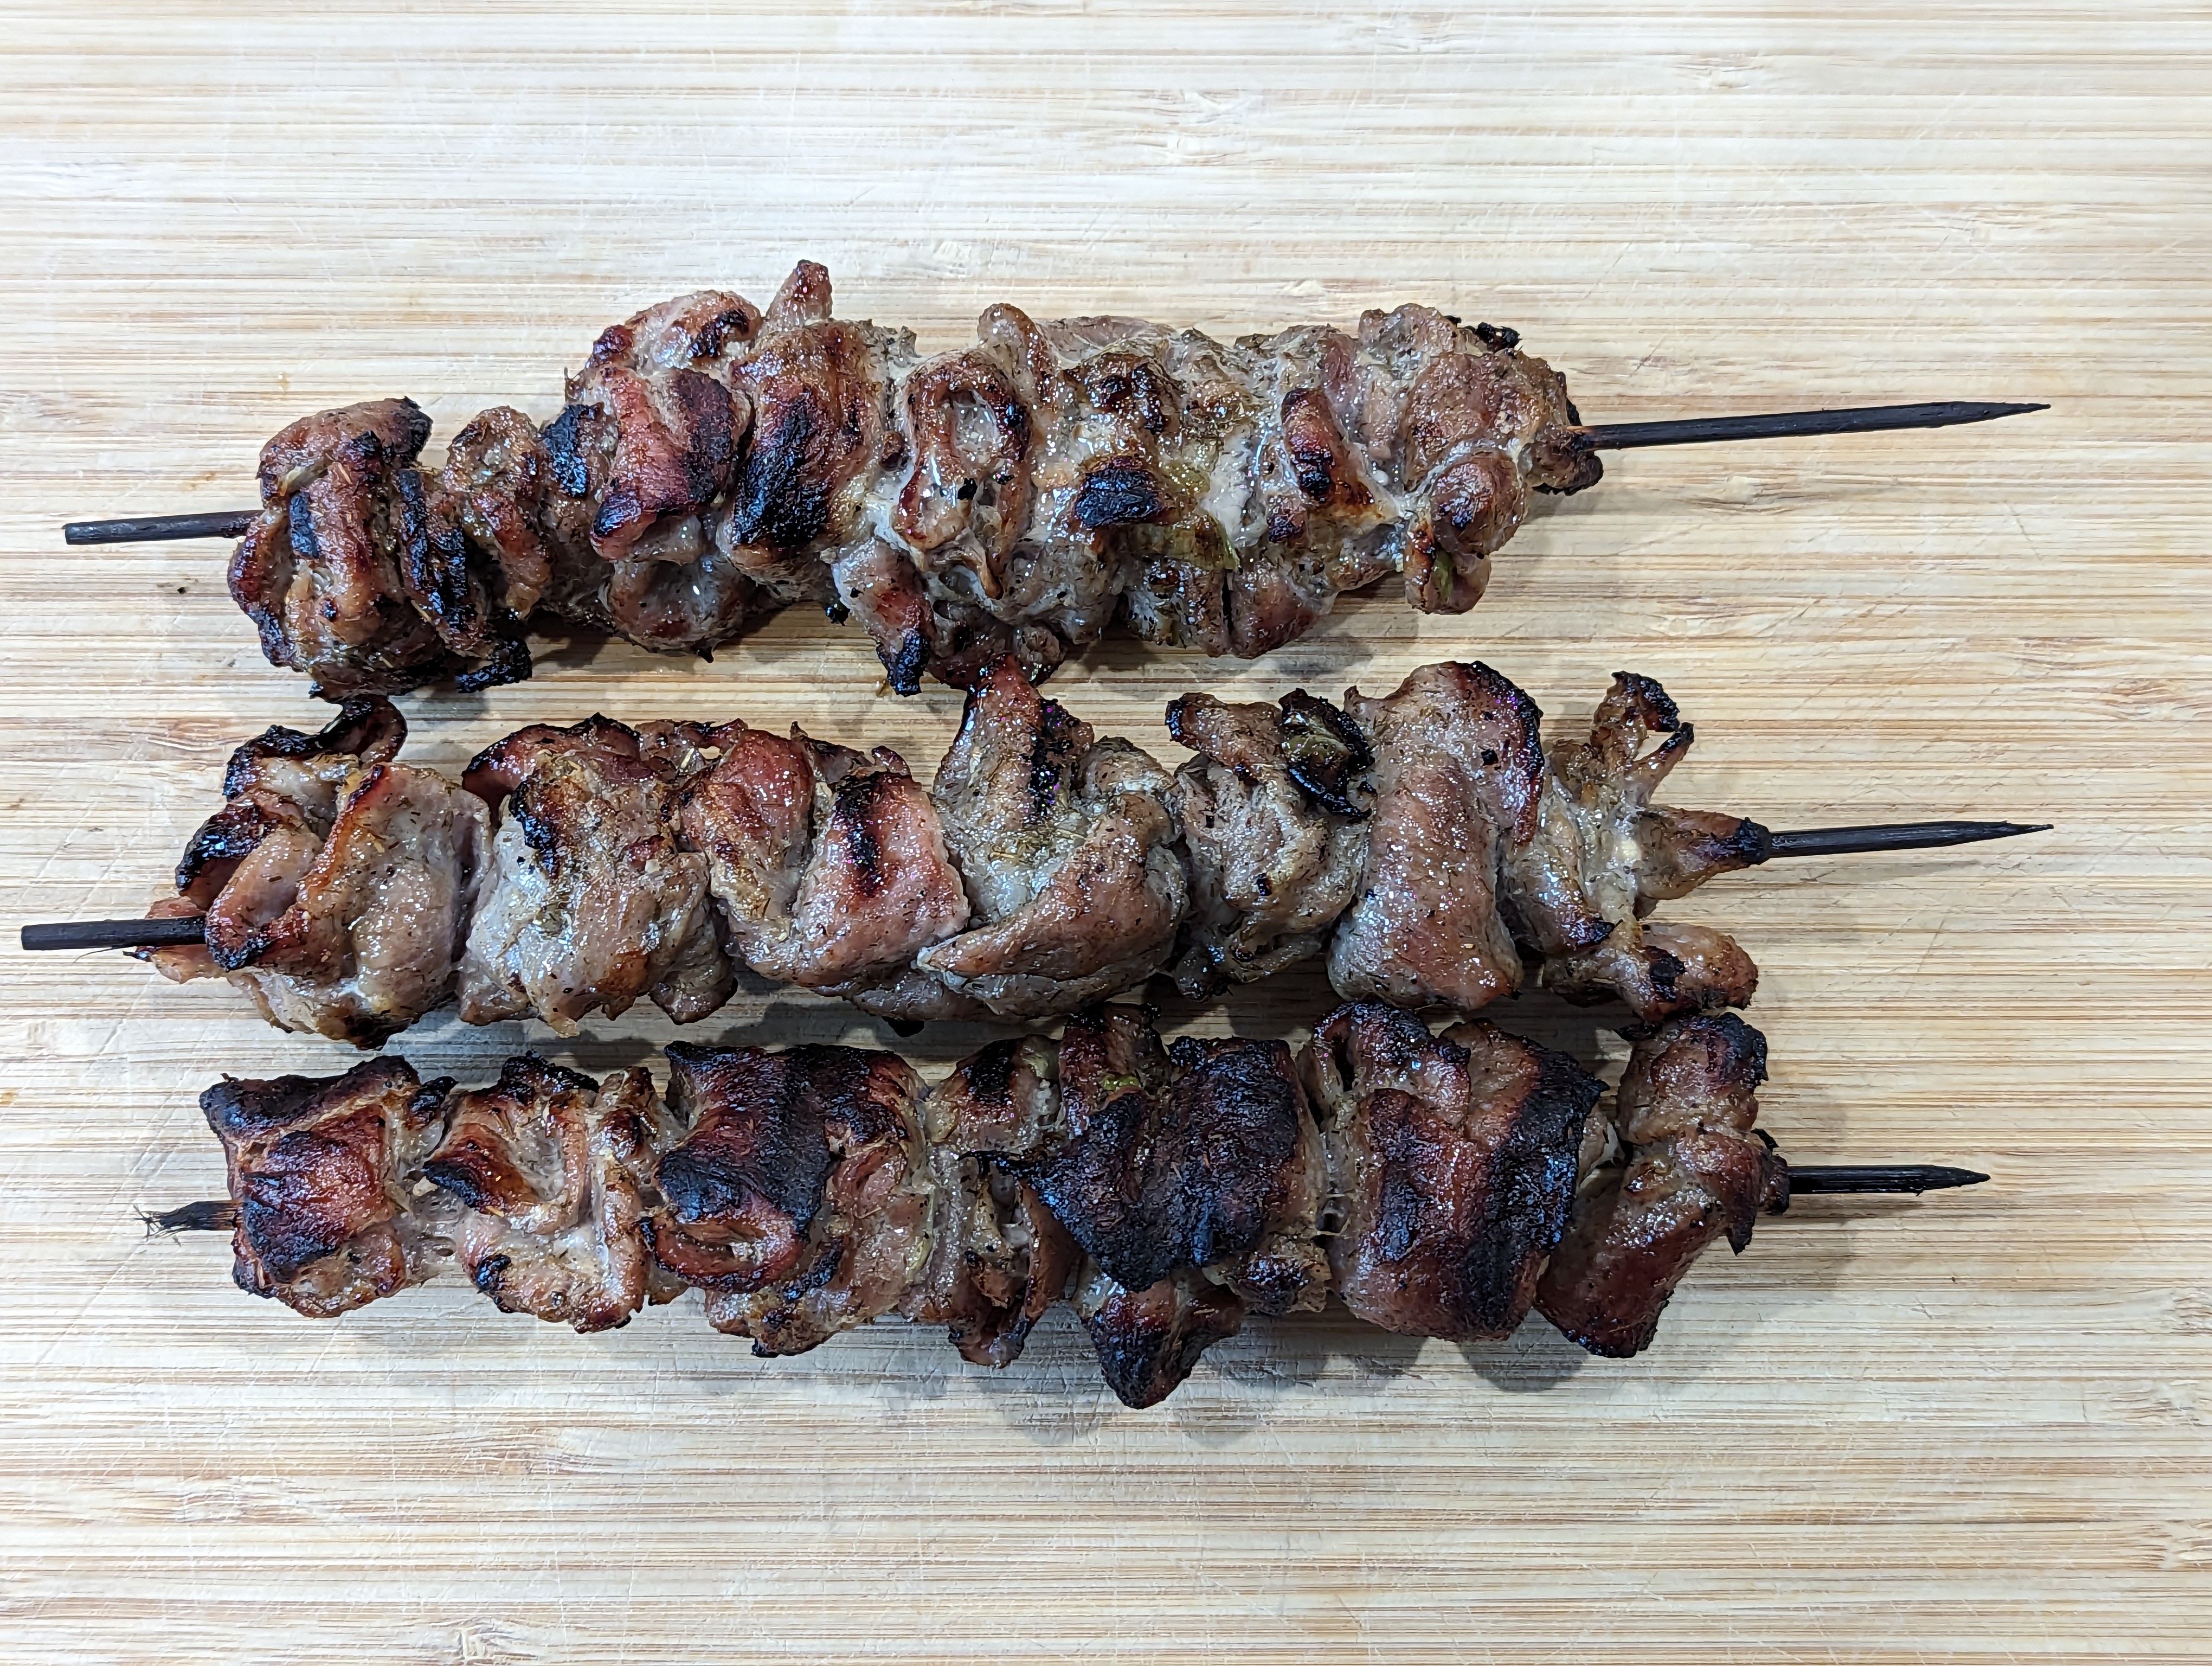
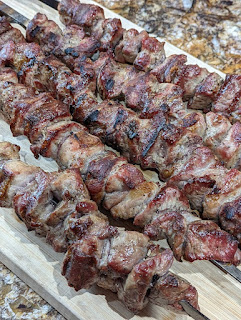
Shisliki is typically made with marinated and grilled lamb, although the recipe that I found leaves open the possibility of preparing skewers of chicken or pork. I decided to keep with the tradition and I used a leg of lamb to prepare this dish. The lamb cut into pieces, seasoned with salt and pepper, and then marinated with onions. (There are some recipes that use vinegar and/or lemon juice as part of the marinade, but I stuck with a fairly basic recipe). The lamb and the onions are left in the refrigerator to  marinate overnight, but, I should note that some recipes call for a longer period of time. For example, the town of Kamsack notes, on its website, the lamb should marinate for up to four days.  That is a little too long for me. I marinated the lamb for a much shorter time.  


SHISHLIK
Recipe from Saskborder
Serves 6

Ingredients:
  • 2 pounds of chicken, pork or lamb, cut into 1 1/2 inch cubes
  • Large onions sliced
  • Kosher salt
  • Freshly ground black pepper
  • Canola oil
Directions:

1.  Prepare the skewers.  Toss the meat and onions in a bowl and add vegetable oil until everything is coated.  Add the salt and black pepper and toss until everything is coated.  Place the meat in a bag and refrigerate it overnight.  

2. Grill the skewers.  Prepare a fire or heat a gas grill on high. Place the skewers next to the fire or on a cooler part of the grill. Turn occasionally and grill until cooked to the proper internal temperature.

*     *     *

In the end, I am happy that my personal culinary challenge is based on the Shishlik, rather than the Bannock. The challenge proved why I don't bake, as the bannock was not baked all the way through. I was still able to salvage enough of it to eat, but I figured that either I needed to make the bread thinner or it needed to bake longer. I also had to reduce the syrup for a longer period of time than what is called for in the recipe. Yet, the lamb skewers turned out perfectly, with pink meat in the center and crispy grilled edges to the lamb. Given the lamb counts as the main course, I can tally this challenge as a win. Until next time ... 

ENJOY!

Thursday, January 6, 2022

Vietnamese Grilled Clams with Oyster Sauce and Peanuts

As I always say, cooking provides many opportunities to learn, whether it is about cooking processes, ingredients, recipes and even cultures and cuisines. At least in my cooking experience, and in my humble opinion, few dishes embody this principle more fully and completely that this dish: Vietnamese Grilled Clams with Oyster Sauce and Peanuts. The recipe provided me with a chance to learn about the concept of fundamental elements in cooking. It is a concept that the Vietnamese call, "Ngũ Hành" or "ngũ vi.

The Ngũ Hành is actually a site in central Vietnam, located just south of Da Nang.  It is actually the Ngũ Hành Son, consisting of five mountains, each representing a fundamental factor of the universe. The mountains are Kim (metal), Moc (wood), Thuy (water), Tho (earth) and Hoa (fire).  

The phrase, "Ngũ Hành" or "Ngũ Vi," has also been used by the Vietnamese to refer to other quintuples. There are the five fundamental tastes: spice, sour, bitter, salty and sweet. There are also the five fundamental cooking modes: raw, steamed, broiled, fried/grilled, and fermented. And, there is the five fundamental food textures: crispy, crunchy, chewy, soft and silky. Vietnamese cuisine has always intrigued me as to how it applies and balances all of these quintuples, that is, taste, cooking mode and texture. 

To be sure, the Vietnamese did not create the culinary philosophy of quintuples, it originated in China. However, in my humble opinion, the Vietnamese have taken this philosophy and elevated when it comes to food.  There is something about the dishes, from the North to the South and from the coast to the inland. It is hard to describe, but the dishes always appear to please the eyes, the nose and the taste buds. That is why when I saw this recipe for Vietnamese Grilled Clams, I had to make it. 

This recipe represents some, but not all, of the Ngũ Hành or Ngũ Vi balance. For example, a balance would include ingredients that are salty and sweet, or spicy and sweet. For this recipe, the ingredients include sugar (sweet), black pepper (spice), which is a balance on a very small level. A balance of textures could be a combination of crispy or crunchy with chewy or silky. The textures in the recipe for Vietnamese Grilled Clams include clams (chewy), fried shallots (crispy) and peanuts (crunchy), paired with the oyster sauce and oil (silky). Together, these balanced ingredients help to elevate the dish to something that is delicious and needs to be made over and over again.

This dish represents what I love about cooking: it is the opportunity to learn and expand horizons. I hope to be able to continue to explore these concepts in future recipes.  Stay tuned for more ....

VIETNAMESE GRILLED CLAMS WITH OYSTER SAUCE AND PEANUTS

Recipe available at Food and Wine

Serves 4

Ingredients:

  • 3 pounds cherrystone clams or 1 pound mussels, scrubbed
  • 2 scallions, finely chopped (about 1 1/4 cups)
  • 1/2 cup chopped fresh rau ram (Vietnamese coriander) or cilantro
  • 1/4 cup packaged crispy fried shallots (such as Maesri)
  • 1/4 cup oyster sauce
  • 1/4 vegetable oil
  • 1 tablespoon granulated sugar
  • 1 tablespoon black pepper
  • 2 tablespoons plus 2 teaspoons finely chopped peanuts
Directions:
1. Steam the clams.  Preheat the grill to high (between 450 degrees and 500 degrees Fahrenheit). While grill preheats, fill a heavy bottomed pot with water to a depth of 1 inch, bring to a boil over high.  Add clams, cover and cook until shells open, 6 to 8 minutes, transferring clams to a backing sheet as they open.  Discard any clams that do not open. 

2. Prepare the sauce. Stir together the scallions, rau ram, fried shallots, oyster sauce, oil, sugar, and pepper in a small bowl. Remove clam meat from shells and coarsely chop. Discard top shells.  Stir chopped meat into scallion mixture; spoon evenly into bottom shells. (If using mussels, spoon about 2 teaspoons of the scallion mixture directly onto the meat inside each shell, leaving the top shells intact.)

3. Finish the dish. Place prepared clams on unoiled grill grates; grill, covered, until scallion mixture bubbles, about 2 minutes.  Carefully transfer to a platter; sprinkle evenly with peanuts, and serve. 

ENJOY!

Sunday, April 5, 2020

Nyonya-Style Steak

One would think during these times of stay-at-home orders, I would be doing a lot of cooking.  While I am doing some cooking, it is not as much as I would like. There are a couple of reasons.  Work, of course, is one of the main reasons.  The other reason is that I really don't like going to the grocery stores right now.  It is not as enjoyable as it once was.  I have spent quite a bit of my spare time researching how to order directly from farms and other local suppliers.  

Still, I have my fair shares to continue with my cooking hobby.  My beautiful Angel recently bought a couple of sirloin steaks when she went to the grocery store.  I went online looking for recipes and found a recipe for "Nonya-Style Flank Steak" from Steven Raichlen.  According to Steven Raichlen, it is a recipe of steak, Malaysian "Grandmother"-style.  The "style" is defined by the of oyster sauce, anise (or Chinese Five Spice) and topped with fried garlic. As much as I love Steven Raichlen and his contribution to cooking and cuisine (I am a big fan of all his shows), there is a little more to the Nonya-style.

Initially, it is Nyonya, not Nonya. The Nyonya (or Baba Nyonya) are the descendants of the Peranakan Chinese.  The Peranakan Chinese left what is now Guangdong and Fujian in modern-day China.  They emigrated to the Malay peninsula and the islands of what are now Indonesia. The emigration began in the 10th century but mostly took place from the 15th to the 17th centuries.  Thus, the Nyonya are a subculture of Chinese descendants who live in modern-day Malaysia. Those who live in Penang, Malacca and Singapore refer to themselves as Baba Nyonya.

In researching the cuisine of the Nyonya, I came across a very detailed research paper by Chien Y. Ng and Shahrim B. Karim, which can be found here. Both Ng and Karim discuss the historical and contemporary influences on Nyonya cuisine in their paper. They generally describe that cuisine as "a product of of cultural borrowing and cultural innovation through exposure to local sources of food such as ingredients and food preparation, that are non-Chinese." In other words, given the roots from whence they came, the starting point is Chinese cuisine. Once they reached the Malay peninsula, some of the ingredients they would have have used were no longer available or easily attainable.  This is where other cultures, such as the Malay, could fill in the gaps.  This allowed the Nyonya to adapt Chinese cuisine to life on the Malay peninsula.

Commonalities between Nyonya and Malay cuisine emerged over time, particularly when it came ot the use of certain ingredients. Both cuisines extensively use pungent roots (such as turmeric, galangal and ginger), leaves (laksa leaves, galangal leaves, and coriander leaves), spices (cloves, cinnamon, cardamom, cumin and nutmeg) and other ingredients (such as lemongrass and tamarind).  One other common ingredient between the two cuisines is the use of chiles. both dried and fresh.

Ng and Karim posit there are three types of Nyonya dishes: (1) traditional Chinese (Hokkien) dishes; (2) Malay-style dishes; and (3) innovated foods. Returning to Steven Raichlen's recipe, the use of oyster sauce, soy sauce, garlic, and turmeric make it hard to distinguish where this recipe draws its inspiration within those types.  Those ingredients are common in both Chinese and Malay cuisine.  It is perhaps the use of Chinese five spice (which is really a Chinese ingredient) that would put this dish in the first category (if categorization were possible).

Overall, this is a very good recipe for a steak, especially when one may be short on time. It was also a great recipe because it got me to look a little further into a culture and cuisine which I never knew about.  That is what cooking means to me.

I just have to remember the fried garlic slices.  Always something for the next time .... 


NYONYA-STYLE STEAK
Recipe adapted from Steven Raichlen
Serves 2-4

Ingredients:
1 1/2 poounds of flank steak, sirloin steak or any steak
3 tablespoons vegetable oil
3 cloves of garlic, thinly sliced
3 tablespoons of oyster sauce
2 tablespoons of soy sauce
2 tablespoons sugar
2 teaspoons of Chinese five-spice powder
1 teaspoon ground turmeric
1 teaspoon freshly ground black pepper
Kosher salt.

Directions:
1.  Prepare the marinade.  Heat oil in a small skill over medium heat.  Add the garlic and cook until golden brown, about 1 minute.  Transfer the garlic to a plate lined with paper towels to drain.  Pour the garlic flavored oil into a heatproof mixing bowl and let cool to room temperature.  Add the oyster sauce, soy sauce, sugar, Chinese five spice, turmeric, and pepepr to the garlic oil.  Season with salt to taste.  Pour the marinade over the flank steak, turn it to coat both sides.  Let the steak marinate in the refrigerator, covered, 1 to 4 hours, turning it once or twice.

2. Grill the steak.  Heat a grill on high heat.   Brush and oil the grate.  Drain the steak and arrange it on a hot grate at a diagonal to the bars.  Grill the steak until cooked to taste, about 3 to 5 minuts for medium rare.  Transfer the grille dsteak to a platter and let it rest for 2-3 minutes. Thinly slice the steak and serve it with the fired garlic slices sprinkled on top.

ENJOY!

Thursday, March 21, 2019

Gochujang Chicken

This recipe is an experiment wherein an air fryer recipe never made it into the air fryer.   As readers of this blog probably know, my beautiful Angel and I recently bought an air fryer.  I am intrigued by air fryers, because I have basically given up on a deep fryer.  I did not want to deal with the leftover oil.  When one adds the negative health aspects of deep fried food, that made it easy for me to move on from a deep fryer or event the cooking process.  When I recipe called for deep frying, I would broil it or grill it.  

Last Christmas, I got an air-fryer cookbook.  There are a lot of interesting recipes in that book, including one for Gochujang Chicken. The Gochujang sauce got my attention. I wanted to make that sauce.  However, the recipe in the book called for the use of chicken wing sections.  I had bone-in thighs.  While I could have thrown those thighs into the air-fryer, I needed the cooking times for bone-in thighs in an air fryer.  After looking around the internet, I just decided to cook the thighs in a conventional oven. 

Overall, the recipe worked very well.  I was able to get the skin crisp, the heat from the sauce was present, and, there were chicken thighs, which are perhaps the best part of the bird.  This is the type of experimentation that I hope to do more in the future!


GOCHUJANG CHICKEN
Sauce recipe from Urvashi Pitre, Every Day Easy Air Fryer, pg. 69
Serves 4

Ingredients (for the chicken):
1 pound of chicken thighs, with skin and bone
1 teaspoon kosher salt
Freshly ground black pepper
1 teaspoon gochugaru
1 teaspoon sesame seeds

Ingredients (for the sauce):
3 tablespoons gochujang (Korean chile paste)
1 tablespoon toasted sesame oil
1 tablespoon minced fresh ginger
1 tablespoon minced garlic
1 teaspoon sugar
1 teaspoon agave nector or honey

Directions:
1.  Make the sauce. In a small bowl, combine the gochujang, sesame oil, ginger, garlic, sugar and agave, set aside. 

2.  Cook the chicken.  Place the chicken skin side down and cook at 360 degrees Fahrenheit for 8 minutes.  Spread some of the sauce on the chicken and flip the thighs.  Spread more of the sauce on the skin and underneath the skin.  Continue cooking for about 6 minutes more or until the chicken is browned with crispy skin and with an internal temperature of 165 degrees Fahrenheit. Remove from the heat, let rest for about five minutes, and serve immediately.

ENJOY!

Saturday, January 26, 2019

Cranberry Orange Relish

I would have never guessed that cranberries have a dark side. But, those berries do.  It is a story of corporate hegemony, regulatory failure, and farmers' resourcefulness.  Much of the story has been told a couple of years ago by Kirsten Saladow for Quartz, but, it is a story that deserves an additional look.

According to Ms. Saladow, one company -- Ocean Spray -- controls nearly three-quarters of the cranberry farms across the United States and Canada. (That's approximately 700 farms.) Ocean Spray is also behind many of the cranberry products that line the shelves of the stores in our neighborhoods.

One would think that, based upon the packaging of Ocean Spray products and the company's advertisements, there are no issues with respect to those little berries. As Ms. Saladow writes, there is the picture of a cranberry farmer:

Cranberries are grown in bogs primarily in the northern part of the US in soft, marshy ground with acid-peat soil.  They're hard to harvest on the vines they grow on, so instead, the bogs are flooded at harvest time, water reels pull them off the vine and the cranberries float to the top, allowing them to be collected and sent off to market.  Those images you see of farmers in waders, up to their chests in water with cranberries floating all around them?  Totally accurate.

Photo from http://endangerednj.blogspot.com
While the image of the cranberry farmer may be "totally accurate," there is a lot more to that picture.  Back in the 1950s, Ocean Spray began to use aminotrizole, a chlorophyll inhibitor that has been proven to cause "growths" in rats.  Ocean Spray limited the use of the chemical in the weeks before each Thanksgiving, but, word got out one year that the chemical was found in cranberries. That caused the purchase of cranberries to plummet by 70% that year.  Needless to say, aminotrizole is no longer used in cranberry farming. However, many other chemicals are used, including chlorothalonil, carbaryl and pronamide.  When the bogs are filled with water, that water becomes contaminated with the chemicals.  Workers who go into the water get exposed to the chemicals.  The bogs are eventually drained and that chemical-laced water enters local bodies of water. All of that runoff is not regulated under the Clean Water Act or any other major environmental law.  And, in one case, the State of Wisconsin (which produces the second most cranberries in the country after Massachusetts), the "cranberry industry" received an exemption from  wetland water quality standard law.  That exemption was granted despite the fact that cranberry farms destroyed more wetlands in the state than any other activity and have negatively impacted trout fishing due to the diversion of streams for the farms' use. 

Thus, for the most part, the story of the cranberry has been one that pitted large companies against individual growers, the environment and, hence, the community. This dark side is a serious and unfortunate one, especially given the fact the history of the cranberry has its positive notes.  Cranberries were eaten by American sailors to prevent scurvy. Native Americans used the cranberries not just for food, but also for a red dye and medicines. 

This recipe draws its inspiration from the earliest days of our country, long before the use of chemicals and the degradation of our environment.  The recipe comes from the Colonial Wlliamsburg Tavern Cookbook. As noted above, Massachusetts is the leading grower of cranberries.  The Pequot Indians introduced ibimi - translated as "bitter berry" to the pilgrims. Eventually, the berries would be exported out of the New England, finding their way south to the other colonies (such as Virginia) and eventually into the taverns of Williamsburg.  Thus, this recipe for Cranberry Orange Relish.

The best part of this recipe, and, indeed, what caught my attention, was the use of Cointreau.  The colorless, orange flavored liqueur from Saint Barthelemy d'Anjou, France. I have never tasted Cointreau, let alone used it in a recipe.  What I have found after making this recipe is that the orange flavors of the Cointreau help underscore the orange in the recipe, as well as provide a richness to what is best a side.  When I served this as part of our Thanksgiving dinner, it was well received by anyone.  After all, who does not like a cranberry orange relish where the alcohol has not been cooked out.  (BTW, if you haven't figured it out already, this is not a kid friendly dish.)


CRANBERRY ORANGE RELISH
Recipe from The Colonial Williamsburg Tavern Cookbook
Makes 3 Cups

Ingredients:
2 cups cranberries
1 orange, quartered, seeded
1/2 lemon seeded
1 cup sugar
1 cup pecans
1/4 cup Cointreau or other orange liqueur

Directions:
In a bowl of a food processor, combine the cranberries, orange and lemon and process until coarsely chopped.  Add the sugar, pecans and Cointreau and pulse briefly to mix.  Cover and let stand at room temperature for 12 hours.  Refrigerate overnight.

ENJOY!

Friday, July 8, 2016

Big Bob Gibson's Loaf Pan Chicken

Anthony Bourdain once said, "Barbecue may not be the road to world peace, but it is a start."  For my latest barbecue project, the road begins in Decatur, Alabama.  The city of Decatur boasts of itself as "a Charming City on a Grand Scale."  This Charming City is the home of Big Bob Gibson's Barbecue, which is a fixture of Alabama barbecue.

Big Bob Gibson started serving barbecue from his home in 1925.  It was a new adventure for Gibson, who previously worked on the railway.  He established his restaurant in Decatur and, over time, his children and grandchilden have continued the tradition.  For more than ninety years, Big Bob Gibson became especially known for its smoked chicken, which are served in a tangy, white barbecue sauce.  This sauce is made from mayonnaise, vinegar and horseradish. This recipe is on my bucket list of barbecue projects.  However, for my first barbecue chicken project (yes, to date, I have never smoked chicken, I focused on pork, beef and turkey), I decided to try Big Bob Gibson's Loaf Pan Chicken.

Chris Lilly, the pitmaster at Big Bob Gibson's describes this Loaf Pan Chicken as a "dummy proof alternative" to beer-can chicken.  "Dummy proof" seems like a good starting point for my first effort at smoking chicken.  The use of the loaf pan is ingenuous, as it captures all of the chicken's juices, along with the marinade to help keep the chicken as moist and flavorful as possible.   Best of all, this recipe is very easy to do.  Once you get the heat in the smoker going, you just place the chicken in the loaf pan on the grill grates.  After a couple of hours, it is done and ready to be served.  

In the end, I can attest to pitmaster Lilly's characterization of the recipe as dummy proof.  The reason is that a novice such as myself was able to produce a very moist and tasty chicken.    The skin on the breast and the legs was just crispy enough (although some of the skin on the sides and back did not crisp due to the liquid in the pan).  The meat was flavorful, with a combination of flavors from the smoke and both rubs. 

Now, I need to turn my attention to that white barbecue sauce.  That will be for another time and another blog post. 


BIG BOB GIBSON'S LOAF PAN CHICKEN
Recipe from Big Bob Gibson's BBQ Book, pg. 123
Serves 4

Ingredients (for the chicken):
3/4 cup apple sauce
3 tablespoons Worcestershire sauce
1 whole chicken, 3 1/2 pounds

Ingredients (for the dry rub):
1 tablespoon turbinado sugar
2 1/4 teaspoons paprika
1 1/2 teaspoons black pepper
1 1/2 teaspoons garlic salt
3/4 teaspoons celery salt
3/4 teaspoon salt
1/4 teaspoon ground cumin
1/4 teaspoon ground coriander

Directions:
1.  Prepare the smoker.  Build a fire (wood or a combination of charcoal and wood) for an indirect cooking by situating the coals on only one side of the cooker, leaving the other side void.  

2.  Prepare the chicken.  In a small bowl, stir together the applesauce and Worcestershire.  Holding the chicken over a 9 x 5 x 3 inch loan fan, pour the mixture over the chicken, making sure the chicken is thoroughly coated both inside and out.  Let the excess liquid drip into the loaf pan.  In another small bowl, combine the dry rub ingredients and mix well.  Coat the entire chicken, both inside and out with the dry rub.  Place the chicken into the loaf pan, breast side up. 

3. Smoke the chicken.  When the grill temperature reaches approximately 300 degrees Fahrenheit, place the loaf pan on the grill grate away from the coals, close the cover and cook for 2 hours, or until the internal temperature of the chicken thigh reaches 175 degrees Fahrenheit.  Let the chicken cool a bit in the pan before cutting into serving pieces. 

ENJOY!