Showing posts with label Lettuce. Show all posts

Friday, August 19, 2022

Maine Lobster Rolls

While the first documented lobster roll may have been served at a restaurant in Milford, Connecticut, there is no doubt that the lobster roll is an icon of Maine cuisine. Anyone who takes a vacation in Maine -- from Kennebunkport to Lubec -- will inevitably have the opportunity to try a roll. And, there are many places across the State to get one. 

However, there are a lot of stories behind this sandwich. It is the stories about the lobsters and those who catch them that need to be told more. 

One of those stories is presently unfolding in the Gulf of Maine. Climate change is clearly making its presence known. The waters in the western part of the Gulf of Maine - such as Casco Bay (near Portland, Maine) - are beginning to get warmer. As anyone who has cooked a lobster will tell you, lobsters don't like warm water. As the waters of Casco Bay get warmer, the lobsters move north and east. As one fisher told Norah Hogan, a journalist with WMTW, "[w]hen I started [about 30 years ago], almost half of the lobsters in the state of Maine were landed in this part of the state - Casco Bay region." He added, "[w]e're not in the ballpark anymore." 

Lobsters thrive in waters that are between 54 degrees and 68 degrees Fahrenheit. The waters in the western portions of the Gulf of Maine exceed 68 degrees from time to time. This means that the lobsters will migrate to where it is cooler, which is toward the northeastern shore of the State and into Canadian waters. It also pushes the lobsters further offshore, to cooler, deeper waters. 

This means that, as the waters warm, there will be less lobsters around the shores of Maine. Less lobsters mean that the already high prices for lobster rolls will only go higher (as long as the demand is there). In fact, I was quite surprised that the cost of a lobster roll could be from $28 to $38 for each roll. If both my beautiful Angel and I had a lobster roll, we would be looking at paying $56 to $76 for a meal (and that is without any beer or anything else). 

As it turns out, I had brought my trusty steam pot to Maine for our vacation. As I noted in my post about Steamed Lobsters, I was able to find a seafood market that sold whole lobsters for anywhere from $8.00 to $12.00 per pound, depending upon the lobster. The market only had soft shelled lobsters (that is, those who had recently molted). Soft shelled lobsters come with a lot of water since they have not fully regrown into their new shells. So, part of what one is paying for with that $8.00 to $12.00 per pound is water. I knew this fact when I bought them, but I could buy 4 soft-shelled lobsters for the price of 2 lobster rolls. 

With those lobsters, I proceeded to make my own lobster rolls. I found a recipe, which is set forth below, and tried to follow it as best I could. I also decided that I would do the "presentation piece" and have a whole lobster claw served on the top of the sandwich. However, I think in the future that I perhaps do a rough chop of the claw into pieces. I think that would be better than a whole claw.

MAINE LOBSTER ROLLS

Recipe from Food & Wine

Serves 2

Ingredients:

  • 1/2 cup mayonnaise
  • 2 tablespoons fresh lemon juice
  • 2 teaspoons fresh chervil or tarragon
  • Kosher salt
  • Freshly ground black pepper
  • 1/4 cup minced celery
  • 1 pound cooked, shucked and chopped lobster meat (from knuckles and 6 pincer claws)
  • 6 top split (New England style) hot dog buns, separated
  • 2 tablespoons salted (or unsalted butter), softened
  • 1 tablespoon fresh chives, plus more for garnish
  • 6 butter lettuce leaves

Directions:

1. Prepare the lobster. Whisk together mayonnaise, lemon juice and chervil. Season lightly with salt and pepper. Stir in celery and fold in chopped lobster meat. Cover and chill up to 4 hours.

2. Prepare the buns.  Heat a large skillet over medium heat. Butter the sides of buns and toast in skillet until golden and heated through, about 2 minutes. 

3. Finish the dish. Fold chives into lobster salad. Place a lettuce leaf inside each bun. Divide lobster salad evenly among buns. Sprinkle with chives. Serve immediately. 

ENJOY!

Thursday, May 25, 2017

B&O Egg Sandwich

It is just an egg sandwich.  That is what my beautiful Angel and I kept saying to ourselves as we were preparing that dish for our Wine Club.  It is just an egg sandwich.  But it is a pretty damn good egg sandwich.  Why? Because it proves that you can make a very good dish with a very simple recipe.

This particular recipe originated in Grafton, West Virginia.  According to Dining on the B&O Railroad, the authors visited a signal tower and spoke with the railroader who worked there. The author asked the employee about his favorite food, which was an egg sandwich that he had every day for lunch.  The recipe is basically an egg between two pieces of toast with a dollop of Miracle Whip.   A simple recipe that brought a lot of satisfaction to a worker, day after day, year after year.  A very good dish that is the product of a very simple recipe.

The railroader's egg sandwich was not an official recipe of the B&O Railroad, although a fried egg sandwich did appear on a menu in the railroad's dining car on March 17, 1960.  The author of Dining on the B&O did not have the recipe and I could not find it.  And, while the railroader's recipe was very good for him, both by beautiful Angel and I wanted to make a couple of changes to make this recipe even better, but still very simple.

First, I decided to '86 the Miracle Whip and add some lettuce and a tomato.  I have never been a big fan of mayonnaise or Miracle Whip.  I rather dispense with that and add something that is a little healthier, like a slice of tomato and some lettuce.

Second, my beautiful Angel suggested that we sprinkle some Old Bay on the egg, giving a nod to Maryland.  This is after all a B&O Egg Sandwich and that "B" stands for Baltimore.  I thought that was a great idea.

Finally, we decided to present the sandwich as an open faced sandwich.  By getting rid of the extra piece of bread, we opened the sandwich to a far more pleasant presentation.

With these three changes, we gave this recipe our own touch.  In the end, at least in my humble opinion, this is a far better sandwich.   I have included the original recipe, with our changes listed as options.  Feel free to try both versions  Either way, a simple recipe produces a very tasty sandwich. 


B&O EGG SANDWICH
Recipe adapted from Dining on the B&O, pp. 28-29
Serves 1

Ingredients:
1 or 2 eggs
1 or 2 slices of toast
1-2 tablespoons butter
Kraft Miracle Whip, optional
1 tomato slice, optional
Lettuce, optional
Old Bay, optional
Salt and pepper to taste

Directions:
1.  Prepare the egg.  Melt 1 or 2 tablespoons of butter in an 8 inch non-stick omelet pan or skillet over medium heat.  Break open eggs into pan and immediately reduce heat to low. Cook slowly until the eggs are completely set and the yolks begin to thicken, but not hard.  Break open the yolks and flip over for 15 seconds until cook.  Do not salt the eggs before or during cooking.  Salt can cause the eggs to become tough during cooking so for best results, salt eggs only after cooking.

2.  Finish the dish.  Toast the bread, place eggs on toast and spread Miracle whip (optional) on one slice of toast.  Salt and pepper to taste.

ENJOY!

Wednesday, March 29, 2017

Around the World in 80 Dishes: Laos

My personal culinary challenge -- Around the World in 80 Dishes -- has figuratively taken me around the world.  I have made a main course based on the cuisine of countries From Andorra to Australia, as well as many places in between.  The next challenge takes me to a region where I have not a challenge ... southeast Asia.  The next challenge requires me to make a main course from the country of Laos.  But, first, a few quick notes about Laotian cuisine.

While Laos is nestled in between Vietnam, Cambodia and Thailand, its cuisine sets itself apart from its neighbors.  Laotian cuisine tends to be spicier than Cambodian and Vietnamese cuisine, due to the use of local chiles. A cornerstone of many dishes is the use of sticky rice, which could be served with breakfast, lunch and dinner.  Those chiles and fresh herbs -- including galangal, kaffir lime leaves, and lemongrass -- contribute pungent, spicy notes to dishes.

Many of those dishes may be more familiar to people than most realize.  Over the years, many Lao emigrated from their home to neighboring countries, particularly Thailand.  Some dishes that are assumed to be Thai, are actually Lao in origin.  Indeed, in southeast Asia, there is a shared heritage between the Thais and Lao, as well as the Vietnamese and Cambodians, that many dishes of each country's cuisine share common characteristics of those prepare by cooks in the countries. 


MAIN COURSE

Whenever I select a main course as part of my Around the World in 80 Dishes culinary challenge, my research often turns up what is labelled  the "national dish" or "official dish" of a country.  However, what really interests me is not what someone or some people call a country's "national dish," but what is commonly eaten by the people of that country. 

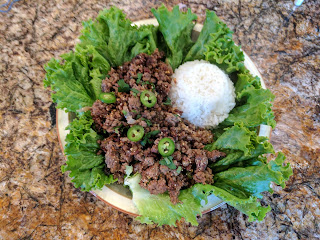
In the case of Laos, that dish would be Larb (or Laab). Generally, Laotian larb is a meat salad prepared with vegetables, fish sauce, lime and chiles served on lettuce with even more vegetables.  The result is a spicy, slightly sour dish that sets it apart from other larb dishes, such as those prepared in northern Thailand.  I have made the Thai version in the past using pork, as well as a version with shrimp, so I have a basic idea as to how to prepare the dish.  (It's kind of like cheating, but in a delicious way.)

Larb can be made with any protein, such as beef and chicken.  Beef is difficult to find in Laos, but it seemed appropriate given that the dish is often used to mark special occasion such as a housewarming, the birth of child or a holiday.  If I was in Laos, I would more than likely have the dish made with chicken, pork or duck.  (All of which sounds delicious, by the way.) 

BEEF LARB
Recipe from Bois de Jasmine
Serves 4 as appetizer, 2 as main dish

Ingredients (for the dish):
1 pound ground beef
4 shallots (2 sliced in thin rounds, 2 minced)
5 spring onions, sliced in thin rounds
2 garlic cloves, sliced in thin rounds
2 hot chile peppers, sliced in thin rounds
1 teaspoon of sugar
1 tablespoon of fish saucea
2 tablespoons of khao khua (roasted rice powder)

Ingredients (for the garnish):
Herbs (spring onions, mint, cilantro)
Lettuce leaves
Cucumber, sliced
Chiles, sliced (to taste)
1 lime, sliced
String beans (optional)

Directions:
1.  Make the khao khua.  Put two tablespoons of rice into a frying pan without oil and toast, stirring frequently, over medium low heat until it turns brown and smells well-toasted.  Remove from the stove adn crush into powder. 

2.  Make the Larb.  Heat 1 tablespoon of oil in a frying pan, then add the sliced shallots, garlic, spring onions and chiles.  When they have browned, add the beef, sugar and fish sauce.  Once the beef is well cooked, add more salt, lime juice and adjust the seasonings.  Set aside and let cool.

3.  Finish the dish.  Toss beef with herbs, minced shallots and roasted rice powder.  Serve with garnishes on a side.  

*      *     *

This challenge was inspired by my desire to make larb, and, it was -- like my prior efforts -- a very delicious dish.  The relative simplicity of the dish makes it one that could be made quickly after a busy day at work.  It is one that I will make again ... and again ... and again.  Until next time ...

ENJOY!

Monday, November 9, 2015

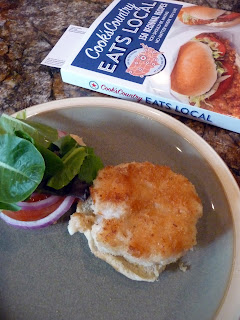
South Carolina Shrimp Burgers

Almost any protein can be made into a burger.  Beef may reign supreme, but lamb and turkey have made their inroads. However, some of the best burgers are those made with fish.  In the past, I have prepare dishes such as Salmon Burgers and Rockfish Burgers, both of which were paired with variations of guacamole.  I actually prefer those types of burgers over a beef burger (but not a lamb burger).  

Given the myriad of possibilities when it comes to proteins and burgers, I am always on the lookout for something new and different.  A few months back, my beautiful wife, Clare, and I -- along with our kids -- went to the Library of Congress' book festival  At that festival, I picked up the Cook's Country Eats Local.  It was a great purchase, because the book has all sorts of interesting recipes from around the country, including one for South Carolina Shrimp Burgers.

The connection between South Carolina and shrimp is an obvious one, especially for a food lover such as myself.  There is a long history of shrimping in the low country, with generation after generation plying the waters catching one of the three types of shrimp that thrive in the area.  Each type corresponds to a color.  There is the brown shrimp or Farfantepenaeus Aztecus.  There is the white shrimp or Litopenaues Setiferus.  And there is the pink shrimp or Litopenaue Duorarum.  Three types of shrimp, that all basically taste the same. 

The true difference in shrimp comes from using fresh shrimp and frozen shrimp.  Unless you live in the low country, or by a body of water where shrimpers ply their trade, you are most likely eating frozen shrimp.  This is even true if you buy them at the seafood counter of your local grocery store. (The shrimp arrive at the store frozen, but the store's seafood staff takes care of that whole defrosting thing.)  While fresh shrimp are definitely the best, you can use frozen shrimp provided that those shrimp did not have to travel half of the globe to make it to your local supermarket.  In other words, look for shrimp that is as "local" as you can get.  If you are in a city such as Charleston, South Carolina, or Chicago, Illinois, you are better off if your shrimp is from the United States, as opposed to Thailand or Ecuador.  While it may cost more to buy shrimp harvested in the United States, you are at least supporting local fishermen and shrimpers, which is a good thing.  

The authors of the Cook's Country book also recommend that you should use "untreated shrimp," that is, shrimp that does not have added sodium or preservatives, such as sodium tripolyphosphate (STPP).  This would pretty much rule out most, if not all, of the shrimp that you find in the freezer section of your grocery store.  Once the freezer section declared off limits, you are left with the seafood counter, where you can buy some seemingly-fresh-but-previously-frozen shrimp for this burger recipe. You will not regret it.

In the end, this is a great recipe. I have already made these shrimp burgers for family and friends.  The recipe is quickly becoming a family favorite, which ensures it will be made again and again.  Too bad we don't live closer to the shore where we could get our shrimp right off of the boat.  


SOUTH CAROLINA SHRIMP BURGERS
Recipe from Cook's Country Eats Local, pages 114-115
Serves 4

Ingredients (for the burgers):
1 cup of panko bread crumbs
1 1/4 pounds of large shrimp (26/30 count),
     peeled, deveined, and tails removed
2 tablespoons mayonnaise
1/4 teaspoon pepper
1/8 teaspoon salt
3 scallions, chopped fine
3 tablespoons of vegetable oil
4 hamburger buns
4 leaves Bibb lettuce

Ingredients (for the tartar sauce):
3/4 cup mayonnaise
3 tablespoons finely chopped dill pickles
1 small shallot, minced
1 teaspoon capers, rinsed and chopped fine
1/4 teaspoon pepper

Directions:
1.  Make the tartar sauce.   Combine all of the ingredients in a bowl and refrigerate until needed.

2.  Begin making the burgers. Pulse the panko crumbs until finely ground, about 15 pulses, transfer to a shallow dish.  Place one-third of shrimp (1 cup), mayonnaise, pepper, salt, and cayenne in the now-empty and pulse until shrimp are finely chopped, about 8 pulses.  Add remaining two-third of shrimp (2 cups) to shrimp mixture in processor and pulse until coarsely chopped, about 4 pulses, scraping down sides of bowl as needed.  Transfer shrimp mixture to a bowl and stir in the scallions. 

3.  Make the patties.  Divide shrimp mixture into four 3/4 inch thick patties (about 1/2 cup each).  Working with 1 patty at a time, dredge both sides of batties in panko, pressing lightly to adhere, and transfer to plate. 

4.  Cook the burgers.  Heat oil in 12 inch non-stick skillet over medium heat until shimmering.  Place patties in skillet and cook until golden brown on first side, about 3 to 5 minutes.  Carefully flip  and continue to cook until the shrimo registers 140 to 145 degrees and second side is golden brown, 3 to 5 minutes longer.  Transfer burgers to paper towel-lined plate and let drain, about 30 seconds each side.  Spread tartar sauce on bun bottoms, then place burgers on top.  Cover with lettuce and bun tops.  Serve.

ENJOY!

Wednesday, February 11, 2015

Roman Turkey Burgers

There is a seemingly infinite number of turkey burgers out there.  If you search for "turkey burger recipe" on Google, you get 147,000 results.  Not every result is a recipe for a turkey burger.  However, the search produces turkey burgers of every variety inspired by cuisines across the world.  There are southwestern turkey burgers, which usually include some chipotle or ancho chiles in the recipe, and "Greek" turkey burgers, with yogurt, oregano and feta cheese in the burgers.  And, there are quite a few "ultimate" turkey burgers. 

Recently, I wanted to make turkey burgers for my beautiful Angel. I perused page after page of turkey burger recipes but none of them really caught and held my attention.  I eventually decided that I would create my own turkey burger recipe.   A turkey burger recipe raises two questions, one that is easily answered and another one that is a little more difficult.

The first question is what type of ground turkey to use.  One has two choices: ground turkey breast or ground turkey thighs.  Personally, I think turkey thighs are better because they have a higher fat content, which helps to prevent the meat from drying out during the cooking process. If you are looking for a healthier turkey burger, you could use one-half thigh meat and one-half breast meat.  However, given the fact that you are making a turkey burger, as opposed to a regular burger, you are already making something that is relatively healthier.  

The second question is what to add to the ground turkey.  If you don't add anything to the turkey burger, you have a simple meal.  A simple, boring meal.  That is why there are so many different turkey burger recipes.  Many people have experimented with different ingredients that are mixed into the ground turkey to create a more flavorful and delicious burger.  

In the end, I decided to incorporate some Italian ingredients into this recipe.  I started with some sun-dried tomatoes.  I bought a jar of sun-dried tomatoes in olive oil, which provided an additional way to add flavor to the turkey.  I also bought some fresh basil and flat leaf parsley, both of which are chopped rather finely.  I rounded out the ingredients with some minced garlic and some grated Parmesan cheese.  All of these ingredients are complementary, working very well together in the ground turkey mixture.  

Overall, this recipe worked out very well.  It is a relatively easy and quick recipe to make during the week.  This means that I will be making it again, probably very soon.


ROMAN TURKEY BURGERS
A Chef Bolek Original
Serves 4

Ingredients:
1 pound of ground turkey (preferably ground thighs)
6 sundried tomatoes in olive oil, thinly sliced
1 to 2 tablespoons of olive oil
2 tablespoons flat leaf parsley, chopped
2 tablespoons Italian basil, chopped
1 tablespoon of grated Parmesan
2 cloves garlic, minced
Sea salt
Freshly ground black pepper
1 large tomato, sliced
1 red onion, sliced thinly
Lettuce

Directions:
1. Prepare the burgers.  Place the turkey in a bowl.  Gently add the sun-dried tomatoes, garlic, parsley, basil, salt, and pepper.  Mix the ingredients thoroughly.  Then add 1 tablespoon of olive oil.  Mix the ingredients gently.  You can add an additional tablespoon of olive oil, but that is optional.  Form into 4 patties and make an indentation in the middle of each one to help the patties cook evenly.

2.  Cook the burgers.  Pre-heart the broiler.  Broil the patties until firm and brown, about 3 to 5 minutes per side.  Serve on toasted buns with lettuce, tomato and onion. 

ENJOY!

Friday, June 1, 2012

Lobster and Shrimp Salad with an Albariño Citrus Dressing

This recipe is an experiment; and, I have debated whether or not to post it.  The objective was to make a cold seafood salad.  I wanted to make a light dish, with lettuce, seafood and a fresh dressing. I put a lot of thought into this recipe, without referring to any recipes.  This dish would rise and fall based upon what I have learned from cooking over the past year or two.

First, there was the question of the seafood.  I wanted to use cold seafood, but the seafood has to complement each other.  The best selection involved seafood that has a relatively similar flavor and texture.  The easiest choices were shrimp and lobster.  Both can be and often are served cold.

Second, there was the question of the dressing.  My thoughts revolved around two components -- citrus juice  and wine.  I  quickly came to the conclusion to use  both lemons and limes.  However, I was a little stumped about which wine to use.  I ultimately chose a wine from a region that is closely related to seafood ... an Albariño.  This wine hails from the Rias Biaxas region, which is located in Galicia, Spain.  Galicia is well known for its seafood, so this pairing seemed to be right on target. 


LOBSTER AND SHRIMP SALAD WITH AN ALBARINO CITRUS DRESSING
A Chef Bolek Original
Serves 2-3

Ingredients:
2 four-ounce lobster tails
1/2 pound of 16/20 count shrimp, shells removed and deveined
2 lemons
3 limes
1 tablespoon of fresh basil, chiffonade
Salt, to taste
1/4 cup of red onions, sliced thinly
1/2 cup of Albariño wine
Pepper to taste
8 ounces of Heirloom lettuce leaves or regular lettuce leaves

Directions:
1.  Steam the lobster and shrimp.  Fill a steam pot with water until there is about three inches of water in the pot.  Add the juice of one lemon and one lime.  Heat the pot on high until the water is boiling and steam is being emitted from the pot.   Add the shrimp and lobster and steam both.  The shrimp should be cooked after about two minutes.  Remove the shrimp.  Continue steaming the lobster tails for about two or three minutes longer.

2.  Make the dressing.  Juice the lemon and two limes. Add the wine and stir well. Add the basil, salt and pepper.  Once the lobster and shrimp have cooled down, add them to the the dressing.  

3.  Plate the dish.  Plate the lettuce and red onions.  Add the shrimp and lobster, spooning a little of the dressing over both the seafood and the lettuce.

Overall, I think this experiment was a success.  The most notable aspect of this dish is how the lobster and shrimp absorbed the flavors of the Albariño wine.  Over all, I liked this dish a lot.

One important caveat: this dish is for adults only and it should not be served to children.  The alcohol in the wine is not cooked out, so the dish should not be served to anyone under the age of 21.  If you want to serve this at a dinner where there will be underage guests, it would be best to cook the alcohol out of the wine by first bringing the wine to a gentle boil in a saucepan and then reducing it to a simmer for about five minutes at most.  You can then let the wine cool down before adding the citrus.  I did not do that because heat can affect the taste of the wine and I wanted to keep that flavor as much as possible. 

PAIRING THIS RECIPE

Obviously, the use of Albariño wine makes that wine the perfect pairing for this recipe.  It is also a good choice because you will have a lot of wine left in the bottle after making the recipe.  One such wine is the following:

Pazo Serantellos -- Albariño (2010)
100% Albariño 
Rias Biaxas DO, Galicia, Spain
Flavors of apples

ENJOY!

Thursday, December 29, 2011

Parmigiano Reggiano "Flatbread" with Ribeye, Porcini and Heirloom Tomatoes

Almost all of the "Chef Bolek Original" recipes are posted after I have made them for the first time.  There is no test kitchen.  There are no repeats to see if I can do a better job.  Some recipes are complete disasters, and, those never see the light of day.  Other recipes are okay, and, I usually post them with a few caveats.  And, every one in a while, I have a very successful Chef Bolek Original.

Recently, I was trying to think of recipes for what we had in our refrigerator.  One thing that caught my attention was the bowl full of grated Parmigiano Reggiano.  I knew of various recipes for Parmesan Crisps, but, I had way too much grated cheese to make crisps.  

So then my mind turned to a "flatbread" made entirely of Parmigiano Reggiano.  This idea was both intriguing and risky.  I had never heard of a "flatbread" made of anything other than bread.  Yet, Parmigiano Reggiano is rather salty, which means that you would need to make sure whatever tops the "flatbread" can offset the saltiness of the cheese.  Ultimately, I decided to plate a salad, with porchini mushrooms and slices of heirloom tomatoes.  I also decided that I would put slices of ribeye on top as well.  

Overall, this dish turned out well.  The one thing that I did not add to this recipe that I would definitely add the next time I make it is a good drizzle of aged balsamic vinegard.  The fruitness of the vinegar will offset the saltiness of the cheese very well.


PARMIGIANO REGGIANO "FLATBREAD" WITH RIBEYE
PORCINI AND HEIRLOOM TOMATOES
A Chef Bolek Original
Serves 3-4

Ingredients:
1 grass-fed ribeye steak, about 1 pound
2 cups of mixed greens
1/2 to 1 heirloom tomato
1/4 to 1/2 cup of dried porcini mushrooms
2 cups of chicken broth
2 tablespoons of Sangiovese wine
2 cloves of garlic, diced finely
1 tablespoon of fresh rosemary, chopped finely
2 teaspoons of dried thyme
1/2 teaspoon of crushed red pepper
Finely grated Parmigiano Reggiano
Sea salt, to taste
Ground black pepper, to taste

Directions:
1.  Prepare the marinade for the steak.  Add the red wine, garlic, rosemary, 1 teaspoon of the dried thyme, 1/4 teaspoon of crushed red pepper to a bowl.  Add the ribeye and make sure that it is coated with the mixture.

2.  Rehydrate the Mushrooms.  Heat the chicken broth over medium heat.  Once the broth is heated, add the dried porcini mushrooms to rehydrate.  After about five minutes strain the mushrooms and set aside.

3.  Cook the steak.  Cook the ribeye under the broiler for about eight to ten minutes per side or until cooked to the desired doneness.  Let the steak rest for fifteen minutes.

4.  Make the Parmigiano Reggiano flatbread.  Line a cooking tray with parchment paper.  Brush the paper with extra virgin olive oil.  Place a spoonful of the grated Parmigiano Reggiano in the middle of the paper and use the spoon to gently spread out the cheese until it is a consistent thickness. Repeat along the edges of the cheese until you have reached the desired size of the flatbread.  Sprinkle the remaining thyme and crushed red pepper over the cheese.  Add the cheese to the oven.  Cook until golden brown, anywhere from five to ten minutes depending upon the size of the "flatbread." 

5.  Plate the dish.  Prepare the "flatbread" by placing it on a plate.  Place the mixed greens in the middle of the "flatbread."  Sprinkle the mushrooms and tomatoes over the greens.  Slice the ribeye and place slices over the greens.

 PAIRING THIS RECIPE

The principal component of this dish is two-fold: ribeye steak and the Parmigiano Reggiano flatbread.  Given Parmigiano Reggiano is perhaps one of the signature foods of Emilia-Romagna, I think that the most appropriate pairing for this dish is a wine from that region.  A Sangiovese di Romagna is very much like a Tuscan Sangiovese, which can stand up to not only the "flatbread," but also the steak, which has been flavored with a marinade that draws from the flavors of Tuscany, such as rosemary and garlic.  The wine belows is one Sangiovese di Romagna that I have previously reviewed.

Collina dei Lecci -- Sangiovese di Romagna Reserva (2004).
85% Sangiovese, 15% other
Emilia Romagna, Italy
Flavors of cherries and raspberries

ENJOY!

Tuesday, November 1, 2011

Around the World in 80 Dishes: Uruguay

After a great meal of Camarao Mozambique and Matata, I depart from Mozambique to the location of my next challenge ... the country of Uruguay.  A relatively small country in South America that has long coastlines and only one land border, which it shares with Brazil.  The indigenous people of Uruguay (i.e., before Spain's colonization of the area) are the Charrúa people.  Although the Charrúa settled in Uruguay, the Guaraní ultimately provided the country with its name.  "Uruguay" is named after Uruguay River; however, the word "Uruguay" means "River of Painted Birds" in the Guaraní language.  

Uruguay's location has greatly influenced its cuisine.  Most notably, the country's proximity to Argentina and Brazil may very likely be the reason why Uruguayan cuisine is very beef-centric.  Brazil has also contributed other ingredients to Uruguayan cooking, such as beans, coconut, rice and manic.  In addition, the country's history as a Spanish colony has also left its mark on the dishes and cooking techniques of the Uruguayan people.  The Spanish are not the only Europeans to have influenced Uruguayan cuisine. Waves of immigrants -- from Portugal, France, Italy, England and Germany -- have contributed in various ways to the food, beer and wine that are enjoyed both in homes and restaurants.

During my research for this challenge, I narrowed down the potential main courses to two iconic Uruguayan dishes:  Steak Milanesa and Chivitos al Pan.  Steak Milanesa is akin to country fried steak ... a rather thin cut of beef, breaded and fried to a delicious golden brown.  The dish is very popular in Uruguay, as well as in Argentina.  By contrast, Chivitos al Pan is uniquely Uruguayan.  It is more than simply a steak dish.  It is an gastronomic experience ... slices of filet mignon, bacon, and ham piled on top of each other, along with lettuce, tomato, grilled onions, hard boiled egg, olive tapenade and red peppers.  All of these ingredients are held into place with a generous slathering of mayonnaise and bookended with a big roll.  This dish is so popular in Uruguay that it is sometimes referred to as the "national dish."  With such a pedigree, how could I turn down the challenge to make my own Chivitos.

MAIN COURSE

So, for this challenge, I am making Chivitos al Pan, the sandwich version of the dish.  (Chivitos al plato is a more "formal" version with all of the ingredients served on a dish).  The story behind the Chivito takes on almost a legendary quality.  On day, more than fifty years ago, a woman walked into a restaurant called "El Mejillon" in Punta del Este, which is a famous summer resort.  The woman went to the owner and asked, something like "quiero comer la carne de chivito" or "I would like to eat some baby goat meat."  The owner did not have any goat meat to serve.  Instead, he prepared a sandwich with a list of ingredients that resemble the shopping list for an average family.  The owner called the dish "Chivito" or "baby goat."

The first time I heard about Chivitos was while I watched an episode of Anthony Bourdain's No Reservations.  Tony and his brother visited Chiviteria Marcos to try what Tony called a "mind-scrambling sandwichness," and "the gift that keeps on giving."  Here is a clip from that episode:


Having watched Tony devour what can only be described as a carnivore's dream, I wanted to create my own truly Uruguayan Chivitos experience.  Rather than hop the first flight to Montevideo, I decided that I would incorporate it into my Around the World in 80 Dishes challenge.  I did a lot of research to focus on the ingredients that are critical to making a Chivito.  I scoured recipes, many of which seemed rather conservative compared to what I saw on No Reservations.  As you watch the clip, you did not see one slice of ham or one slice of cheese.  Instead, you saw slices of meats and cheeses, with toppings added.

A couple of notes about this recipe.  Filet mignon is cut in small pieces.  In order to make the beef "wide" enough for the sandwich, I suggest that you slice the beef in quarter inch slices.  Place one slice between two sheets of plastic wrap and, using a rolling pin, gently begin to "roll" the meat.  Use the rolling pin once, turn the meat 90 degrees, and use the rolling pin again.  Repeat until the slice of filet mignon is thin and even.  Then repeat this process with each of the remaining slices.  In addition, I just wanted to note that the olive tapenade can be either green or black olives, or a combination of the two.  I used a spicy tapenade made by the Louisiana Sisters, which was given to me as a gift by Clare's parents.  


CHIVITOS AL PAN
Recipe adapted from Uruguayanfood.com
Serves 1

Ingredients:
1 large sandwich bun, like a ciabatta roll
2 thin slices of filet mignon
2 slices of ham
2 slices of mozzarella cheese
3 slices of bacon
1/2 cup of sliced onions
1-2 slices of tomato
1-2 slices of lettuce
2 tablespoons of diced olives or olive tapanade
1 egg, fried or hard boiled
4 slices of red pepper
A good amount of mayonnaise

Directions:
1.  Prepare the hot toppings (bacon and onions).  Fry the bacon in a pan until crisp.  Remove the bacon from the pan and add the onions and fry then onions until golden brown.  Heat the broiler.

2.  Saute the filet mignon.  In a clean pan, saute the filet mignon for about one minute and then flip.  Remove and set aside.

3.  Construct the Chivito.  Place the steal on the lower bun.  Add the ham, bacon, onions, bacon, tomato, red peppers, lettuce, cheese, tapenade and egg.  (In the alternative, you can place everything under the cheese.)  Place the sandwich under the broiler until the cheese begins melt. Once the cheese begins to melt, remove the sandwich from the broiler.  Slather the top of the bun with mayonnaise and place it on top of the sandwich. Serve immediately.


Before this challenge, my favorite sandwich was the Philly cheesesteak.  After this challenge, my favorite sandwich is the Chivito. Although a cardiologist may recommend that I only have one Chivito per year, the wait is truly worth it.

In the end, I only made the main course as part of this challenge.  I did not make an appetizer, soup, salad or even a drink.  I am fine with that because the main course included all of the food groups  and doubled down on the meat group.  Well, until next time ...

ENJOY!

Monday, July 18, 2011

Soft Shell Crab Po-Boy with Avocado Remoulade

In a prior post about soft shell crabs, I noted that, as a cook, the months of May through September are special to me.  During this time, fresh soft shell crabs are available at local supermarkets and seafood markets.  On our way back from our Outer Banks vacation, Clare and I bought a dozen jumbo soft shell crabs from Endurance Seafood in Kill Devil Hills, North Carolina.  While I normally buy soft shell crabs fresh, Endurance Seafood was sold out of fresh soft shell crabs.  All they had left were frozen soft-shell crabs.  Still, I could not pass up the opportunity to buy those frozen crabs because it would provide me with a supply of those delicious crustaceans for experimenting with different dishes. I have previously used two of the jumbo soft-shell crabs as part of my Iron Chef Night: Vidalia Onion cooking experience.  However, my mind still works on recipes that we could make for the remaining soft shells that are sitting comfortably in our freezer.

 One recent recipe that I decided to make was Soft Shell Crab Po-Boys with a Remoulade.  Although I like remoulade sauces, I am not a big fan of mayonnaise, which is usually a principal ingredient in a remoulade.  I cannot say that I avoid mayonnaise altogether, because many people have witnessed me eating a tuna salad or chicken salad sandwich.  However, if I can avoid the ingredient, I will do that, even if it requires additional steps or searching out new ingredients.  Fortunately, I came across a recipe for an Avocado Remoulade.  I made this recipe as a topping for the Soft-Shell Crab Po-Boy Sandwiches and it was a great success.  This recipe will be my go-to whenever I need a remoulade.

On other thing about this recipe, many seafood po-boys involve deep frying the fish or shellfish.  You can certainly deep fry soft shell crabs.  For this recipe, however, I sauteed the soft-shell crabs.  I believe that soft shell crabs taste best when they are lightly dredged with flour and sauteed on a hot pan with butter. This recipe simply reflects my personal preference.  If you want to deep fry the soft-shell crabs, just heat enough oil in a pot or a deep fryer to 360 degrees Fahrenheit. 


SOFT SHELL CRAB PO BOY WITH AVOCADO REMOULADE
Remoulade adapted from Simply Recipes
Serves 2

Ingredients (for the Soft Shell Crabs):
4 soft shell crabs
1 1/2 cups of flour
1 teaspoon of chipotle powder
1 teaspoon of onion powder
1 teaspoon of garlic powder
Salt, to taste
Ground pepper, to taste
3 tablespoons of butter
2 small french loaves
1 medium Vidalia onion, sliced
1 heirloom tomato, sliced
Lettuce leaves
French bread (or just any other bread or bun)

Ingredients (for the Avocado Remoulade):
2 avocados, cut, peeled, and cut into large dice
3 tablespoons of freshly squeezed lime juice
4 tablespoons of extra virgin olive oil
1 tablespoon of minced shallots
1 tablespoon of flat leaf parsley, chopped
1 teaspoon of Dijon or other mustard
Salt, to taste
Ground black pepper, to taste

Directions:
1.  Make the remoulade.  Add the avocado and lime juice in a food processor.  Pulse until blended.  Slowly add olive oil, pulsing until you get the desired consistency.  Add minced shallots and parsley and continue to pulse until combined.  I pulsed it a little more to maintain the consistency that I wanted, but you do not have to do that.  Remove the sauce to a bowl, add the mustard, salt and taste and stir until incorporated.

2.  Prepare the soft shell crabs.  After washing the soft shell crabs, dry them and set them aside. Spread the flour on a plate and add the spices to the flour.  Mix the spices to make sure that they are incorporated throughout the flour.  Dredge the soft shell crabs in the flour and shake off the excess flour.

3.  Saute the soft shell crabs.  Heat the three tablespoons of butter on medium high heat.  Once the butter is melted, add the soft shells carefully, shell side down.  Let the soft shell crabs cook for about four to five minutes, then flip the crabs.  Cook for about three to five minutes more.  Remove the crabs.  

4.  Plate the dish.  Construct the po-boy sandwiches by first cutting the bread in half and slicing down the side.  Spread some of the remoulade on both sides of the bread.  Place the soft shells on the bread and top with sliced onions, heirloom tomatoes and lettuce.  Then add a nice heaping spoonful of the remoulade on top.  Serve immediately.

ENJOY!

Saturday, February 26, 2011

Fresh Green Beans with Romaine and Tomatoes, Oil and Lemon Dressing

Photo courtesy of Nanther Thangarajah
I am a big fan of Julia Child, although I have to admit that I do not have any of her cookbooks and I have not made any of her recipes.  This is the first Julia Child recipe that I've ever made.  Both Clare's father and I made this dish as a side dish for the Guest Chef Night menu. 

While I am not a very big fan of vegetables, I have to say that this recipe is a refreshing mix of beans, onions and tomatoes.  All of these vegetables (and fruits) are all tied together with very light, lemony dressing that is probably the most labor intensive part of this recipe, but all of that labor is definitely worth it in the end. 

As for the beans, they just need to be blanched and then cooled in an ice bath, which helps to preserve their color and crispness.  Each ingredient to this salad -- the beans, tomatoes and onions -- need to be refrigerated and then assembled shortly before serving.  This is a great side dish to any many course.   

FRESH GREEN BEANS WITH ROMAINE AND TOMATOES,
OIL AND LEMON DRESSING
Recipe by Julia Child from Julia Child and Company,
     Alfred A. Knopf, New York, 1978 at 154-55
Serves 8

Ingredients for salad:
2 1/2 pounds fresh green beans trimmed and blanched
1 head romaine lettuce (or other fresh salad greens)
Salt, to taste
Ground pepper, to taste

Ingredients for dressing:
1 lemon
1 small clove of garlic
1 teaspoon Dijon Mustard
6 or more tablespoons of olive oil
2 medium size red onions sliced into thin rings
1 quart cherry or grape tomatoes 

Directions:
1.  Blanche the beans in hot boiling water for about three minutes and then remove the beans to an ice bath.  Once the beans are cooled, wrap the blanched beans in a clean towel and store in a plastic bag.  Wash and dry salad greens.  Wrap in a clean towel and store in a plastic bag.  Refrigerate both the beans and the greens.

2.  Zest half of the lemon.  Pound garlic and zest with a little salt into a paste.  Whisk in mustard, a tablespoon of lemon juice and olive oil.  Taste the dressing to ensure that it does not become too acidic.

3.  Toss the onions with the dressing and refrigerate. Halve the tomatoes, place cut side up on a dish and lightly salt.  Cover and refrigerate.

4.  Arrange salad greens on plate and lightly salt.  Toss the blanch beans in a bowl with the onions and dressing.  Arrange the tomatoes around the edge of the plate.  Baste the tomatoes with dressing.  Cover and keep cool until serving time.

ENJOY!

Friday, December 24, 2010

Minestra Maritata (Italian Wedding Soup)

One of the Christmas Eve traditions in my family is to have Wedding Soup. I love this soup.  A sumptuous chicken broth, punctuated by pieces of tender chicken and browned meatballs, surrounded by escarole.  The recipe has been perfected by my great grandmother, my grandmother and my mother.  Now it is my turn, as the recipe, which has been passed down from my grandmother to my mother, now finds itself in my hands.

I've always wondered about the origin of the name "Wedding Soup."  Was this soup served at weddings in Italy?  Well, from what I've been able to determine, the etymology of the name "Wedding Soup" does not come from the marital bliss of many Italian couples.  Instead, the name originates from what cooks use to say about the ingredients of soup ... vegetables and meat ... se maritato bene or or they have married well.  (On a side note, it is kind of like Clare and me ... vegetarian and carnivore, we have married well.)  In the case of the soup, which is a Neapolitan green and meat soup, cooks would say that the flavors of the greens and the meat married well together as they cooked together in a pot over a wood fire.  

The version typically cooked in kitchens throughout Campana used different cuts of meat, usually from a pig.  In other regions, cooks used meats that were common for them.  For example, in Abruzzo, cooks used meatballs.  And, given the relatives on my mom's side of the family came to this country from two small towns in Abruzzo, Rivisondoli and Roccaraso, meatballs figure prominently in the recipe handed down through the generations in our family. 

MINESTRA MARITATA (Italian Wedding Soup)
Serves many

Ingredients:
1 whole chicken
3 bunches of celery
1 bunch of carrots
2 large onions
1 pound of escarole lettuce
1 pound of ground beef
1 can of low sodium chicken broth
Water
Salt, to taste
Pepper, to taste

Directions:
1. Wash the chicken thoroughly.  Put the chicken in a kettle and add water until chicken is covered.  If you can't cover the chicken completely, that is okay.  Just place the chicken breast down and bring the water to as high of a level as possible.  Bring the pot to a boil and skim off the top.  Add salt, pepper, the tops of the celery stalks (including leaves), some of the carrots and onion.  Bring to a boil again and continue to simmer, covered, until the chicken is done, which may take two to four hours depending on the size of the chicken.

2.  While the chicken is cooking, wash the escarole lettuce and break it into little pieces.  Begin filling the pot with the lettuce.  When you have put about a third of the lettuce in the pot, add a layer of carrots and celery.  Repeat this twice until the pot is filled about half way.    Add water to cover, about 1/2 to 3/4 full.  Bring to a boil, reduce heat and continue to simmer.

3.  Take the ground meat, and add some salt and pepper.  Mix the meat.  Then make small meatballs, making sure each meatball is compacted.  With one and one-half pounds of meat, you should be able to make about one-hundred, forty-four meatballs.  Brown the meatballs in a frying pan just enough to take the pink out of the meat.  Using a slotted spoon, remove them from the frying pan and put them into the pot with the escarole.  Keep the pot simmering, as the water cooks down.

4.  When the chicken is done, pull it out and de-bone it.  Break the chicken into small pieces.  Chop the cooked celery and mash the carrots.  Strain the chicken broth into the kettle.  Add the chicken, celery and carrots.  Also, add the chicken broth.  Stir to mix the ingredients and bring to a boil.

5.  Allow the soup to simmer for about an hour or two.  Stir the soup occasionally.  Refrigerate the soup overnight to allow the fat to congeal at the top.  The next day, carefully skim off the fat from the top of the soup.

6.  Bring to a boil and allow the soup to simmer until you are ready to eat. If you want to add pastine, add about five minutes before serving.

To serve, ladle some of the soup into a bowl.  Make sure that you get a lot of the individual ingredients -- chicken, meatballs, carrots, celery and escarole -- into each bowl.  Then top each bowl with a healthy amount of grated Pecorino Toscano, Pecorino Romano or Parmigiano Reggiano.


ENJOY!

For more about Minesta Maritata or Italian Wedding Soup, check out Supereva or About.com