Showing posts with label Red Onions. Show all posts

Saturday, February 22, 2025

Salsa de Pina Tatemada

Many towns are known from something or someone. When it comes to Loma Bonita, a town of about 41,000 people in Mexican State of Oaxaca, that something is the pineapple. Indeed, Loma Bonita is often referred to as the Pineapple Capital of the World.

The story of how Loma Bonita became that capital involves a yanqui named Frank Peters. Frank arrived in the area in 1906, working for an Illinois doctor who purchased land there. Frank later bought some land -- nearly 200 acres -- in the area for himself. Frank then planted pineapples on his land. And, by 1910, he was harvesting 20,000 pineapples per year. His success led to the purchase of more land (eventually reaching 7,400 acres) and, of course, many more pineapples. Things eventually went downhill for Frank Peters. The Mexican government seized most of his land in 1934.

While history may have been written about yanquis bringing pineapples to Oaxaca or Loma Bonita, one white man could not harvest all those pineapples. By 1952, the area was producing 40,000 to 60,000 tons of pineapples, which supported four nearby canneries. The focus primarily rests upon the growers, but it is the laborers whose work ensures that pineapple after pineapple, ton after ton, make it to the canneries and beyond. Those laborers are just as deserving of recognition for making the area, with Loma Bonita at its center, one of the most important pineapple exporting regions in Mexico. 

In Oaxaca, the pineapple is often used to prepare salsas. Those salsas are often cruda, incorporating raw pineapple, along with other raw ingredients like tomatillos. I came across a recipe from Salsa de Pina Tatamada when I made Arrachera Verde, which is a recipe for grilled flap steak (or, in my case, skirt steak). This salsa may be considered a variation of the traditional Oaxacan pina salsas in that the pineapples -- along with all of the other ingredients are grilled. 

I am a big fan of pineapple, but usually raw. However, I have to say that the use of grilled pineapple really worked in this recipe, because the heat brings out the sweetness and tames the citrus notes. That sweetness helps to balance the chiles in the salsa.

SALSA DE PINA TATEMADA

Recipe from B. Lopez, Asada at 195

Makes 2 cups

Ingredients:

  • 3 cloves garlic, peeled
  • 1 large red onion, minced
  • 1 medium pineapple, cored and cut into 3/4 inch slices
  • 2 habanero chiles
  • 2 tablespoons fresh lime juice
  • 1 teaspoon sea salt, plus more as needed
  • 1/4 cup olive oil
  • 1/2 cup flat leaf parsley, minced

Directions:

1. Start the grill. Start a charcoal or gas grill. Gas should be set to high. If using a pellet grill, preheat the grill to 425 degrees Fahrenheit for at least 15 minutes. If using charcoal, the coals should be red but entirely covered with gray ash.  

2. Grill the garlic and onion. Wrap the garlic and onion in separate aluminum foil packets. Place them on the grill until the garlic and onion have softened, about 15 to 20 minutes. 

3. Grill the pineapple and habanero peppers. Meanwhile, place the pineapple slices and habaneros directly on the grill. Cook until the pineapple has charred evenly on both sides and the skin of the habaneros has charred evenly too, about 5 to 10 minutes. Turn every 2 to 4 minutes for even cooking. When charred, remove everything from the grill.

4. Prepare the salsa. On a cutting board, chop the grilled pineapple into 1/4 inch cubes. In a serving bowl, mix the pineapple with the grilled onion and lime juice. Reserve. Add salt and garlic to a molcajete and grind until the garlic has dissolved into a paste. Next, slowly incorporate the habaneros and the olive oil, continuing to grind until you are left with a paste.  

5. Finish the dish. Add the habanero paste to the bowl of pineapple and onion, add the parsley, and stir to combine. Taste for salt, adding more as needed and serve. 

PEACE.

Saturday, January 25, 2025

Molho a Campanha

The "rule of three" takes many forms, including as a literary device. In this particular form, the rule represents an understanding that people better remember and understand concepts when presented in groups of three. It is the pattern -- and it takes at least three of something to create one -- that fixates itself in the human brain.  If one pays attention to the numbers in any method of communication, then they will be surprised how often words and concepts appear in groups of three. 

In many respects, food is a form of communication. The term, communication, can be defined (ironically) as a duality: the process by which we understand the world and the means (verbal or nonverbal) by which we convey that understanding to others. Food thus becomes a way that we communicate amongst ourselves; and, in doing so, it is one of the fundamental means by which we create cultures, whether through personal identity or group association. 

These concepts unfolded before me as I was preparing molho a campanha, which is basically a vinaigrette sauce prepared to accompany grilled dishes in Brazil. While the word molho translates from Portuguese to English as a "sauce," what I was preparing looked more like a salsa. The ingredients -- tomatoes, onions, and peppers -- confirmed that fact. Those three ingredients got me thinking about all of the other recipes that I have made from around the world where tomatoes, onions, and peppers (or chiles) constitute the basis of the dish. Indeed, if one looked at a basic pico de gallo (or salsa) from Mexico, its core ingredients are tomatoes, onions and peppers. Sometimes, they are the foundation of the dish, followed by the addition of other ingredients that results in a larger presentation. Sometimes, they are the dish, as is the case with pico de gallo or this molho. 

As with any means of communication, it can be used to bring people together, but it can also be used to differentiate. For example, a pico de gallo in Mexico is typically prepared with the addition of a citrus juice, such as lime juice; however, the molho a campanha is prepared with vinegar. The vinegar is better suited for flavoring and tenderizing grilled meats, such as beef, chicken and even fish (as the recipe below will attest). Such differences are minor, and, to most people, go unnoticed. They are more likely to note, as I did, the use of three -- tomatoes, onions and peppers -- and its similarity with other dishes that they have eaten. And, they are more likely to think about other groups of three, which, for me, gets me thinking about sofritos, mirepoix and the Cajun/Creole "holy trinity." All of those may be posts for a later date.

MOLHO A CAMPANHA

Recipe from Serious Eats

Serves 4 

Ingredients:

  • 1 large tomato, cored, seeded and cut into 1/4 inch dice (about 3/4 cup)
  • Kosher salt
  • 1/2 red onion, diced (about 1 cup)
  • 1/2 green bell pepper, stemmed, seeded and diced (about 3/4 cup)
  • 1/2 red bell pepper, stemmed, seeded and diced (about 3/4 cup)
  • 2 tablespoons chopped cilantro leaves and tender stems
  • 2 tablespoons chopped flat-leaf parsley leaves and tender stems
  • 2 tablespoons white wine vinegar
  • 1 tablespoon extra-virgin olive oil, plus more for oiling fish
  • Freshly ground black pepper
  • 2 pounds whole fish, such as branzino, mackerel or trout, scaled or gutted

Directions:

1. Prepare the tomatoes. Season tomatoes with 1 teaspoon of salt and toss to combine. Transfer to a fine mesh strainer or colander set in a bowl to allow to drain for 20 to 30 minutes. Discard liquid.

2. Prepare molho. In a medium bowl, stir together tomatoes, red onion, green pepper, red pepper, cilantro, parsley, vinegar and olive oil. Season with salt and pepper. Let molho stand for at least 30 minutes, or refrigerate for up to 24 hours. Return to room temperature before serving.

3. Prepare the grill. About 30 minutes before grilling, remove fish from refrigerator and let come to room temperature. Light one chimney full of charcoal. When all the charcoal is lit and covered with gray ash, pour out and spread coals evenly over half of coal grate. Alternatively set half of the burners of a gas grill to high heat. Set cooking grate in place. Cover and grill and allow to preheat for 5 minutes. Clean and oil the grilling grate.

4.  Prepare the fish. Thoroughly pat fish dry with paper towels. Season inside and out with salt and pepper. Rub fish all over with olive oil. 

5. Grill the fish. Set fish over hot side of grill and cook until bottom sides are browned, about 5 minutes. Using a carving fork (the tines of which can slide down between the grill grate) or a thin metal spatula, carefully attempt to lift fish from below; if it resists, allow to cook for 1 more minute and try again. When fish lifts easily from grill, turn onto other side and cook until an instant-read thermometer inserted into the thickest part registers 135 degrees Fahrenheit, about 5 minutes longer. If the skin begins to char before the fish is cooked through, transfer fish to the cooler side of the grill to finish cooking. Let the fish rest for 5 minutes.

6. Finish the dish. Serve the fish with the molho spooned over top.

ENJOY!

Saturday, November 23, 2024

Goi Ga (Vietnamese Chicken Salad)

 Ăn uống hài hoà 
(Eat and drink harmoniously)

Balance is important in every aspect of one's life, including what one cooks and eats. As I continue to explore the cuisines of cultures around the world, I have noticed a current that runs through the recipes and dishes of many cultures, including, by way of example, Vietnamese, Chinese, Thai, Indian and even Native American. It is balance. This balance may take many forms, such as a balance of ingredients or a balance of cooking methods. Nevertheless, it is still there. 

More recently, I found this balance in Gỏi Gá, a chicken salad that is commonly prepared in Vietnam. From what I could find, the salad originated in the north of the country. However, it is dish that is popular throughout Vietnam. Goi Ga is often served at home for family gatherings; but, people can also find the salad being served at festivals and even as street food. When one peruses the ingredient list, they will find a recipe for a light salad that incorporates chicken, fresh vegetables, fresh herbs and a dressing that features one of my favorite ingredients, fish sauce. 

Yet, there is something more fundamental about Goi Ga. It represents balance, or as the Vietnamese would describe it, "Ngũ Hành" or "ngũ vi.I have previously explored the multiple levels of balance in Vietnamese cuisine. For example, there is the balance among the five tastes: spice, sour, bitter, salty and sweet. There is also a balance in texture: crispy crunchy, chewing, soft and silky. There are even further levels of balance, such as in cooking methods. 

Balancing "Ngũ Hành" or "ngũ vion multiple levels can seem somewhat like a culinary game of 3-D chess. Gỏi Gá achieves that balance. The ingredient list illustrates the balance across all five tastes: peppers (spice), lime juice and vinegar (bitter), sugar (sweet), and fish sauce (sour and salty). It similarly shows a balance with respect to texture, with crispy elements (fried shallots), crunchy (peanuts), silky (olive oil), soft and chewy (chicken). 

Each bite of the Gỏi Gá brings with it a sense of harmony, and, along with that, a sense of happiness. This recipe is a call to be mindful of ingredients and how they interact. It is a mindfulness that I lack and have struggled to develop, especially given the lack of balance elsewhere in life, such as the work-life balance.  Still, If I can make this dish every once in a while, it will serve as a necessary reminder to take a moment and think more about what I prepare, eat and serve to others.

This may be the reason why I subconsciously keep coming back to dishes from Vietnam or elsewhere, such as China's Sichuan province. It is my own little nudge to find my some balance, even if it is only of the culinary kind. 

GOI GA (VIETNAMESE CHICKEN SALAD)

Recipe from Food & Wine

Serves 4

Ingredients:

  • 2 tablespoons sugar
  • 2 tablespoons plus 1 teaspoon fish sauce
  • 1.5 tablespoons fresh lime juice, plus lime wedges for serving
  • 1.5 tablespoons distilled white vinegar
  • 1 tablespoon water
  • 1 serrano chile with seeds, minced
  • 1 small garlic clove, minced
  • 1 cup vegetable oil for frying
  • 2 large shallots, thinly sliced
  • Kosher salt
  • 4 cups green cabbage (from 1/2 small head), finely shredded
  • 2 carrots, finely shredded 
  • 1/2 small red onion, thinly sliced
  • 1/4 cup coarsely chopped cilantro
  • 1/4 cup coarsely chopped mint
  • 3 cups chicken (from 1/2 chicken), shredded
  • 2 tablespoons extra virgin olive oil
  • 3 tablespoons coarsely chopped unsalted roasted peanuts

Directions:

1. Prepare the dressing. In a small bowl, combine the sugar, fish sauce, lime juice, vinegar, water, chile and garlic. Stir until the sugar is dissolved. Let the dressing stand for 5 minutes.

2. Fry the Shallots. In a small saucepan, heat the vegetable oil until shimmering. Add the shallots and cook over heat heat, stirring constantly, until golden, 3 to 4 minutes. Drain the shallots on paper towels. Reserve the oil for another use. Sprinkle the shallots with salt and let cool.

3. Finish the dish. In a large bowl, toss the cabbage, carrots, red onion, cilantro, mint and shredded chicken. Add the olive oil and the dressing and toss. Sprinkle with the peanuts and fried shallots and serve the chicken salad with lime wedges.

PEACE.

Saturday, November 2, 2024

Lahmajoun (Lahmacun/Lahmajo)

This post has been a long time coming. The spark of inspiration goes back years, perhaps more than a decade. I was sitting at home watching Anthony Bourdain eating with someone at a small restaurant in Turkey, most likely Istanbul. He and his guest were eating a flatbread that had a layer of minced lamb and vegetables. Tony identified the flatbread as "lahmacun." Ever since that day, I have wanted to make that flatbread. However, a lot of days went by. Then the years passed. I still wanted to make this recipe, but I made a lot of  other ones instead (as this blog will attest). 

Perhaps the one obstacle in my mind was making the dough. Sure, I make pasta, but I don't really do a lot of baking or working with dough. Thoughts of how long it would take to make the dough, or what would happen if I screwed up the dough, became difficult to overcome. However, I recently decided that, on some time off from work, I would take the time to make the dough. Then other obstacles got in the way. It seemed that more days, weeks and years would go by without me making this flatbread. That was, until I had a batch of thawed pizza dough in front of me. That batch served as the springboard with which I would finally make lahmacun.

Or is it lahmajoun or lahmajo? There is a serious debate in which these two words -- lahmacun and lahmajo -- are at the very heart.  The debate asks the question of where did this flatbread originate? Was it Turkey, where it is referred to as lahmacun? Or, was it Armenia, where it is referred to as lahmajoun.

As it turns out, the answer requires some explanation. The original name derives from Armenian, in which lahmajo means "meat with dough." One account traces the dish back to the city of Aleppo, Syria, where Armenian merchants settled from areas such as Aintab, Urha and Cilicia. The Armenian community in Aleppo began preparing the dish, and local cooks offered it to customers as "lahmajoun." The dish became very popular throughout Syria and Lebanon (where it is called lahm bi ajin), as well as in Turkey, where it took on the name lahmacun

Of course, those in Turkey disagree with the above account. The Turkish version traces the flatbread's origin to the southern Turkish cities of Urfa and Gaziantep. (It should be noted that there were significant communities of Armenians who lived in both cities until the end of the nineteenth century.)

Setting aside the dispute over its origin, I decided to make the recipe for myself. The batch of pizza dough made the preparation of this dish a lot easier for me. I could just focus on preparing the spread. I relied upon a recipe from the World Central Kitchen cookbook, which came from a Lebanese chef (which, for this reason, I will refer to it as lahmajoun). I made only one change to the filling. Instead of using a mixture of half beef and half lamb, I decided to use all lamb. There were two reasons. First, I think lamb is more traditional (although there could be some debate about that). Second, ground lamb comes in one-pound packages and I did not want to have to buy a separate package of ground beef. 

In the end, I think that this was a very good first effort at making lahmajoun. I think when I return to this recipe, I will try some of the regional variations, as well as incorporate other ingredients. Hopefully, it won't take a decade for that to happen.

LAHMAJOUN (LAHMACUN/LAHMAJO)

Recipe adapted from Jose Andres, World Central Kitchen Cookbook, page 85

Serves 4-6

Ingredients (for the topping):

  • 1 batch store-bought, fresh pizza dough
  • 16 ounces ground lamb
  • 1 tablespoon tomato paste
  • 1 tablespoon ground allspice
  • 1 tablespoon kosher salt
  • 1 1/2 teaspoons Armenian red pepper paste or finely chopped roasted red peppers
  • 1 2/3 teaspoon sweet paprika
  • 1 pound plum tomatoes diced
  • 1 medium red onion, chopped
  • 1 small red bell pepper, chopped
  • 1/2 cup chopped fresh flat-leaf parsley
  • 1 medium garlic clove

Directions:

1. Make the topping. In a medium bowl, combine the beef, lamb, tomato paste, allspice, salt, red pepper paste, and paprika. Gently mix in the diced tomatoes, onions, bell peppers, parsley and garlic until well distributed - avoid overmixing. 

2. Prepare the oven. Heat the oven to the highest temperature, preferably with a pizza stone or foil lined sheet pan inside. 

3. Prepare the flatbread. On a lightly floured surface, divide the dough into 12 pieces (to do this, cut the ball of dough in half, then half again, then divide each quarter into 3 pieces). Roll each piece into a round about 8 inches in diameter and about 1/8 inch thick. Put 3 to 4 tablespoons of filling in the center of the round and use a spoon to spread it out nearly to the edge, leaving 1/4 to 1/2 inch border all around. 

4. Bake the flatbread. Depending on the size of the stone or baking sheet, bake the lahmajoun in batches until they start to brown but the dough is still soft enough to fold over - the meat layer will be completely cooked by the time the dough is done. There are no rules for the time and temperature. The hotter the oven and stone, the shorter the baking time and the tastier the lahmajoun. In a home oven that can reach 500 degrees Fahrenheit, it should take 6 to 8 minutes. While the flatbread is baking, you can grill long pieces of eggplant over an open flame until smoky, and season with sea salt.

5. Finish the dish. Serve warm. Lahmajoun are served folded over, sometimes with a squeeze of lemon, a yogurt dip or the traditional Armenian Ayran yogurt.  

PEACE.

Monday, July 8, 2024

Mango Gazpacho

Picture yourself in a place with a contrast of landscapes: mountains rising in the background, with cliffs that give way to valleys. As one proceeds into the valleys, they would find olive trees and almond trees, along with orange and lemon groves. The greenery is broken up by small towns that still retain their moorish character, with squares and fountains. If you can picture this scenery in your mind, you have taken yourself to the region of Andalusia, Spain, known as La Axarquia.

Apart from the beautiful surroundings, the region is also particularly known for one agricultural commodity (above and beyond the almonds, olives, lemons and oranges) ... the European mango. That landscape provides the basis for La Axarquia to fashion itself as "the home" of that fruit. Of course, it takes more than a few mountains, valleys and greenery to grow mangos. La Axarquia has a subtropical climate that provides more than 300 days of sunlight per year, with temperatures that range often from the mid 70s to the mid 80s Fahrenheit in the summer. 

There are five different mango varieties that are cultivated in La Axarquia. The most common one is known as the Osteen. It makes up more than half of the production. (Interesting side note: the Osteen mango originated in Merritt, Island Florida, named after the Osteen family who lived there and first cultivated this particular type of mango back in 1935. It made its way to Spain thereafter.) The remaining four mango varieties - the Kent, Tommy Atkins, Keitt, and Red Palme -- constitute the remainder of the mangos cultivated in the region. (Another side note: the Tommy Atkins is probably the most popular mango in the United States.)

It seemed to be only a matter of time until the mango of La Axarquia would be incorporated into a dish of Andalucia, namely, gazpacho. This particular version of gazpacho relies more on citrus, namely orange juice and lime juice, than a traditional gazpacho. It is just my speculation, but it may be an effort to balance the sweetness of the mango. The recipe does include more traditional ingredients, such as bell pepper, cucumber, onions, and garlic. These ingredients, when pureed, help to give the soup some texture and depth. 

The end result is a very different and very delicious take on gazpacho. I am sure that the mangos I were probably of the Tommy Atkins variety, as opposed to the Osteen mango. The former varietal tends to be more tart with sweet notes, while the latter seems to be the inverse, more sweet with touches of acidity or tartness. Now that I have prepared this dish, as well as learned about the different mangos out there, I will have to be more mindful when I am in the store.  If I ever come across Osteen mangos, then I could truly transport myself culinarily to La Axarquia.

MANGO GAZPACHO

Recipe from Sprig and Vine

Serves 6

Ingredients (for the gazpacho):

  • 2 cups diced mangoes
  • 2 cups orange juice
  • 1 cucumber, diced
  • 1 red or yellow bell pepper diced
  • 1/2 red onion, diced
  • 1 clove garlic
  • 3-4 tablespoons lime juice
  • 1 jalapeno
  • 3 tablespoons chopped coriander (cilantro)
  • Salt, to taste
  • Pepper, to taste

Ingredients (for the toppings):

  • 1 cup of finely diced mango, cucumber, bell pepper
  • 1 cup micro greens (optional)

Directions:

1. Blend the gazpacho ingredients. Blend the mangoes and orange juice in a blender until smooth and pureed. Add the cucumber, bell pepper, onion, garlic, lime juice, olive oil and jalapeno, along with a cup of iced water and blend again. Add more water if you want a thinner consistency, or leave it as is for a thicker gazpacho.

2. Season the gazpacho. Season with salt and pepper. Taste and adjust according to preference: add more lime juice for zing, chile for heat, etc. Stir in coriander (cilantro).

3. Chill the gazpacho. Let the gazpacho chill in the refrigerator for 4-6 hours before serving. This allows the flavors to mingle. 

4. Finish the dish. To serve, divide into bowls. Top with the mix of mangoes, cucumber and and bell pepper. Garnish with microgreens, if using. 

PEACE.

Monday, November 6, 2023

Zibdiyit Gambari (Spicy Shrimp and Tomato Stew)

"If cooking is in part an act of preservation, a way to sustain cultural identity, it is also an art of resilience, demanding the ability to adapt."  --  Ligaya Mishan

The New York Times columnist, Ligaya Mishan, wrote those words about the Palestinian people and their cuisine in February 2020. However, as I write this post, these words take on more meaning and, in a very real sense, more urgency. 

On October 7, 2023, Hamas perpetrated barbaric acts of murder, rape and inhumanity upon Israeli and other civilians. The scale of the terror attacks shocked the world, which quickly and rightfully rallied around the Israeli people. The Israeli government responded with a "self defense" campaign, vowing to end Hamas. The campaign included a complete blockade of the Gaza strip, where Hamas has wielded control since 2006, as well as a relentless military assault upon that territory with the objective of eliminating the terrorist organization. 

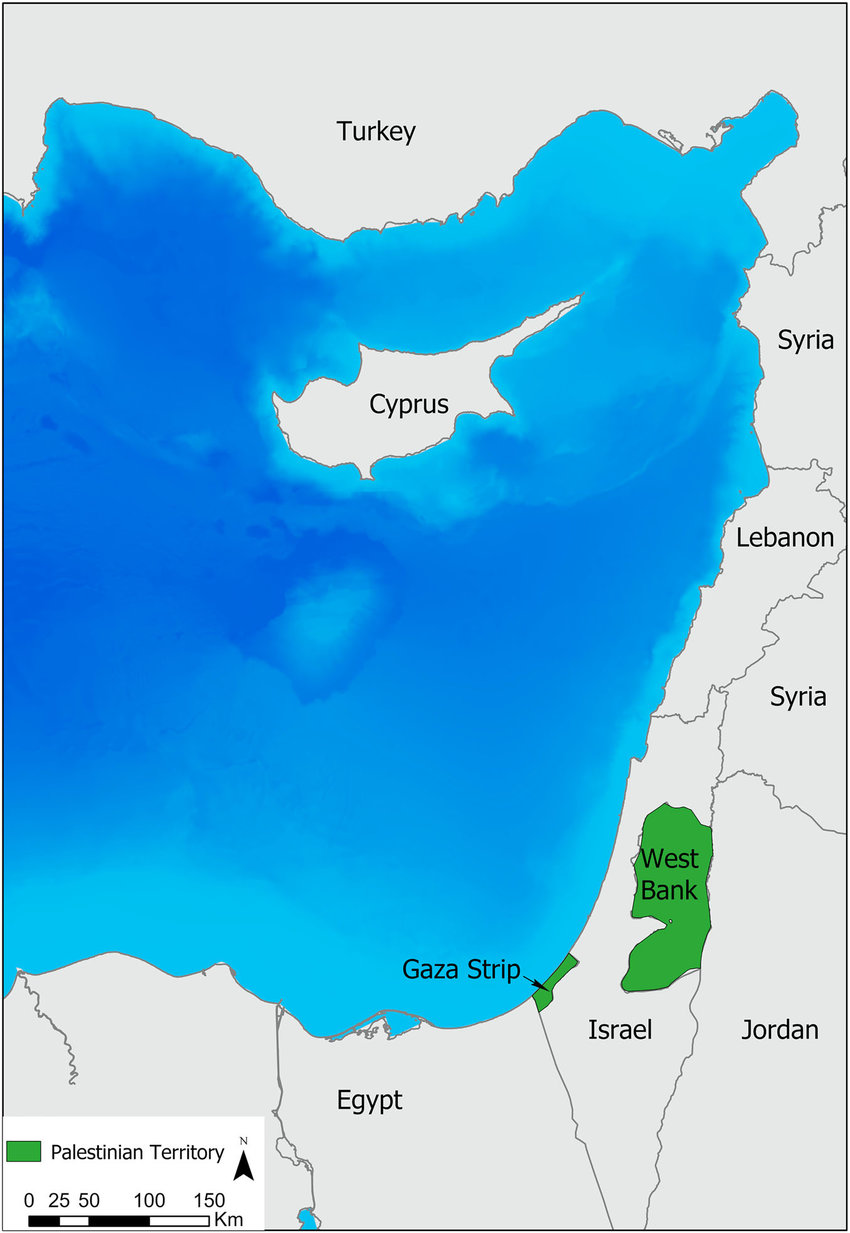
A view of the Gaza strip in 2020.

While Hamas deserves to be eliminated, there are over two million Palestinians who live in Gaza (who I sometimes refer to as "Gazans"). These Palestinians live in cities such as Khan Yunis, Beit Hanoun, Rafah and, of course, Gaza City. Many live in neighborhoods such as Jabalia and Al-Shati, which originated as refugee camps. All of these cities, with their neighborhoods, occupy an area of 140.9 square miles. By comparison, the city of Las Vegas, Nevada occupies 135.9 square miles. In addition, Gaza City, which is the largest city on the strip, has a higher population density (with 36,296 people per square mile) than New York City (which has only 29,303 people per square mile). The overwhelming majority of the more than two million Palestinians had nothing to do with Hamas's October 7 terrorist attack.  

Israeli airstrikes in Gaza in October 2023
Despite that fact, Gazans have found themselves caught between two warring parties -- Hamas and Israel -- and dehumanized by both sides. Hamas uses the Palestinians living in the Gaza strip as human shields against Israeli attacks. Much of the terrorist organization's command and control structure exists in tunnels beneath schools, hospitals and apartment buildings of Gaza. If Israel were to strike at Hamas, then it would have to go through the Palestinian people. And, as the events after October 7 have shown, Israel has engaged in an aerial bombardment that has resulted in significant deaths, injuries and displacement of Gazans. As of this post, nearly 10,000 Palestinians have been killed (many of whom were children), with thousands more injured and over 1 million (or half of Gaza's population) displaced. The numbers that are being reported as of the time of this post include nearly 10,000 Palestinians dead, countless thousands more injured, and over 1 million (or half the population of Gaza) being displaced. Put bluntly, while Hamas may be using the Palestinian people as human shields, the Israeli Defense Forces nonetheless continued their relentless assault and their complete blockade. Everyday Gazans are struggling to find food, clean water, and fuel, against a backdrop of Israeli bombardment in which the only numbers rising are the dead and injured, as hospitals deal with dwindling medical supplies and resources. 

While bombs drop across Gaza, as the armchair experts exchange salvos and blame on social media, one basic fact seems to have been forgotten: Palestinians living in Gaza are humans just like everyone else. Together, they have their own culture, cuisine, and history that is also part of a larger Palestinian one. I want to take this moment to restore, in whatever small way that I can, the humanity of these people whose were already struggling -- but surviving -- before the recent events. This post will delve into the history, culture, and cuisine of the Palestinians who live in Gaza, with a particular focus to their ties to the Mediterranean Sea.

If we go back in time, Gaza was definitely a different place. Long before the first blockade, which Israel imposed after Hamas took control of the strip in 2006. Even before the Yom Kippur war of 1973.

Source: Research Gate

The Gaza strip is located on the southeastern edge of the Mediterranean Sea. There are forty (40) kilometers of coastline, which has a long historical connection with the sea. From 800 B.C.E. to 1,000 A.D., a thriving port known as Anthedon provided sea access to a succession of peoples, including Neo-Assyrian, Babylonian, Persian, Greek, Byzantine and eventually, Islamic empires (such as the Umayyad and Abbasid). During this time, the port played an important role in the incense trade and the silk route.  Goods such as spices, frankincense, myrrh, rare woods and precious stones made their way through the port.  The Anthedon Harbor is on a tentative list for designation as a UNESCO Heritage Site. 

While the Anthedon port continued into history under names, such as El-Blakiyeh, the strip continued to play an important role in connecting people with the sea, as well as promoting trade. Indeed, Gaza continued to serve as an important point in the spice trade until the 19th century. It served as the main port for goods being imported into southern Palestine, as well as Jordan and Iraq.

The Gazan coastline was not only important to international trade in the region, but also the local economy. Gazans have a long history and tradition of shipbuilding and fishing.  Workers would take their boats out to sea, drop their nets, wait patiently a few hours, and then pull up the nets to reveal the catch. At one point in time, that catch included  sardines, sea bass, mullet and various types of bream. The vessels would return with the catch, which would then make its way into the local market and on to the plates of Palestinian families.

Things changed after the Israeli government occupied Gaza in 1967. While a small port continued to exist in Gaza City, its role began to diminish and eventually end when Israel closed the port to international shipping. 

The Israeli government began to impose increasingly greater restrictions upon Gazan fishing boats. For comparison purposes, international law provides that the first twelve (12) nautical miles are territorial waters, with an additional twelve miles constituting a "contiguous zone" over which a country can exert certain authorities, which include fishing. Under the Oslo Accords of 1993, the area of territorial waters (and the contiguous zone) open to Gazans was limited to twenty (20) nautical miles. That area shrank to approximately twelve (12) nautical miles with the Bertini Commitment in 2005. Israel reduced the area open to Gazan vessels to six (6) nautical miles one year later. By 2009, the area open to Gazan fishing boats had been reduced to three (3) nautical miles, which is well short of where much of the fish swim. Israeli's navy enforced the restrictions, not only arresting workers on vessels that ventured too far out, but also shooting at them when at them for crossing the arbitrary lines that Israel drew in the sea. 

The lines changed again, with Israel widening them to fifteen (15) nautical miles in 2019, only to reduce it again one year later to eight (8) nautical miles a year later. The lines would change again and again at the whim of the Israeli government, usually in response to violence by terrorists, leaving Gazan fisheries uncertain about what their future held. Those uncertainties increased with Israel's initial blockade in 2006, which made fishing equipment and boat fuel harder to come by and more costly when found. The restrictions made it extremely difficult for Gazans to make a living off the seas, with an overwhelming number of fishermen living in poverty. 

Yet, there are still stories of how the Palestinians have persevered in the face of adversity. The Fishermen's Wives Seafood Kitchen provides one such example. Twenty wives of Gazan fisherman -- who call themselves Zawajat al-Sayyadin or "Fishermen's Wives" -- opened the kitchen to help their spouses. When the fishermen returned to port with their catch, the wives would prepare the seafood according to customers' orders. These orders include crispy fried fish, grilled fish, fish soups and fish pies. The prepared dishes could be sold for more than the fish. This effort followed a previous one that failed. But, the wives learned from the prior attempt, made changes, and found success, as well as support from a non-profit organization.

Some of the Fishermen's Wives preparing the catch. Source: Middle East Eye

For those Gazans who did not venture out into the dwindling areas where they could fish, they looked for other opportunities to continue their connection with the sea. One such opportunity involves a fish farm that is expected to raise sixty to eighty tons of sea bream each year. The farm was established with the assistance of the United Nations Food and Agricultural Organization and Italy. Palestinians have also established inland fish farms to raise tilapia. Both the sea bream and tilapia present opportunities to address needs within the Gaza strip, as well as potential "exports" to at least the West Bank, if not beyond (when allowed by the Israeli government). 

More importantly, these stories, and many others, provide insights into the Gazan people. Although told over the years, these voices are now silenced by the thunderous tones of war and weakened by the sharp propagandist attacks by each side's supporters.  The ultimate casualty are the innocent civilians who are caught in the cross-fire. They are first deprived of their humanity by outside forces, with the truly unfortunate being deprived of their lives. 

Martin Luther King, Jr. once said, "[o]ur lives begin to end the day we become silent about the things that matter." I have used this blog to protest the inhumanity of how people have been treated, such as Myanmar's treatment of the Rohingya or China's treatment of the Uyghurs. For me, this blog has evolved beyond just cooking food, but to learn about cultures and to gain a better understanding of other people and, most importantly, have a greater empathy for their lived experiences. 

So, I refuse to be silent in the face of so many people who appear to accept or ignore the dehumanization of everyday Palestinians. I will use my voice, through this blog, to recognize their lived experience (as briefly outlined in part, above) and to respect their culture and cuisine by preparing one of their traditional dishes (as set forth below).  

I have selected a dish that dish that represents the Palestinians' ties to the sea, namely, Zibdiyit Gambari (Spicy Shrimp and Tomato Stew). The dish calls for ingredients that are common in Gazan recipes, such as the use of dill, which has been referred to as part of the "Trinity of Gazan Cuisine," with the other parts of the trinity being seafood and resilience.  I also learned that Gazans have a love of spicy food, using chiles to bring a kick to many of their dishes. That is something that, as the more than a dozen dried and ground chiles in my pantry will attest, is something that I have in common with them. This particular dish was not too spicy, as I left out the seeds from the chiles. The end result was still a very delicious stew, that I served with some white rice and flat bread. 

ZIBDIYIT GAMBARI (SPICY SHRIMP AND TOMATO STEW)

Recipe from New York Times

Serves 4

Ingredients:

  • 2 tablespoons extra virgin olive oil
  • 1 medium red onion, finely chopped
  • 1 (14-ounce) can whole, peeled plum tomatoes, juices reserved
  • 1 teaspoon granulated sugar, plus more to taste
  • 3/4 teaspoon ground cumin
  • 1/2 teaspoon caraway seeds
  • 1/4 teaspoon ground allspice
  • Sea salt
  • Freshly ground black pepper
  • 1 to 2 jalapenos, finely chopped, plus more to taste
  • 3 garlic cloves, chopped
  • 2 tablespoons finely chopped fresh dill
  • 2 tablespoons sesame seeds
  • 1 pound raw medium shrimp, peeled and deveined, tails removed
  • Coarsely chopped parsley leaves, for serving

Directions:

1. Sauté the onion and garlic. Heat 2 tablespoons extra virgin olive oil in a large saucepan over medium heat. Add the onion and cook, stirring occasionally, until softened, about 10 minutes. Add tomatoes and their juices; 1 teaspoon sugar, the cumin, caraway seeds, allspice, 1/2 teaspoon each salt and pepper, and 1 cup of water to bring to a boil. 

2. Prepare the jalapeno, garlic and dill paste. Mash the jalapeno, garlic, dill and 1/2 teaspoon together using a mortar and pestle for a few minutes. Alternately, finely chop them together on a cutting board, then  mash them by pressing back and forth using the flat side of your knife until a paste forms. (Both approaches release the oil from the jalapeno and dill and make them more fragrant.) Add to the tomato sauce and stir to combine. Cover and simmer over low heat, stirring occasionally to break down the tomatoes, until the sauce is thickened and flavors meld, about 20 minutes. 

3. Toast the sesame seeds. in a small skillet, stir the sesame seeds over medium heat until golden brown, about 3 minutes. Transfer to a small bowl.

4. Cook the shrimp. When the tomato sauce is ready, taste and adjust the seasoning (you may want to add some more sugar or jalapeno). Finally stir in the shrimp, making sure that they are submerged, and cook over medium heat, stirring occasionally until they have all just turned pink and are cooked through, about 2 to 3 minutes. 

5. Finish the dish. To serve, drizzle with a generous amount of extra-virgin olive oil and scatter with the sesame seeds and chopped parsley.

*    *    *

I will have more to say in my efforts to protest against the dehumanization of the Palestinians who live in Gaza, as well as about the experiences of people around the world. Until then, lets pray for ...

PEACE.

Thursday, August 24, 2023

Watermelon Salsa

We had a lot of watermelon, which we had bought for our daughter's birthday party. I sliced the watermelon into kid-sized wedges. But, we had a lot of watermelon. And, when the party was over, we still had a lot of watermelon. 

Clare had been talking about making some watermelon salsa. I went onto the Internet and began looking at various recipes. Needless to say, there is a lot of commonality amongst those recipes. Besides the watermelon, most recipes called for red onion, jalapenos, lime juice, cilantro and salt.

I wanted to do something a little different. There were a few recipes that provided some ideas. Recipes that called for additional ingredients, such as cucumber and lime zest. I even thought about adding some mango, but I decided to leave that for another day and another recipe.

In the end, I took a recipe that I found on Master Class and made a couple of changes based on other recipes. I added that cucumber (1/2 of a cucumber, diced) and lime zest (about 1 tablespoon). I also made the salt optional, because I did not think it was required. Given all of the fresh ingredients, along with watermelon's natural tendency to leech water, I thought that it was good to go without the salt (which would have only drawn out more water from the ingredients).  

The end result is a colorful, fresh salsa that is actually very good. If I had a summer menu, this salsa would be part of it, along with a good gazpacho. 

WATERMELON SALSA

Recipe adapted from Master Class

Serves several

Ingredients:

  • 3 cups of seedless watermelon, diced
  • 1 small red onion, diced
  • 1/2 cucumber, seeded and diced
  • 1 jalapeno, seeds removed and diced
  • 2 tablespoons lime juice
  • 1 tablespoon lime zest
  • 1/3 cup cilantro leaves, chopped finely
  • Kosher salt, to taste (optional)
Directions:

Combine all of the ingredients together and mix well. Season with salt, if desired, just prior to serving. 

Saturday, October 1, 2022

Rapa Nui Ceviche

Whether an island such as Easter Island can be considered remote is simply a matter of perspective. Those who live there, the Rapa Nui, call their homeland Te Pito Te Henua, 'the navel of the world.' Any point on the infinite globe of the Earth can become a centre.

 - Judith Schalansky, Atlas of Remote Islands

The island of Te Pito Te Henua or, as it is more commonly known, Easter Island, lies in the middle of the southern Pacific Ocean. It is a special territory of Chile, yet it lies more than 1,400 miles from the nearest Chilean island and more than 2,400 miles from the capital of Chile, Santiago.

Yet, the island remains the center of the Rapa Nui, the indigenous people descended from the Polynesians who first arrived by two canoe expedition from Marae Renga (also known as the Cook Islands) between 800 C.E. and 1200 C.E. The Polynesian explorers believed the island was a good place to settle and live peacefully away from the conflicts from where they came.

The Rapa Nui eventually encountered the European explorers during the 18th century; but, the 19th century brought devastating events for the indigenous people, including slave raids from Peru in the 1860s (resulting in nearly half of the population being captured and taken away) and colonization by Chile in 1887. The indigenous people found themselves largely confined to the city of Hanga Roa, while the rest of the island was rented to the Williamson-Balfour Company, who used the land for a sheep farm. This ended by 1966 and the island was reopened again to its residents. 

Despite all of this adversity, on a remote island in the middle of the ocean, the Rapa Nui have retained their own culture, including their language, their art (for example, the Moai resting on large platforms known as ahu), and their cuisine.  Chilean control of the island has left its mark as well, with Spanish being the predominant language and with Latin influences making their way into the cuisine of the people. 

This recipe provides an example of that influence. Tuna - or kahi as it is referred to in Rapa Nui - is a traditional food of the Rapa Nui. Tuna ahi is a Rapa Nui dish that involves placing the tuna on hot volcanic rocks, allowing the fish to cook as the rocks begin to cool. This dish and its preparation represent traditional Rapa Nui preparation of the fish.

By contrast, a tuna ceviche is perhaps the most typical dish of Rapa Nui cuisine. It is also illustrative of how the Latin influences have made their way into that cuisine. The tuna is cut into small pieces or slices, and then prepared with lime juice, sugar, and ginger. The addition of coconut milk provides more of a Polynesian influence to the dish. The tuna is then mixed with the liquid, along with diced chiles, sliced onions and julienned carrots. The end result takes a traditional food of the Rapa Nui people and presents it in a manner that one could find along the Pacific coastline of South America.

RAPA NUI CEVICHE

Recipe from New World Review

Serves 4-8 

Ingredients:

  • 2 tablespoons grated fresh ginger
  • 1 tablespoon sugar
  • 1/2 cup freshly squeezed lime juice
  • 14 ounces unsweetened coconut milk
  • 1 1/2 pounds sashimi grade tuna, cut 1/4 inch thick
  • 1/2 purple (red) onion, thinly sliced
  • 2 tablespoons died red pepper (use aji rocoto for a little kick)
  • 1 tablespoon finely chopped chives
  • 3 tablespoons finely chopped cilantro leaves
  • 3 tablespoons julienned carrots

Directions:

1. Prepare the ceviche liquid. Place the ginger, sugar, lime juice and coconut milk in a blender and puree until smooth. 

2. Combine the liquid with the tuna. Toss the mixture with the tuna and the remaining ingredients. Cover and refrigerate if not serving immediately. 

3. Finish the dish. Garnish with thick cut potato chips, coconut sticky rice, cucumber slices and/or a small bowl of coconut milk. Serve immediately.

ENJOY!

Friday, July 8, 2022

Cochinita Pibil

There is cochinita pibil and then there is cochinita pibil. The former involves a suckling pig (cochinita = little pig) that is first marinated with a mixture of achiote, sour orange juice, chiles and other ingredients, then wrapped in banana leaves, and finally placed in a relatively shallow hole in the ground that is lined with very hot stones or the remnants of a fire (pibil = piib, or Yucatec Mayan for "earth oven"). The hole is covered and the meat roasts for a very long time, often at least eight hours or overnight. By contrast, the latter is a pork shoulder, marinated with the same mix of ingredients, but roasted in either a smoker or an oven. One dish, but two ways to prepare it.

The authentic preparation -- banana leaves and the hole in the ground -- has a very long history throughout the Yucatan peninsula and surrounding regions. That history is tied to the indigenous Mayans, who used this process to prepare wild boar or venison. However, the dish that we know today has been heavily influenced over time. This influence came principally from the Spanish, who brought many things in their conquest over of the indigenous Mayan civilization and the colonization of the Mayan lands. 

Placing the wrapped pork in the pib.
Source: Mexicolores
The influence can be seen in three ways with respect to this dish. First, there is the use of pork. The Spanish introduced pigs to the Yucatan region approximately in 1511, although it would be a few decades later before pigs were brought in significant numbers to the area. The Mayans accepted the pigs as a food source, and, prepared the pork in the same way as the boar and venison. Second, there were the oranges, most notably, the Seville orange. Its sour juices were incorporated into the marinade and preparation of the pork prior to the roasting of the meat (just as the Spanish used the orange juice for marinating fish and meats). Third, the influence of the Spanish can be seen in the banana leaves. The banana tree is not native to the western hemisphere. The tree probably originated in Southeastern Asia, somewhere between Malaysia and New Guinea. The fruit made its way through trade routes in the east. However, the Spanish -- more specifically, Bishop Vasco de Quiroga (the first Bishop of Michoacan) -- brought the banana trees to what would become Mexico in 1554. Thus, cochinta pibil demonstrates how cuisines can change with the introduction of new ingredients and cooking processes.

Turning to this particular recipe, it falls more in line with the latter form of Cochinita Pibil, that is, the one that is prepared in a smoker or oven, as opposed to a hole in the ground. A few notes. First, my beautiful Angel will not let me dig any holes in our yard for culinary purposes. So, no pib. Second, I had to dispense with the banana leaves. While I have occasionally seen banana leaves in ethnic food markets, but I have not seen them recently. However, this recipe provided an interesting substitute: parchment paper. I have a lot of parchment paper thanks to a purchase at the local warehouse store. So, I cut pieces that could be used much in the same way as banana leaves to wrap the pork.

One last thing about this recipe. I decided to use a smoker, which would give me the closest thing to a charcoal fire that would have been used to heat the rocks that would have gone into the pibil. Given I was using a smoker, I also decided to add some wood for smoke. I needed to decide on a wood; and, I went with post oak because I felt that (after doing some research) oak would be as close as I could get to the type of wood that might be found in the region.

COCHINITA PIBIL

Recipe adapted from Glebe Kitchen

Serves several

Ingredients (for the marinade):

  • 8 cloves unpeeled garlic
  • juice of 2 medium oranges
  • juice of 2 large limes
  • 3 ounces achiote paste
  • 2 teaspoons salt
  • 1/4 cup white vinegar

Ingredients (for the pork):

  • 4 pounds of boneless pork shoulder
  • chunks of oak wood (for the smoker)
  • Banana leaves (or parchment paper)
  • Foil pan

Ingredients (for the pickled onions):

  • 2 red onions, sliced about 1/8 inch thick
  • 2 cloves garlic, cut in half
  • 1 1/4 cups apple cider vinegar
  • 1 1/4 cup water
  • 1 clove
  • 5 allspice berries, whole
  • 1/4 teaspoon black peppercorns
  • 3 tablespoons sugar
  • 1 teaspoon salt
Ingredients (for the presentation):

  • Corn tortillas
  • Pico de gallo

Directions:

1. Prepare the pork.  Roast the garlic in their skins. Use a small cast iron frying pan over medium heat and toast them until they blacken slightly and soften. This takes about 3-5 minutes. Peel the garlic. Combine the peeled, softened garlic with the lime and orange juice, achiote paste, and salt in a blender and blend thoroughly. Check to ensure that the achiote paste is broken up. Add the marinade to the pork and ensure that all sides of the meat are covered by the marinade. Marinate for two to four hours.

2. Prepare the smoker. Prepare the smoker to reach a temperature of about 275 degrees to 300 degrees. Soak the chunks of oak wood for about 1 hour in water.

3. Prepare the pickled onions. Combine all of the ingredients except the onions in a pot and bring that pot to a boil. Add the onions and boil for one minute. Remove from the heat and let cool, stirring occasionally. Store in a sealed jar in the refrigerator. Let the onions rest for at least 4 hours before using.

4. Prepare the pork for the smoker. Typically, the pork is wrapped in banana leaves; however, I did not have access to those leaves. However, I used four pieces of parchment. Scrunch one piece of parchment to form a receptacle for the pork along with the marinade. (The goal is for the pork to be steamed with the marinade while it is smoked.) Take a second piece and cover the pork wrapping it around the pork. Place the pork in an aluminum pan. Place the pan in the smoker and smoke for about 3 to 4 hours or until the pork reaches 190 or 195 degrees Fahrenheit.

5. Continue to prepare the pork. After removing the pork from the smoker, let it rest for 20 minutes. Remove the pork from the parchment packets but keep the marinade and juices. Use a fat separator to separate the fat. shred the pork with two forks and then mix the juice back into the meat. 

6. Finish the dish. Serve with corn tortillas, pico de gallo and the pickled onions.

ENJOY!

Saturday, March 5, 2022

Oyster Ceviche

"As I ate the oysters with their strong taste of the sea and their faint metallic taste that the cold white wine washed away, leaving only the sea taste and the succulent texture, and as I drank their cold liquid from each shell and washed it down with the crisp taste of the wine, I lost the empty feeling and began to be happy and to make plans." 

Earnest Hemingway, A Moveable Feast

Hemingway's words capture the joy that comes with eating raw oysters on the half shell. And, I have enjoyed many an oyster in that fashion. Eastern oysters, ranging from the Damariscotta River in Maine to the Outer Banks of North Carolina. Western oysters, from Puget Sound in Washington State to Northern California. Despite all of the different varieties of oysters that I have tried, I have never encountered a "faint metallic taste." I do love the briny, seawater taste that comes with each little bivalve.

Over time, I have expanded beyond simply eating raw oysters. I have made a variety of oyster shooters, including my Andalusian-Inspired Oyster Shooters and my Trinidad Oyster Cocktail. I have also made oyster stews

I recently had a couple dozen oysters, Chunus, which were farmed in the Chesapeake Bay. I decided to serve one dozen in the traditional fashion, that is, raw on the half shell.  But, I wanted to find a new way to experience the joy of eating oysters.  

That is when I came across a recipe for Oyster Ceviche. The dish, ceviche," is generally described as raw seafood that is "cooked" through chemical reactions caused by the acid in citrus juice that coagulates the proteins in the seafood. 

There is some debate about ceviche's origins.  Most scholars and historians believe that the dish originated in colonial-era Peru, with the Spanish bringing the citrus - at first, oranges, and then, lemons and limes - which were combined with local seafood and chiles to make the dish. Most historians also agree that it was not the conquistadors who were responsible for the creation of ceviche. Instead, they credit the Moorish women who were brought to the New World with the colonizers. The women brought a cooking method known as escabeche, which is the maceration of raw meat or fish in vinegar or citrus. The word escabache itself is derived from the Andalusi Arabic phrase al-sikbaj. While the origins may trace back to the old world and to Arabic empires, there is little doubt that ceviche is Peru's national dish.  

Most ceviche served in restaurants usually involves fish. To the extent "shellfish" is involved, it is usually shrimp.  Other shellfish - such as oysters and clams - are usually not on the menu. The thought of gently "cooking" oysters with citrus juice really intrigued me. The addition of the diced bell peppers, diced red onions and chopped cilantro also provide a colorable palette for the oysters. The one departure from the recipe that I did was to simply chop the oysters in half, rather than in "small chunks." I think the larger the oyster, the better the presentation. The next time that I make this recipe, I will probably keep the oysters whole, unless they are too large. 

OYSTER CEVICHE

Recipe from Laylita

Serves 2

Ingredients:

  • 6 large oysters, shucked, liqueur reserved
  • 1/4 red onion, diced
  • 1/2 bell pepper, finely diced
  • 1/2 tablespoon cilantro, finely chopped
  • 5 limes juiced
  • 1/2 tablespoon sunflower seed oil or light olive oil
  • Salt to taste
Directions:
1. Prepare the onions. Soak the onion in one cup of cold water with 1 teaspoon of salt.  Rinse and drain well. Marinate with the juice of 1 lime.

2. Prepare the oysters. Remove the oyster meat from the oyster shells, saving the oyster liqueur (juice), and chop the oysters into small cubes.

3. Marinate the oysters. In a medium sized bowl, combine the chopped oysters, the liqueur, marinated red onion, diced tomatoes, diced bell pepper, lime juice, finely chopped cilantro, oil and salt to taste.  Let marinate in the fridge for about 5 to 10 minutes and serve immediately. 

ENJOY!

Wednesday, February 9, 2022

West African-Style Broiled Lobster Tails

"The American relationship with shellfish would not be the same without the African and African-American presence."

Michael Twitty

The statement of culinary historian and chef, Michael Twitty, refers to the impact that Africans and African-Americans have had on the cuisine of this country, specifically with respect to shellfish, such as lobsters and crawfish. Before being brought to the New World, Africans had extensive experience catching, preparing and eating shellfish. Twitty recounts that experience along the African coast from Senegal to Benin. Whether it is lobster in spicy okra stews of Sierra Leone or the large shrimp thrown on red hot grills in Benin, it is well worth the read. 

Indeed, it was Twitty's words that drew me to this particular recipe for West African-style Broiled Lobster Tails. Twitty noted the red brick slipper lobsters or spiny lobsters that could be found in a Senegalese market, along with the local cooks who knew how to prepare the crustaceans with available ingredients, including tomatoes, ginger, garlic and habanero peppers.  Some of those ingredients - such as the garlic and the chiles - find their way into this recipe, as does the Maggi cube, which seem to find their way into many African recipes. 

The foregoing is not just African culinary history, it is also American culinary history. The Africans who were forcefully brought to the New World as slaves brought their knowledge of how to prepare foods. They incorporated that knowledge with the ingredients they found here, such as those lobsters or crawfish. Their work laid the foundation for many of the dishes that can be found on tables in restaurants and at home across our country. 

The late Cornelius White working on
an oyster skipjack on the Chesapeake
Bay (Source: Visit Annapolis)

There is so much more to the role that African-Americans have played in the culinary history of the United States. They have had a profound impact on what ends up on the plate. This aspect of our history includes the stories of African Americans who worked in every aspect of the seafood trade. It is the story of two African-American business partners, William Coulburne and Frederick Jewett, who opened the Coulbourne and Jewett Packing Company. This company began by processing fish, but it moved on to processing crab meat. Coulburne and Jewett introduced the method of sorting crab meat by backfin, lump, claw, special and regular. It is also the story of Downes Curtis, an African-American who lived in Oxford, Maryland. In the 1920s, he was a well known sailmaker, who produced sails by hand for vessels not only in the Chesapeake Bay area, but for famous people as well. The history of African Americans includes the story of every oysterperson along the Chesapeake Bay who plied the waters to harvest oysters. It also includes the story of every African-American fisherman or shrimper who brought his or her catch to the markets in New Orleans and across the Gulf of Mexico. That history began before the founding of our country (that is, in 1619) and it continues to the present day.

These stories are our history. They are important. They should not be reserved for one month in a year. They deserve to be told over and over again, because their contribution needs to be recognized, not forgotten. In the end, each of these stories is proof that there is so much more than what is simply on a plate.  That has become the purpose of my blog. Only time will tell if I can fulfill it. 

WEST AFRICAN-STYLE BROILED LOBSTER TAILS

Recipe by Michael Twitty, available at Luke's Lobster

Serves 2

Ingredients:

  • 1 inch piece of roughly chopped fresh turmeric or 2 teaspoons of powdered turmeric
  • 1/2 bunch flat leaf or curly parsley, chopped
  • 2 celery stalks, leaves and all, roughly chopped
  • 3 green onions (scallions), sliced,
  • 7 cloves garlic, smashed
  • 1 small red onion, sliced
  • 1 small Scotch Bonnet pepper (spicy) or 1 medium red bell pepper (not spicy), stem removed and chopped
  • 1 crushed small Maggi cube
  • 1 tablespoon canola oil
Directions:
1.  Prepare the rub. Add all of the wet ingredients in a food processor and pulse until the mixture is fully pureed. Scrape down the sides and process again.  Repeat until the mixture is more or less smooth.

2. Prepare the tails.  Using a sharp knife, half each lobster tail lengthwise, cutting almost all the way through the soft side and use your hands to pull gently at each side to lay the lobster flat. Place split lobster tails on a flat surface and season with the wet rub. Place in a resealable plastic bag and close securely. Allow the lobster tails to marinate in the refrigerator for at least 1 hour or up to 6 hours.

3. Broil the tails. Pull the lobster out 30 minutes before broiling and allow to come to room temperature.  Heat your broiler to 450 to 500 degrees Fahrenheit.  Place lobster tails seasoned side up.  Cook until the meat becomes opaque white and the shell turns bright red, or for about 8-10 minutes. 

4. Finish the dish. Remove from the broiler.  Brush the lobster tails with melted butter and serve immediately.

ENJOY!