Showing posts with label Vanilla. Show all posts

Sunday, June 2, 2024

Pizzelles

The pizzelle may be one of the oldest known cookie recipes. There are recipes that are said to date back to the 8th century B.C.E., which would go as far back as the founding of Rome (which took place around 753 B.C.E.). Yet, these cookies did not emerge on the streets of the city founded by Romulus and Remus. Instead, the cookies originated on the other side of the peninsula, in an area that would become known as Abruzzo. 

The story of the pizzelle is said to have begun in the village of Culcullo. The village and its residents were overrun with poisonous snakes. A man named Dominic rendered all of the snakes harmless. To thank that man, a celebration was held, which became known as the Festival of Snakes. Pizzelle cookies were made and eaten as part of the celebration. The man would later become Saint Dominic. The Festival of Snakes, as well as the Feast Day of San Dominico, continue to this very day to celebrate that story. Now, as people eat their pizzelles, they can watch snakes slither up and down a statute of Saint Dominic. (It is said if the snakes wrap themselves around the statue's head, it will be a good year for the crops.)

Over time, pizzelles were also made and eaten for other celebrations, notably Christmas and Easter. Indeed, my Italian ancestors - who came from Abruzzo - had a yearly tradition to make stacks and stacks of the waffle-like cookies at Christmas time. It was as much a part of the tradition as the holiday meals themselves. 

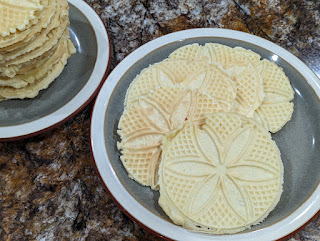
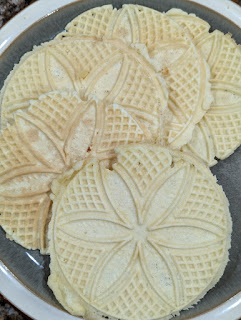
The process of making pizzelles is as old as the wafer-like cookies. Centuries ago, people used iron presses. The presses were usually adorned with some design, such as a snowflake; however, families could have irons decorated with the family crest, or other meaningful designs. The iron presses had a long handle, which one could use to hold the irons over hot coals. The batter was placed in the center, the press was closed. and pressure was applied for a very short time until the cookie was done. Fast forward several centuries and one can still find people using iron presses to make these cookies, just with electricity rather than coal. 

This recipe is relatively easy to make, but it takes a little time getting used to the pizzelle iron. Generally speaking, I find that using a small ice cream scoop works best, placing the batter in the middle of each part of the iron. I also find that holding the iron closed (rather than relying on the clip), gets better results. If the batter sticks to the iron, try a little spritz of olive oil to grease the irons. That also helped immensely in terms of making the cookies, although it did make it a little messier. A little mess is worth it in the end.

PIZZELLES

Recipe from Food Network

Serves many

Ingredients:

  • 3/4 cup sugar
  • 1/32 cup unsalted butter, melted
  • 2 tablespoons milk
  • 1 teaspoon vanilla extract
  • 1/2 teaspoon anise extract
  • 3 large eggs
  • 1 2/3 cups all-purpose flour
  • 1 1/2 teaspoons baking powder

Directions:

1. Whisk together the ingredients. Whisk together the sugar, butter, milk, vanilla, anise and eggs in a large bowl. Add the flour, baking powder and salt, and continue to whisk until the batter is smooth. Allow to stand at room temperature for at least 1 hour so the batter can hydrate.

2. Cook the pizzelles. Heat the pizzelle iron. Once the iron is hot, use a small ice cream scoop to place one scoop in the center of each side of the iron. Close the iron firmly and hold close for 30 seconds. Remove the cookies immediately and place to the side to cool. 

PEACE.
Saturday, February 1, 2014

Apple Crumble

I am not the only one who cooks in our family.  My beautiful wife, Clare, is also a great cook and a great baker.  Every once in a while, I ask my Angel to provide a guest blog post so that I can share some of the amazing and delicious things that she makes for family, friends and, of course, me.  She has already provided guest blog posts about Cuban Bread, Loyalist Bread, Salmon Burgers, Peach Cobbler, Parmesan Soufflé with White Wine Butter Sauce and Meatballs with Orechhiette, Kale and Pine Nuts.   So, without further ado,

A Guest Blog Post by Clare ...

When it comes to desserts, I am the one that makes them in our family.  Keith does not really make a lot of desserts; and, I think that is because he is not really into baking.  When it comes to cooking, he does not always measure things exactly.  He likes to "eyeball"the measurements.  This does not lend itself very well to baking, where exact measurements are much more important, particularly if you want to have a good dessert.

Then there are desserts that are more "Keith-friendly," that is, ones in which being off on a measurement or two would not spell ruin for the dish.  One such dish is this apple crumble, which I made as part of our Wine Club dinner back last September.  (Keith has been really busy at work and at home, which has left some recipes, like this one, waiting to be posted.)  The theme of the Wine Club dinner was The F Word, which was a dinner based on recipes by Gordon Ramsay.  This is Gordon's take on an Apple Crumble.  

The key to this recipe is that the apple is presented in two forms ... puree and chunks.  This helps to provide some interesting texture to the fruit in the dessert.  Gordon adds dried cranberries, which add some interesting flavor to complement the apples.  The granola topping, which adds that crunch one would expect with a crumble rounds out the dish. 

Over all, this is a delicious dessert and a great way to end that particular wine club dinner. 


APPLE CRUMBLE
Recipe from Gordon Ramsay's Cookery Course
Serves 4

Ingredients (for the apples):
6 tablespoons of caster sugar
Pinch of ground cinnamon
1 vanilla pod, seeds only
6 apples, cored but not peeled, 3 of them grated
     3 of them cut into chunks
3 tablespoons of dried cranberries
Zest of one lemon, juice of 1/2 lemon

Ingredients (for the crumble topping):
6 2/3 tablespoons of plain flour
2 tablespoons of demerara sugar
3 1/3 tablespoons of butter, chilled and cubed
Pinch of ground cinnamon
4 tablespoons of nutty granola or muesli

Directions:
1.  Prepare the apples.  Heat the oven to 390 degrees Fahrenheit.  Heat a small hob-proof baking dish. Add the caster sugar and heat for about 5 minutes until it caramelizes.  Add the cinnamon, vanilla seeds and grated apples and cook for 1-2 minutes.  Stir in the apple chunks, then mix in the cranberries, lemon zest and juice.  Remove from heat and set aside.

2.  Make the topping. Place the flour, sugar, butter and cinnamon in a bowl and rub together with your fingertips until the mixture resembles breadcrumbs.  Add the granola and mix fully until incorporated. 

3.  Bake the crumble.  Scatter the crumble topping over the fruit and heat the dish on the hob.  Once the apple mixture is bubbling, transfer to the preheated oven and bake for 12-14 minutes until the topping is a deep golden brown.  Remove and serve warm.

ENJOY!

Tuesday, December 13, 2011

Warm Cream Cheese Tart with Cinnamon and Almonds

I am not the only one who cooks in our family.  My beautiful wife, Clare, is also a great cook and a great baker.  Every once in a while, I ask my Angel to provide a guest blog post so that I can share some of the amazing and delicious things that she makes for family, friends and, of course, me.  She has already provided guest blog posts about Cuban Bread, Loyalist Bread, Salmon Burgers, Peach Cobbler and Parmesan Soufflé.  So, without further ado,

A Guest Blog Post by Clare ...

For a couple of recent parties, I have made a warm cream cheese tart with cinnamon and almonds.  The recipe comes from Frank Stitt's Bottega Favorita, which is a cookbook of recipes from Frank Stitt's restaurant, Bottega, in Birmingham, Alabama.  I first made this recipe as part of our wine club dinner.  The warm cream cheese tart was an excellent dessert course that provided a sweet ending to the meal.  I made this recipe again for a Christmas party.  Both times that I have made this recipe, it has turned out well (so, well in fact, that Keith insists that there be some left over for him to eat).

I have to say that it is important to make your own tart shell rather than buying a store bought one.While it takes extra effort, it really pays off in the end.  The tart shell recipe that is in Bottega Favorita is fairly easy to make, with one exception.  While the recipe says that you can refrigerate the dough overnight, I would recommend that you only refrigerate it only for an hour.  If you let it sit in the refrigerator overnight, it will take quite a while before the dough becomes workable again. 

The sweet pastry tart shell recipe will produce two tart shells.  You should double the filling and glaze recipes.  The outcome is two very delicious tarts that make great desserts for parties, and, of course, leftovers for Keith. 

WARM CREAM CHEESE TART WITH CINNAMON AND ALMONDS
Recipe from Frank Stitt's Bottega Favorita at page 122
Serves 10 to 12

Ingredients for the sweet pastry tart shell):
2 1/2 cups of all-purpose flour
Pinch of salt
1/2 pounds (2 sticks) of unsalted butter
     cut into cubes and chilled
Scant 1 cup of confectioner's sugar
3 large egg yolks

Ingredients (for the filling):
8 ounces cream cheese, softened
8 tablespoons of unsalted butter, softened
1/2 cup of sugar
2 large eggs
2 teaspoons vanilla extract

Ingredients (for the glaze):
1/2 cup confectioner's sugar
1/4 teaspoon ground cinnamon
2 tablespoons hot water
1 cup sliced almonds
Whipped cream

Directions (for the sweet pastry tart shell):
1.  Combine the flour and salt in a food processor and pulse to mix.  Add the butter and pulse until the mixture resembles coarse bread crumbs.  Add the sugar and egg yolks and pulse again, just until the mixture comes together and pulls away from the sides of the bowl.  Transfer the dough to a sheet of plastic wrap, divide in half equally, shape into two disks, and wrap in plastic.  Chill for at least 1 hour, or overnight.

2.  Preheat the oven to 350 degrees Fahrenheit.

3.  Roll the pasty rounds out on a lightly floured surface into two twelve inch circles.  Fit the dough into two 10 1/2 to 11 inch loose bottomed tart pans with fluted sides, pressing it evenly over the bottom and up the sides.  Line the tarts with foil and fill with dried beans or pie weights.

4.  Bake the tart shells for 20 minutes, or until the edges are very light brown.  Remove the parchment paper and weights and bake until lightly golden, about five to ten minutes more.  Cool on a rack before filling.

Directions (for the tart):
1.  Preheat the oven to 350 degrees Fahrenheit.

2.  To make the filling, combine the cream cheese, butter and sugar in a food processor and process until light and creamy.  Add the eggs and vanilla extract and process until smooth.  Spread the filling evenly ni the prepared tart shell.

3.  Bake for 20 to 25 minutes, until the center is set and the edges and light golden.  Remove the pan from the oven and allow the tart to stand for 2 to 3 minutes, while you prepare the glaze.

4.  Whisk the confectioner's sugar, cinnamon, and hot water together in a small bowl until smooth.

5.  Spread the glaze over the top of the tart.  Garnish the top with the sliced almonds.  Serve warm, with whipped cream.

Finally, I should note that although this is a warm cream cheese tart, it is also very delicious after being refrigerated for a while. As Keith would say ...

ENJOY!

Saturday, April 12, 2008

Angeli della Fragola

Strawberry Angels.... Or, more appropriately, Strawberry Shortcake Angels. This is my first creation. Inspired by my Angel (you know who you are). I prepared this as a dessert for Christmas. Of course, this dessert can be made for any occasion.

This is a very simple recipe - premade shortcakes, fresh strawberries, fresh mint, and whipped cream. Yet, there is a lot that can be done to tweak the recipe. For instance, vanilla beans and lemon can be used to provide contrast to the other flavors.

I'm still experimenting with this recipe, which is my own creation. That's right, this is something new. There are three layers - one premade and two to be made. The shortcake shells are available at any grocery store. The filling in the shortcake shell consists of diced strawberries, and the scrapings from vanilla beans. The topping is a whipped cream, which gives the appearance of clouds. Strawberries act as the angels and fresh mint represent their wings. After I made this recipe, I thought of using lemon zest to create halos. That will be for the next time.

ANGELI DELLA FRAGOLA
A Chef Bolek Original
Serves 4-6

2 pints of fresh strawberries
2 vanilla beans
2-3 tablespoons of strawberry jam
whipped cream
fresh mint
pre-made shortcake shells

Select the largest fresh strawberries and set aside, as those strawberries will be the angels. Take the remaining strawberries and dice them. Take the vanilla beans, scrape the vanilla and add it to the diced strawberries. Also add some chopped mint. Then, add the strawberry jam to the mix all of these ingredients.

Take a spoonful of the strawberry mixture and place it in each shortcake shell. Once all the shortcake shells are filled, take a spoonful of whipped cream and place it on top of the strawberry mixture. Try to place the cream in a manner that replicates clouds.

Once the whipped cream is added to all of the shortcake shells, take the large strawberries and slice them in half (to make it easier to eat them). Place the two halfs together in a shell, using the cream to hold the strawberry halves together. Then take two good size mint leaves and anchor them in the whipped cream. Repeat with each shortcake shell.

ENJOY!