Showing posts with label Red Chiles. Show all posts

Sunday, June 11, 2023

Togarashi

Anyone who knows me can tell you that I love spices and that I love to make spice mixes. I also like to learn about spice mixes, as this blog shows. I have made spice mixes based on historical recipes, such as Kitchen Pepper. I have also made spice mixes from around the world including, by way of example, Hawayil from Yemen, Suya from Ghana, and Nine Spice Mix from Palestine. 

This post offers me a chance to make a spice mix from Japan. The mix is known as Togarashi or Shichimi Togarashi. 

The story begins during Japan's Edo Period, around 1625 C.E. which happens to be around the time that chile peppers were introduced in Japan. The place was the Yagenbori Herb Shop. The shop was located in the Higashi-Nihonbashi district of Tokyo. It is at this shop where the first mixture was made. At the time, it was referred to as yagenbori, after the shop. It was used principally for medicinal purposes. Over time, however, the mix made its way into the kitchen for culinary uses. 

Togarashi is typically prepared from seven ingredients (and, hence, why it is also referred to as Shichimi Togarashi, as Shichimi is "seven" and "Togarashi" is "peppers" in Japanese). The seven ingredients may vary slightly by region, but it typically includes red pepper, poppy seeds, sesame seeds, hemp seeds, nori (or anori), sancho (a Japanese pepper) and orange peel.  Notwithstanding the variations, there is one thing that remains constant. There can only be seven ingredients. Any additional ingredient will result in Hachimi. That's a different blog post.

TOGARASHI

Recipe from the Daring Gourmet

Ingredients:

  • 2 tablespoons red chile flakes
  • 1 tablespoon dried orange peel
  • 2 teaspoons white sesame seeds
  • 2 teaspoons black sesame seeds
  • 1 teaspoon ginger powder
  • 1/2 teaspoon poppy seeds
  • 1/2 nori sheet, toasted over open flame, crumbled

Directions:

1. Toast the seeds. In a dry skillet, lightly toast the white and black sesame seeds, poppy seeds, and Sichuan peppercorns until fragrant, being careful not to burn them. Transfer to a bowl and let them cool completely. 

2. Prepare the spice mixture. Place all of the ingredients, along with the nori, in a spice/coffee grinder and pulse until coarsely ground. It should be coarse and not a fine powder. 

3. Store the mixture. Store in an airtight jar. For best results, use within a few weeks. 

Tuesday, May 15, 2018

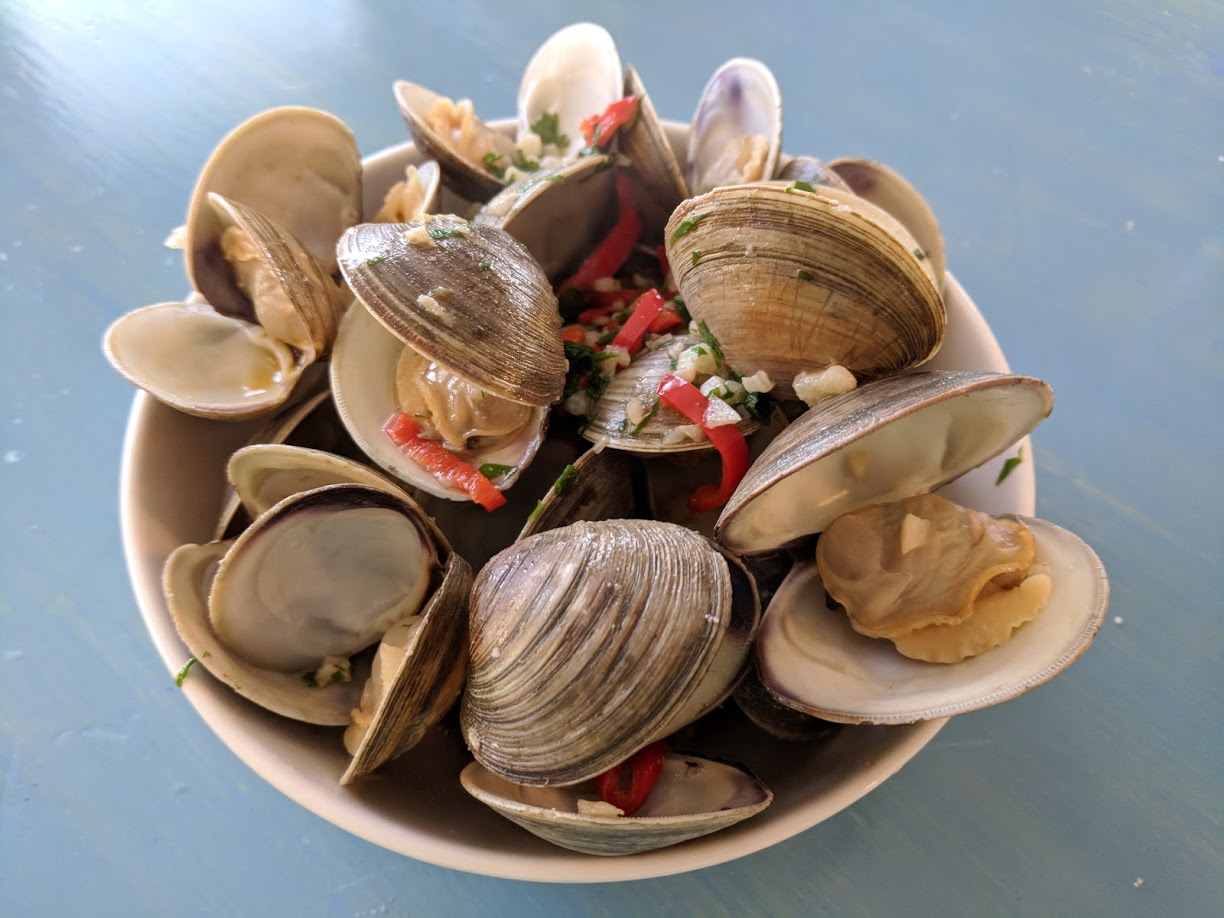
North Carolina Steamed Clams

Lately, it seems like it has been all about the oyster.  Everyone is talking about the different types of oysters out there, usually while eating a dozen oysters at a raw bar.  Kumamotos, Blue Points, Chincoteagues.   The statement that that oysters are in vogue could be taken both figuratively, and, literally.  After all, there recently was an article about oysters from Canada's Prince Edward Island on the Vogue website.   But, as oysters enjoy their moment in the spotlight, one needs to remember that they are not the only shellfish that can produce a tasty dish.

There is the clam.  It can provide just as much briny flavor as an oyster when eaten raw.  When I worked in the kitchen of a seafood restaurant, I used to shuck both clams and oysters.  I found myself enjoying the taste and texture of clams. However, here is what separates clams from oysters: in my humble opinion, a bowl of steamed clams far surpasses just about anything you can do with oysters.  I enjoy steamed clams more than I do oysters Rockefeller.  I will eat a bowl of those clams with much more abandon than I will a plate of fried oysters.  The only preparation of oysters (apart from raw oysters) than can out perform a bowl of steamed clams, again in my humble opinion, is a properly prepared oyster po-boy.  And not everyone can prepare a proper po-boy.

As I stood at a seafood market with a bag of middleneck clams in my hand, I got to wondering what  it takes to bring that bag of clams to a consumer.   This is where the Internet can actually be a good thing.  It can connect people like me -- who have an interest in how clams are cultivated -- with those who want to share their day-to-day experience harvesting those clams.  Some of those who fall in the latter category, and who also happen to work at the University of Maine, have even established their own "Clam Cam." The website contains a wide range of videos showing hardworking individuals harvesting clams in Maine (work that I think is probably the same for individuals harvesting clams in Massachusetts, New York, Maryland, Virginia and North Carolina).  Needless to say, it involves a lot of digging in the tidal sand or mud flats to pry the bivalves loose from their hiding spots.   (Commercial clammers use mechanical dredging offshore, but that is far less interesting to me with the exception of the possible environmental impact of tearing up the seabed, but that is a subject for a future post.)

With all of this in mind, I turn to the recipe.  I had in my mind of a curry recipe, but, that recipe was for mussels.  I had neither mussels nor other important ingredients for that curry, such as turmeric or lemongrass. So, I began looking for an alternative that would work with clams.  I found a recipe for Littleneck Clams Steamed in Vinho Verde.  It is a great recipe from Abraham Conlon, the chef at Fat Rice in Chicago.  Chef Conlon used Vinho Verde, which is a great white style of Portuguese wine.  The problem is that I did not have bottle of that wine handy.  However, I was in the Outer Banks and I bought a bottle of the Three White Wine from the Childress Vineyards.  The wine is a blend of Viognier, Chardonnay, and Pinot Grigio.  The description of that wine got my attention: grapefruit and lemongrass with an almond finish.  I thought these taste elements would work well with this recipe.  Hence, the substitution of the North Carolina wine turned the recipe into North Carolina Steamed Clams.


NORTH CAROLINA STEAMED CLAMS
Recipe adapted from Food & Wine
Serves 4

Ingredients:
100 littleneck or middleneck clams
1/3 cup extra virgin olive oil
2 fresh long hot red chiles, stemmed, seeded 
     and thinly sliced crosswise
1 cup of white wine from North Carolina
1/3 cup minced garlic
1 cup of minced cilantro
3 tablespoons fresh lemon juice, plus lemon wedges for serving
Kosher salt
Freshly ground black pepper

Directions:
1.  Prepare the base.  In a large pot, heat the olive oil until shimmering.  Add the garlic and chiles and cook over high heat, stirring until fragrant and the garlic is just starting to brown, about 2 to 3 minutes.  Add the clams and wine.  Cover and steam until the clams just open, about 8 minutes.  Using tongs or a slotted spoon, transfer the clams to a baking sheet, discard any that done open.

2.  Finish the sauce.  Boil the cooking liquid over high heat until reduced by half, about 7 minutes.  Stir in the minced cilantro and lemon juice.  Add the clams and season lightly with salt and white pepper.   Toss well.  Transfer to a deep platter and serve with lemon wedges.  

ENJOY!

Sunday, November 2, 2014

Around the World in 80 Dishes: India

It has been well over a year since I completed a dinner for my personal culinary challenge, Around the World in 80 Dishes. The last challenge was to prepare Mauritian Duck Curry, along with Chana Masala, dishes from the island country of Mauritius.   The cuisine of Mauritius is heavily influenced by immigrants, especially those from India.  For the next challenge, I'll will travel from Mauritius to India.

The timing could not be better.  I undertook and completed this challenge during Diwali, the Hindu festival of lights, an important festival for Hindus, Jains and Sikhs.  Diwali unfolds over five days, with the third day being celebrated as the main festival or "Festival of Lights." The lights were originally clay lamps, lit for reasons that vary with the celebrants.  For example, lighting lamps represents the victory of knowledge of ignorance.  Darkness represents ignorance, as well as wickedness, violence, anger, bigotry, injustice and suffering.  The lighting of lamps allows light to overcome darkness, which is not only a metaphor for knowledge overcoming ignorance, but also illustrates how light reveals the beauty that surrounds us.

Of course, the Diwali celebration involves far more than lighting of clay or electric lamps.  Families decorate their houses, set off firecrackers and, of course, partake in a feast of food.  The feast of food that I prepared included two main courses and a side dish, all of which are part of this culinary challenge.
 
MAIN COURSE

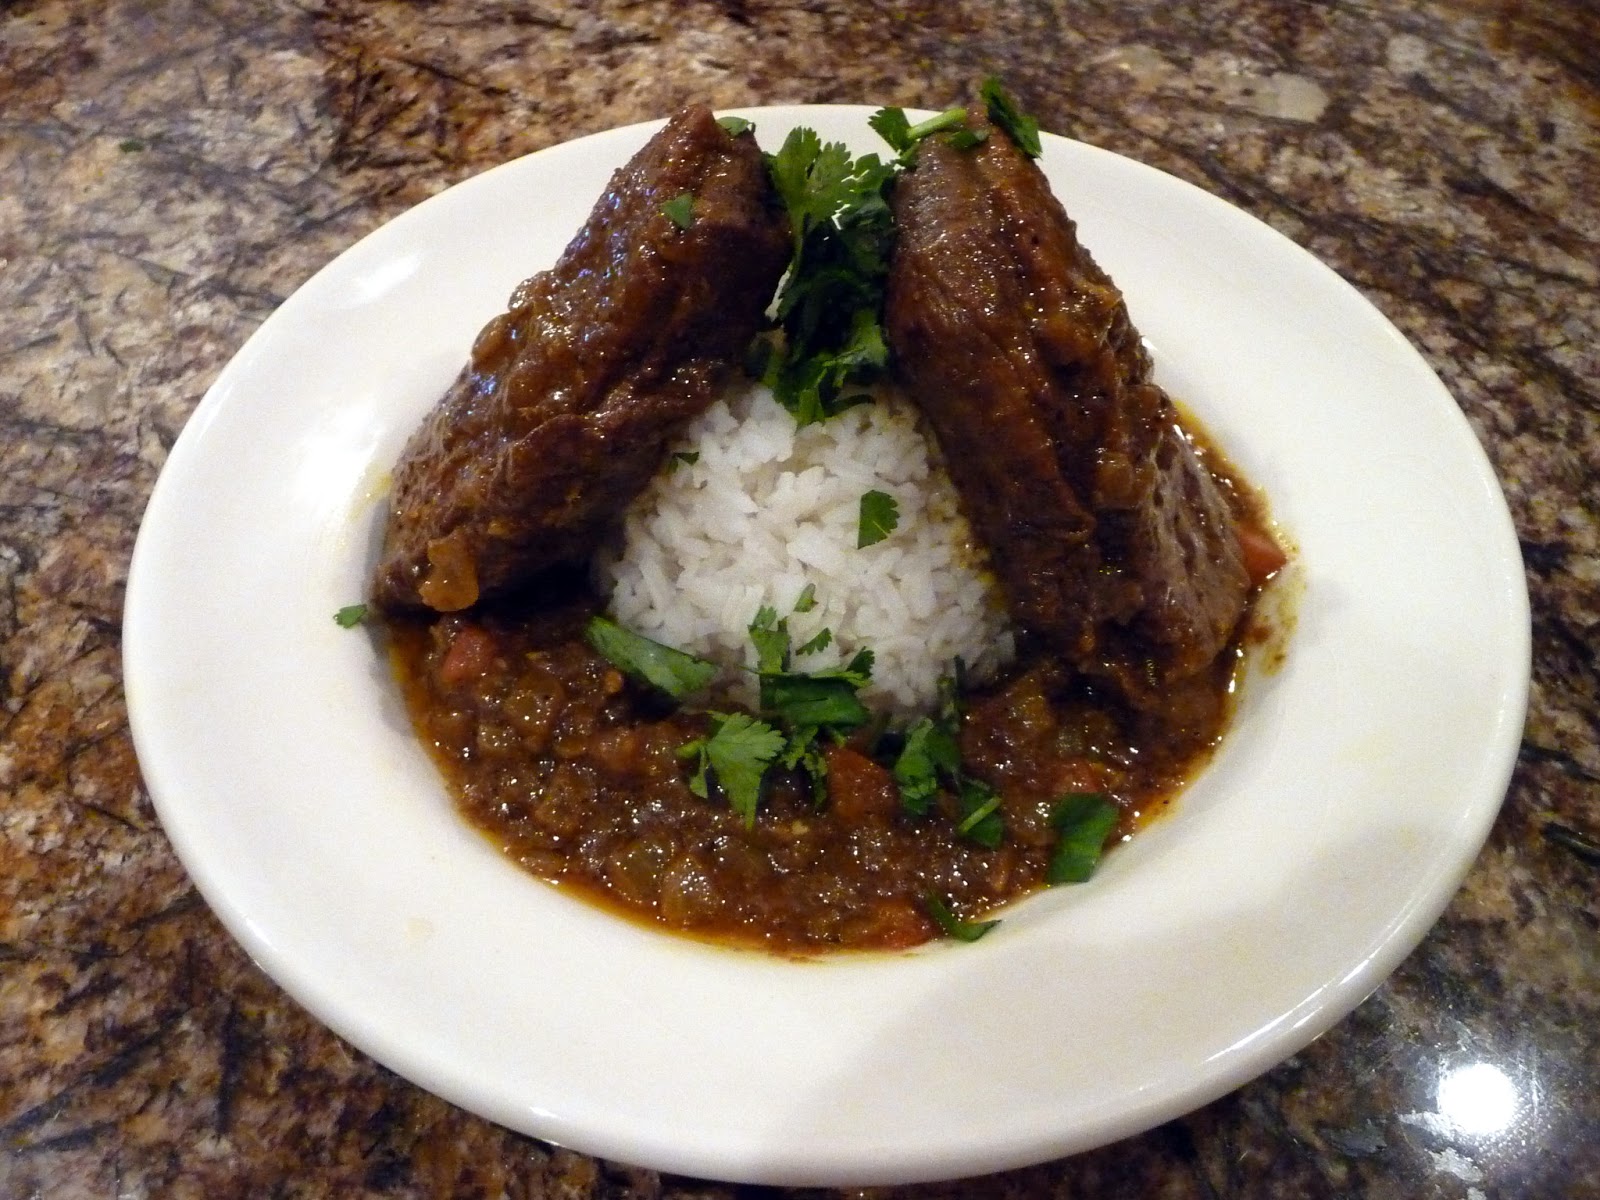
While I made two main courses, only one can satisfy the challenge.  That dish is Rogan Josh, an aromatic and very tasty lamb stew or curry.  The dish originated in Persia, which gave the red curry its name.  According to Wikipedia, Rogan means "clarified butter" or "fat" in Persian, while Josh basically means to heat or boil in an intense or passionate way.  The dish was introduced to the subcontinent by the Mughal Empire, where it became very popular in the Kashmir region. 

The Kashmiri version features braised lamb chunks cooked with a gravy based on browned onions or shallots, yogurt, garlic, ginger and aromatic spices, such as cloves, bay leaves, cardamom and cinnamon. The red color of Rogan Josh traditionally comes from liberal amounts of dried, de-seeded Kashmiri chilies.  These chiles are more akin to paprika than the cayenne chiles used by Indian cuisine.  

Personally, I love Rogan Josh and this dish has been on my "to do list" for some time. This version is a simplified curry based upon a recipe by Vikram Sunderam, the chef and owner of the very popular Washington, D.C. restaurant Rasika.


ROGAN JOSH
Recipe from Food and Wine
Serves 4

Ingredients:
1/4 cup canola oil
2 pounds boneless lamb shoulder, cut into 1 inch pieces
Kosher salt
2 onions, thinly sliced
2 tablespoons, minced fresh ginger
2 garlic cloves, minced
1 tablespoon plus 1 teaspoon Madras curry powder
1 teaspoon turmeric
1/2 teaspoon cayenne pepper
2 bay leaves
1 14 ounce can tomato puree
1 cup plain whole milk yogurt
1 cup plain whole-milk yogurt
2 cups water
1 teaspoon garam masala
Cilantro leaves, for garnish
Basmati rice and warm naan for serving.

Directions:
1.  Brown the lamb.  In a large, enameled cast-iron casserole, heat the oil. Season the lamb with salt and cook over high heat, stirring occasionally, until the lamb is browned, about 12 minutes; using a slotted spoon, transfer to a plate.

2.  Add the remaining ingredients.  Add the onions to the casserole and cook over moderate heat until lightly browned, 4 minutes. Add the ginger, garlic, curry, turmeric, cayenne and bay leaves and cook for 2 minutes. Add the tomato, yogurt and water; bring to a boil. Season with salt.

3.  Simmer the stew.  Return the lamb and any juices to the casserole. Cover partially and simmer over low heat until the lamb is very tender, 1 hour. Stir in the garam masala; cook for 5 minutes. Discard the bay leaves. Garnish with cilantro. Serve with rice and naan.

SIDE DISHES

Although the Rogan  Josh satisfies the culinary challenge, I try to make some other dishes, whether appetizers, side dishes or desserts as part of the Around the World in 80 Dishes.  Since I have not done a challenge in awhile, I decided to do another main or side dish.  This dish -- Daal Saag -- features yellow split lentils and spinach.  I have to admit that I do not cook very much with lentils, so this presented a whole different type of challenge.


DAAL SAAG
Recipe from Merilees Parker and
Available on the BBC's Food Website
Serves 4

Ingredients:
8 ounces of yellow split lentils (moong dal)
3 1/2 cups of water
2-3 tablespoons of vegetable oil
1 teaspoon black mustard seeds
1/4 teaspoon ground turmeric
1/4 teaspoon ground cumin
1/4 teaspoon asafoetida or fennel seeds
2 tablespoons of fresh ginger, grated
2 green chiles, de-seeded and chopped
8 curry leaves
3 1/2 ounces of spinach
2 spring onions, trimmed and chopped

Directions:
1.  Prepare the lentils.  Put the daal in a heavy based saucepan, pour in the water and bring to a boil.  Reduce the heat and simmer for about 1 hour until the lentils are really soft.

2.  Heat the spices.  Heat oil in a large pan.  Add the mustard seeds, turmeric, cumin, asafoetida or fennel sides, ginger, chilies and curry leaves.  Fry for 2 to 3 minutes.

3.  Add the daal.  When the daal is cooked, add to the pan and stir in spinach and spring onions.  Heat for an additional two minutes.  Season and then serve.

Whenever you make a curry, whether Rogan Josh or Daal Saag, you should always have a pullao, or rice.  This particular rice dish includes carrots, potatoes and green beans. 


VEGETABLE PULLAO
Recipe from Merilees Parker and
Available on the BBC's Food Website
Serves 4

Ingredients (for the garam masala):
1 tablespoon of cardamom seeds
1 teaspoon of black peppercorns
1 teaspoon black cumin seeds (or regular cumin seeds)
1 teaspoon whole cloves
1/3 whole nutmeg
1 medium stick of cinnamon, broken into pieces

Ingredients (for the pullao):
Basmati rice, measured to the 1 pint level (2 cups)
Thumb piece of fresh ginger, grated
3 tablespoons of olive oil
1/2 teaspoon brown mustard seeds
1 hot green chile, finely chopped
1/4 pound of potatoes, peeled and cut into dice
1/4 carrot, peeled, cut into dice
1 1/2 ounces of green beans, cut into segments
1/2 teaspoon ground turmeric
1 teaspoon garam masala
1 1/4 teaspoon salt
1 pint water

Directions:
1.  Prepare the garam masala.  Put all of the spices in a clean coffee grinder or other spice grinder and grind as finely as possible. Store in a tightly lidded jar, away from heat and sunlight. This makes about three tablespoons.

2.  Prepare the rice. Wash the rice in several changes of water then drain. Put the rice in a bowl, cover with water and leave to soak for 30 minutes, then drain again.

3.  Heat the spices.  Heat the oil in a heavy-based pan (with a tight-fitting lid) set over a medium-high heat. When it's hot, add the mustard seeds.  As soon as they begin to pop - a matter of seconds - add the chilli, potato, carrot and green beans and stir. Add the turmeric and garam masala and stir for one minute.  Add the ginger and saute, stirring, for another minute.

4.  Add the rice and other ingredients.  Drain the rice and add it to the pan. Reduce the heat to medium-low and stir the rice very gently to mix it into the other ingredients and coat it with the oil and spices. Cook this way for two minutes.  Add the 570ml/1 pint water and the salt and bring to the boil. Cover the pan with a very tight-fitting lid (if you don't have a very tight-fitting lid then cover the pan with foil then a lid) then turn the heat to very low and cook for 25 minutes. After this time try a grain of rice to see if it's cooked - cook for a few more minutes if necessary.

5.  Finish the dish.  Once it's cooked you can leave it with the lid on and the heat turned off for up to half an hour before serving. Or serve at once on a serving plate.

*     *     *

I have to say that I completed the challenge successfully.  The Rogan Josh was amazing and I can understand why it is a very popular dish in India.  I also learned that I still have a lot of work to do when it comes to making large amounts of rice.  The pullao was good, but I have difficulties getting the right texture with the rice.  I can do it in small batches.  However, when cooking for large crowds, it is a little more difficult, at least for me. The one thing is that I still have over fifty challenges to go.  I am sure that there will be many more opportunities to make rice.  

Until next time ...

 ENJOY!

Tuesday, August 6, 2013

Crispy Salt and Pepper Squid with a Cucumber Salad

In a land where the food airwaves are dominated by Food Network, one can understandably look elsewhere for inspiration.  Rather than watching shows like Diners Dives and Drive-Ins, Semi-Homemade Meals and What is Brian Boitano Cooking, I find myself watching shows like Hell's Kitchen and MasterChef.  Both of those shows feature Gordon Ramsay, but they reveal very little about his cooking.  I found myself channel surfing again, only to stop at a show called the F-Word

When it comes to Gordon Ramsay, who built his reputation on being a brash, straightforward chef, the "F Word" could have a couple of meanings.  In this case, the "F Word" means food.  What sets the F-Word apart from other Ramsay shows is that the F-Word shows Gordon Ramsay cooking dishes and providing the recipes for the viewers.  One such recipe is Gordon Ramsay's Crispy Salt and Pepper Squid with a Cucumber Salad.

Of course, the recipe comes with that thought of Gordon Ramsay critiquing you from a distance.  As I made this recipe, I thought "what would the Chef say?"  Those thoughts became more and more frequent as it became clear as I struggled with the breading of the calamari.  In the end, I do not think that Chef Ramsey would have approved of the dish because the breading did not adhere to the calamari as much as I think he would expect.  There was still enough breading left that you could taste the peppercorns and Chinese five spice with every bite of the squid.  In any event,  I am not cooking on any of his shows and I have the opportunity to practice the dish before the rather unforeseeable event that I should find myself on one of those programs.


CRISPY SALT AND PEPPER SQUID WITH A CUCUMBER SALAD
Recipe by Gordon Ramsay
Available at BBC America

Ingredients (for the squid):
3/4 pound squid, both bodies and tentacles
1 tablespoon of Szechuan peppercorns
     (or substitute black peppercorns, with 1/2 teaspoon of red chile flakes)
1 teaspoon Chinese five spice powder
1 tablespoon sea salt
8 tablespoons of corn flour
Vegetable oil for frying

Ingredients (for the salad):
1 cucumber, peeled and shaved into thin ribbons
1 carrot, peeled and shaved into thin ribbons
1 chile, diced finely
1 to 2 tablespoons rice wine vinegar
1 teaspoon toasted sesame oil
1 pinch of sugar
Salt, to taste
1/4 cup of cilantro leaves
Lime slices, for serving


Directions: 
1.  Prepare the squid. Crush together the peppercorns, chilli flakes and sea salt with a pestle and mortar then mix with the flours. Slit the squid hoods down one side, open out then score the inside lightly in a criss-cross pattern. Cut into bite-size pieces.  Add the squid to the flour and toss to coat the squid as much as possible.

2.  Prepare the salad.  Combine all of the ingredients, mix thoroughly.

3.  Fry the squid.  Fill a large pan or wok 1/3 full with oil. Heat until a cube of bread browns in 30 seconds. Coat the squid pieces in the flour, shaking off the excess, and fry for 1-2 minutes or until golden. Serve with lemon wedges.

ENJOY!

Wednesday, March 6, 2013

Around the World in 80 Dishes: Mauritius

I have been working on my ongoing, personal culinary challenge, Around the World in 80 Dishes.  However, as I worked on a couple of particular challenges, a surprise challenge seemed to emerge out of nowhere.  It was a dot in amongst an ocean of ingredients.  A package of duck breasts.  My eyes fixated on that package, and, I began to wonder what I could make with it.  As soon as I got to a computer, I began to review various recipes that used duck breasts.  It was then that I came across for a recipe of Mauritius Duck Curry.  That recipe gave rise to a challenge.  I would make a main course from the country of Mauritius. 

Much like those duck breasts, the Republic of Mauritius is a dot or dots in the larger Indian Ocean. The country consists of a set of islands, including Mauritius, Agaléga, Rodrigues, and Saint Brandon.  Mauritius was first charted by Arab sailors, although it was Portuguese explorers, perhaps Diogo Fernandes Pereira, who established the first base on the island of Mauritius.  At that time, the Portuguese encountered the local inhabitants ... the dodo bird. The Portuguese later abandoned the islands, only to have the Dutch who landed and later settled the island.  (The Dutch gave the country its name, Mauritius.) The Dutch settlements did not survive, but they left sugar cane, domestic animals and deer.

After the Dutch abandoned the island, it was the French who settled in and established a long-lasting settlement and renamed the islands the "Isle de France." The French established Port Louis, the capital, and used it as a naval base to raid British shipping.  Ultimately, the French lost the islands to the British in 1810 as a result of the British victory in the Napoleonic war.  The British allowed the residents to keep their land, their French language and their laws.  This probably gave rise to the Mauritian Creole (Kreol Morisien), a French-based language spoken by the populace, even though English is the official language.

It is at this point the focus shifts to the culture and cuisine.  Mauritius has a very diverse population.  At first, there were the Africans, Creoles and Europeans.  During the 19th century, Indians began to emigrate to Mauritius from the subcontinent, bringing their culinary traditions with them.  Toward the end of that century, the Chinese began to migrate to Mauritius.

Each of these populations have left their mark on the Mauritian cuisine. A variety of dishes may grace the tables of Mauritians, whether at home, on the street or in a restaurant.  These dishes include Indian curries, European braised dishes, and Chinese stir frys. Such a range of culinary influences creates a dilemma for my personal culinary challenge.  The question becomes what which influence should serve as my starting point.  For this challenge, the choice of a duck curry made this decision rather easy.  I would be exploring the Indian influence on Mauritian cuisine. 

FIRST COURSE

Indians migrated to Mauritius from both North and South India, which means that there is a wide range of influences just within the Indian cuisine in Mauritius.  As followers of my blog know, I try to make more than just the main course.  I usually try to make a first course, side dish and/or a beverage.  On this occasion, I decided to make a first course of Chana Masala. 

Chana -- or chole -- are more commonly known as chickpeas.  This masala is a very popular dish in the Punjab region of India, as well as in Guajarat and Rajahstan.  I found the recipe on the Mijo Recipes website.   The one substitution that I made was to use canned chickpeas, rather than dried chickpeas.  This cut down on the preparation time, although it also meant that I would not have the reserved liquid that is called for in Step 3.  I had some vegetable stock in the refrigerator, so I used that in place of the reserved liquid.  This substitution worked out very well. 


CHANA MASALA
Recipe adapted from Mijo Recipes
Serves 4-6

Ingredients:
2-3 cups of chana/chole/chickpeas (if using dried, soaked overnight or at least 5 hours)
2 2/3 tablespoons of butter
1 medium onion, chopped finely
1 tablespoon garlic-ginger paste (or 4 cloves garlic and 2 cm ginger, grated)
1-2 red chiles, sliced
1 teaspoon cumin seeds
1/4 teaspoon turmeric powder
1 teaspoon coriander powder
1 teaspoon garam masala powder
2 medium tomatoes, chopped to a paste (or made into a paste with a blender)
1 tablespoon of cilantro, chopped
1/2 cup of low sodium vegetable stock or broth (if using canned chickpeas)

Directions:
1.  Prepare the chole.  Soak the chole in water overnight or for at least 5 hours. Wash and boil them until well cooked. Take one chole and if you can mash it with your fingers, then it’s done. Drain the chole and reserve the liquid.

2.  Begin to prepare the masala.  Heat a non-stick pot over medium heat.  When warm, add the butter and allow it to melt.  Add the cumin seeds and let them fry for a few minutes.  Add the chopped onions and fry until most of the water evaporates.  Add ginger-garlic, fry until fragrant. Lower your heat, add turmeric powder, coriander powder, garam masala powder, salt and 1 tbsp water. Mix until you get a nice paste and cook until fragrant. The low heat and adding some water prevents the spices from burning.

3.  Continue to prepare the masala.  Put heat to medium. Add red chillies, chopped tomatoes and cook until the mixture reduces to about half in quantity. The mixture will become a bit thicker.  Add the chole/chickpeas, and add half-cup of the reserved liquid.  Cook for a further 10 minutes covered.

4.  Finish the dish.  Mash up some of the chickpeas and add water until the mixture reaches your desired consistency.  Add chopped coriander leaves.  Mix and serve.

This dish is very good.  I liked this recipe because it allows the cook to adjust the consistency of the masala to his or her own liking. Personally, I prefer the masala on the dry side.  This meant that I did not add any water at the end of the cooking.

MAIN COURSE

When I selected the challenge to make a main course from Mauritius, I did not expect that it would come with a lesson about food security.  However, I should have expected it.  Mauritius is a series of islands, which means that there is not a lot of land to grow crops or raise livestock.  The country imports about 75% of its food, while only producing 25% locally.  Food also accounts for approximately one-third of the expenses incurred by a Mauritian family.   Taken together, these facts reveal the basic problem in the context of food security: the vulnerability to increases in food prices.  For the people of Mauritius, they not only face higher increases in the cost of basic food, but also increased costs attendant to the importation of that food. These increases in food and transportation costs translate into an even larger portion of an average family's expenses being used to purchase the food they need to survive.

Given this real threat of food insecurity, the Mauritian government has undertaken various initiatives to obtain food "independence," which means self-sufficiency in the production of dairy, vegetables, and meat.  This provides a good transition to those duck breasts.  One of the government's initiatives is to increase the production and consumption of ducks.  Private companies brought stocks of Pekin and Muscovy ducks to Mauritius.  However, with some assistance, the Mauritian government established a "Duck Unit," which included the construction of a hatchery in Reduit and a farm in Albion.  The government's objectives include the development of high yielding meat strains through breeding, to increase the number of hatchlings and to further research duck nutrition.

As the Mauritian government promotes the production and consumption of ducks, chefs and cooks have risen to the challenge by using their creativity to develop dishes that feature Mauritian ducks.  One such chef is Jocelyn Riviere, who was born in Mauritius but who heads kitchens in Australian restaurants.  Chef Riviere created a recipe for Mauritian Duck Curry, which serves as the main dish for my challenge.

This is a very interesting recipe and I wished I could have followed it to the letter. Unfortunately, I had to make a couple of changes due to the availability of ingredients.  First, the original recipe calls for the use of a whole duck, but I wanted to cook with duck breasts and, in any event, the store where I bought the duck did not have whole ducks available.  So, I used duck breasts.  Second, the recipe calls for the use of stalks of young curry leaves.  Once again, the store did not have any curry leaves and I did not have the time to stop at the stores where I knew that ingredient would be available.  So, I made the dish without the curry leaves, but I left them in the recipe.  Finally, the recipe calls for the use of bird eye chilies.  These chiles are also known as "piri-piri."  I did not have any whole bird eye chiles, but I did have ground piri-piri.  So, I substituted ground chiles for whole ones.  This substitution greatly increased the heat of the dish, but, it is consistent with the fact that Mauritians love spicy foods.  (After all, the influences of African, Indian and Chinese cuisines provides the perfect conditions for spicy dishes.)  With all of those changes, I proceeded to the challenge:


MAURITIAN DUCK CURRY
Recipe adapted from SBS Food
Serves 2-4

Ingredients:
1 whole duck cut into sauté pieces or four duck breasts
Vegetable oil
3 inch piece of fresh ginger, peeled
6-8 large cloves garlic, peeled and chopped
1-2 birds eye chilies (or 1/4 teaspoon of ground piri-piri pepper)
4 tablespoons of curry powder, mixed with water to make a wet paste
2 medium onions, finely chopped
10 stalks of fresh young curry leaves
Half a bunch of washed coriander, coarsely chopped
4 medium sized ripe tomatoes, pulp removed and diced coarsely

Directions:
1.  Make the garlic/ginger/chile paste.  In a mortar and pestle crush ginger, garlic and chilli with a pinch of salt to form a paste. 

2.  Prepare the duck.  Remove all the excess fat and skin that hangs from the sides or ends of the duck, leaving only the skin that sits on top of the meat. Cut the duck into 2 drumsticks, 2 thighs, and 4-breast quarter and the rest into same size pieces. Place in a bowl, season well with salt and fresh ground white pepper and toss. If you are using duck breasts, just season them liberally with salt and ground pepper.  

3.  Brown the duck.  Heat a large heavy sauté pan on medium to high heat. When it is hot, put in as many duck pieces as will fit easily, skin side down. Quickly brown the duck on both sides. Set the browned pieces aside. Continue to brown all the duck pieces in the same way. (Do not burn the bottom of the pan) Reduce to medium heat. 

4.  Saute the onions.  To the same hot pan, which should have enough duck fat for frying, add the onion and sauté until light brown. Add the garlic, chile and ginger paste. Sauté and cook for about 2 minutes, then add the curry leaves and curry powder mix, stirring and cooking over medium-low heat for another 2 minutes until the paste bubbles and cooks out. 

5.  Make the curry.  Add one-half cup of water, the cooked duck pieces and any juices from the bowl.  Mix well and add another cup of water to bring the liquid level to half way up the ingredients. Check seasoning.   Bring to the boil then cover and simmer on a low heat for 45 minutes to 1 hour until meat is tender (almost falling of the bone). Stir gently every 20 minutes or so during the cooking period, turning the duck pieces over now and then. 

6.  Finish the curry.  Remove lid and add chopped tomato. Allow the tomato to break down into the sauce, gently turning up the heat to reduce. Check the seasoning and, just before serving, add the chopped cilantro. 

*          *          *

When asked to give advice to home cooks, Chef Riviere recommended that they be "well organized and season everything before cooking (especially with freshly ground pepper)."  "More importantly," he added, "remember that it takes a few tries to get it perfect."  Those words are sage advice.  I have to say that my first attempt at Chana Masala and Mauritian Duck Curry was a good start.  The masala was very good and I was able to taste the various spices in the dish.  The duck curry was a little reminiscent of the Kerala Duck Curry that I made a few weeks ago.  If I had to chose between the two types of curry -- Mauritian or Keralan, I think I would choose the Mauritian Duck Curry.  I also plan on following Chef Riviere's advice by making the duck curry again.  I will update this post with any changes based upon my future efforts.  

Now, it is time to return to my previously scheduled challenges, and, until that time ...


ENJOY!


For more about Mauritius, check out Wikipedia

Saturday, December 8, 2012

Around the World in 80 Dishes (Special): Tibet

As part of my Around the World in 80 Dishes culinary adventure, I decided that I would prepare four special challenges.  Each challenge would focus on a cuisine of a culture that does not have its own, formally recognized country. These challenges will also appear as part of my Beyond Borders project.

The first special challenge takes me to "Bod," which translates to "Tibet" or the "Tibetan Plateau."  That plateau is a vast stretch of land that has an average elevation in excess of 14,500 feet that is surrounded by even higher mountain ranges.  Several rivers cut through the plateau, including the Yangtze, Yellow, Indus, Ganges and Mekong Rivers. 

This geography has a definite impact upon agriculture.  Subsistence farming is the predominant form of agriculture, with Tibetans cultivating the few crops that can grow at that elevation.  The principal crop is barley, which, unlike wheat or rice, can fare well at higher altitudes.  The barley is ground into a flour to make a dough called tsampa, which is used to make bread.  The Tibetans also raise yaks, goats and sheep, which are an important part of their meat-eating tradition.  The eating of meat is necessary for the Tibetans, because the meat provides an important source of protein and fat that is not only useful, but necessary for life on the high plateau.

This meat-eating tradition also presents a dilemma, which has been documented Julia Moskin in an article published by the New York Times.  The majority of Tibetans practice Buddhism and abhor the taking of life ... any life.  This presents a problem when it comes to their cuisine, because it is full of yak, goat, and mutton dishes.  The "unofficial" dish is called Sha Momo or "Meat Momo," which is a dumpling made with a minced yak meat mixture.  While the unofficial dish may be a carnivore's delight, the Sha Momo represents a dilemma.  Nevertheless, the Tibetans have resolved that conflict.  Known as the "karmic load," Tibetans recognize that the killing of one yak is the same as killing one fish.  However, a yak feeds many more people than a fish.  Thus, if a creature must perish so that people can eat, Tibetans choose the yak.  Thus, Tibetans are able to minimize the "karmic load" by feeding many more people through the killing of many less creatures.

MAIN COURSE

Turning to the matter at hand, I decided that, for this special culinary challenge, I would make the "unofficial dish" of Tibet, Sha Momo. This is the first time that I made dumplings of this kind.  I have previously made Hushuur, as part of my challenge to make a main course from Mongolia.  Hushuur are a kind of "dumpling," shaped into half-moons and deep-fried.  Huushur are larger than Sha Momo and, looking back on the challenge, my Hushuur looked more like calzones when compared to the smaller, more refined Sha Momos.  And, I have to admit, the task seemed daunting.

Every Tibetan family has their own way to make momos; however, there are some general guidelines.  First, Sha Momos generally come in two shapes: round and the half moon.  I chose to make the round dumplings.  Second, the filling for Sha Momos obviously includes meat.  While I did not have any ground yak meat, I did substitute grass-fed, ground beef.  Third, momos can be prepared in different ways ... for a soup, steamed, or fried.  I decided to steam the momos.  With the parameters set, I moved on to making the momos from scratch....


SHA MOMO
 Recipe adapted from Yowangdu and National Public Radio
Makes 24 large dumplings or 32 medium dumplings

Ingredients (for the dough):
2 cups of unbleached flour or white all purpose flour
3/4 cup of just boiled water

Ingredients (for the filling):
3/4 pound ground beef (preferably chuck), coarsely chopped to loosen
1/2 cup finely chopped yellow onion
1/3 cup chopped Chinese chives or scallions (white and green parts)
2-1/2 tablespoons minced fresh ginger
3 cloves garlic, minced and crushed into a paste
1 teaspoon salt
3/4 teaspoon Sichuan peppercorns (or substitute black peppercorns),
     toasted in a dry skillet for 2 to 3 minutes, until fragrant,
     then crushed with a mortar and pestle
2 tablespoons canola oil
6 tablespoons water

Directions:

The dough after it has been kneaded.
1.  Make the dough.  Put the flour in the bowl and make a well in the center. Add 3/4 of a cup of hot water in a steady stream and use a wooden spoon to stir the flour. The goal is to evenly moisten the flour; and, it is okay to pause to stir the flour or to add water.  After the water has been added, knead the dough in the bowl to work out any lumps. If the dough does not come together easily, add water by the teaspoon. 

2.  Knead the dough.  After kneading the dough in the bowl, move the dough to a work surface.  Flour that only if it is necessary, and then use the flour sparingly. Continue to knead the dough with the heel of your hand for about 2 minutes. The result should be somewhat smooth and elastic.  Press on the dough and it should slowly bounce back, with a light impression of your finger remaining. Place the dough in a zip-top plastic bag and seal tightly closed, expelling excess air. Set aside to rest at room temperature for at least 15 minutes and up to 2 hours. The dough will steam up the plastic bag and become soft, which makes it easy to work with the wrappers. 

The filling before the liquid is added.
3.  Make the filling.  Combine the beef, onion, chives (or scallions), ginger, and garlic in a bowl. Stir and lightly mash the ingredients together with a fork or spatula.  In a separate bowl, stir together the salt, Sichuan peppercorns, oil, and water.  Pour the liquid mixture over the meat mixture and then stir with the fork or spatula to blend well. There should not be any visible large chunks of meat. To develop the flavors, cover with plastic wrap and set aside at room temperature for 30 minutes. The recipe makes about 2 cups of filling. (I had extra filling after I completed making the momos.)

4.  Make the dough wrappers.  Remove the dough from the bag. Put the dough on a lightly floured work surface and cut it in half. Put half back in the bag, squeezing out the air and sealing the bag to prevent drying.

Cutting the pieces for the wrappers.
Roll the dough into a 1-inch-thick log, and then cut it into the number of pieces required by the recipe. To cut even pieces, quarter the log first; the tapered end pieces should be cut a little longer than the rest. Weigh each piece of dough to be super precise, if you like. If your dough pieces are oval shaped, stand each one on a cut end and use your fingers to gently squeeze it into a round. The resulting squat cylinder resembles a scallop. This bit of advance work makes it easier to form a nice circle in the remaining steps.  (The forming of each piece into a round is not necessary, but you have some additional work when it comes to flattening the piece into a thin circle.)

To prevent the dough from sticking and to flatten it a bit, take each piece of dough and press one of the cut ends in flour, then flip it over and do the same on the other end; the dough will be sticky.

A small pan works well when flatting the pieces.
Next, flatten each piece of dough into a thin circle that is about 1/8 inch thick, either with rolling pin or with a heavy, flat-bottomed object.  Put the floured disk between the plastic squares and press down with the rolling pin or a heavy object to produce a circle about 1/8-inch thick. You may have to press more than once. Gently peel back the plastic from the wrapper.  Set aside the dough circle.  Repeat this process with the remaining dough pieces, setting each one to the side of the work area as you finish it. It is okay to overlap the wrappers slightly, but I tried to avoid any overlap of the dough circles because the dough was still a little sticky.

To finish the wrappers, take a wrapper and place it on the work surface, flouring the surface only as needed to keep the dough from sticking. Imagine a quarter-size circle in the center. This is what the Tibetans call the "belly" of the wrapper. the goal is to create a wrapper that is larger than its current size but retains a thick belly. This ensures an even distribution of dough after the wrapper's edge has been gathered and closed around the filling.

It is hard to see the "belly."
To keep a thick belly, use the rolling pin to apply pressure on the outer 1/2- to 3/4-inch border of the wrapper, as follows. Try to roll the rolling pin with the flat palm of one hand while using the other hand to turn the wrapper in the opposite direction. For example, as your right palm works the rolling pin in short, downward strokes from the center toward your body, the fingers of your left hand turn the disk counterclockwise about one-quarter of a turn between each stroke. Keep the thumb of the rotating hand near the center of the wrapper to guide the rolling pin and turn the wrapper.

If the wrapper sticks to the work surface or rolling pin, pause to dust the wrapper with flour and then continue. If you cannot get a wrapper thin enough on the first try, set it aside to relax for about 1 minute, and then roll again. Should the wrapper tear or be hopelessly misshapen, roll up the dough, let it rest for a few minutes, then press it again and roll it out. Resembling a flat fried egg, the finished wrapper does not need to be a perfect circle. Frilly edges are fine. The finished diameter of the wrapper depends on the dumpling. Wrappers are moderately thick and suitable for boiled, steamed, pan-fried, and deep-fried morsels.

As you work, line up the finished wrappers on your work surface; if you need extra space, use a baking sheet lined with parchment paper and dusted with flour. A bit of overlapping is fine, but avoid stacking the wrappers. When a batch of wrappers is formed, fill them before making wrappers out of the other portion of dough, or the wrappers may stick together as they wait for you. Alternatively, I filled the wrappers as I finished them, which provided more room on the work surface. 

The filling.
5.   Fill the wrappers.  Before assembling the dumplings, line steamer trays and/or a baking sheet with parchment paper. (If you are making the dumplings in advance, or plan to freeze them, lightly dust the paper with flour to avoid sticking.)

For each dumpling, hold a wrapper in a slightly cupped hand. Scoop up about 1 tablespoon of filling with a bamboo dumpling spatula, dinner knife, or fork and position it in the center of the wrapper, pressing and shaping it into a mound and keeping about 1/2 to 3/4-inch wrapper clear on all sides. Use your fingers to pleat and pinch the edge together to enclose the filling and form a closed satchel, or simply fold over to form a half-moon.

In the alternative, you can place the dough circle on the work surface and spoon a tablespoon of the filling into the middle of the circle.  You want the filling to sit on the "belly" of the dumpling.  You can then use your fingers to pull the sides up, pleat and pinch the edges of the momo together to form the satchel (or  fold the dough over to create the half-moon).

If you are steaming right away, place each finished dumpling in a steamer tray, sealed side up, and 1 inch away from the edge if you are using metal steamers. Repeat with the remaining wrappers, placing them in the steamer about 1/2 inch apart. If you don't have enough space on your steamer trays to steam all the dumplings at once, or if you are not steaming them right away, place the waiting ones on the prepared baking sheet, spaced a good 1/2 inch apart. 

Ready to steam.

6.  Steam the momos.  Steam the dumplings over boiling water for about 8 minutes, or until they have puffed slightly and become somewhat translucent. Remove each tray and place it atop a serving plate.

HOT SAUCE

One of the sauces or condiments that are served with Momos is called Sepen, which is a Tibetan hot sauce made from dried red chile peppers.  I tried to determine which chiles are used in Tibetan cuisine; however, apart from stories about the use of spicy chiles, I was unable to find the exact chiles.  I decided to use dried Sanaam chiles, which are grown and cultivated in nearby India.  Sanaam chiles have about 40,000 Scoville Heat Units. These chiles are definitely spicy, which falls within the description of the chiles used to make Sepen. If you do not like spicy foods, choose a pepper that has less Scoville Heat Units, like a guajillo, Anaheim or serrano chile. 


SEPEN (TIBETAN HOT SAUCE)
Recipe adapted from Lonsang Wongdu and
available at the New York Times

Ingredients:
1 cup whole dried small red chile peppers
1 teaspoon whole Sichuan peppercorns
     (optional, you can substitute black peppercorns)
1/2 cup coarsely chopped fresh cilantro stems and leaves
2 teaspoons minced garlic
2 tablespoons minced ginger

Directions:
1.  Rehydrate the peppers.  If possible, soak chiles overnight in plenty of cold water. If time is short, cover chiles with boiling water and soak for 20 minutes. Drain and discard soaking liquid. 

2.  Blend the ingredients.  If using peppercorns, coarsely grind in a mortar or spice grinder. In a blender or mortar, combine all the ingredients with 2 tablespoons of water and grind until smooth (the seeds of the chiles will remain whole). The finished sauce should be as thick as ketchup; thin with water as needed.

BEVERAGE

Finally, to round out the meal, I decided that I would make a beverage to enjoy either with the Momos or afterwards.  After doing a little research, I chose a recipe for Po Cha or Tibetan Butter Tea.  This recipe is basically a black tea with a little butter and milk.  This recipe is similar to the Suutei Tsai or Mongolian Milk Tea that I made as part of my challenge to prepare a main course from Mongolia. 

Ordinarily, I am someone who does not like milk or anything in my tea.  However, I have to admit that the addition of the butter and milk to this tea was actually good. 


PO CHA (TIBETAN BUTTER TEA)
Recipe from Recipes Wiki
Serves 4

Ingredients:
5 to 6 cups of water
2 bags of black tea
1/4 teaspoon of salt
2 tablespoons of unsalted butter
1/2 cup of milk or 1 teaspoon of milk powder

Directions:
1.  Prepare the water.  Boil the water, then turn down the fire.  Add two bags of tea in the water and boil again for a couple of minutes.  Take the tea bags out.

2.  Prepare the tea.  Pour the tea, salt, butter and milk into a blender.  Blend the mixture for two or three minutes.  Serve immediately.

*     *     *

In the end, my challenge to prepare a Tibetan meal was a success.  I was able to prepare the Sha Momo, and, they were very delicious.  I have to admit that I deviated a little from the recipe, especially when it came to assembling the momos, because I found it easier to prepare the momos placing them on the flat surface rather than stuffing and sealing them in my hands.  I also think I could have rolled out the skins a little more because the sides on a few were perhaps a little too thick. Still, for a rookie, I think I did a great job.

As for the rest of the meal, it was also an outstanding success.  The Sepen was a great condiment for the Sha Momo, as the heat from the chilies enhanced the flavor of the meat, garlic, and ginger flavors in the filling of the dumpling.  The Po Cha offered a smooth, milky escape from the heat of the Sepen.  It is the perfect beverage for the meal because, after cooling the heat from the chiles, the Po Cha allows the diner to start the process all over again.  (I should add that I found a recipe for a Tibetan rice beer, but, I did not have enough time to make it. That will have to wait for another day and another post.)

Notwithstanding my own personal critiques, I still think I successfully completed the challenge.  I now turn my attention to the next chapter of my culinary adventures, beginning with my 21st challenge, which will require me to make a main course from the cuisine of .... 

ENJOY!

Thursday, October 14, 2010

Around the World in 80 Dishes: Ecuador


My culinary travels find me in Ecuador, a small South American country with diverse geographical regions, whether it is the coastal region along the Pacific Ocean, the high elevation of the Andes mountains or the rainforests.  Along the coasts, the food centers around fish, beans and plaintains.  As you move inland and into the Andres mountains, the cuisine changes to meat and rice.

While my culinary challenge requires me only to make a main dish, I wanted to create a meal that would require me to cook outside of my comfort zone.  Ecuador presents such a challenge because one of the quintessential dishes is Ceviche de Corvina or Sea Bass Ceviche.  There is some debate as to whether ceviche originated in Ecuador or Peru, but what is not disputed is that ceviche in each country is different.  In Ecuador, ceviche is typically fish or shirmp, but it is usually steamed for a couple of minutes before citrus is added.  In Peru, the fish or shrimp is raw when the citrus is added.  So, for my first time at making ceviche, Ecuador provides a good starting point since I would not be making ceviche from raw seafood.  In addition, I decided to make my own aji criollo, which is an Ecuadorian hot sauce to serve as a condiment with the fish.

To complete the meal, I decided to make a soup called Locro, which is a soup of potatoes, milk, and cheese and a drink called Cuaker, which is a pineapple oat drink.  All together, the warm soup and drink contrasted with the ceviche and the aji criollo made for some wonderful contrasts and an excellent meal.

THE APPETIZER


 LOCRO (Creamy Potato Soup)
Adapted from Ecuador Channel
Serves 2

Ingredients:
2 pounds of potatoes (I used Yukon Gold)
2 tablespoons of butter
1 teaspoon of paprika
1 medium onion, finely diced
1/2 cup milk
1/2 cup light cream
1/4 pound of Munster cheese
Salt to taste
2 cups of water

Directions:
1. Saute the onions.  Melt the butter in a sauce pan and add the paprika.   Add onions and saute until translucent.

2.  Make the soup.  Add the water and bring to boil.  Then add the potatoes and reduce the heat, allowing the potatoes to simmer for about 15 minutes.

3.  Add the milk and cream.  Before the potatoes are fully cooked, add the milk and cream.  Stir occasionally to make sure that it is blended.

4.  Add the cheese.  When the potatoes start to brake up, add the cheese.  Salt to taste.

THE CONDIMENT


AJI CRIOLLO (Ecuadorian Hot Sauce)
Adapted from Laylita's recipes

Ingredients:
4 red or green chiles, seeded (red ones are hotter)
1/2 bunch of cilantro
1/2 cup of water
3 garlic cloves
1/4 cup of lemon or lime juice
3 tablespoons of finely chopped onion
Salt, to taste.

Directions:
1. Add the chilies, cilantro, water, garlic and lime juice in a food processor.  Blend thoroughly.

2.  Pour the blended mixture in a bowl.  Add the onions and salt, to taste.

THE MAIN DISH

And on to the main dish, Ceviche de Corvina or Sea Bass Ceviche.  This is an excellent dish that is relatively easy to make.  For the fish, I used Branzino, which is a Mediterranean Sea Bass, with very flaky flesh and without a very fishy taste. 

CEVICHE DE CORVINA (SEA BASS CEVICHE)
Adapted from Galapagos Travel
Serves 2

Ingredients:
2 fillets of sea bass (Branzino, Black, etc.)
1 red pepper, sliced thinly
1 small bunch of parsley, chopped
2 tablespoons of cooking oil
1 teaspoon of aji criollo
4 tablespoons of lemon juice
Salt, to taste
Ground pepper, to taste

Directions:
1.  Steam the fish.  Steam the sea bass for 3 minutes.  Turn once during steaming.  Once the flesh is white, remove the fish and place in a glass dish.

2. Prepare the citrus marinade.  In a bowl. mix the lemon juice, oil, parsley, aji criollo, onion, salt and pepper.

3.  Marinade the fish.  Pour the mixture over the sea bass and coat the fish thoroughly.  Let the sea bass stand for one hour.

THE BEVERAGE

Finally, this great meal needs a beverage.  I came across a recipe on Whats4eats.com for Cuaker, an Ecuadoran oatmeal beverage.  Cuaker is the Spanish word for "Quaker," as in Quaker oats.  According to Whats4eats.com, oat-based beverages are popular in Central and South America.  The concept of an "oatmeal beverage" fascinates me, so I decided to make the beverage.  The key to this recipe is to use real oats, not the instant kind.  I used steel cut oats to make the Cuaker for this meal.


CUAKER (Oatmeal Beverage)
Adapted from Whats4eats.com
Serves 2

Ingredients:
1 Pineapple, peeled and sliced into rounds
1 cup of oats
1/2 cup of sugar
2 cinnamon sticks
5 cups of water

Directions:
1.  Boil the ingredients.  Add all of the ingredients to a pot and bring it to a boil.  Reduce the heat medium-low and let the ingredients simmer for about 20 minutes.  Stir frequently.

2.  Strain the ingredients.  Remove the pineapple and cinnamon sticks.  Strain the remainnig liquid, pressing down on the oats to extract all of the liquid.  Discard the oats.

3.  Serve.  Serve the beverage chilled or warm.  (I prefer it served warm.)

*     *     *

Well, I have to say that this was a very good meal.  I learned about making ceviche and learned that I probably should have let it stand in the citrus for a little longer, but it was still good.  The locro was also very good and is an ideal soup for a cool, rainy day, which was today.  But, the star of the meal was the Cuaker, which is very good and, actually, would make a great holiday drink.

With my cooking adventures in Ecuador coming to an end, I need to start planning the next stop.  I can't wait.  Till next time....

ENJOY!