Showing posts with label Lime Juice. Show all posts

Friday, May 22, 2026

Chicken Tikka Masala

As the story goes, it all began the Shish Mahal, which is currently located at the corners of West Prince's Street and Park Road. It was the 1970s, and, the owner of the restaurant - Ali Ahmed Aslam - was confronted by customers who complained that his tandoori chicken tikka was slightly dry. Chicken tikka, is actually a kebab of boneless chicken chunks cooked in a tandoor oven. Apparently, at the time, Aslam was perhaps cooking his kebabs a little too long. The complaints motivated the owner to respond by adding a creamy tomato sauce. The end result was the first serving of Chicken Tikka Masala

I have prepared Chicken Tikka in the past. However, until very recently, I have never went the additional step to add the creamy tomato sauce.  The recipe came from an unlikely place ... Ayurvedic cooking. I have always thought that Ayurvedic cuisine focused heavily on vegetables. That thought was reinforced by many of the recipes that I came across as I was researching ways to improve my cooking. Not that vegetables are a bad thing, I have quite a few Ayurvedic vegetable recipes that I want to make. But, I still remain an omnivore, and, protein (in some form) still remains a significant part of my diet. 

Yet, as I have learned, Ayurvedic cuisine does not completely take chicken off the table. The cuisine definitely promotes vegetarianism as it helps to promote higher consciousness. It does include chicken (and turkey) dishes because Ayurveda recognizes those proteins as something that has a range of chicken dishes in its repertoire. Chicken is considered nourishing and warming, something that can balance certain doshas (like Vata and Pitta). In taking an ayurvedic test, my results labeled me as Vata with some Kapha. As I searched for recipes that would fit this profile, I found one for Chicken Tikka Masala. 

The recipe has some modifications that make it healthier, such as the use of chicken breasts instead of chicken thighs. The one modification that specifically addresses a Vata dosha is the addition of four tablespoons of coconut milk. That also helps to add to the creaminess of the sauce. It also made this dish a little lighter than the Chicken Tikka Masala that I have gotten at restaurants, which is okay given the reason why I made it. And, why I will make it again ... and again. 

CHICKEN TIKKA MASALA

Recipe from Tomas Yareda, et al., Eat Taste Heal, pg. 267

Serves 4

Ingredients:

  • 4 skinless chicken breast halves
  • 1/4 cup organic plain yogurt
  • 2 tablespoons sunflower oil or ghee
  • 1 tablespoon lemon or lime juice
  • 4 tablespoons organic tomato paste
  • 2 teaspoons curry powder
  • 1 teaspoon salt
  • 1/2 teaspoon chile powder
  • 2 teaspoons paprika
  • 1 teaspoon minced garlic
  • 1 teaspoon grated ginger
  • 1/4 teaspoon ground turmeric
  • 6 kari leaves, chopped or 1 tablespoon chopped fresh mint
  • 4 tablespoons coconut milk

Directions:

1. Prepare the chicken. Make several deep slits over the meaty side of each chicken breast. Put the chicken in a baking dish, bone down.

2. Prepare the sauce. In a mixing bowl, whisk the yogurt, sunflower oil (or ghee), lemon (or lime) juice, tomato paste, curry powder, salt, chile powder, paprika, garlic ginger, turmeric, coconut milk, and kari leaves (or fresh mint). Spread the yogurt mixture over the chicken evenly. Cover and refrigerate for at least 3 hours or overnight. 

3. Bake the chicken. Preheat the oven to 475 degrees Fahrenheit. Transfer chicken and marinade to a baking pan and cook until tender, about 25 minutes. 

PEACE.

Sunday, July 27, 2025

Goat Sukha

Whenever I order food from a particular Indian restaurant, I always include an appetizer of goat sukka (or sukha). As an aside, this particular restaurant allows its customers to choose between an American level of spice and an Indian level of spice for their dishes. I like a restaurant that not only caters to the local Indian community in this way, but also offers those options to someone like myself, who is not Indian. Given my love for very spicy foods, I always order my dishes from this restaurant at the Indian spicy or Indian very spicy level. 

Being able to choose spice levels in accordance with the Indian palate is important to me, because I want to experience the foods of southern India as one would prepare them for people who live in that region. Chefs and cooks alike across southern Indian states like Karnataka, Kerala and Tamil Nadu have embraced chiles. In so doing, they create dishes that contrast with those from the north of India. 

A sukka (or sukha) is a dry curry dish that originates from the south of India. The word sukha is Hindi and means "dry." Unlike a typical curry, sukhas are not prepared with a yogurt, tomato, or coconut milk base. Instead, recipes typically call for a combination of chiles and spices that, when prepared, cling to the featuerd protein with a paste-like texture. And, as for that protein, it could be just about anything. The most common versions of sukhas feature mutton or lamb, but one can find many recipes for Mangalore Chicken Sukha or even Chana Sukha (for vegetarians).  

For this recipe, I attempted to recreate the goat sukka dish from one of my favorite restaurants. I had some extra goat meat from another recipe that I prepared (which will also be posted on this blog). I encountered some difficulty finding a goat sukha recipe, which I needed to ensure that I prepared the goat properly. I eventually decided to use a mutton sukha recipe, for which there are many, and incorporated the directions for preparing goat from that other recipe I mentioned above. 

In the end, this dish was good, but it was not the goat sukka that I would order from the restaurant. There are two reasons for this conclusion. First, I am not as good at cooking goat as the Indian cook or chef at that restaurant. (Despite my best efforts, the goat was a little overcooked.) Second, the recipe would probably translate to an Indian mild or Indian medium on spice level. As noted above, my minimum threshold is Indian hot. 

GOAT SUKHA

Recipe adapted from Relish the Bite

Serves 2-3

Ingredients:

  • 1 pound goat, cubed, bone-in
  • 1/2 teaspoon turmeric
  • Salt, to taste
  • Garlic, 5 cloves minced
  • 5 dried chiles (e.g., Kashmiri)
  • 1/2 teaspoon fennel seeds
  • 1/4 cup onions, sliced thinly
  • Few curry leaves
  • 4 green chiles (e.g., jalapeno)
  • 1 teaspoon chile powder
  • 1 teaspoon coriander powder
  • 1 teaspoon cumin powder
  • Salt, to taste
  • 2 teaspoons oil
  • Lime juice and coriander (cilantro), chopped, for garnish

Directions:

1. Prepare the goat. Place the goat, turmeric and salt in a sauce pan and cover with water. Bring to a boil and boil until cooked, about 15 to 20 minutes. Remove the goat from the water, strain the water through a fine mesh and reserve. 

2. Prepare the base. While the goat is cooking, combine the garlic, dried chiles and fennel seeds in a mortar and pestle. Grind the ingredients, with a dash of salt, until they become a paste.

3. Prepare the curry. In a pan, heat the oil over medium high heat. Add the onions, green chiles and curry leaves. Saute until the onions become translucent and the chiles become softer. Add the paste, along with the red chile powder, coriander powder and cumin powder. Saute well. 

4. Finish the dish. Add the goat and stir. Add some of the reserved water and let it cook until the water evaporates. Drizzle some lime juice and garnish with the chopped coriander (cilantro). Serve with rice and naan. 

PEACE.

Saturday, February 22, 2025

Salsa de Pina Tatemada

Many towns are known from something or someone. When it comes to Loma Bonita, a town of about 41,000 people in Mexican State of Oaxaca, that something is the pineapple. Indeed, Loma Bonita is often referred to as the Pineapple Capital of the World.

The story of how Loma Bonita became that capital involves a yanqui named Frank Peters. Frank arrived in the area in 1906, working for an Illinois doctor who purchased land there. Frank later bought some land -- nearly 200 acres -- in the area for himself. Frank then planted pineapples on his land. And, by 1910, he was harvesting 20,000 pineapples per year. His success led to the purchase of more land (eventually reaching 7,400 acres) and, of course, many more pineapples. Things eventually went downhill for Frank Peters. The Mexican government seized most of his land in 1934.

While history may have been written about yanquis bringing pineapples to Oaxaca or Loma Bonita, one white man could not harvest all those pineapples. By 1952, the area was producing 40,000 to 60,000 tons of pineapples, which supported four nearby canneries. The focus primarily rests upon the growers, but it is the laborers whose work ensures that pineapple after pineapple, ton after ton, make it to the canneries and beyond. Those laborers are just as deserving of recognition for making the area, with Loma Bonita at its center, one of the most important pineapple exporting regions in Mexico. 

In Oaxaca, the pineapple is often used to prepare salsas. Those salsas are often cruda, incorporating raw pineapple, along with other raw ingredients like tomatillos. I came across a recipe from Salsa de Pina Tatamada when I made Arrachera Verde, which is a recipe for grilled flap steak (or, in my case, skirt steak). This salsa may be considered a variation of the traditional Oaxacan pina salsas in that the pineapples -- along with all of the other ingredients are grilled. 

I am a big fan of pineapple, but usually raw. However, I have to say that the use of grilled pineapple really worked in this recipe, because the heat brings out the sweetness and tames the citrus notes. That sweetness helps to balance the chiles in the salsa.

SALSA DE PINA TATEMADA

Recipe from B. Lopez, Asada at 195

Makes 2 cups

Ingredients:

  • 3 cloves garlic, peeled
  • 1 large red onion, minced
  • 1 medium pineapple, cored and cut into 3/4 inch slices
  • 2 habanero chiles
  • 2 tablespoons fresh lime juice
  • 1 teaspoon sea salt, plus more as needed
  • 1/4 cup olive oil
  • 1/2 cup flat leaf parsley, minced

Directions:

1. Start the grill. Start a charcoal or gas grill. Gas should be set to high. If using a pellet grill, preheat the grill to 425 degrees Fahrenheit for at least 15 minutes. If using charcoal, the coals should be red but entirely covered with gray ash.  

2. Grill the garlic and onion. Wrap the garlic and onion in separate aluminum foil packets. Place them on the grill until the garlic and onion have softened, about 15 to 20 minutes. 

3. Grill the pineapple and habanero peppers. Meanwhile, place the pineapple slices and habaneros directly on the grill. Cook until the pineapple has charred evenly on both sides and the skin of the habaneros has charred evenly too, about 5 to 10 minutes. Turn every 2 to 4 minutes for even cooking. When charred, remove everything from the grill.

4. Prepare the salsa. On a cutting board, chop the grilled pineapple into 1/4 inch cubes. In a serving bowl, mix the pineapple with the grilled onion and lime juice. Reserve. Add salt and garlic to a molcajete and grind until the garlic has dissolved into a paste. Next, slowly incorporate the habaneros and the olive oil, continuing to grind until you are left with a paste.  

5. Finish the dish. Add the habanero paste to the bowl of pineapple and onion, add the parsley, and stir to combine. Taste for salt, adding more as needed and serve. 

PEACE.

Saturday, November 23, 2024

Goi Ga (Vietnamese Chicken Salad)

 Ăn uống hài hoà 
(Eat and drink harmoniously)

Balance is important in every aspect of one's life, including what one cooks and eats. As I continue to explore the cuisines of cultures around the world, I have noticed a current that runs through the recipes and dishes of many cultures, including, by way of example, Vietnamese, Chinese, Thai, Indian and even Native American. It is balance. This balance may take many forms, such as a balance of ingredients or a balance of cooking methods. Nevertheless, it is still there. 

More recently, I found this balance in Goia Ga, a chicken salad that is commonly prepared in Vietnam. From what I could find, the salad originated in the north of the country. However, it is dish that is popular throughout Vietnam. Goi Ga is often served at home for family gatherings; but, people can also find the salad being served at festivals and even as street food. When one peruses the ingredient list, they will find a recipe for a light salad that incorporates chicken, fresh vegetables, fresh herbs and a dressing that features one of my favorite ingredients, fish sauce. 

Yet, there is something more fundamental about Goi Ga. It represents balance, or as the Vietnamese would describe it ngu hanh or ngu vi. I have previously explored the multiple levels of balance in Vietnamese cuisine. For example, there is the balance among the five tastes: spice, sour, bitter, salty and sweet. There is also a balance in texture: crispy crunchy, chewing, soft and silky. There are even further levels of balance, such as in cooking methods. 

Balancing ngu hanh or ngu vi on multiple levels can seem somewhat like a culinary game of 3-D chess. Goi Ga achieves that balance. The ingredient list illustrates the balance across all five tastes: peppers (spice), lime juice and vinegar (bitter), sugar (sweet), and fish sauce (sour and salty). It similarly shows a balance with respect to texture, with crispy elements (fried shallots), crunchy (peanuts), silky (olive oil), soft and chewy (chicken). 

Each bite of the Goi Ga brings with it a sense of harmony, and, along with that, a sense of happiness. This recipe is a call to be mindful of ingredients and how they interact. It is a mindfulness that I lack and have struggled to develop, especially given the lack of balance elsewhere in life, such as the work-life balance.  Still, If I can make this dish every once in a while, it will serve as a necessary reminder to take a moment and think more about what I prepare, eat and serve to others.

This may be the reason why I subconsciously keep coming back to dishes from Vietnam or elsewhere, such as China's Sichuan province. It is my own little nudge to find my some balance, even if it is only of the culinary kind. 

GOI GA (VIETNAMESE CHICKEN SALAD)

Recipe from Food & Wine

Serves 4

Ingredients:

  • 2 tablespoons sugar
  • 2 tablespoons plus 1 teaspoon fish sauce
  • 1.5 tablespoons fresh lime juice, plus lime wedges for serving
  • 1.5 tablespoons distilled white vinegar
  • 1 tablespoon water
  • 1 serrano chile with seeds, minced
  • 1 small garlic clove, minced
  • 1 cup vegetable oil for frying
  • 2 large shallots, thinly sliced
  • Kosher salt
  • 4 cups green cabbage (from 1/2 small head), finely shredded
  • 2 carrots, finely shredded 
  • 1/2 small red onion, thinly sliced
  • 1/4 cup coarsely chopped cilantro
  • 1/4 cup coarsely chopped mint
  • 3 cups chicken (from 1/2 chicken), shredded
  • 2 tablespoons extra virgin olive oil
  • 3 tablespoons coarsely chopped unsalted roasted peanuts

Directions:

1. Prepare the dressing. In a small bowl, combine the sugar, fish sauce, lime juice, vinegar, water, chile and garlic. Stir until the sugar is dissolved. Let the dressing stand for 5 minutes.

2. Fry the Shallots. In a small saucepan, heat the vegetable oil until shimmering. Add the shallots and cook over heat heat, stirring constantly, until golden, 3 to 4 minutes. Drain the shallots on paper towels. Reserve the oil for another use. Sprinkle the shallots with salt and let cool.

3. Finish the dish. In a large bowl, toss the cabbage, carrots, red onion, cilantro, mint and shredded chicken. Add the olive oil and the dressing and toss. Sprinkle with the peanuts and fried shallots and serve the chicken salad with lime wedges.

PEACE.

Saturday, October 19, 2024

Nuoc Cham Marinated Steak

One thing has become increasingly clear as I cook my way around the world: namely, that I have become a huge fan of fish sauce and recipes that incorporate that ingredient into a dish.  My growing interest in this sauce made from fermented fish and salt has led me to prepare a variety of dishes from southeast Asia. 

Many of those dishes incorporate a Vietnamese sauce known as nuoc cham. It is typically served as a condiment, served alongside something else. For example, I prepared and served it as a dipping sauce for raw oysters.  I also prepared nuoc cham as an unconventional sauce for a New Year's Eve fondue.

These efforts have elevated nuoc cham, increasing its presence in my mind. For this reason, when I happened to stumble across a recipe for Nuoc Cham Marinated Steak, I immediately added it to my "to-do" list. Unlike many recipes on my to-do list, which languish for long periods of time before I get around to making them, this recipe was made within just a few days.

There are three regional variations of nuoc cham - northern, central and southern. The northern Vietnamese version uses a broth made from pork and shrimp. The central Vietnamese version uses recipes that incorporate the same amounts of fish sauce, lime juice and sugar, but also with fresh chiles. The southern version uses palm sugar and coconut water.

This particular recipe seemingly draws from the central Vietnamese variation, because of the balance of ingredients and the incorporation of chiles. If the Thai chiles are too spicy for you, you can substitute a less spicy chile, such as a serrano chile or jalapeno chile. 

NUOC CHAM MARINATED STEAK

Recipe from Food & Wine

Serves 4

Ingredients:

  • 1/2 cup fish sauce
  • 3 tablespoons granulated sugar
  • 3 tablespoons fresh lime juice (from 2 limes)
  • 1 tablespoon soy sauce
  • 1.5 teaspoons grated garlic (from 4 medium garlic cloves
  • 3 Thai chiles, halved
  • 1.5 pound beef strip steak (about 1.5 inches thick)
  • 1.5 tablespoons canola oil
  • 1 teaspoon kosher salt
  • Lime wedges for serving

Directions:

1. Prepare the marinade. Whisk together the fish sauce, sugar, lime juice, soy sauce, garlic and chiles in a small bowl until sugar dissolves. Prick steak all over with a fork and place in a ziploc plastic freezer bag. Pour nuoc cham all over steak in bag. Seal bag and shake to ensure that steak is evenly coated. Chill for 4 hours. 

2. Prepare the steak. Preheat the oven to 400 degrees Fahrenheit. Remove the steak from the refrigerator and let come to room temperature for 30 to 45 minutes. Heat oil in large cast iron skillet over medium high heat. Remove steak from marinade; discard marinade. Pat steak dry with a paper towel and sprinkle both sides with salt. 

3. Cook the steak. Add the steak to the skillet and cook, undisturbed, about 3 minutes per side. Transfer skillet to preheated oven and bake until a thermometer inserted in the thickest steak registers 125 degrees Fahrenheit, 12 to 15 minutes, turning half way through. 

4. Finish the dish. Transfer steak to cutting board and let rest for 10 minutes. Cut steak against the grain into thin slices and serve with lime wedges. 

PEACE.

Saturday, August 17, 2024

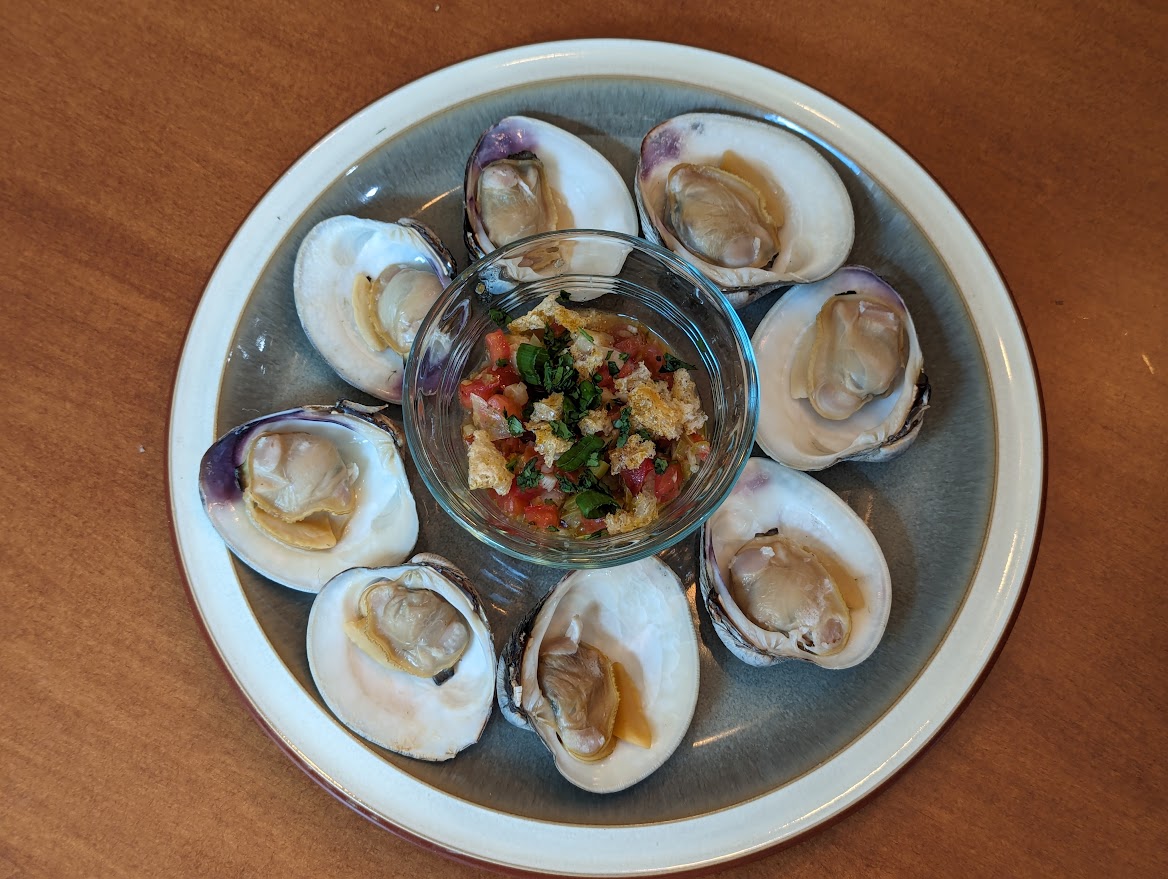
Grilled Clams with Mexican Salsa and Crumbled Chicharrones

Grilling clams is an easy way to prepare the shellfish. The heat of the grill cooks the clams in just minutes. The clams can be plucked off the grill, thereafter removing the top shell. The clam rests on the bottom shell, ready for whatever topping you wish to apply. I have experimented with a few different toppings, which seem to gravitate around Southeastern Asian cuisine. I have prepared Grilled Clams with a Cambodian Ginger Sauce and Vietnamese Grilled Clams with Oyster Sauce and Peanuts.  Both recipes were delicious.

However, this time I wanted to draw inspiration for a topping from a different part of the world. I chose Mexico because I thought that a take on a salsa would be a great topping for grilled clams. I looked for recipes, which were not too hard to find. However, I wanted to do more than simply create a Mexican-inspired topping. I wanted to go above and beyond. I really wanted a recipe that would stand out.

Looking at the recipes, some of them called for the use of bacon. Pork goes very well with clams. Look at any clam chowder and you will find some kind of pork (usually bacon, salt pork, or ham) used to make the recipe. There also also many dishes, like Porco Alentejana, that combine a cut of pork (like a pork butt) with clams. For this recipe, I wanted to take a more Mexican approach. The pork would not be bacon. Instead, it would be chicharrons.

Generally speaking, chicharrones are pieces of fried pork skin. There are many versions of chicharrons, but the classic version involves pork skin or pork belly that is deep fried. If it is just the skin, the process produces a light, puffy, crackling goodness. Chicharrones did not originate in Mexico; instead, these fried pork rinds got their start in Spain, and, more specifically, in the Andalusia region. Spanish conquistadors and colonialists brought not only pigs with them, but the recipes to prepare, among other things, chicharrones. The fried pork rinds took hold across much of the Spanish speaking world, including Mexico, where they are often added as an accompaniment or to finish a dish. 

That is how I used them in this grilled clams recipe. I prepared a Mexican salsa, drawing from recipes that I could find from Baja California. That is the Mexican State where one is most likely to find and harvest clams in Mexico. I took that recipe and then used crumbled chicharrones as a way to finish the dish. The end result was amazing.  I definitely need to incorporate this ingredient into my cooking more often.

GRILLED CLAMS WITH MEXICAN SALSA AND CRUMBLED CHICHARRONES

Recipe adapted from E is for Eat

Serves 2-3

Ingredients:

  • 2 pounds of top neck clams (about 8-12 clams)
  • 1/4 cup chicharrones, crumbled
  • 1 bunch scallions, white parts finely diced, green parts thinly sliced
  • 1 small serrano pepper, seeded and diced
  • 1 tomato, seeded and diced
  • Splash of tequila (about 1 ounce)
  • Pinch of red pepper flakes
  • 1 teaspoon dried Mexican oregano
  • 3-4 cloves garlic, minced
  • Couple dashes hot sauce (optional)
  • 1 lime, zested and juiced
  • Sea Salt
  • 2 tablespoons minced cilantro
  • 1 tablespoon vegetable oil

Directions:

1. Sauté the onions, pepper and garlic. Heat the vegetable oil in a skillet over medium-high heat. Add the scallions, peppers and garlic. Sauté for about 4-5 minutes. Add the crushed red pepper and oregano. Stir the mixture. Add the tequila and cook for about another 2-3 minutes until the tequila has cooked down. Add the tomatoes and cook for another 2-3 minutes.  

2. Finish the sauce. Remove the onion mixture from the heat, add the lime juice, lime zest and sea salt. Stir to combine. Pour the sauce into a bowl, garnish with the cilantro and chicharrones. 

3. Grill the clams. Heat a grill on high heat. Place the clams on the grate. Close the grill and cook the clams until they open, at most 5 minutes.  Remove the clams from the grill.

4. Finish the dish. Remove the top shells from the clams. Spoon some of the salsa over each clam. Serve immediately. 

PEACE.

Monday, July 8, 2024

Mango Gazpacho

Picture yourself in a place with a contrast of landscapes: mountains rising in the background, with cliffs that give way to valleys. As one proceeds into the valleys, they would find olive trees and almond trees, along with orange and lemon groves. The greenery is broken up by small towns that still retain their moorish character, with squares and fountains. If you can picture this scenery in your mind, you have taken yourself to the region of Andalusia, Spain, known as La Axarquia.

Apart from the beautiful surroundings, the region is also particularly known for one agricultural commodity (above and beyond the almonds, olives, lemons and oranges) ... the European mango. That landscape provides the basis for La Axarquia to fashion itself as "the home" of that fruit. Of course, it takes more than a few mountains, valleys and greenery to grow mangos. La Axarquia has a subtropical climate that provides more than 300 days of sunlight per year, with temperatures that range often from the mid 70s to the mid 80s Fahrenheit in the summer. 

There are five different mango varieties that are cultivated in La Axarquia. The most common one is known as the Osteen. It makes up more than half of the production. (Interesting side note: the Osteen mango originated in Merritt, Island Florida, named after the Osteen family who lived there and first cultivated this particular type of mango back in 1935. It made its way to Spain thereafter.) The remaining four mango varieties - the Kent, Tommy Atkins, Keitt, and Red Palme -- constitute the remainder of the mangos cultivated in the region. (Another side note: the Tommy Atkins is probably the most popular mango in the United States.)

It seemed to be only a matter of time until the mango of La Axarquia would be incorporated into a dish of Andalucia, namely, gazpacho. This particular version of gazpacho relies more on citrus, namely orange juice and lime juice, than a traditional gazpacho. It is just my speculation, but it may be an effort to balance the sweetness of the mango. The recipe does include more traditional ingredients, such as bell pepper, cucumber, onions, and garlic. These ingredients, when pureed, help to give the soup some texture and depth. 

The end result is a very different and very delicious take on gazpacho. I am sure that the mangos I were probably of the Tommy Atkins variety, as opposed to the Osteen mango. The former varietal tends to be more tart with sweet notes, while the latter seems to be the inverse, more sweet with touches of acidity or tartness. Now that I have prepared this dish, as well as learned about the different mangos out there, I will have to be more mindful when I am in the store.  If I ever come across Osteen mangos, then I could truly transport myself culinarily to La Axarquia.

MANGO GAZPACHO

Recipe from Sprig and Vine

Serves 6

Ingredients (for the gazpacho):

  • 2 cups diced mangoes
  • 2 cups orange juice
  • 1 cucumber, diced
  • 1 red or yellow bell pepper diced
  • 1/2 red onion, diced
  • 1 clove garlic
  • 3-4 tablespoons lime juice
  • 1 jalapeno
  • 3 tablespoons chopped coriander (cilantro)
  • Salt, to taste
  • Pepper, to taste

Ingredients (for the toppings):

  • 1 cup of finely diced mango, cucumber, bell pepper
  • 1 cup micro greens (optional)

Directions:

1. Blend the gazpacho ingredients. Blend the mangoes and orange juice in a blender until smooth and pureed. Add the cucumber, bell pepper, onion, garlic, lime juice, olive oil and jalapeno, along with a cup of iced water and blend again. Add more water if you want a thinner consistency, or leave it as is for a thicker gazpacho.

2. Season the gazpacho. Season with salt and pepper. Taste and adjust according to preference: add more lime juice for zing, chile for heat, etc. Stir in coriander (cilantro).

3. Chill the gazpacho. Let the gazpacho chill in the refrigerator for 4-6 hours before serving. This allows the flavors to mingle. 

4. Finish the dish. To serve, divide into bowls. Top with the mix of mangoes, cucumber and and bell pepper. Garnish with microgreens, if using. 

PEACE.

Sunday, June 16, 2024

Grilled Clams with Cambodian Ginger Dressing

In my humble opinion, Cambodian cuisine has mastered the pairing of ginger to seafood. I don't know how they did or even when they did it. Yet, whenever I come across a Cambodian seafood recipe that incorporates a ginger sauce or dressing, that recipe is amazing. 

I learned that first hand more than four years ago, when my beautiful Angel and I hosted a New Year's Eve party. I prepared a bunch of dishes that symbolized good luck in the new year. The most popular dish that I prepared was a Cambodian Ginger Catfish recipe. That catfish was in more demand from the guests than anything else in the spread. 

So, when I got my hands on some top neck clams that I planned on grilling, it seemed only appropriate that I return to the cuisine of Srok Khmer (how the Cambodians refer to their country) and its cuisine for inspiration. Sure enough, I found a few recipes that were worth a try. The only question is which one to use. 

I ultimately chose a recipe from Theo Cooks, but I decided to make a few modifications. The original recipe called for four tablespoons of grated ginger and four tablespoons of olive oil. I halved the grated ginger because I got a little impatient and I thought that, given its relatively strong flavor profile, a lot of ginger might cause an imbalance in the dressing. I also substituted vegetable oil for olive oil because, as far as I know, olive oil does not feature prominently in Cambodian cuisine. The last modification is that I did not shake the ingredients in a jar. Instead, I used a whisk to create an emulsion. I thought that would better mix the ingredients as well as improve the texture of the dressing. 

In the end, this recipe was very good. The ginger still shined in the dressing, but the sweetness from the honey and the slight tartness of the lime juice were also present in the flavor of the dressing. Not only does the dressing work well on clams, but it would also be a good condiment for grilled fish. That will be another post for another day.

GRILLED CLAMS WITH CAMBODIAN GINGER DRESSING

Recipe adapted from Theo Cooks

Serves 2-3

Ingredients:

  • 2 pounds of top neck clams (about 8 to 12)
  • 2 tablespoons grated ginger
  • 1 clove garlic, grated
  • 1 lime juiced
  • 1 teaspoon soy sauce
  • 1 tablespoon honey
  • Salt
  • Freshly ground black pepper
  • 2 tablespoons vegetable oil
  • Pinch dried chile flakes
  • Handful of finely chopped cilantro

Directions:

1. Prepare the dressing. Combine all of the ingredients, except the cilantro, together in a bowl. Whisk until the ingredients are well combined. Add the cilantro and stir to combine. 

2. Grill the clams. Heat a grill on high heat. Place the clams on the grate. Close the grill and cook the clams until they open, at most 5 minutes.  Remove the clams from the grill.

3. Finish the dish. Remove the top shells from the clams. Spoon some of the dressing over the clams and serve immediately.

PEACE.

Sunday, June 9, 2024

Salsa de Congrejo

I love to eat crawfish; and, in my cooking, I have made a few etoufees and gumbos that feature the freshwater crustaceans.  A while back, I bought a bag of frozen crawfish, hoping to make a nice meal with it. (I don't have a good reliable source for fresh crawfish.) When I got around to deciding to make that meal, I found myself wanting something more than a bowl of gumbo. I wanted to try something different.

It got me thinking to another dish that I love to eat ... chapulines. There is something about grasshoppers marinated in a variety of spices, chiles and herbs that is very appetizing. The best chapulines recipes come, of course, from the Mexican State of Oaxaca. So, I decided that I would pursue the pages of Oaxacan recipes looking for a recipe that could serve as a starting point a crawfish dish. 

To be sure, there were a few recipes that caught my attention. The one that I decided to make was a Salsa de Chapulines. Perhaps it has been my recent craze in making Sambols - like Lunu Miris or Dried Shrimp Sambol - that got me thinking this salsa could have a variety of uses in other dishes. All I needed to do was to substitute the grasshoppers with crawfish. I would then have Salsa de Congrejo

This salsa is very easy to make as long as you have access to some good tomatillos, which you can find at most Latin American markets and even in some big name grocery stores. I did not have any morita chiles on hand, so I bought a can of chipotles and just made sure that I rinsed the adobo off of them. One could use dried or reconstituted chipotles if you have them, but the store-bought ones were more convenient to use. 

Now, I just need a good source for chapulines (spoiler -- I found one, check back for that post).

SALSA DE CONGREJO

Recipe adapted from Oaxaca, by Bricia Lopez and Javier Cabral

Serves a few

Ingredients:

  • Generous one pound of tomatillos, husked and rinsed
  • 3 tablespoons vegetable oil
  • 1/4 cup chopped white onion 
  • 3 cloves garlic, peeled
  • 4 morita chiles (substitute chipotle chiles), stems removed
  • 1/4 cup cooked and rinsed crawfish tails
  • 1 1/2 teaspoon sea salt
  • 1 tablespoon fresh lime juice

Directions:

1. Boil the tomatillos. In a 2-quart saucepan over medium high heat, combine the tomatillos and 1/2 cup water and heat to boiling. Reduce the heat to medium, cover and boil for 20 minutes, stirring occasionally. until the tomatillos have changed color from a dark to a light green color. Set aside. 

2. Prepare the salsa. Heat the oil in a large pan over high heat. Add the onion and garlic, reduce the heat and mix well. Sauté until the garlic and onion are golden brown, then remove from the pan and reserve. Add the chiles to the pan and toast them for about 1 minute or until the color changes to a bright red. Remove from the pan and reserve. Add the crawfish tails and fry for about 3-4 minutes, until they are heated through. 

3. Finish the dish. In a blender, pure the tomatillos, chiles and garlic and onion mixture, 3/4 cup water and the salt. Stir in the lime juice. Pour into a bowl and add the crawfish tails. 

PEACE.

Monday, May 20, 2024

Crying Tiger (Suea Rong Hai) with Jaew Sauce

One can trace the origin of this recipe -- Crying Tiger (Suea Rong Hai) -- to its principal range, which extends from northeastern Thailand into Laos. One could find cuts of beef, usually brisket, marinating in a mixture of herbs and spices that balances sweet, spicy, sour, and savory.  Cooks then grill the marinated meat over charcoal. Once the meat is grilled, the cooks slice it thinly and serve it with a dipping sauce.

There is a lot to learn about Crying Tiger, but some of it is shrouded in mystery, like the name.  There are at least three different versions of where this recipe got its name. The first one focuses on the meat itself. It is said that cooks used cuts of beef that were so tough that they would make tigers cry when they chewed them.  The second focuses on a farmer's cow. A tiger came out of the jungle and stole the cow. The tiger then proceeded to eat most of the cow. The tiger eventually was too stuffed to eat the brisket. The tiger looked at the juicy piece of meat and began to cry because it could not finish it. Finally,  there is the story that the fat marbling on a brisket looked like tiger stripes and, when the brisket was grilled, the fat dripping off the meat looked like a tiger's tears.

Whatever the origin of the name, this dish represents some of the best qualities of Thai cuisine, especially given the balance of flavors that I mentioned above. That balance is reinforced with the jaew sauce, which is one of many nam jim (or sauces) that are served alongside Thai dishes. The jaew sauce comes from Isan, the northeastern Thai region that borders Laos. The one ingredient that sets jaew sauce apart from other nam jin is the use of toasted rice powder. The powder adds an element of toastiness to the sauce, as well as serves as a thickener. The other ingredients -- lime juice (bitter), tamarind (sweet), chile pepper (spice), and fish sauce (sour or umame) -- provide a level of balance to the entire dish.

In the end, Suea Rong Hai with Nam Jim Jaew provides a multi-dimensional balance of flavors that makes one of the best beef dishes that I have made or had recently. It gets me to thinking about what other recipes are lurking out there, waiting to be discovered.


CRYING TIGER (SUEA RONG HAI) WITH JAEW SAUCE

Recipe from Thai Caliente & The Wanderlust Kitchen

Serves 4

Ingredients (for the steak)

  • 2 tablespoons soy sauce
  • 1 tablespoon fish sauce
  • 1 teaspoon palm sugar (or brown sugar)
  • 1 pound of beef (such as rib eye, sirloin or strip steak)
  • 1 lime, juiced

Ingredients (for the Jaew Sauce):

  • 2 tablespoons fish sauce
  • 1/3 cup lime juice (about 2 limes)
  • 1 teaspoon tamarind concentrate
  • 1 teaspoon ground toasted rice
  • 2 teaspoons ground Thai chile peppers
  • 2 teaspoon coconut sugar (or brown sugar)
  • 2 tablespoons cilantro, chopped
  • 2 tablespoons scallions, chopped
  • 1 tablespoon water, if needed

Directions:

1. Marinate the beef. Combine the soy sauce, fish sauce, sugar and lime juice. Whisk the ingredients. Add the beef and allow it to marinate for 30 minutes to 45 minutes at room temperature. 

2. Prepare the Jaew Sauce. Combine fish sauce, lime juice, tamarind, toasted rice powder, chile peppers, sugar, cilantro green onion and, if necessary, water.  Adjust the sauce by adding water to dilute it or lime juice, sugar, or fish sauce to balance the flavors.

3. Grill the beef. Heat a grill or cast iron skillet over the stove to hot. Pat steaks dry, season with salt and pepper, and place steaks on grill or skillet. Cook for a couple minutes on each side until desired temperature (medium rare) is reached.  Allow the steaks to rest for 10 minutes. 

4. Finish the dish. Slice the steak and serve immediately with the Jaew sauce and condiments such as lettuce leaves, cucumber slices and rice. 

PEACE.

Saturday, February 24, 2024

Lunu Miris

I love the cuisine of Sri Lanka, which is known to curry almost everything. One particular aspect of this cuisine has really gotten my attention: the sambols. A sambol is a freshly made condiment or relish that typically incorporates chiles to add not just spice, but other flavors to whatever one is eating.

The history of sambols takes us to Indonesia, where they are referred to as sambals. Indonesians prepared these condiments using cabya, also known as the Javanese long pepper, which is native to the island of Java. The earliest references to cabya go back to the 10th century C.E. Although not technically a chile, the cabya provided a spicy element to the dishes prepared by Indonesian cooks. However, by the 16th century C.E., Spanish and Portuguese explorers and colonizers brought the traditional chiles from the new world to the Indonesian islands. Soon, cooks started using chiles over cabya. From there, the Dutch colonizers exported sambals to other countries, including Sri Lanka. 

Sambols (or sambals) have chiles as the central ingredient, around which a range of secondary ingredients are added. For example, pol sambol includes green chiles combined with coconut, shallots, Maldive fish chips, and lime juice. Dried shrimp sambol uses red chiles combined with dried shrimp (obviously), dried coconut, onions, garlic and lime juice.  

Lunu miris translates into onion chile. However, there are no onions in this recipe, but there are three different chiles: long red chiles, chile flakes and chile power, as well as freshly ground black pepper. I found this recipe in O Tama Carey's Lanka Food, which describes the sambol as more of a paste. When I prepared it, the final product was more like a salsa, but a very thick and extremely fiery one. Carey advises that this sambol is "[n]ot for the faint hearted." That is definitely an understatement. This recipe should only be prepared by people who order their food at the highest level of spice for those who ordinarily prepare it.


LUNU MIRIS

Recipe from O Tama Carey, Lanka Food, pg. 222

Serves 4-6

Ingredients:

  • 7/8 ounces Maldive fish flakes
  • 1/8 ounce chile flakes
  • 1/8 ounce salt flakes
  • 3 long red chiles, cut into thin rounds
  • 2.5 ounces of shallots, finely sliced
  • 1/8 ounce chile powder
  • 1/10 ounces of freshly ground black pepper
  • 2 limes juiced

Directions:

Using a mortar and pestle, or a food processor, pound (or process) the Maldive fish flakes, chile flakes and salt until the flakes are finely ground. Add the long red chiles and shallots and pound (or process) to a paste like consistence. It does not have to be super smooth. Mix through the pepper and chile powder and season to taste with lime juice. Service at room temperature. 

PEACE.

Thursday, August 24, 2023

Watermelon Salsa

We had a lot of watermelon, which we had bought for our daughter's birthday party. I sliced the watermelon into kid-sized wedges. But, we had a lot of watermelon. And, when the party was over, we still had a lot of watermelon. 

Clare had been talking about making some watermelon salsa. I went onto the Internet and began looking at various recipes. Needless to say, there is a lot of commonality amongst those recipes. Besides the watermelon, most recipes called for red onion, jalapenos, lime juice, cilantro and salt.

I wanted to do something a little different. There were a few recipes that provided some ideas. Recipes that called for additional ingredients, such as cucumber and lime zest. I even thought about adding some mango, but I decided to leave that for another day and another recipe.

In the end, I took a recipe that I found on Master Class and made a couple of changes based on other recipes. I added that cucumber (1/2 of a cucumber, diced) and lime zest (about 1 tablespoon). I also made the salt optional, because I did not think it was required. Given all of the fresh ingredients, along with watermelon's natural tendency to leech water, I thought that it was good to go without the salt (which would have only drawn out more water from the ingredients).  

The end result is a colorful, fresh salsa that is actually very good. If I had a summer menu, this salsa would be part of it, along with a good gazpacho. 

WATERMELON SALSA

Recipe adapted from Master Class

Serves several

Ingredients:

  • 3 cups of seedless watermelon, diced
  • 1 small red onion, diced
  • 1/2 cucumber, seeded and diced
  • 1 jalapeno, seeds removed and diced
  • 2 tablespoons lime juice
  • 1 tablespoon lime zest
  • 1/3 cup cilantro leaves, chopped finely
  • Kosher salt, to taste (optional)
Directions:

Combine all of the ingredients together and mix well. Season with salt, if desired, just prior to serving. 

Saturday, March 25, 2023

Vietnamese Grilled Whole Fish

There are a wide variety of fish dishes in Vietnamese cuisine, which is only to be expected given the country has 3,260 kilometers of coastline. There are also several major rivers that run through the country, such as the Song Da, Song Chiang, and, of course, the Mekong River.

One of the most interesting subset of dishes are the whole fish dishes. Setting aside the relatively easy preparation, I find that it is the sauces that one prepares alongside the whole fish to be one of the truly interesting aspects of Vietnamese whole fish dishes. The sauces provide an extra level of flavor that often enhances whatever spices, herbs and citrus are stuffed into the fish. 

Take, for example, chef and author Charles Phan, who has quite a few whole fish recipes out there. My parents gave me his cookbook, Vietnamese Home Cooking, as a gift. I decided to make the whole fish recipe in that cookbook, which is set forth below. The fish was delicious, but it was that dipping sauce that, for me, completed this dish.

The dipping sauce represents what the Vietnamese call "Ngũ Hànhor the five tastes. It is an excellent balance of those tastes, namely, spice, salt, bitter, sour and sweet. The chiles provide the spice; the lime juice offers the bitterness; the fish sauce contributes both the sour and the salt; and, the sugar provides, as you can guess, the sweet. The balance in this dipping sauce led me to dipping every bite-sized morsel of the fish into the sauce. 

VIETNAMESE GRILLED WHOLE FISH

Recipe from Charles Phan, Vietnamese Home Cooking at pg. 181

Serves 2

Ingredients (for the fish):

  • 1 (1 1/2 to 2 pound) whole branzino, cleaned with head and tail intact
  • Kosher salt
  • Freshly ground black pepper
  • 1 by 1-inch piece of ginger, cut into thin coins
  • 2 large Thai basil sprigs
  • 2 large cilantro sprigs
  • 3 thin lemon slices
  • 3 thin lime slices
  • 2 tablespoons canola or olive oil

Ingredients (for the dipping sauce):

  • 2 1/2 tablespoons freshly squeezed lime juice
  • 2 tablespoons fish sauce
  • 2 teaspoons sugar
  • 1 teaspoon peeled and minced fresh ginger
  • 1/4 teaspoon minced garlic
  • 1/4 teaspoon minced Thai chile

Directions:

1. Prepare the grill.  Prepare a hot fire for direct heat grilling in a charcoal grill (you should be able to hold your hand 1 to 2 inches above the grate for only 2 to 3 seconds). When the coals are ready, place a cast iron griddle or large cast iron frying pan on the grill grate and let it preheat until very hot.

2. Prepare the fish. While the fire is reaching temperature, rinse the fish in cold water and pat dry with paper towels. Season the inside with salt and pepper and then stuff the cavity with the ginger, basil, cilantro and lemon and lime slices. Drizzle the oil on both sides of the fish and set aside. 

3. Make the dipping sauce. To make the sauce, in a small bowl, stir together lime juice, fish sauce, sugar, ginger, garlic, and Thai chile until the sugar has dissolved. Set aside.

4. Grill the fish. When the griddle or pan is very hot, add the fish and cook it without moving for about 6 minutes until the skin is a deep golden brown and no longer sticking to the griddle. To check, gently try to lift the fish; of it does not release easily, continue to cook until it does. 

5. Continue to grill the fish. With a large, wide spatula centered at the middle of the fish, flip the fish and cook on the second side until golden brown. After 1 minute, begin checking to see if the fish is done. Insert a knife into the fish and wiggle it gently; the flesh should be barely clinging to the bone. If you feel resistance, continue cooking, repeating the test until the flesh offers no resistance.

6. Finish the dish. Transfer the fish to a plater and serve immediately. Accompany with the dipping sauce. 


Friday, July 1, 2022

Achiote Paste

Scientists and botanists refer to a particular plant as Bixena orellana. It is a tree that is native to Central America and the Caribbean. The tree produces beautiful pinkish flowers, which eventually develop into some rather odd fruit. While the fruit is inedible, it nevertheless contains some red seeds that have a very colorful history. 

To shed some light on that history, the proper starting point is the indigenous people of the Caribbean and Mesoamerica. Those people referred to this tree as annatto (in the Caribbean) or by the Nahuatl word, achiotl. Those words give us what we commonly refer to as annatto or achiote.

The red seeds are often dubbed "saffron of Mexico." The nickname comes from the fact that these little red seeds have the ability to create pigment colors that range from yellow to a deep red.  As with saffron, one could add annatto seeds to hot water to create a reddish water that could be incorporated into dishes. However, one of the more common ways of creating color through annatto is its use in what is commonly referred to as "achiote paste." 

There appear to be two different types of achiote paste, at least according to Oaxaca al Gusto, which was written by Diane Kennedy. In areas such as Oaxaca, people prepare the paste using just the annatto seeds. By contrast, in the Yucatan, the paste is prepared with more than just annatto seeds. Recipes call for the addition of coriander, cumin, oregano, cloves, black pepper and garlic. The combination of these ingredients in the Yucatan version produces a mild, somewhat earthy paste that contributes both flavor and color to a wide range of dishes.

I was particularly interested in the Yucatan version of the paste, because I intended to use it as part of my first effort to make Cochinita Pibil, the iconic roast pork dish of that peninsula. Overall, I think the effort was a success, although it produced a paste that was slightly darker than expected. 

ACHIOTE PASTE

Recipe from The Spruce Eats

Ingredients:

  • 1/4 cup annatto seeds
  • 1 tablespoon coriander seeds
  • 1 tablespoon dried oregano
  • 1 teaspoon cumin seeds
  • 1 teaspoon black peppercorns
  • 2 whole cloves
  • 1 teaspoon kosher salt
  • 5 cloves garlic, peeled and coarsely chopped
  • 1/2 cup bitter orange juice (or 1/4 cup orange juice plus 1/4 cup Mexican lime juice or 1/3 cup white vinegar)

Directions:

Grind the annatto, coriander seeds, oregano, cumin seeds, peppercorns and cloves in a spice mill or with a mortar and pestle. Place the ground spices with the salt, garlic and bitter orange juice in a blender and process until it is smooth. Store in an airtight container in the refrigerator.

ENJOY!

Wednesday, April 6, 2022

Vietnamese Grilled Oysters

Thanks to aquaculture, oysters can be found pretty much anywhere in the world, even in places where one may least suspect their presence. One such place is Vietnam. While the shellfish industry is not a traditional one, oyster cultivation has taken root in Vietnam, spanning over twenty-eight (28) provinces from the north to south of the country.  Given most of the oyster production is sold for local consumption, there is little chance that an oyster from Vietnam would grace a seafood market on the other side of the globe. 

It has been said that "oyster farming is cushy." Those words came from the first oyster farmer in the Long Hoa commune, which is found in the Can Gio District just outside of Ho Chi Minh City. The oysters are placed in cages, or hung from ropes on rafts in March, which the farmers tend as the oysters grow. After about four or five months, the farmers begin to harvest the oysters. The harvesting continues for the rest of the year and into the new year, ending around the time of the Tet holiday. The harvested oysters then make the trip to the nearest processing facility. 

In doing the research for this post, I found the two different methods of oyster farming -- cages or ropes, to be really interesting. The first method, cages, is fairly self explanatory. The cages are situated on structures that keep them off of the bottom. The structures also keep the cages in place, where their contents -- mesh begs -- allow oysters to grow. The other method involves the use of rafts, with ropes that hang down from the rafts. The oysters grow on the ropes.

Oyster cultivation using rafts and ropes in
Van Don District, Quang Ninh Province in Vietnam
(Source: Cuisine of Vietnam)

According to one oyster distributor, Vo Tien Chuong, the Vietnamese prefer to eat raw oysters; however, their cuisine does feature dishes such as sour oyster soup and oyster floss. The latter dish is an almost dried mixture of oyster meat, shrimp, pork, fish sauce and salt. While oyster floss made it to the list of dishes that I will make some day, I decided to approach the interplay of oysters and Vietnamese cuisine from a different angle. 

More specifically, I wanted to further explore the Vietnamese concept  of ngu hanh or ngu vi. This concept is otherwise known as the five elements. When it comes to cooking, there are multiple levels of quintuple elements. For example, there are the five flavors: spice, sour, salty, bitter and sweet. There are also the five textures: crispy, crunchy, chewy, soft and silkg. There are even the five preparation methods: raw, steamed, broiled, fried/grilled and fermented. East Asian cuisines generally, and Vietnamese cuisine in particlar, have achieved an amazing balance at every level.  

I found a recipe for a "zesty Vietnamese dressing" that demonstrated this balance, at least as it came to the five flavors.  Running down the ingredient list, I saw how each item could fit in the balance. The chiles provided the spice. Lime juice perhaps contributes the sour or bitter flavors. Fish sauce definitely imbues a salty umami flavor and there can be no dispute that honey adds sweetness to the dish. 

Together all of these ingredients provide that balance that contributes to an overall amazing flavor of a sauce that could be served alongside or on top of oysters. While I have made many a mignonette sauce to go with raw oysters, I think this cause could perhaps be the best one for oysters served in any of the five cooking methods, thereby achieving balance in yet another, albeit indirect way.  

VIETNAMESE GRILLED OYSTERS

Recipe from Irena Macri

Serves 2-4

Ingredients:

  • 1 tablespoon grated fresh ginger
  • 1 small garlic clove, finely diced
  • 1/2 long red chile, finely diced
  • 1 teaspoon sesame oil
  • 2 tablespoons of extra-virgin olive oil
  • 1 lime, juiced
  • 2 tablespoons fish sauce
  • 1 teaspoon coconut sugar/syrup or raw honey
  • 1 tablespoon Tamari sauce
  • 1 tablespoon chopped scallions
  • 1 tablespoon chopped cilantro
  • 1 or 2 dozen oysters

Directions:

1. Prepare the sauce. Mix or whisk all of the ingredients in a bowl. 

2. Prepare the oysters. Shuck the oysters, removing the top shell but leaving the oysters in the bottom shell.  Spoon 1/2 tablespoon to 1 tablespoon (depending upon the size of the oyster) over the oyster.

3. Grill the oysters. Heat a grill on high heat. Add the oyster shells and grill for 2 minutes. Remove from the grill and serve immediately. 

ENJOY!

Saturday, March 5, 2022

Oyster Ceviche

"As I ate the oysters with their strong taste of the sea and their faint metallic taste that the cold white wine washed away, leaving only the sea taste and the succulent texture, and as I drank their cold liquid from each shell and washed it down with the crisp taste of the wine, I lost the empty feeling and began to be happy and to make plans." 

Ernest Hemingway, A Moveable Feast

Hemingway's words capture the joy that comes with eating raw oysters on the half shell. And, I have enjoyed many an oyster in that fashion. Eastern oysters, ranging from the Damariscotta River in Maine to the Outer Banks of North Carolina. Western oysters, from Puget Sound in Washington State to Northern California. Despite all of the different varieties of oysters that I have tried, I have never encountered a "faint metallic taste." I do love the briny, seawater taste that comes with each little bivalve.

Over time, I have expanded beyond simply eating raw oysters. I have made a variety of oyster shooters, including my Andalusian-Inspired Oyster Shooters and my Trinidad Oyster Cocktail. I have also made oyster stews

I recently had a couple dozen oysters, Chunus, which were farmed in the Chesapeake Bay. I decided to serve one dozen in the traditional fashion, that is, raw on the half shell.  But, I wanted to find a new way to experience the joy of eating oysters.  

That is when I came across a recipe for Oyster Ceviche. The dish, ceviche," is generally described as raw seafood that is "cooked" through chemical reactions caused by the acid in citrus juice that coagulates the proteins in the seafood. 

There is some debate about ceviche's origins.  Most scholars and historians believe that the dish originated in colonial-era Peru, with the Spanish bringing the citrus - at first, oranges, and then, lemons and limes - which were combined with local seafood and chiles to make the dish. Most historians also agree that it was not the conquistadors who were responsible for the creation of ceviche. Instead, they credit the Moorish women who were brought to the New World with the colonizers. The women brought a cooking method known as escabeche, which is the maceration of raw meat or fish in vinegar or citrus. The word escabache itself is derived from the Andalusi Arabic phrase al-sikbaj. While the origins may trace back to the old world and to Arabic empires, there is little doubt that ceviche is Peru's national dish.  

Most ceviche served in restaurants usually involves fish. To the extent "shellfish" is involved, it is usually shrimp.  Other shellfish - such as oysters and clams - are usually not on the menu. The thought of gently "cooking" oysters with citrus juice really intrigued me. The addition of the diced bell peppers, diced red onions and chopped cilantro also provide a colorable palette for the oysters. The one departure from the recipe that I did was to simply chop the oysters in half, rather than in "small chunks." I think the larger the oyster, the better the presentation. The next time that I make this recipe, I will probably keep the oysters whole, unless they are too large. 

OYSTER CEVICHE

Recipe from Laylita

Serves 2

Ingredients:

  • 6 large oysters, shucked, liqueur reserved
  • 1/4 red onion, diced
  • 1/2 bell pepper, finely diced
  • 1/2 tablespoon cilantro, finely chopped
  • 5 limes juiced
  • 1/2 tablespoon sunflower seed oil or light olive oil
  • Salt to taste
Directions:
1. Prepare the onions. Soak the onion in one cup of cold water with 1 teaspoon of salt.  Rinse and drain well. Marinate with the juice of 1 lime.

2. Prepare the oysters. Remove the oyster meat from the oyster shells, saving the oyster liqueur (juice), and chop the oysters into small cubes.

3. Marinate the oysters. In a medium sized bowl, combine the chopped oysters, the liqueur, marinated red onion, diced tomatoes, diced bell pepper, lime juice, finely chopped cilantro, oil and salt to taste.  Let marinate in the fridge for about 5 to 10 minutes and serve immediately. 

ENJOY!