Showing posts with label Lemon Zest. Show all posts

Saturday, March 8, 2025

Arrachera Verde

My parents bought me Bricia Lopez's Asada, The Art of Mexican Style Cooking for my birthday. It is a cookbook that I have wanted for some time. I wanted to learn more about Mexican cooking, as well as to do more grilling and smoking of meats, seafood and vegetables. As I read the cookbook, I began to make mental lists of the recipes that I wanted to make. One of those recipes is Arrachera Verde. 

The name translates to green skirt steak, which raises a question and provides a nod to its preparation. First, the question is around the meat. While arrachera may mean "skirt steak," the recipe calls for flap steak. That latter is also known as bavette, a thin and chewy cut of meat that is very popular in France, Argentina and Uruguay.  However, I have found that flap steak is not very common or available, at least around where I live. So, I had to look for a substitute, which led me back to skirt steak. Flank steak is also a workable substitute. Both skirt steak and flank steak share many characteristics with flap steak, being thinner cuts, as well as more fibrous and chewy.

The nod goes to the marinade. Perhaps the most green of the marinades is chimichurri. Indeed, Bricia Lopez notes, Arrachera Verde utilizes a marinade that is inspired by chimichurri. The recipe calls for a lot of herbs -- basil, mint, parsley and oregano -- for the marinade. Other classic chimichurri ingredients, like garlic and olive oil, help to round out the marinade. As the photo to the right shows,  the marinade does look a lot like a chimichurri.

The one thing that I like about the marinade is that the recipe says that only thirty (30) minutes are needed before the meat is ready for the grill. (Obviously, one can marinate the meat overnight, but the fact that a short marinade period raises a question for me as to whether a long period is necessary - that may have to await another post.) More importantly, the short marinating period makes the recipe something that can be made as dinner on a busy weekday.

While this blog readily illustrates that I have made quite a few chimichurri recipes over the years, I have to admit that I have rarely made recipes that use flap steak, skirt steak or flank steak. That is another reason why I wanted to make this recipe. I wanted to use a cut of meat that has not been a regular part of my repertoire.

This recipe also led me to another recipe, Salsa de Pina Tatemada. This recipe takes a salsa two ways that are different. First, it incorporates grilled ingredients, like grilled garlic and red onions. Second, it incorporates pineapple, which I have to say I don't usually use when making salsas. But, this salsa really worked and it is amazing with the grilled skirt steak.

One last note, Arrachera Verde with Salsa de Pina Tatemada is best served with corn tortillas. That seems, at least for me, to take me to what asado really is in Mexico.

ARRACHERA VERDE

Recipe from B. Lopez, Asada at 74

Serves 4

Ingredients:

  • 1 cup loosely packed basil leaves
  • 1 cup loosely packed fresh mint
  • 1 cup loosely packed fresh parsley
  • 1/4 cup fresh oregano leaves
  • 2 Fresno chiles
  • 3 large cloves garlic, peeled
  • 1 lemon, zested and juiced
  • 1/4 cup olive oil
  • 1 teaspoon citrus vinegar
  • 2 tablespoons sea salt
  • 2 pounds flap steak
  • Warm tortillas, for serving
  • Salsa de Pina Tatemada, for serving

Directions:

1. Marinate the steak. In a food processor, add the basil, mint, parsley, oregano, chiles, garlic, lemon zest and juice, olive oil, vinegar and salt. Pulse until a smooth paste forms.  Pat the steak dry with paper towels and place it in a large bowl. Rub the paste mixture all over the meat. Cover and refrigerate for at least 30 minutes or overnight.

2. Prepare to grill. Remove the meat from the refrigerator to allow it to reach room temperature before grilling if possible. Start a charcoal or gas grill. The gas should be set to high. If using a pellet grill, preheat your grill to 450 degrees Fahrenheit for at least 15 minutes. If using charcoal, the coals should be red but entirely covered with gray ash.

3. Grill the steak. Remove the meat from the marinade and put it on the grill directly over the fire. Close the lid and cook, turning once, about 4 to 5 minutes on each side. Transfer the meat to a cutting board and let rest for 5 minutes. 

4. Finish the dish. Slice the meat against the grain. Serve with warm tortillas and the salsa. 

PEACE.

Sunday, May 8, 2022

Around the World in 80 Dishes: Portugal

"Portugal was the beginning, where I began to notice the things that were missing from the average American dining experience. The large groups of people who ate together. The family element."

- Anthony Boudain

I have never been to Portugal, although it is definitely on my culinary travel list. The country's relationship with food is a mixed story. On the one hand, Portugal had a key role in terms of the distribution of spices and other ingredients across the globe. At one point in history, the Portuguese had complete control over the African sea route, a long perilous journey around the Cape of Good Hope in southern Africa to lands such as Kerala (in India), Malacca (in Malaysia) and, ultimately to the Moluccas (in present day Indonesia). On the other hand, the Portuguese were a colonial power, which propagated the inhuman and immoral practice of slavery in the New World and oppressive violence in its colonies.

Yet, the good and bad are inextricably intertwined to form the one history of Portugal as a people. Just as they used to say that the sun never set on the British empire, the saying also applies to a certain extent to the Portuguese. The country had colonies that stretched from South America (Brazil) to Africa (Cape Verde, Guinea-Bissau, Sao Tome & Principe, Angola, and Mozambique to Asia (Goa, Macao).  The Portuguese are well known for their role in bringing peppers from South America to Europe, Africa and Asia. And, I am a very big fan of that particular pepper -- the peri-peri or piri-piri.

So, I always thought that when I got to the personal culinary challenge to make a main course from Portugal, that it would feature that pepper. However, as it turns out, the challenge ended taking a completely different turn.

The (few) followers of this blog may remember that I have recently grappled with how to prepare a challenge for a country that has regional cuisines, like Spain and Canada. I have taken to using a random address and then building the challenge from there. I thought about doing the same for Portugal, which definitely has regional cuisines as one travels from Porto to Lisbon to Lagos, and then beyond to the Azores or Madeira. That is when I had what I thought was a great thought - as one goes down the coastline of Portugal, the one thing that all of those regions have in common is that very coastline. Seafood comes with coastline. With this thought, I had the building blocks for my culinary challenge.

APPETIZER

I don't know what it is about the Iberian peninsula, but both Spanish and Portuguese cuisines have recipes that combine octopus with potatoes. For an appetizer, I decided to explore the Portuguese version of this dish. While I have always loved the Spanish version, which is available at almost every tapas restaurant that I have eat at, I have to say that I loved the Portuguese version much more. 

I have to admit that I departed slightly from this recipe. First, I did not pour the oil and the garlic from the roasted potatoes over the dish. I think this helped from making the octopus and potatoes seem "drowned" in oil. Second, while I like cilantro, I thought that parsley would work better.  Finally, I left off the olives because of the guests who got to enjoy this dish. They were not olive fans. 

POLVO A LAGAREIRO

Recipe adapted from Photos and Food

Serves 4

Ingredients:

  • 2.65 pounds of octopus, either whole or tentacles
  • 1 pound of fingerling or small white potatoes, with peel and washed
  • 1 tablespoon kosher salt for boiling the potatoes
  • 3/4 cup olive oil
  • 1 1/2 teaspoon kosher salt for roasting the potatoes
  • 4 cloves garlic, sliced thin
  • 1 dried bay leave
  • 1/4 cup cilantro (or flat leaf parsley)
  • 1/2 cup black olives (optional)

Directions:

1. Boil the potatoes. Fill a medium to large pot half-way with water, add the 1 tablespoon of salt, and boil the potatoes for about 15 to 20 minutes or until they become tender.  If using cooked octopus, skip to step 3, if using raw octopus, continue with the next step.

2. Prepare the octopus. Using your hands, wash the octopus under cold water, and boil the whole octopus for about 40 minutes or until tender (you should be able to insert a fork into the thickest part of the tentacle). 

3. Prepare the oven and grill. Preheat both the oven for broiling and the BBQ or grill at 500 degrees Fahrenheit.

4. Continue to prepare the potatoes. Once the potatoes are ready, pour out the water and pat them dry with a paper towel. Place the potatoes in a roasting pan. Use the bottom of a glass or a mug to carefully press down on each potato until they slightly crack. Do not completely flatten them. Drizzle olive oil them.  Place the roasting pan with the potatoes in the hot oven on the middle rack and roast for 5 to 10 minutes.

5. Grill the octopus. Place the octopus on the BBQ or grill for about 5 minutes, flip and then let cook for another 5 minutes.

6. Finish the dish. Scoop the potatoes onto a serving dish. Cut the octopus into bite sized pieces. Place the grilled octopus over the potatoes. Drizzle the olive oil and garlic from the roasting pan over the potatoes and octopus. Garnish with olives and cilantro (or parsley).

MAIN COURSE

As I mentioned above, I decided to build the personal culinary challenge around the one thing that may unit all of Portuguese cuisine in one way or another ... seafood. I decided to make a Caldeirada de Peixe, which is the Portuguese version of a fish stew that goes by many other names throughout the Mediterranean. To be sure, there are regional variations of this dish, which vary based upon the available fish and ingredients. The regional variations cannot obscure the fact that this dish represents Portugal, and, provides an ever so slight nod to the country's history from the shores to the seas.

CALDEIRADA DE PEIXE

Recipe from Photos and Food

Serves 4

Ingredients:

  • 1 cup white wine
  • 3 tablespoon tomato paste
  • 1 teaspoon paprika
  • 1/4 cup olive oil
  • 6 pounds of fresh grouper cut into steaks (substitute conger or cod)
  • 1 large cooking onion, sliced thin
  • 5 cloves of garlic, sliced thin
  • 1 tablespoon kosher salt
  • 1 teaspoon cumin 
  • 1/2 teaspoon ground cinnamon
  • 2 medium tomatoes sliced into thin wheels
  • 1 large bell pepper sliced into thin wheels
  • 2 bay leaves
  • 8 sprigs of fresh flat leaf parsley with most stem cut off

Directions:

1. Build the stew. In a measuring cup with a spout, whisk together the wine, tomato paste, and paprika until well combined. Pour the olive oil into the bottom of a large dutch oven or heavy pot.  Spread half of the sliced onions and garlic evenly over the oil and bottom of the pot. Place half of the fish steaks over the onions and garlic in one layer. Sprinkler 1/3 of the salt, cumin and cinnamon evenly over the fish.

2. Continue to build the stew. Place the tomato and pepper sliced wheels evenly over the fish.  Spread the remaining half of the sliced onions and garlic evenly over the tomato and pepper slices.  Place the remaining half of the fish steaks over the onions and garlic in one layer. Sprinkler 1/3 of the salt, cumin and cinnamon evenly over the fish.

3. Continue to build the stew. Place the remaining tomato and pepper sliced wheels evenly over the fish.  Sprinkle the remaining salt, cumin and cinnamon over the tomatoes and peppers.  Add the two bay leaves.  Pour the wine mixture over the ingredients in the pot.  

4. Cook the stew. Place the pot on the stove and turn the heat up to medium high.  Once the liquid starts to bubble, cover the pot with the lid and reduce the heat to low.  Let simmer for about 30 minutes or until the fish starts to flake.  Turn off the heat, uncover the pot, and add the springs of fresh parsley over the cooked ingredients.  Serve with steamed/boiled potatoes, rice or a green salad.

*     *     *

Needless to say, I think I can chalk up another successful personal culinary challenge. The guests who got to enjoy both dishes certainly thought that I did a good job. It was just the morale boost that I needed as I contemplate some much more difficult challenges ahead. Until next time, 

ENJOY!

Friday, November 26, 2021

Arista-Style Turkey with Tuscan Chestnut Stuffing (Savage Boleks' Thanksgiving 2021)

It is interesting how a decision to depart from a tradition could, itself, turn into a tradition.  Nearly two years ago, I decided to try prepare a Christmas dinner that was different than what the traditional Italian holiday meal that my family has prepared for more than fifty years. I prepared a turkey in the style of a Tuscan pork roast. That experience gave rise to a blog post, Turkey in the Arista Style with Tuscan Bread Stuffing. My beautiful Angel loved the meal so much, both the turkey and the stuffing, that I have made the dish a few times since that holiday dinner. And, now, it has officially become the traditional Thanksgiving dinner for the Savage Boleks. 

Yet, a turkey in the arista style is itself a departure from tradition in another sense. Since the dawn of the thirteenth century, an arista has always been a pork roast. That roast evolved over time to what it is today: a mass of porcine goodness covered in a rub consisting primarily of rosemary and garlic, along with other ingredients, such as lemon, cloves and/or fennel seeds. While recipes change, the one constant is that the protein used in an arista comes from some part of a pig, either a roast or the loin. The use of a turkey is a break from that tradition. Yet, it is a good break. The reason is simple: much like pork, turkey meat provides a tableau upon which all of the flavors used in the rub come together to provide a culinary image of Tuscan flavors.  If pork is the other white meat, then turkey is the other, other white meat.

The arista-style turkey is just the beginning of this new Savage-Bolek tradition. Another important aspect is the stuffing and, because I make so much of it, the dressing. (As you may know, it is stuffing if it is stuffed in the bird; it is dressing if it is baked alongside the bird.) This stuffing is a culinary mélange of Tuscan flavors and aromas. It begins with the bread, which is focaccia. The bread is cut up and toasted until the moisture is removed. One then adds in diced pancetta (or, if that person is me cooking for my beautiful Angel, diced turkey bacon), along with diced turkey heart, liver and gizzard (that is, all of the giblets in the package provided with the turkey). This step is followed by the addition of the traditional elements of a stuffing, namely, diced onion, celery and carrots. Finally, just before the liquid (turkey stock) is added, one adds a heaping 1/4 cup of rosemary, sage and the chestnuts. after the liquid is added, the ingredients are mixed well, left to marry for an hour and then stuffed into the bird or placed in a dish to be baked.

This stuffing or dressing is perhaps the best stuffing that I have ever made. One does not have to take my word for it, my beautiful Angel has made similar proclamations. This stuffing or dressing pairs perfectly with the ingredients used to make the arista-style turkey. There are major connections in terms of flavor, with the use of turkey bacon and rosemary. Yet, the stuffing or dressing adds to the flavors of the turkey with the use of sage and chestnuts. 

The recipe set forth below is not the same recipe that I used back in 2019. I have made some modifications based upon my subsequent efforts to make this dish. The two major changes are as follows: (1) I have incorporated the juice from the zested lemons into the marinade, as a way to utilize all of the ingredients; (2) I increased the amount of times that I baste the turkey with the juices and butter from once every hour to once every 40 minutes; and (3) I added an uncovered/covered/uncovered sequence to roasting the bird. While this additional work extends the cooking time a little, it is definitely worth it if you are trying to get crispy, brown skin on  the bird. 


ARISTA-STYLE TURKEY
WITH TUSCAN CHESTNUT STUFFING
Turkey recipe adapted from Reinhardt Hess & Sabine Salzer, 
Regional Italian Cuisine, pp. 148-49
Tuscan Bread Stuffing Recipe adapted from Tasting Table
Serves many

Ingredients (for the turkey):
1 whole turkey (about 12 pounds)
4 lemons, zested and juiced
8 to 10 sprigs of rosemary
10 cloves of garlic
4 teaspoons of fennel seeds
4 pinches of ground cloves
Kosher salt
Freshly ground black pepper
Olive oil
1 stick of unsalted butter

Ingredients (for the stuffing):
1 1/2 pounds ciabatta bread, cut into 1 inch cubes
8 ounces pancetta, small dice
1 package turkey liver and gizzards (from 1 large turkey)
2 medium carrots, peeled and small dice
2 celery stalks, small dice
1 large yellow onion, small dice
2 sticks unsalted butter
1/4 cup heavy cream
3 cups turkey stock + 2 cups of turkey stock
1 cup roasted chestnuts, roughly chopped
1/4 cup minced sage
1/4 cup minced rosemary
Kosher salt, to taste
Freshly ground black pepper, to taste

Directions:
1.  Prepare the turkey.  Rinse the turkey well.  Pat the turkey dry.  Separate the skin from the turkey so that you can apply the rub directly onto the meat. Combine the lemon zest, rosemary, fennel seeds, ground cloves, garlic, salt and black pepper into a small bowl.  Mix well. Juice the lemons and pour into a separate bowl.  Whisk in olive oil with the lemon juice and then add it to the small bowl with the dry ingredients to create a paste. Add additional olive oil, if necessary, to create that paste.  Continue to mix.  Once the paste has the desired consistency, apply it to all parts of the turkey, including under the skin.  Reserve some of the rub for basting. Allow the turkey to rest for at least 2 hours in the refrigerator.

2.  Prepare the stuffing.  Preheat the oven to 225 degrees Fahrenheit.  Lay out the bread on a baking sheet and bake until dry, about 25 to 30 minutes.  Transfer the bread to a huge bowl.  While the bread is baking, heat the pancetta in a medium skillet over medium-high heat. Cook, stirring often until the pancetta is crispy and the fat has rendered, about 8 to 10 minutes. Using a slotted spoon, transfer the pancetta to the bowl with the bread.  Drain the fat into a separate bowl. Add back 1 to 2 tablespoons of the fat to the pan and add the liver and gizzards.  Cook the ingredients, turning as needed until golden and cooked through, about 4 to 5 minutes for the liver and 8 to 10 minutes for the gizzard.  Transfer to a cutting board and roughly chop, then add to the stuffing bowl.

3.  Continue to prepare the stuffing.  Add a little more of the pancetta fat back to the pan.  Add the carrots, celery and onion to the pan.  Sweat the ingredients until softened, 6 to 8 minutes.  Transfer the vegetables to the stuffing bowl.   Add the butter to the pan and cook until it begins to brown and has a nutty aroma.  6 to 8 minutes.  Turn off the heat and stir in the cream to warm through.  Add the butter mixture to the stuffing bowl with the remaining ingredients (namely, the turkey stock).  Using your hands, mix the stuffing to incorporate.  Let sit at room temperature for 1 hour. 

4.  Prepare to roast the turkey.  Preheat the oven to 400 degrees Fahrenheit. Stuff the turkey's cavities with the stuffing, and place the remaining stuffing in a baking dish.  Roast the turkey for about 3 hours or until the turkey's internal temperature reaches 160 degrees. I roast the turkey uncovered for about the first hour and twenty minutes, cover the bird for the next hour and twenty minutes, and then leave the bird uncovered for the rest of the time. Baste the turkey approximately every 40 minutes with melted butter that has some of the rub mixed into it.  Once the turkey reaches that temperature, remove the turkey from the oven and cover it.  Place the baking dish full of dressing in the oven and cook for about 30 minutes to 45 minutes, or until the dressing begins to crisp on the surface.  Remove the stuffing and set on the stove to cool.

5.  Prepare the au jus.  Drain the liquid from the roasting pan into a separator.  Pour the juices into a pot, along with 2 cups of the turkey stock. Taste and adjust the seasonings with salt and pepper if necessary.  Bring to a boil under medium high heat and reduce to a simmer.  Allow to simmer until you are ready to serve. 

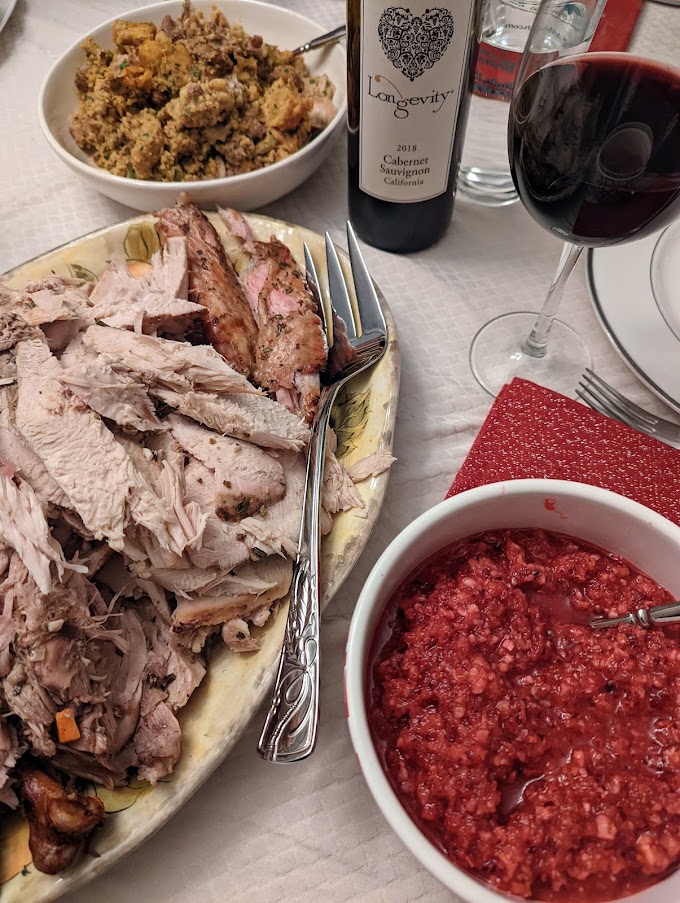
6.  Finish the dish.  Spoon the stuffing and dressing into a serving bowls (one for the stuffing and another for the dressing).  Slice the turkey and place on a serving dish.  Serve immediately.

ENJOY!

Friday, October 15, 2021

Asari No Sumashijiru (Japanese Clam Soup)

There is something to be said about simplicity. A handful of ingredients - water, lemon, clams, salt and cilantro - combined in a basic preparation. The end result is a soup is a dining experience that transcends many of the dishes that I have had at a lot of fancy restaurants. 

This recipe - Asari No Sumashijiru - has made me rethink much of what I have thought about cooking. I spend a lot of time looking for recipes that incorporate a range of ingredients, utilize new cooking (and sometimes complex) cooking techniques, and produce some very delicious dishes (which, if my photography skills were a little better, would look as good as they taste). But this five ingredient dish, prepared simply by boiling the clams, turned everything on its head.

A sumashijiru is a simple, clear soup with certain specific components. There is the suiji, which is the stock (or water), and the wadane, which is the solid ingredient. There is also the tsuma, a garnish that adds color, and the suikuchi, a garnish that adds fragrance. 

Each particular component is clearly present in this recipe. The suiji is water, flavored by the solid ingredient or the wadane, which are asari (clams). The tsuma is the Japanese cilantro and the suikuchi is the use of lemon juice and zest.   

One additional note about the clams. The recipe called for manila clams, which resemble short-neck clams (or little neck clams). Little neck clams are the smallest type of clams that one will find either in grocery stores or in restaurants. 

However, I had middle-neck claims on hand when I made this recipe.  Middle neck clams are, as their name suggests, mid-sized clams. They are basically cherrystone clams. Generally speaking, I prefer middle-necks or cherrystone clams because of their size. In my humble opinion, they are the "Goldilocks" of clams, not too small so as to barely register when you bite into them and not too big so that they are too tough when you bite into them. In the end, I think the middle-neck clams worked as well as manila clams or little-neck clams. 

Whatever clams you have, or if you need clams (go out and get them), you should make this recipe. It is truly amazing how something so simple can be so profound.

ASARI NO SUMASHIJIRU (JAPANESE CLAM SOUP)

Recipe available at The Spruce Eats

Serves 4

Ingredients:

  • 1 pound manila clams
  • 5 cups water
  • Kosher salt, to taste
  • 1 lemon, zested
  • Mitsuba (wild Japanese cilantro), for garnish

Directions:

1. Cook the clams. In a medium pot, bring water to a boil. Reduce heat to medium and add a bit of salt to the water (approximately 1/2 to 1 teaspoon salt). Add fresh clams directly into the boiling water.  Cook until all the clams open. If there are any unopened clams, remove them from the pot and discard.

2. Finish the dish. While the clams are are cooking, zest the lemon using a microplane or a peeler.  Serve four to five clams in small soup bowls and pour broth over them. Garnish with lemon zest and Japanese parsley. Serve immediately. 

ENJOY!

Thursday, September 23, 2021

Michael Symon's Grilled Oysters

Few things are more sublime than the raw oyster, whether it is the iconic Kumamoto from Washington's Puget Sound or the lesser-known Chincoteague Salts from the Chesapeake Bay. There is something, in my humble opinion, about taste of oysters, especially those that have a briny little bite to them, that just speaks to me. 

For this reason, I usually order raw oysters in the restaurant; or, even better yet, I purchase some from a local aqua farm and shuck them myself.  And, as is evident to anyone who follows this blog, I usually serve them with a mignonette, such as my Peach Champagne Mignonette, or as shooters, like my gazpacho, Andalusian-Style Oyster Shooters.

Recently, I purchased a new grill and I decided it was time to try grilled oysters. So, I purchased some Chincoteague Salt oysters and set out to find a good grilled oyster recipe on the Internet. Fortunately, I was able to find a recipe from one of the few chefs that I admire. That chef is Michael Symon.

One of the many reasons that I admire Chef Symon is his ability to simplify recipes and the cooking process to enable people to make really good food in a way that is easy to understand. His 5 in 5 cookbooks are great examples of his ability. More recently, drawing upon his personal experiences, Chef Symon has used skills to author a cookbook entitled Fix it with FoodThis book is designed to help people with autoimmune issues (Chef Symon has publicly acknowledged his rheumatoid arthritis and discoid lupus conditions). The recipes enable people to cook simple and delicious recipes that are targeted to address their triggers (whether it is meat, dairy, etc.). Chef Symon has another Fix it with Food book coming out in the near future with an appropriate subtitle, Every Meal Easy. That book is set to be released on December 7, 2021.

Source: Food Network

This grilled oyster recipe is an excellent example of Chef Symon's skills terms of communicating and teaching a recipe in a way that makes it easy to prepare and produces a very delicious meal. Each element and technique is straight forward. A quick sauce consisting primarily of butter, shallots and garlic, with some crushed red pepper and some parsley.  A quick roast of the oysters over a hot grill. Once the oysters are done, dress them with the sauce and the dish is ready to be served. The recipe is easy enough; however, the hardest part is waiting for those oysters to open. I have to admit that I watched them carefully, worrying that they may end up overcooked. In the end, I pulled a few off before they opened and just opened them with an oyster knife. 

In the end, I still prefer my oysters served raw with a side of a mignonette or some freshly grated horseradish.  If I decide to have some cooked oysters, this grilled oyster recipe is the way to go.

MICHAEL SYMON'S GRILLED OYSTERS

Recipe available at Cooking Channel

Serves 4

Ingredients:

  • 16 oysters
  • 3 tablespoons unsalted butter
  • 3 tablespoons extra-virgin olive oil
  • 2 cloves of garlic, minced
  • 1 shallot minced
  • 1 tablespoon fresh parsley, minced
  • 1 teaspoon lemon zest
  • 1 teaspoon lemon juice
  • 1/2 teaspoon chile pepper flakes
  • Salt
  • Cracked black pepper
Directions:
1. Prepare the sauce. Heat a saucepan over medium low heat.  When hot, add the butter and olive oil.  Add the garlic and shallots and sauté until fragrant, about 30 seconds.  Add the parsley, lemon zest, and juice, chile pepper flakes, salt and pepper to taste. Remove from the heat.

2. Grill the oysters. Place the oysters on the hot grill until they pop open, about 2 minutes.  Carefully remove the the top shells (BBQ gloves make this much easier, a thick kitchen towel is a good substitute). Spoon some sauce over top of each oyster and serve.

ENJOY!

Friday, December 27, 2019

Turkey in the Arista Style, with Tuscan Bread Stuffing

For this holiday season, I decided that I would try something different.  Christmas Eve dinner is a well established tradition in my family, with the antipasta plate and wedding soup, followed by pasta with meatballs and sausage. That tradition has produced many great memories for me going back to my childhood. 

Traditions are good, in fact, they are great.  But, at least for me, I felt that I could be missing something if I didn't take a chance and try something different. There was only one question: what to make?

Recently, my beautiful Angel's parents traveled to Italy, spending time in Lazio, Tuscany and Liguria.  I too spent time in Tuscany, which provided me with the inspiration for the dinner.  I spent a lot of time researching main courses, but I wanted to make something that everyone could enjoy.  I ultimately decided to do an Arista, which is a dish that I previously made. Arista is a roast pork dish that is quintessential Tuscan cuisine. The problem with an Arista is that it is roast pork, and, my beautiful Angel does not eat pork.  My Angel does eat turkey, so I decided to apply the ingredients and cooking techniques of an Arista to a turkey.

To be sure, there are not very many turkeys gobbling around Tuscany. (Although, interestingly, there is a highly challenged study that says the ancient Etruscans, who called the area of Tuscany their home around 900 B.C. came from Anatolia, which is currently known as Turkey.) But, the use of a rub of rosemary, garlic, fennel seed and clove pretty much made this turkey smell like a Tuscan pork roast. 

Additional Tuscan flavor and character was added to the bird with the stuffing.  I searched far and wide  on the Internet for a "Tuscan stuffing."  I came across one recipe for a Tuscan Bread Stuffing. This recipe incorporated many classic Tuscan ingredients, such as rosemary, sage and chestnuts.  The use of pancetta is also key, as its fat provides flavor at every level and stage of preparation.  

Overall, this is perhaps the best turkey that I have ever made; and, according, to my beautiful Angel, the stuffing is the best that she has ever had.  This recipe is now the Savage Boleks' standard for a stuffed turkey dinner.  This may be the beginning of a new tradition ... for now.


TURKEY IN THE ARISTA STYLE
WITH TUSCAN BREAD STUFFING
Turkey recipe adapted from Reinhardt Hess & Sabine Salzer, 
Regional Italian Cuisine, pp. 148-49
Tuscan Bread Stuffing Recipe adapted from Tasting Table
Serves many

Ingredients (for the turkey):
1 whole turkey (about 12 pounds)
4 lemons, zested
8 to 10 sprigs of rosemary
10 cloves of garlic
4 teaspoons of fennel seeds
4 pinches of ground cloves
Kosher salt
Freshly ground black pepper
Olive oil
1 stick of unsalted butter

Ingredients (for the stuffing):
1 1/2 pounds ciabatta bread, cut into 1 inch cubes
8 ounces pancetta, small dice
1 package turkey liver and gizzards (from 1 large turkey)
2 medium carrots, peeled and small dice
2 celery stalks, small dice
1 large yellow onion, small dice
2 sticks unsalted butter
1/4 cup heavy cream
3 cups turkey stock + 2 cups of turkey stock
1 cup roasted chestnuts, roughly chopped
1/4 cup minced sage
1/4 cup minced rosemary
Kosher salt, to taste
Freshly ground black pepper, to taste

Directions:
1.  Prepare the turkey.  Rinse the turkey well.  Pat the turkey dry.  Separate the skin from the turkey so that you can apply the rub directly onto the meat. Combine the lemon zest, rosemary, fennel seeds, ground cloves, garlic, salt and black pepper into a small bowl.  Mix well.  Add enough olive oil to create a paste.  Continue to mix.  Once the paste has the desired consistency, apply it to all parts of the turkey, including under the skin.  Reserve some of the rub for basting. Allow the turkey to rest for at least 2 hours in the refrigerator.

2.  Prepare the stuffing.  Preheat the oven to 225 degrees Fahrenheit.  Lay out the bread on a baking sheet and bake until dry, about 25 to 30 minutes.  Transfer the bread to a huge bowl.  While the bread is baking, heat the pancetta in a medium skillet over medium-high heat.  Cook, stirring often until the pancetta is crispy and the fat has rendered, about 8 to 10 minutes.  Using a slotted spoon, transfer the pancetta to the bowl with the bread.  Drain the fat into a separate bowl.  Add back 1 to 2 tablespoons of the fat to the pan and add the liver and gizzards.  Cook the ingredients, turning as needed until golden and cooked through, about 4 to 5 minutes for the liver and 8 to 10 minutes for the gizzard.  Transfer to a cutting board and roughly chop, then add to the stuffing bowl.

3.  Continue to prepare the stuffing.  Add a little more of the pancetta fat back to the pan.  Add the carrots, celery and onion to the pan.  Sweat the ingredients until softened, 6 to 8 minutes.  Transfer the vegetables to the stuffing bowl.   Add the butter to the pan and cook until it begins to brown and has a nutty aroma.  6 to 8 minutes.  Turn off the heat and stir in the cream to warm through.  Add the butter mixture to the stuffing bowl with the remaining ingredients (namely, the turkey stock).  Using your hands, mix the stuffing to incorporate.  Let sit at room temperature for 1 hour. 

4.  Prepare to roast the turkey.  Preheat the oven to 400 degrees Fahrenheit. Stuff the turkey's cavities with the stuffing, and place the remaining stuffing in a baking dish.  Roast the turkey for about 3 hours or until the turkey's internal temperature reaches 160 degrees. Baste the turkey approximately every hour with melted butter that has some of the rub mixed into it. Fahrenheit. Once the turkey reaches that temperature, remove the turkey from the oven and cover it.  Place the baking dish full of stuffing in the oven and cook for about 30 minutes to 45 minutes, or until the stuffing begins to crisp on the surface.  Remove the stuffing and set on the stove to cool.

5.  Prepare the au jus.  Drain the liquid from the roasting pan into a separator.  Pour the juices into a pot, along with 2 cups of the turkey stock. Taste and adjust the seasonings with salt and pepper if necessary.  Bring to a boil under medium high heat and reduce to a simmer.  Allow to simmer until you are ready to serve. 

6.  Finish the dish.  Spoon the stuffing into a serving bowl.  Slice the turkey and place on a serving dish.  Serve immediately.

ENJOY!

Tuesday, December 1, 2015

Mobile Style Oysters

As the chronological archive on the right demonstrates, I have not posted as many recipes this year as I have in previous years.  This is due in part to a very busy schedule, both at work and at home.  It does not mean that I am not cooking or that I am not trying out new recipes.  It just means that those recipes sit in a queue, waiting for me to write a few pithy paragraphs about them.

This recipe -- Mobile Style Oysters -- was one that waited a long time in that queue.  A really long time.  The reason why it waited so long was not necessarily due to my schedule, but the fact that I wanted to make this dish for my very beautiful Angel, Clare.  However, I was unable to do so for days, weeks and months.  The reason is that Clare was pregnant with our little girl.  I was unsure about serving oysters, even when cooked, so I held off making this recipe.  This restraint was very difficult.  Many a night I wanted to buy a half-dozen oysters and make this dish.  I held off, and it was well worth it.

This dish, as its name suggests, heralds from Mobile, Alabama, where local restaurants have a ready supply of oysters from the Gulf of Mexico.  There are at least eight commercial oyster farms in Alabama.  In addition to these farmers, there are local fishermen who harvest the variety of oyster species in the bay, most notably the Eastern Oyster.  Once the harvests reach the shore or the store,  the oysters find their way to restaurants like Bluegill.  The chefs and cooks then grill or broil oysters in their shell filled with a bath of butter, garlic and parmesan cheese.  The end result is  Mobile Style Oysters.

There are two things that make this recipe work.  First, the combination of those three flavors -- garlic, butter, and parmesan -- always work together in a delicious harmony.  This is true no matter the dish.  Nevertheless, what makes the harmony work in this case is that it does not drown out the star ... the oysters.  The briny flavor of the oysters are still able to stand out, surrounded by the supporting elements.

The other thing that works with this recipe is that the oysters are cooked just enough.  Often times, oysters can be overcooked, which takes such a beautiful ingredient and turns it into trash.  The five minutes under the broiler (which I did) or on the grill provides just enough heat and cooking time to give the bivalves the opaqueness one expects from cooked seafood without turning them into a chewy mess.

It was definitely worth the wait.  Both Clare and I loved these oysters, almost as much as eating them raw.  


MOBILE STYLE OYSTERS
Recipe from Saveur
Serves 4

Ingredients:
12 tablespoons of unsalted butter, softened
6 tablespoons of finely grated Parmesan
2 tablespoons of fresh parsely, minced
1/4 teaspoon crushed red chile flakes
3 cloves garlic, minced
1 shallot, minced
Zest of 1 lemon and juice of 1/2 lemon
Tabasco sauce
Worcestershire sauce
Kosher salt
Freshly ground black pepper
24 medium oysters, shucked and left in bottom shell
Crusty bread, for serving.

Directions:
1.  Prepare the grill or stove.  Build a medium-hot fire in a charcoal grill or heat a gas grill to medium high.  Alternatively arrange an oven rack 6 inches from the heating element and heat the oven to broil.

2.  Prepare the topping.  Combine the butter, Parmesan, parsley, chile flakes, garlic, shallots, lemon zest and lemon juice in a medium bowl. Season with Tabasco, Worcestershire, salt and pepper.  Spoon about 1 tablespoon of the mixture over each oyster.

3.  Grill or broil the oysters.  Grill or broil the oysters until the edges of the oysters begin to curl, about 5 minutes.  Serve with the bread.

ENJOY!

Sunday, March 10, 2013

Penne Rigate with Asparagus-Pistachio Pesto

One of the most interesting chefs and television personalities is Andrew Zimmern.  I am a big fan of his television shows, especially Bizarre Foods.  Andrew has a very interesting and inspiring personal history.  He moved to Minnesota in the 1990s to receive treatment for chemical dependency and alcoholism.  After he finished the treatment program, he found a job at a French restaurant called Café Un Deux Trois.  Although Andrew washed dishes and bussed tables, he closely watched the chef, who had spent a few years learning under Chef Bouley in New York City.  Andrew watched the chef closely, and, when a line cook called in sick, Andrew took the job as a line cook.  After a few weeks, Andrew climbed the ranks and took over the kitchen.

I have been wanting to make some of Andrew's recipes for quite a while.  Recently, I came across a recipe for Rigatoni with Asparagus-Pistachio Pesto.  This recipe dates back to Café Un Deux Trois.  Andrew recalls that the the old chef at the restaurant claimed to have gotten the recipe from Chef Bouley.  Whether or not that is true, Andrew notes that the recipe is delicious.

And, Andrew is right.  This recipe is very delicious.  I made two changes to his recipe.  First, I substituted rigatoni with penne rigate.  Really, this dish could be prepared with any pasta, although I think rigatoni and penne rigate, as well as fusilli or orcchiette, would be the best pasta for this dish. Second, I used regular Parmesan cheese rather than Parmigiano Reggiano because I was making this dish for my beautiful wife, Clare.  Given she is pregnant, unpasteurized cheeses -- like Parmigiano Reggiano -- are off the table.  However, regular Parmesan is pasteurized and it works as a good substitute. 


PENNE RIGATE WITH ASPARAGUS-PISTACHIO PESTO
Adapted from recipe by Andrew Zimmern and available at Food & Wine
Serves 4-6

Ingredients:
1/4 cup of pine nuts
1 1/2 pounds of asparagus, cut into 1 inch lengths
3 medium carrots, chopped
1 medium shallot, chopped
1/2 cup packed basil leaves
2 garlic cloves
1 tablespoon of honey
2 teaspoons of thyme, finely chopped
1 1/2 teaspoons of lemon zest, finely grated
1 teaspoon of cumin
1/4 cup of extra virgin olive oil, plus more for tossing
Kosher salt
Freshly ground pepper
1 pound of Penne Rigate
1 cup of vegetable broth
4 tablespoons of unsalted butter
1/4 cup unsalted roasted pistachios, very finely chopped
1/3 cup parsley, chopped
Grated Parmesan cheese for serving

Directions:
1.  Toast the pine nuts.  Preheat the oven to 400°. Spread the pine nuts in a pie plate and toast for about 3 minutes, until golden brown.

2.  Begin preparing the pesto.  In the bowl of a food processor, combine the asparagus with the carrots and shallot and process until finely chopped. Scrape the mixture into a 9-by-13-inch glass or ceramic baking dish. Stir in the basil, garlic, honey, thyme, lemon zest, cumin and the 1/4 cup of olive oil. Bake for 25 to 30 minutes, stirring once, until the vegetables are soft and just starting to brown. Season with salt and pepper.

3.  Cook the pasta.  Meanwhile, in a large pot of boiling salted water, cook the pasta until al dente, 10 to 12 minutes. Drain, reserving 1/2 cup of the cooking water. Transfer the pasta to a baking sheet and toss with olive oil.

4.  Finish the pesto and the dish.   In a very large skillet, combine the cooked vegetables with the chicken stock and butter and cook over moderate heat, stirring occasionally, until hot, about 4 minutes. Add the pasta, pine nuts, pistachios and the reserved 1/2 cup of pasta water and cook, tossing, until the sauce is thick and the pasta is coated. Stir in the parsley and chopped bacon and season with salt and pepper. Transfer the pasta to bowls and serve, passing the grated cheese at the table. 

ENJOY!