Showing posts with label Chile. Show all posts

Sunday, April 10, 2016

Shrimp Masala in the Pakistani Style

After having just completed my Around the World in 80 Dishes challenge to prepare a main course from the country of Pakistan, which was a delicious dish of Karahi Gosht, I still felt inspired by the Pakistani cuisine.  I was looking for a shrimp masala dish when I came across a recipe for Prawn Masala in the Pakistani Manner.

Before I get to the recipe, there has always been something that kind of vexed me.  Is there really any difference between a prawn and a shrimp?  As it turns out, there is. Prawns come from the sub-order Dendrobranchiata, while shrimp are from the sub-order Pleocymata.  Latin aside, there is a more obvious biological difference.  Prawns have claws on three pairs of legs, while shrimp only have claws on two pairs of legs.  Other than an extra set of claws, prawns are relatively similar to shrimp.  Both come in a variety of sizes, from small to very big.  Both have relatively the same taste and texture.

But, alas, in most supermarkets around where I live, there are shrimp, not prawns.  The prawns seem to find their way only onto menus, usually of higher-priced restaurants. So, whenever I come across a recipe calling for prawns -- like Prawn Masala in the Pakistani Manner -- I use shrimp.  Shrimp are cheaper and, when used in the recipe, it sounds a little less pretentious.

With respect to this particular recipe, it did not really matter whether I used shrimp or prawns.  What really matters is the masala.  The word comes from the Hindi word for spice.  As it is used in cooking, a masala can refer to two things.  First, it refers to the spice mixture or paste that is used in Indian ... and, as this post obviously suggests, Pakistani ... cooking.  The mixture could include a variety of spices, such as chile peppers, coriander, cumin, garam masala (a masala unto itself) and turmeric.  Second, it can refer to the dish that in which the spice mixture is used.  Thus, a Shrimp Masala is a shrimp dish in which a masala is used.  

This particular masala dish uses a really simple masala.  It consists of four ingredients: cumin, coriander, garlic and chile powder.  Those four ingredients work together to produce a complex spice blend that (with the cumin and the chile powder) provide heat on a couple of different levels.   The simplicity of the masala mirrors the simplicity of this dish.  Saute some garlic, then the shrimp and the masala and finally some tomato.  Serve with rice and you have a dish.  Can't beat that, especially after a busy day at work or with the kids on a weekend.  


SHRIMP MASALA IN THE PAKISTANI STYLE
Recipe adapted from Spice Spoon
Serves 2-3

Ingredients:
1 pound of shrimp, deveined, shells and tails removed
2 tablespoons of vegetable oil
2 garlic cloves, sliced finely width-wise
1/4 teaspoon turmeric powder
1 teaspoon cumin powder
1 teaspoon coriander powder
1/4 read chile powder 
2 medium sized tomatoes, de-seeded and diced
2 tablespoons fresh cilantro leaves and stalks

Directions:
1.  Saute the garlic.  Place a wok or a frying pan on medium heat.  Add the oil and garlic and saute for two minutes, until fragrant.  The garlic should not darken in color.

2.  Saute the shrimp.  Add the shrimp and spices (turmeric, cumin, coriander and chile).  Continue to saute for 3 minutes more or until the shrimp are opaque.

3.  Add the tomatoes.  Turn the heat to medium high and add the tomatoes.  Stir the shrimp with a spatula, and, after one minute, turn the heat off.  The tomatoes should not be overcooked and the skin should remain intact.  

4. Finish the dish.  Sprinkle with the cilantro and serve with crusty bread or rice.

ENJOY!

Sunday, September 14, 2014

Malabar Mussels

When one thinks of strength, the first thing that comes to mind is muscles.  However, for many women in the southern Indian state of Kerala, it is mussels that give them strength.  Green mussels or perna viridis, to be exact. Back in the 1990s, local villages along the Indian Ocean coastline began to start farming mussels as a way to make a living.  Mussel farming exploded in the region and, overall, India rose to become one of the largest producers of green mussels in the world.  

The most important thing about mussel farming in Kerala, at least to me, is found in a study by V. Kripa and K.S. Mohamed.  Their study is entitled "Green Mussel, Perna Viridis, Farming in Kerala, India - Technology Diffusion Process and Socioeconomic Impacts" (2008).   As Kripa and Mohamed report, there were three types of ownership when it came to mussel farms.  There were individual ownership and family ownership, both of which are self-explanatory.  And, there was "self-help group" ownership or SHG ownership.  There were only about 17 to 20 SHG mussel farms, all of which were located in one district (the Kasgorod district) of Kerala  

The SHG mussel farms are the key to empowering women.  As both Kripa and Mohamed found, "[t]he biggest outcome of mussel farming in Kerala was the empowerment of women with 87% of the SHG farms owned by women." The SHG is a formal organization, with officers and group meetings.  This organization makes it easier for women to obtain financial assistance and support from local banks and the government. Those 17 to 20 SHG mussel farms have enabled as many as 2,000 women to become active in an economic activity, which enables them to better support themselves and their families.  The SHGs not only help to alleviate poverty, but they also empower women not only in the economic workplace, but also when it comes to decision-making in their homes.

This recipe demonstrates what can be made with those green mussels, as well as blue and black mussels that are traditionally found in the Atlantic and Pacific Oceans.  It incorporates a wide range of ingredients, especially in the Malabar Masala.  (One note: don't let the fact that you can't find some of the masala ingredients -- like the curry leaf powder -- stop you from making the dish.  The masala will still be great.)  Along with the masala, the combination of fresh chiles, ginger, garlic, and red onions also provide an interesting array of range of tastes and flavors.  The sauce was so good that I decided to serve the dish with some rice, which could help to soak up some of the sauce.  I hated to see that sauce go to waste.   


MALABAR MUSSELS
Adapted from Smita Chandra's recipe published by Saveur
Serves 2-4

Ingredients (for the mussels):
3 tablespoons of canola oil
6 cloves of garlic, thinly sliced
2 small green Thai chiles or 1 serrano, thinly sliced
1 two-inch piece of ginger, peeled and thinly sliced
1/2 small red onion, thinly sliced
2 tablespoons of Malabar Masala (recipe below)
3 plum tomatoes, chopped
1 14 ounce can of coconut milk
Kosher salt, to taste
2 1/2 pounds of mussels, debearded, rinsed and scrubbed
1/4 cup roughly chopped cilantro
Cooked white rice, for serving (optional)

Ingredients (for the Malabar Masala):
1/4 cup of coriander seeds
2 tablespoons of cumin seeds
2 tablespoons of fennel seeds
1 tablespoon of green cardamom pods
1 tablespoon of whole cloves
1 teaspoon of black mustard seeds
1 teaspoon of fenugreek seeds
1 teaspoon of whole black peppercorns
2 star anise
2 sticks of cinnamon
2 tablespoons of dessicated coconut
2 tablespoons of dried fenugreek leaves
1 tablespoon of crushed red chile flakes
1/3 cup of curry leaf powder
1 teaspoon of ground ginger
1 teaspoon ground turmeric

Directions:
1.  Prepare the Malabar Masala.  Heat a 10 inch skillet over medium high heat.  Cook coriander, cumin, fennel, cardamom, cloves, mustard seeds, fenugreek seeds, peppercorns, star anise, and cinnamon sticks until fragrant and toasted, about 3-4 minutes.  Add coconut, fenugreek leaves and chile flakes, cook until the coconut is golden, 2 minutes.  Let cool and then transfer to a spice grinder along with curry leaf powder, ginger, and turmeric.  Grind into a powder and store in an airtight container for up to 6 months.  

2.  Prepare the base.  Heat oil in a 6 quart saucepan over medium high heat.  Cook garlic, chiles, ginger, and onion until golden, about 4 to 6 minutes.  Add masala and tomatoes. Cook, stirring occasionally until the tomatoes begin to break down, about 5 to 7 minutes. 

3.  Cook the mussels.  Add coconut milk, salt, and 1/4 cup of water and bring to a boil.  Add the mussels.  Cook covered, occasionally shaking pan until all mussels are opened, about 5 minutes.  Garnish with cilantro and serve with rice.

ENJOY!

Wednesday, September 10, 2014

Malabar Fish Fry

If there was ever a meal that could be considered to be universal, one that could cross boundaries or even oceans, it should be a fish fry.  Cultures around the global make a meal -- indeed, an event -- out of frying abundant, cheap local fish.  Back in the Midwest, where I was born and raised, a fish fry was almost a weekly event.  Numerous restaurants would advertise "all-you-can-eat" fried fish.  Customers could double down on the fried experience by getting their fried fish with french fries.  Cue the All in the Family theme, "those were the days."

I still have fond memories of going with my family to a local restaurant for a fish fry.  I would stuff my self with all the fish I could eat.  It was most often fried perch or fried catfish, thickly battered and deep fried.  I would devour fillet after fillet of deep-fried, heavily battered fish.  This was long before I knew about there were good or bad kinds of cholesterol, saturated or unsaturated fats.   When I was a kid, my focus was singularly on the fish.

Halfway around the world, I am sure there were children having the same enjoyable experience.   Take, for example, children in the Indian state of Kerala.  One of the boundaries of Kerala in the north is a long coastline, known as the Malabar Coast.  All along that thin coastline, there are cities with people who depend upon the ocean for their meals.  The abundant supply of seafood makes a fish fry a logical meal for many families.  The fish would be those native to the waters, such as bullseye or sardines, most likely whatever the fishermen brought back in their boats on that particular day. .

I recently came across a recipe for a Malabar Fish Fry and knew that it was something that I had to make. Rather than battered fish, this simple fish fry recipe features a rub consisting of turmeric, chiles, garlic and ginger.  The only issue that I faced  was the fish.  Bullseye are no where to be found where I live.  Sardines are a hit or miss.  The recipe suggests salmon, shrimp or snapper, but I decided to go another route.  I chose catfish, one of the fishes from my childhood fish fry courses, for two reasons.  The first is that the thickness of the fillets stands up well to frying.  Second, catfish is cheaper than snapper or salmon.

Finally, I thought the combination of red chile powder and turmeric would be spicy, but not overbearing or inedible.  The heat was perfectly fine for me; however, my beautiful Angel found the rub to be too spicy for her to eat.  This was only the second time that I made a dish that was too spicy for Clare.  (Interestingly, the other dish was another Indian-inspired dish, my Soft Shell Curry, Goan-Style.)  Although I really wanted to make something for my beautiful Angel, it just meant that I had seconds.   Just like when I was a kid.


MALABAR FISH FRY
Recipe adapted from Saveur
Serves 2

Ingredients:
1 pound of catfish fillets
1 1/2 tablespoons of red chile powder (such as cayenne)
1 teaspoon ground turmeric
2 cloves garlic, mashed into a paste
1 one-inch piece of ginger, peeled and mashed into a paste
Kosher salt, to taste
1/4 cup of coconut or canola oil

Instructions:
1.  Prepare the fish.  Rinse fish and pat dry using paper towels.  Mix chile powder, turmeric, garlic, ginger, salt and 2 tablespoons of water in a bowl to make a paste.  Rub over fish and let the fish sit for 10 minutes.

2.  Cook the fish.  Heat oil in a 12 inch non-stick skillet over medium high.  Cook fish, flipping once, until crisp and cooked through, 8 to 10 minutes.

ENJOY!

Tuesday, October 29, 2013

Masaledar Macchi (Spicy Grilled Fish)

Cooking with a whole fish is always a great experience. Whenever I go grocery shopping, I always pause to look at the whole fish.  Branzino, striped bass, rockfish, mackerel, trout., flounder.  Each fish has a different size, texture and flavor.  

I have made a few recipes using whole fish, such as Pesce al Palermitana and Sauteed Sheephead, Savage Boleks' Style. A while back, I wanted to cook with whole fish again.  I decided to make it a part of a dinner with a theme ... an Indian grill. After a search, I found a recipe for Masaledar Macchi or Spicy Grilled Fish.

While I had the recipe in hand, I could not find any background to the recipe.  I don't know where this dish originated and how it reflects a particular cuisine from the subcontinent.  Nevertheless, the recipe calls for the marinating of fish in a mixture that is reminiscent of Indian dishes that I have both cooked and eaten.  The combination of turmeric, ginger, lemon juice, chiles, garam masala and coconut milk creates a very tasty marinade that adds a lot to the fish itself.

While the paste added flavor to the fish, it presented a problem when it came to grilling the fish.  The recipe calls for flipping the fish while it grills and, toward the end of the cooking, to leave the fish alone so that it could develop a crust.  Although I tried to get that crust, it never really developed, as you can see from the pictures.   Still, the grilled fish served as a delicious centerpiece to a dinner that included tomato chutney and grilled naan with a cucumber raita.


MASALEDAR MAACHI (SPICY GRILLED FISH)
Recipe from RecipesLib
Serves 2-4

Ingredients:
2 whole fish, such as trout
3 tablespoons of lemon juice
1/4 cup of onion, coarsely chopped
2 cloves garlic, coarsely chopped
1 fresh hot green chile, sliced
2 inch piece of ginger root
1 teaspoon of cilantro
1/4 teaspoon of ground turmeric
1 teaspoon of garam masala
1/4 teaspoon of chile powder
1 6 ounce can of coconut milk, well stirred
Vegetable oil

Directions:
1. Prepare the fish.  Wash and dry fish.  Cut 3-4 deep diagonal slits across both sides of the fish.  Rub with 1/2 teaspoon of salt and 1 tablespoon of lemon juice.  Set aside.  

2.  Marinate the fish.  Combine and blend the remaining lemon juice, 1/4 teaspoon salt, onion, garlic, cilantro, turmeric, garam masala and chile powder into a smooth paste.  Empty paste into a shall large dish large enough to hold the fish  Add coconut milk and mix.  Leave fish in the paste and milk for 10 minutes.  Flip and let rest for 10 minutes more. 

3.  Grill the fish.  Preheat the grill and oil grilling rack with vegetable oil.  The rack should be placed about 6 inches from the heat source.  Lift fish out of marinade and place it on the rack.  Grill for about 25 minutes. Turn fish once about half way through.  If fish is browning too fast, distance it more from the heat. Do not baste fish toward the end of cooking, so that it can form a crust.

ENJOY!

Friday, November 2, 2012

Agnello alle Olive

Sheep and lamb have historically held an important place in the cuisine of Abruzzo.  The rugged land of mountains and hills served as the backdrop for herds of sheep.  Herders would drive the sheep to pastures at higher elevations during the spring and summer and, when the temperatures began to cool in the fall, they would return to lower elevations.  The abundance of sheep meant that there was an abundance of mutton and lamb for use in Abruzzese cooking.  This lamb is generally considered to have a better quality than lamb from other regions, primarily due to those grazing lands.  

This recipe features that lamb (although I did not buy it from a herder in Abruzzo).  It is reflective of Abruzese cuisine: simple and frugal.  The recipe calls for a handful of some basic ingredients, like lamb, olives, lemons, flour and chile peppers.  When these ingredients are combined together, however, the produce a wholesome lamb dish with a rich sauce that has a lot of depth to its flavor. 

Finally, the authors suggest a variation of this dish that incorporates mushrooms.  They suggest adding some wild mushrooms during the last half-hour of cooking the lamb.  I did not do that for this recipe, but, when I make it again, I will add those mushrooms.


AGNELLO ALLE OLIVE
Recipe adapted from  Hess & Silver, Regional Italian Cuisine, at 226
Serves 6

Ingredients:
2 pounds boneless leg of lamb
5 ounces of pitted black olives (about 30-40 olives)
Juice from 1 to 2 lemons
1 tablespoon of dried oregano
1 cup of beef stock
1 dried chile pepper
1 tablespoon of flour
6 tablespoons of olive oil
Salt
Freshly ground pepper

Directions:
1.  Brown the lamb.  Dust the meat with the flour.  In a dutch oven, heat the olive oil, add the meat, and brown evenly on all sides.  Season with salt and pepper and moisten with the juice of 1 lemon and 1/2 cup of stock.  Cover and simmer on low heat for 30 minutes.  

2.  Continue cooking the lamb.  Remove the pits from the olives (if necessary) and seed the chile pepper.  Mince the 20-30 of the olives and the pepper. After 30 minutes of cooking time (step 1), add the olives and pepper to the lamb.  Sprinkle half of the oregano over the lamb, then moisten with the remaining 1/2 cup of beef stock.  Cover and finish cooking for about 1 1/2 hours or until the meat is soft and flaky.  Add the remaining whole olives. 

3.  Finish the dish. Season the gravy with salt, pepper, and lemon juice.  Thinly slice the meat and place on a preheated platter.  Pour the gravy over the meat and sprinkle it with oregano.  Serve hot.

PAIRING THIS RECIPE

Of course, a lamb dish from Abruzzo calls out to be paired with wine, especially a wine from the region.  Montepulciano d'Abruzzo is one of my favorite Italian wines because the wines are very good and much cheaper than other wines like Chianti.  I have reviewed a couple of Montepulciano d'Abruzzo wines, including the Castellana and the San Lorenzo.  Both would work perfectly with this dish.

ENJOY!

Sunday, September 30, 2012

Nambé Wings

Culinarily speaking, New Mexico is perhaps known best for its chiles. The most prominent pepper is the Hatch chile, which gets its name from the fact that the chile grows in the area around Hatch, New Mexico.  Despite its prominence, the Hatch chile is not the only one grown and cultivated in New Mexico.

During my trips to Santa Fe, I discovered a heirloom chile known as the Nambé chile (capsicum annuum longe ground Nambé supreme).  Like the Hatch Chile, the Nambé chile gets its name from the area in which it is cultivated, namely, the Nambé Pueblo in northeastern New Mexico.  The Nambé chile has a very earthy flavor, as well as a very spicy kick.

Recently, I decided to make that heirloom chile the centerpiece of a wing recipe.  I also used the traditional accompaniment of spices -- paprika, onion powder, garlic powder -- to round out the recipe, plus a little cumin to add some depth to the rub.  I could have added other spices, such as thyme or oregano, but, I left that for the next time I made this recipe.

NAMBE WINGS
A Chef Bolek Original
 Serves 1-2

Ingredients:
12 chicken wings, first and second parts, wing tips removed
2 teaspoons of Native Nambé Chile Pepper
1 teaspoon of paprika
1 teaspoon of onion powder
1 teaspoon of garlic powder
1/2 teaspoon of cumin
1/4 teaspoon of salt

Directions:
1.  Prepare the rub.  Mix the chile pepper, paprika, onion powder, garlic powder, cumin and salt together in a bowl. After rinsing the chicken and patting it dry, rub the spice mix onto the chicken.

2.  Cook the chicken.  You can either cook the chicken under the broiler for about twenty to twenty-five minutes or bake the wings at 400 degrees Fahrenheit for about thirty minutes. 

PAIRING THIS RECIPE

It is a universal truth that beer is the best pairing to buffalo wings or chicken wings.  For a spicy rub such as this one, the best beer is probably a lighter, crisper beer, such as a pilsner or a pale ale.

ENJOY!

Tuesday, January 10, 2012

Gumbo aux Poissons, Huitres et Chevrettes

I asked my beautiful Angel, Clare, "what would you like for dinner on New Year's Eve?"  Her answer, "seafood gumbo."  So, I decided that I would try to make the best damn gumbo ever.  I did my research, reviewing not only modern day gumbo recipes, but also historic gumbo recipes, including a couple of recipes that date back to the late nineteenth century. I studied the difference between Cajun gumbo and Creole gumbo. I contemplated the ingredients, particularly the seafood, that I would use in the gumbo.  And, after all this research, I felt ready to cook.

However, I planned on making my own gumbo. I was not going to simply follow a recipe ... or any recipe.  I decided that for this "Gombo" (the name that I saw used to describe the dish in some old Cajun recipes), it would be a Chef Bolek Original, inspired by the gumbos of the Cajun bayous.  There was one twist ... Clare is a pescatarian, who does not eat meat but does eat seafood.  So, with andouille sausage, chicken and other meats off the menu, I still endeavored to be as Cajun as someone from the Midwest could try to be, choosing to make my Gombo with what the Cajun would call "poissons" (fish), "huitres" (oysters) and "chevrettes" (shrimp). 

With the selection of seafood, I turned my attention to the roux.  Perhaps the most important aspect of this dish is the roux.  My prior experience with roux has generally been successful; however, I always left thinking that I could have gotten the roux darker.  This time I worked to get the roux as dark as I thought I could get it ... or at least as dark as I could before I began to worry about burning it.  I saw the color go from light brown, to brown, to chocolate brown, to dark chocolate.  Although I did not reach mahogany, which was my goal, I did manage to get the darkest roux that I have ever achieved.

After getting the roux to the desired color, the key to cooking the rest of the gumbo is timing.  I tried to cut the fish pieces in even sized pieces that would cook in a few minutes.  I also made a change that is usually not done in cooking seafood.  Generally speaking, one almost always puts in shrimp last, because they cook fast and can overcook fast.  So, typically, one would follow the fish with the oysters and finish with the shrimp.  I bucked convention by putting the shrimp in next and then turning off the heat after the shrimp cooked for a couple of minutes on each side.  I then placed the oysters in the gumbo.  The residual heat would finish cooking the shrimp and cook the oysters just enough so that they were cooked on the outside and a little soft on the inside.  This resulted in the perfect oysters. 

In the end, I have to say that I surprised myself.  I think I made a pretty good gumbo, especially considering that there is not a drop of Cajun blood in me.  Clare also loved the gumbo so I can say that I made the best damn gumbo that I could for my beautiful Angel! 


GUMBO AUX POISSONS, HUITRES ET CHEVRETTES
A Chef Bolek Original
Serves 2-3

Ingredients:
1 whole fish (catfish, snapper, bass), scaled, filleted,
     and reserving the head and backbone
1/2 pint of oysters, liqueur reserved
1/2 pound of 26-30 count shrimp, shells reserved 
     and deveined
1/4 cup of canola oil
1/4 cup of flour
4 stalks of celery
2 carrots
1 1/2 onions
1/2 green pepper
4 bay leaves
Several dashes of Tabasco sauce
1 teaspoon of ground red chile peppers
1 teaspoon of dried thyme or 2 sprigs of fresh thyme
2 cups of fish stock
Salt, to taste
Pepper, to taste

Directions:
1.  Make the fish stock.  Place the head and backbone of the fish, along with the shrimp shells into a small stock pot.  Cut 1 onion into quarters and add it to the pot.  Cut two carrots and three celery stalks into quarters and add them to the pot.  Add 3 bay leaves, the dashes of Tabasco sauce, thyme and 10 cups of water.  Bring the pot to a boil and reduce to a strong simmer.  Let the stock cook for 1 hour.  

2.  Strain and reduce the fish stock.  Strain the fish stock.  Carefully pick through the backbone and the head for all the little pieces of fish meat.  After you have picked the bones and head, discard the parts and the vegetables.  You could get as much as a quarter of a cup of additional fish meat. Return the stock to a clean pot, add the oyster liqueur, and bring it back to a boil.  Reduce down until you have two cups of liquid.

3.  Make the roux.  Heat the canola oil over high heat.  Reduce the heat to medium.  Add the flour slowly, whisking the flour with the oil.  Continue to whisk the flour into the oil until completely incorporated.  Continue to cook the flour and oil until it reaches a dark chocolate to mahogany brown.

4.  Add the vegetables.  Add the onions, celery, bell pepper and okra, stirring continuously.  Cook the vegetables for about ten minutes or until tender.  

5.  Add the fish stock.  Add 2 cups of fish stock in a steady stream or slowly to the roux over medium heat, stirring constantly to make sure the roux does not break up.  Once all of the fish stock has been added, add the ground chile pepper.  Reduce the heat to low and let the gumbo simmer for one hour. Stir occasionally.

6.  Prepare the rice.  Prepare 1 cup of rice according to the instructions on the package or box.

7.  Add the seafood.  Cut the fish fillet into even bite size pieces.  Add the fish to the gumbo first and cook for about three minutes or until the fish is opaque.  Add the shrimp and cook for another three minutes until they are opaque.  Turn off the heat  Finally, add the oysters and cook until they just become opaque, which should take a couple of minutes.  If the oysters do not seem like they are cooking, turn the heat back on low for a couple of minutes.

8.  Plate the Gumbo.  Spoon the gumbo into a bowl.  Spoon a cup of rice in the middle of the bowl or serve it on the side.

PAIRING THIS DISH

When it comes to pairing, gumbo has a surprising flexibility that makes it possible to pair both beers and wines with this dish.  When it comes to a beer, a pilsner or lager beer would work best, particularly if the gumbo is really spicy.  One such beer that would pair well with this dish is the following:

Abita Brewery -- S.O.S.
Weizen Pils
Louisiana, USA
Malt and slight hop flavors

When it comes to pairing this dish with a wine, red wines can be ruled out.  Red wines would only underscore the heavy nature of the gumbo.  A white wine or, even better, a rosé would be a better pairing for a gumbo.  One such wine is the following:

Famille Bougrier -- Rosé d'Anjou (2010).
100% Cabernet Franc
D'Anjou AOC, Loire Valley, France
Strawberry and raspberry flavors, with a little sweetness.

ENJOY!


Monday, September 12, 2011

Around the World in 80 Dishes: Mozambique

My culinary adventures take me to Mozambique, a large country located in southeastern Africa.  The history of Mozambique can be best simplified and summarized by three emigrations.  First, there was the emigration of Bantu peoples, who brought agriculture and farming to the area around 300 A.D.  Second, there was the arrival of the Swahili and the Arabs, who established commercial and military ports in the land that would become Mozambique.  Third, and most significantly, there were the Portuguese, who colonized the country in the early 16th century.  The Portuguese controlled Mozambique as a colony for more than three hundred years, leaving an indelible print upon the culture and cuisine of that country and its people.

The Portuguese influence is perhaps the most apparent when it comes to the ingredients used by Mozambican cooks.  The Portuguese introduced cassava and cashew nuts as crops for agriculture, along with maize, rice, sorghum and potatoes.  The Portuguese also introduced the use of certain spices, such as bay leaves, coriander, garlic, red sweet peppers, chile peppers, onions, paprika and wine. 

Moreover, this influence of the Portuguese extends beyond ingredients and reaches the dishes prepared in Mozambican kitchens.  For example, Mozambicans have their own version of Feijoada, the Portuguese bean stew and condiments like Piri-Piri Sauce.  They have also incorporated roasting methods introduced by the Portuguese to create dishes such as Frango a Portuguesa (Chicken, the Portuguese way).

For this challenge, I wanted to go beyond the influence of the Portuguese and reach for a dish that is reflective of the indigenous peoples of Mozambique.  I decided to make Matata, a clam and peanut stew enjoyed by local Mozambicans.  The principal ingredients for this stew are simple -- clams, peanuts, pumpkin leaves -- highlight the local nature of the dish.  However, I could not complete the meal without at least doing one dish that is influenced by the Portuguese.  That dish is Camarao Mozambique, which is as fiery shrimp dish that is heavily influenced by chiles and wines of the Portuguese. 

THE SAUCE

Before making Camarao Mozambique, I need to make one of the ingredients for that dish, Piri Piri Sauce.  This sauce is basically a hot pepper sauce that combines Portuguese and African influences.  The Portuguese contributed the peppers, which originated in the New World.  Explorers and traders brought the peppers to Portuguese colonies in Angola and Mozambique.  In Mozambique, the peppers acquired the name of "piri piri," which is "pepper pepper" in Swahili.  This recipe is adapted from one by Jorge Jordão, the chef at Zambi, a restaurant in Maputo, Mozambique.  I could not find the right red chiles, so I used red bell peppers and added some ground Mombosa pepper, which is said to be the descendant of the peppers brought to Africa by the Portuguese. 


PIRI-PIRI SAUCE
Recipe adapted from Saveur.com

Ingredients:
2 red peppers
1 teaspoon of ground Mombosa (Piri Piri) pepper
     (you can use more if you want a more spicy dish)
3 tablespoons of fresh lime juice
2 teaspoons of dark brown sugar
1/2 tablespoon of olive oil
1/2 tablespoon of finely chopped fresh ginger
1/4 tablespoon of white wine vinegar
1/4 teaspoon of kosher salt
1 clove of garlic

Directions:
Add all of the ingredients in a blender and puree into a chunky sauce.

THE APPETIZER

With the sauce, I can turn to the Camaro Mozambique.  As noted above, Portuguese explorers introduced chile peppers to Mozambicans.  However, it was the Mozambicans who combined those peppers with shrimp.  In doing so, local cooks created a dish that has become very popular, not only in Mozambique, but also in Portugal itself.


CAMARAO MOZAMBIQUE
Adapted from ChopOnionsBoilWater
Serves 3-4

Ingredients:
7-10 threads of saffron
1 pound of shrimp, deveined but not deshelled
1/8 cup of olive oil
1/8 cup of water
5 cloves of garlic, roughly chopped
4 tablespoons of butter
1/4 bottle of white wine (like a Vinho Verde)
1/2 teaspoon of paprika
1 tablespoon of hot crushed red pepper
1/2 lemon, juiced
1/4 cup, flat parsley, coarsely chopped (optional, for garnish)
Portuguese piri-piri sauce , to taste

Directions:
1.  Steep the saffron.  Put the saffron in the water and let it steep.  You could let it steep overnight, but usually I just let it steep for fifteen minutes to thirty minutes.

2.  Saute the shrimp.  Place a deep saucepan on medium-high heat, when the pan warms, add the olive oil. When oil begins to shimmer add the shrimp and sauté until they just turn pink.  Remove the shrimp from the pan with a slotted spoon and keep the juices and oil in the pan. Put the shrimp aside and keep them warm.

3.  Saute the garlic.  Add the garlic to the pan and sauté for 2-3 minutes until golden.  Do not let the garlic brown or burn.

4.  Make the sauce.  Add the saffron and water, wine, paprika, crushed pepper, hot sauce, and lemon juice. Bring this mixture to a boil, adjust to a lively simmer and allow it to reduce and thicken slightly.

5.  Finish the shrimp.  Return the shrimp to the pan and continue simmering, stirring frequently for about 2-3 minutes.

6.  Finish the sauce.  Add the butter to the pan stirring frequently. Once butter melts, stir one more time, remove from heat and adjust salt and pepper to taste.

THE MAIN COURSE

Finally, I turn my attention to the main course, which is the subject of the Around the World in 80 Dishes Challenge.  The main course and challenge for Mozambique is Matata, a clam and peanut stew with pumpkin leaves.  I had to make two alterations to this recipe.  The original recipe called for the use of canned clams.  There is nothing wrong with using canned clams (other than the fact that clams are living shellfish and once removed from their shell, clams have to be preserved).  I had access to fresh cherrystone clams and bought three small bags of clams to use in this recipe.  The one drawback to using fresh clams is that I had to shuck them, which is time consuming but well worth the effort.  The same goes for the peanuts.  Bottles of peanuts line shelves in a grocery store; however, I bought fresh peanuts and shelled them myself. 

However, the original recipe also calls for pumpkin leaves.  Unlike the clams and peanuts, I did not have a source for fresh pumpkin leaves.  The authors of the recipe (and authors of other Matata recipes) anticipate the lack of pumpkin leaves.  They suggest fresh spinach leaves as an alternative.  I readily accepted this alternative and proceeded to make the dish. 


MATATA (CLAM AND PEANUT STEW)
Adapted from the University of Pennsylvania's African Cookbook
Serves 2-3 

Ingredients:
1/2 cup of chopped onions
1 ounce of extra virgin olive oil
1/2 cup of chopped peanuts
1 tomato, diced
2 cups of clams, chopped
1/2 tablespoon of sea salt
1/4 teaspoon of ground black pepper
1/2 teaspoon of crushed red pepper
3/4 of a pound of fresh spinach

Directions:
1.  Saute the onions.  Heat the olive oil in a pan on medium heat.   Add the onions and simmer until soft, but not brown.

2.  Add ingredients (except the spinach).  Add the peanuts, tomato, clams, salt, black pepper, and red pepper.  Stir and simmer for about thirty minutes.

3.  Add the spinach.  Add the spinach and cover the pan.  When the spinach has wilted, the dish is ready to serve.

4.  Plate the dish.  Matata is usually served over rice.  Plate some rice in the center of the bowl and spoon the Matata around the rice. 

*     *     *

Overall, I think this challenge was a success.  I was most pleased with my variation on the Piri-Piri sauce.  I confronted a lack of red chiles by substituting ingredients to still achieve the desired result ... a spicy sauce.  My efforts also made for a sauce with more complex flavors, sweet up front, followed by vinegar with a kick in the end.  The Camarao Mozambique and Matata also turned out well for the first time that I made each dish.  I was surprised how much I liked the Matata, given the fact that I am not a big fan of spinach.

With this challenge in the books, it is time to turn to the next one.  Until next time ...

ENJOY!

For more about the cuisine of Mozambique, check out Food by Country.

Wednesday, June 29, 2011

The Peruvian Fire Flower

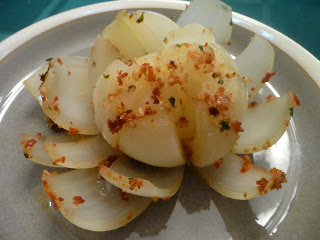
Many of the "Chef Bolek Original" recipes are dishes that I create "on the fly."  Some of those recipes come with caveats; this one comes with a warning.  Do not make it.  This recipe originates from the devil inside me ... the one that loves fire and spice.  I took two Aji Limo Rojo peppers, which are dried, Peruvian chile peppers and ground them down to a fine powder.  I added the powder to some garlic butter and drizzled it over a Vidalia sweet onion.  I then wrapped the onion and foil and threw it on the grill for fifteen minutes.  

The result is a very spicy blooming onion that is much healthier than the deep fried version that is available at certain restaurants that will not be named.  Although I should qualify the word "healthier" in that it will not clog your arteries like the deep fried blooming onion.  As for your stomach lining and intestinal comfort, that is a different matter.  

The reason rests with the Aji Limo Rojo, a small red pepper that comes from the same family as the habanero pepper.  The Aji Limo Rojo is very spicy, with one of the higher ratings on the Scoville scale.  Named after its creator, American pharmacist Wilbur Scoville, the Scoville scale measures the piquancy or spicy heat of chiles.  Actually, the scale is a measure of the amount of capsaicin in a chile.  Capsaicin is a chemical compound that stimulates chemoreceptor nerve endings in skin and mucous membranes.

The scale is measured in units -- Scoville Heat Units (SHU) -- and chiles are usually associated with a range of SHU.  For example, a poblano pepper ranges from 500 to 2,500 Scoville Heat Units.  A jalapeno pepper ranges from 2,500 to 8,000 Scoville Heat Units.  A serrano pepper ranges from 10,000 to 23,000 Scoville Heat Units.  

As for the Aji Limo Rojo, it ranges from 50,000 to 60,000 Scoville Heat Units.  In other words, the Aji Limo Rojo can be as much as one hundred times hotter than a poblano pepper,  six to seven times hotter than a jalapeno pepper and up to five times hotter than a serrano pepper.  While I love this kind of spicy heat, it may be a little to hot for people who do not like spicy foods.  So, do not make it unless you enjoy the "burn" of hot, spicy foods. 

THE PERUVIAN FIRE FLOWER
A Chef Bolek Original
Serves 1

Ingredients:
1 medium sized Vidalia onion
2 dried Aji Limo Rojo chiles
2 tablespoons of butter
1 clove of garlic, diced
1/2 tablespoon of fresh cilantro, chopped finely
Salt, to taste

Directions:
1.  Prepare the onion.  Remove the skin from the onion.  Slice a little from the bottom of the onion (the root side) so that the onion will sit flat.  Slice a little off of the top.  Then slice the onion, top to bottom and left to right.  Do not slice all the way through the onion.  Leave about 1/2 inch at the bottom.  Turn the onion forty-five degrees and repeat, cutting from top to bottom, left to right.  Place the onion on an aluminum foil sheet large enough to wrap the onion.

2.  Prepare the chiles and butter.  Grind the chiles into a fine powder. Melt the butter in a small saucepan.  Add the garlic and cilantro.  Add the chile powder and remove from the heat.  Pour the melted butter over the onion and add salt to taste.  Wrap up the onion.

3.  Cook the onion.  Heat the grill or your stove to about 400 degrees.  Grill or cook the onion for about ten to fifteen minutes. 

ENJOY!

For more on the Scoville scale, check out Wikipedia.

Thursday, March 10, 2011

Grass Fed Strip Steak with Watercress Chili Salad and Citrus Dressing

My beautiful wife, Clare, is always trying to get me to eat my vegetables, which is quite a task given that I am a committed carnivore.  She has made inroads, because I definitely eat more vegetables than I ever did in the past. I've also come to realize that I need to eat more vegetables to have a healthy, balanced diet, but it is hard.  Really hard.

So, when I decided to make a steak, I decided that I would make a salad as a side.  It could not be any salad.  I am not a big fan of iceberg lettuce or other basic leafy greens.  So, when it came to what kind of vegetable I would use for my salad, my thoughts turned to watercress, a semi-aquatic leaf vegetable that, according to Wikipedia, is one of the oldest vegetables consumed by people.  Also, as explained on Wikipedia, watercress is related to garden cress and mustard, and all three are noted for their peppery, tangy flavors.

With the lettuce question solved, I still needed to make the salad appealing to me and, the easiest way to do that is to incorporate chiles and citrus.  So, I bought a red chili, along with a lemon, lime and orange, and I had the basic ingredients to make a Watercress Chili Salad with Citrus Dressing.  Remember, I made this salad for myself, and I love spicy, peppery foods, so this salad has quite a kick to it.  But, if you like chiles like I do, then you could give this recipe a try.


GRASS FED STRIP STEAK WITH
WATERCRESS CHILI SALAD AND CITRUS DRESSING
Serves 2
A Chef Bolek Original

Ingredients:
1 grass fed strip steak (about 3/4 of a pound)
1 bunch of watercress
1 red chile, sliced very thinly
1 garlic, finely diced
1 lemon (zest 1/2 of the lemon)
1 lime (zest 1/2 of the lime)
1 orange (zest 1/4 of the orange)
1/4 cup of extra virgin olive oil
Salt, to taste
Ground pepper, to taste

Directions:
1.  Cook the steak.  Salt and pepper the steak liberally on all sides.  Cook the steak in the broiler for about seven minutes on one side, flip and cook for about another five minutes or until it is done to your desired level (medium rare, medium, etc.).

2.  Prepare the watercress and dressing.  While the steak is cooking, trim the watercress.   Juice the lemon, lime and orange into a bowl.  Add the zest from the fruit to the juice.  Add the garlic and sliced chile.  Whisk in the olive oil until it is incorporated with the citrus juice.  Salt and pepper to taste.

3.  Plate the dish.  Slice the steak and arrange the slices.  Pour some of the dressing over the salad and mix thoroughly.  (Add more dressing if you like.)  Plate the salad.

ENJOY!

Saturday, August 14, 2010

Iron Chef Night: CORN!

Every once in a while, I like to do an "Iron Chef" night, when I pick an ingredient and try to make two or three dishes featuring that ingredient.  For the latest Iron Chef Night, the secret ingredient was ... CORN.  I skimmed the Internet for recipes, which I use for ideas as to what dishes I could make.  After a quick review, I decided on three dishes: Chilled Corn Soup with Tarragon and Sun-Dried Tomatoes; Blue Crab and Corn Salad; and Grilled Black Sea Bass with a Roasted Corn Salsa.  Each of these dishes was made on the spot, from ideas in my head.  I tried to keep it as simple as possible.  I used recipes only as guides, not really following them.  The measurements are sketchy and even if I made these again, they would probably come out different.  Still, it is an exercise in creativity.


CHILLED CORN SOUP WITH TARRAGON AND SUN DRIED TOMATOES
Serves 4

This is a great chilled soup for the summer.  The key is the colder the soup, the better.  So let it rest in the refrigerator for a couple of hours before serving it.

Ingredients: 
3 cups of corn (about four ears of corn)
4 green onions (white part only), diced
1 small red chile, seeded and diced
Juice from half a lemon
2-3 teaspoons of tarragon, chopped finely
3 cups of milk
1 cup of yogurt
Sun-dried tomatoes for garnish
A few tarragon leaves for garnish

Directions:
1.  Using a serrated knife, carefully cut the kernels off of the cobs and put into a bowl.  In the food processor, add about 1/2 of the corn, the chopped tarragon and the onions.  Blend until smooth.  Add lemon juice and continue blending.

2.  In a separate bowl, add the milk and yogurt, and whisk until smooth.  Add one cup of the blended milk and yogurt to the corn mixture in the food processor, while the processor is running.  Pour the mixture into a clean bowl.  Whisk in the remaining milk and yogurt mixture.  Add the red peppers.  Chill the soup for a couple of hours.  Garnish with sun-dried tomatoes and a few tarragon leaves.


BLUE CRAB AND CORN SALAD
Serves 4

Ingredients:
16 ounces of jumbo lump crab (pasteurized only)
4 ears of corn
Juice from 1 lemon
4 leaves of basil, chopped finely
A handful of sun-dried tomatoes
Salt, to taste
Pepper, to taste

Directions:
1.  Rub the corn with butter, salt and pepper.  You may also add some red pepper flake.  Wrap the corn in foil with two pads of butter.  Heat grill on high.  Placed the wrapped corn on the grill for 5 minutes and turn.  Cook for another two to three minutes.  Remove and let cool.  Using a serrated knife, remove the kernels from the cobs.

2.  Mix the corn, crab, chile, basil, sun dried tomatoes, and lemon juice.  Salt and pepper to taste.


GRILLED CORN-TOMATO SALSA
Serves 4


Ingredients:
4 ears of corn
1 red chile, seeded and diced finely
Juice from 1 lemon
Juice from 1 lime
1 small red onion, diced
2 tomatoes, seeded and diced
1 avocado, pitted and diced
1 small bunch of cilantro, diced
Salt, to taste
Pepper, to taste

Directions: 
1.  Rub the corn with butter, salt and pepper.  You may also add some red pepper flake.  Wrap the corn in foil with two pads of butter.  Heat grill on high.  Placed the wrapped corn on the grill for 5 minutes and turn.  Cook for another two to three minutes.  Remove and let cool.  Using a serrated knife, remove the kernels from the cobs.


2.  Mix the corn, chile, tomato, onion, cilantro, avocado, lemon juice and lime juice.  Salt and pepper to taste.

I served this with grilled black sea bass.

ENJOY!