Sunday, June 30, 2013

Ponderosa's Sweet Vinegar Slaw

As I begin the barbecue season here at the Savage Boleks, I have decided that I would experiment with different types of barbecue.  The first smoke of this season was a Mesquite Smoked Bison Brisket. As I planned this barbecue project, I realized that I have not really made any sides when I barbecue.  So, I took the experimentation a little further, and, I decided to make a side to go with the brisket. The only question was, "what side to make?"

Now, my beautiful Angel can tell you that I have been watching a lot of Barbecue Pitmasters on television.  (I think that I was trying to motivate myself to get the BBQ season moving.)  I was watching various pitmasters do their work, but one of them really impressed me.  The pitmaster is Moe Cason, of Ponderosa Barbecue.  I particularly liked his laid back approach to barbecue, as well as how he prepared the various meats that he was given for the competition.  

So, I did a little research and I came across a recipe from Moe Cason for a sweet vinegar slaw.  I decided that I would make the slaw as a side to the bison brisket.  The slaw was delicious, although, I think that the next time I make it, I will dice the cabbage, carrots and onions a little finer.  I did not cut the cabbage fine enough and I decided to use the peeler to make carrot peelings, which I diced.  My cole slaw tended to be a little on the salad side rather than the slaw side.  I think the next time I will follow the recipe a little closer than I did this time.


PONDEROSA'S SWEET VINEGAR SLAW
Recipe by Moe Cason and available at TLC Cooking
Serves several

Ingredients:
1 head of cabbage, finely chopped
1 sweet onion, finely chopped
1 carrot, finely grated or chopped
1 cup of sugar
1 cup of apple cider vinegar
2 1/4 teaspoons of dry mustard
1 1/2 teaspoon of coarse sea salt
1 1/4 coarse black pepper

Directions:
Mix the ingredients in the pan until the sugar has dissolved.   Add the vegetables and toss until evenly coated.  Refrigerate until cold.

ENJOY!

Friday, June 28, 2013

Mesquite Smoked Bison Brisket

It is always a good thing to challenge yourself.  One of my most recent challenges was to smoke a brisket.  I have smoked a beef brisket in the past.  While smoking a brisket is always a challenge (at least for me), I wanted to up the ante.  I decided that I would smoke a bison brisket.  

The challenge came together as my beautiful Angel and I were returning from a wedding in Lancaster, Pennsylvania.  We were driving down the Interstate, looking for an exit that would take us to a bison farm in Monkton, Maryland.  I had told Clare about this Gunpowder Bison & Trading Company, which is a bison farm where you could watch the bison and buy various cuts of bison meat.  Clare really wanted to see the bison, so we decided to stop at the farm.  I also decided to purchase a bison brisket.  This gave rise to my latest barbecue challenge ... and it was quite the challenge.

Smoking a brisket is difficult enough.  The primary concern is ensuring that that the brisket remains moist throughout the smoking process.  When you use a beef brisket, you at least have a fat cap that can help in that regard.  Bison meat is much leaner than beef, which means I could not rely upon fat to help ensure that the brisket retained its moisture.

I debated about using an injection.  I thought about injecting beef stock, beer or even butter into the brisket to help maintain its moisture.  I have watched many an episode of Barbecue Pitmasters, where pitmasters take large syringe-like injectors and repeatedly poke a piece of meat to insert some liquid.  Ultimately, I decided against an injection.  Instead, I would use a combination of techniques.  First, I would try a wet smoke, using a substantial amount of liquid in the bowl, which would convert to steam and rise to keep the meat moist.  Second, I decided to wrap the meat after a couple of hours of cooking.  I realized that wrapping the meat would affect the bark that otherwise would develop.  In the end, the choice between bark and moisture, I chose the moisture.  Finally, I decided to cook the bison brisket for 2/3 of the time that I would ordinarily cook a beef brisket.  This would help prevent the brisket from drying out.

Finally, I decided to use mesquite wood for the smoking.  Mesquite is a wood that is traditionally used to smoke briskets, particularly in Texas. 

In the end, I think this challenge went well.  The brisket was moist, although a longer cooking time could have helped to make the brisket a little more tender.  The salt and pepper was just the right seasoning, and, I had just enough mesquite smoke to flavor the brisket.  This brisket was not perfect, but it was definitely a great start.  I will definitely be making this recipe again and I will update this recipe accordingly.  


MESQUITE SMOKED BISON BRISKET
A Chef Bolek Original
Serves many

Ingredients:
1 bison brisket (about 3 pounds)
Kosher salt
Freshly ground black pepper
Mesquite wood
8 cups of water
3 bottles of beer (such as Shiner Bock)

Directions:
1.  Prepare the brisket.  Trim and prepare the brisket.  Season the brisket liberally with Kosher salt and freshly ground black pepper.  Make sure all sides of the brisket are seasoned.  Wrap the brisket in plastric wrap and refrigerate it overnight.

2.  Prepare the smoker.  Prepare a chimney and light it.  Once the coals are ready, add them to the smoker.  Add the water and beer to the liquid bowl and place that over the fire. Bring the temperature up to 200 to 225 degrees Fahrenheit.  If the temperature exceeds 225 degrees, bring the temperature down to that level. 

3.  Smoke the brisket.  Place the brisket in the smoker, fat side up.  Smoke the brisket for about 2/3 of the time that you would ordinarily smoke a beef brisket (one hour per pound instead of an hour and a half per pound).  After about two hours, wrap the brisket in foil.  Smoke the brisket for about another hour.  For a beef brisket, you want to reach a temperature of at least 180 degrees.  For a bison brisket, I pulled it out once the temperature reached about 160 degrees. 

4.  Finish the dish. Remove the brisket from the smoker and allow it to sit for at least twenty minutes.  Slice and serve immediately. 

A smoked brisket, whether beef or bison, always calls for a nice beer.  I would serve this brisket with the remainder of the six pack of Shiner Bock that I bought to smoke the meat.  

ENJOY!

Tuesday, June 25, 2013

The Real Ale in Bar Harbor

One of the things that I like to do when I travel is to check out the local craft beer scene.  When my beautiful Angel, Clare, and I traveled to Bar Harbor, Maine for a vacation, we decided to check out the local beer scene.  That scene is dominated primarily by one craft brewer ... Atlantic Brewing Company.  On one afternoon, we paid a visit to the brewery.  We skipped the tour because we have done enough tours.  Rather, we wanted to try the beer. 

One of the beers that we both really liked was Atlantic Brewing Company's Real Ale.  The "Real Ale" is really an American Brown Ale.  The Beer Judge Certification Program has defined the American Brown Ale style very broadly, such as having a light to dark brown color.  That includes a lot of different shades of brown.  The aroma is sweet, malty and rich, with a focus on the malts more than the hops.  The hops make their presence more in the flavor, with a light to moderate hop flavor that is combined with a strong malt flavor.  That malt flavor could be a combination of chocolate, caramel and/or toasty flavors.  

According to the brewers, they created the recipe for this American Brown Ale while brewing with their mentor in a friend's garage in Montreal, Canada.  Their objective was to create a beer that is, in their words, "smooth and easy-drinking, yet still retained an assertive body to set it apart."  The brewers use Wye Golding and Pilgrim hops, along with Pale, Crystal and Black Patent malts.  They also use a Nottingham yeast.   The brewers describe the result as a "beer with nice caramel tones and a balance of the malt and hop profiles." 

The Real Ale pours a dark brown in color, with a very thick, somewhat cream colored foam.  It took a little time for that foam to recede, but, as it  did, an aroma of nuts, toast, and chocolate greet the nose.  Each sip was full of malt flavors, providing a sweet, somewhat bready taste, with a light roast and toast.  The balance of the beer gravitated more toward the malts than the hops, but overall, it was very good. 

We purchased the Real Ale at the brewery, but I have seen it in some beer stores.  If you happen to be at the brewery, it is definitely worth a try, along with the Mainely Meat BBQ!

ENJOY!

Sunday, June 23, 2013

A Malaysian BBQ Wine Pairing

One of the greatest things about a wine club, apart from the fun time spent with great friends, are the challenges.  Very rarely are challenges expressly stated.  They are often implied.  For example, when the host couple decides to prepare a Malaysian BBQ dinner, it creates a challenge for the couple who is tasked with pairing wines to each course.  That challenge was presented to my beautiful Angel and myself.  

To add to the challenge, I did not have as much time as I would have liked to research each potential pairing.  With our newest arrival, I have not had nearly as much time to cook, work on the blog or just read about food.  (This is not a complaint, because I love our new son and enjoy every moment that I have with him and Clare.)  Still, with less time to prepare, it required a little more faith and gut-checking when it came to the selection of the wine.  I was able to come to a rather quick decision on the wine styles and/or grapes, but the actual choice of wines would prove a little more difficult.

Familia Pisano - Río de los Pájaros Torrontés Reserve (2012)
Paired with Grilled Turmeric and Lemongrass Chicken Wings

For the first course, the host couple prepared Grilled Turmeric and Lemongrass Chicken Wings.  As I reviewed the recipe, I immediately focused upon the ingredients that would need to considered when it came to the pairing.  Ingredients like turmeric, lemongrass, fish sauce, lime juice and ginger.

I immediately began to think that a white wine would seem to be particularly appropriate, given the citrus flavors, the turmeric and the chicken.  A fruity wine, like a Pinot Grigio or a Vinho Verde, would not stand up to the earthiness of the turmeric or the fish sauce.  A smoother white wine was needed.  I originally thought of a Viognier, which has been served at quite a few wine club dinners in the past. 

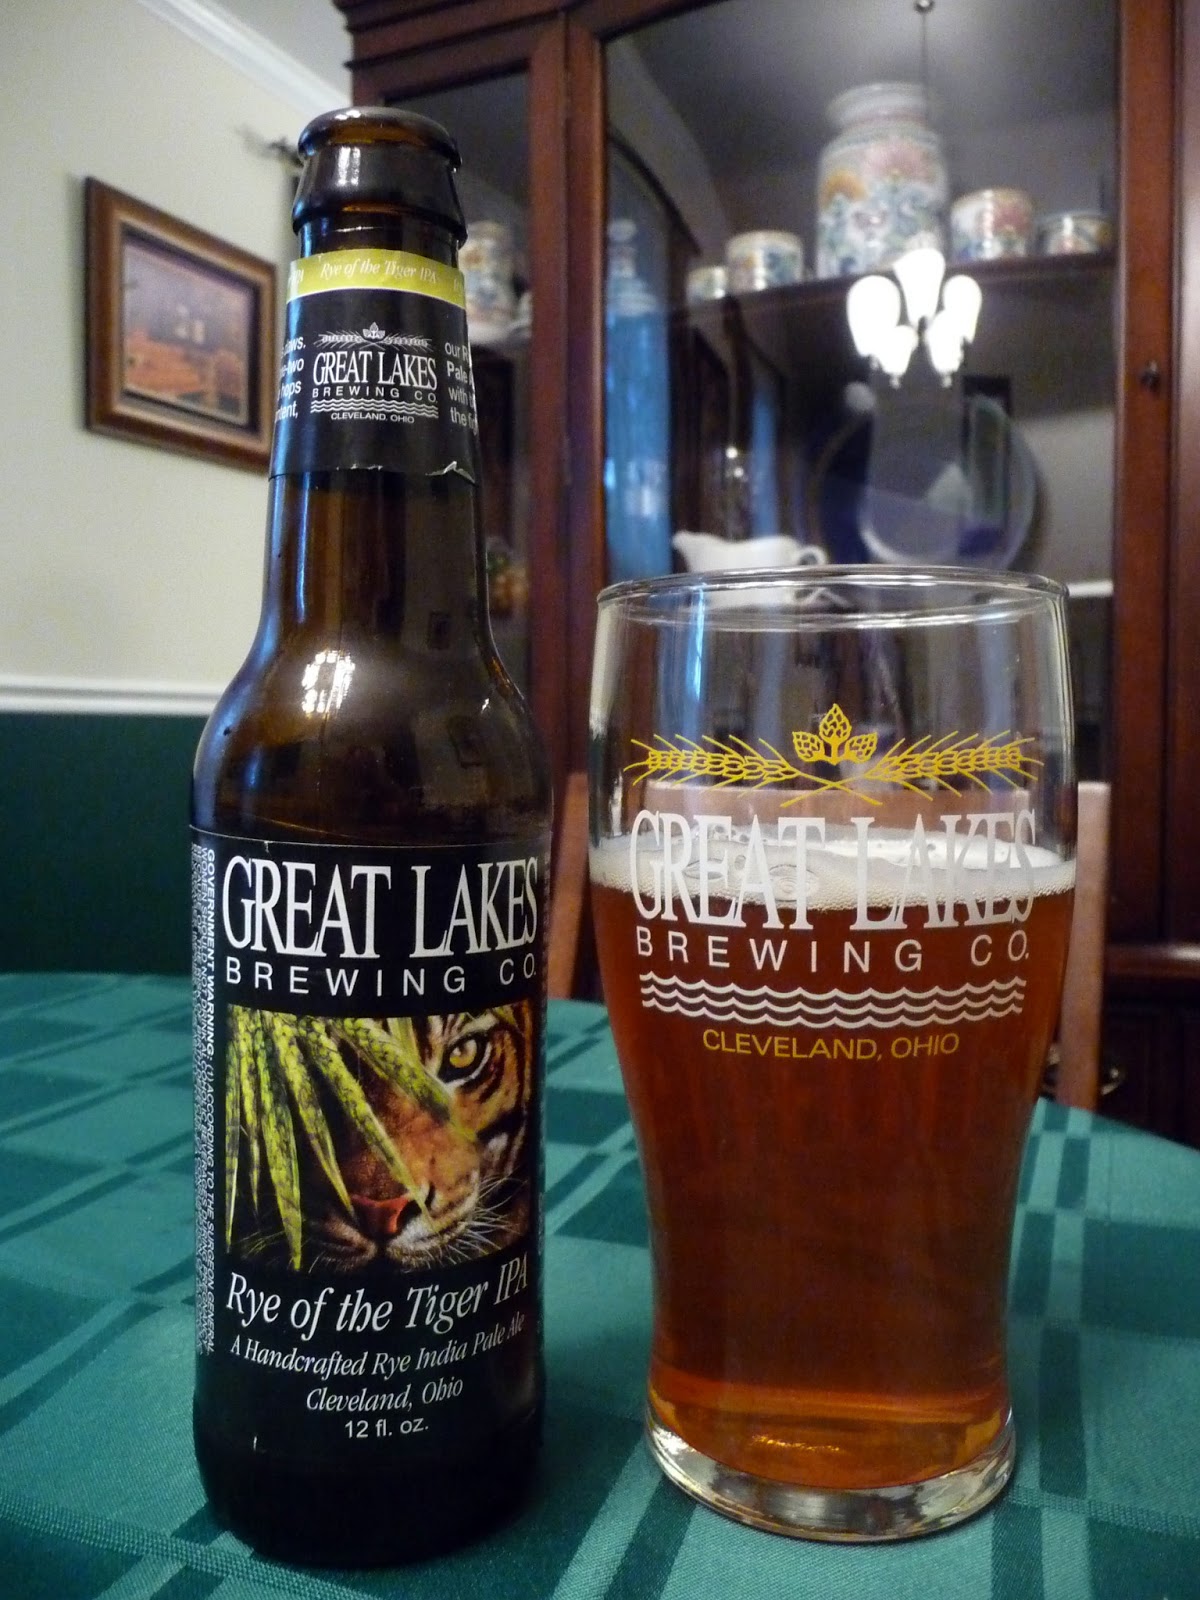
However, as I stood in the wine store, none of the Viognier wines caught my eye.  Instead, a different wine caught my attention.  Actually, it was the winemaker who caught my attention ... Familia Pisano.  I was staring at their Río de los Pájaros Torrontés Reserve (2012).  I have previously tried the Pisano Cabernet Sauvignon (2009), which is a very good wine.  I also have a bottle of the Tannat sitting in my wine cage for the right time.  So, I decided to go with the Torrontés as the pairing for the first course.

The Torrontés is a white grape varietal that is principally grown in Argentina, although it can also be found in Chile and, in the case of the Familia Pisano, from the "River of the Painted Birds" or Uruguay as it is known in the native language of the Guarani, Uruguay's native inhabitants.  The Pisano family can trace their winemaking history back to 1870, when their great grandfather emigrated to Uruguay from Italy.  The vineyards and winery passed down the generations to three brothers -- Daniel, Eduardo and Gustavo Pisano-Arretxea.

This wine comes from their the Río de los Pájaros selections, which includes the Cabernet Sauvignon and the Tannat.  This particular Río de los Pájaros is produced with 100% Torrontés.  The wine pours a clear golden color, and had an aroma of citrus (such as lemon or lime), with a floral element.  The taste of the was was principally peach and citrus flavors, although there was a slight hint of honey and minerality in the background.

This wine was a great start to the evening because it paired very well with the delicious marinade used to make the chicken wings.  It was also my favorite wine of the night.

McManis Family Vineyards - Pinot Noir (2010)
Paired with Steak Skewers with Scallion Dipping Sauce and 
Grilled Shrimp with Chile, Cilantro and Lime

The second course actually consists of two completely different courses.  One course, for the carnivores in the group, is Steak Skewers with Scallion Dipping Sauce.  The steak is marinated in among other things, fish sauce, lime juice, Thai chiles, lemongrass and ginger.  These are some potent flavors, both in terms of taste and heat.  The other course is grilled shrimp with chiles (long red chiles), cilantro and lime.

The wine for this course has to be able to reach across both red meat and seafood.  This is a fairly difficult task for most red wines, because they can be somewhat difficult to pair with seafood.  There is one wine, however, that can bridge that gap between land and water with relative ease ... a Pinot Noir.  The only question is which one.  Although a real pain to cultivate, there are several very good countries and regions around the world that produce some very good Pinot Noir wines.  Countries like France, and regions like the Willamette Valley in Oregon. 

However, we are working with a budget, which eliminates almost all of the good French Pinot Noirs and all of the Oregonian wines.  As I stood in the wine store contemplating my options, I saw a wine from a vineyard that both Clare and I really like.  The vineyard is the McManis Family Vineyards.  We are very big fans of the Petit Sirah, but that wine would probably be too forward for this dish, especially with respect to the shrimp.  We did see a bottle of the McManis Pinot Noir, which I have never had before.  So, we chose that wine to pair with the second course.

This particular wine is produced in California, which, from my experience, makes Pinot Noirs that are a less earthy and spicy than the wines from Oregon.  Californian Pinot Noirs then to be a little more fruit forward than their Oregonian counterparts.  That fruitiness was what I was looking for with respect to the pairing. 

The 2010 vintage, according to the winemakers provides a garnet color.  I was a little concerned about the color, looking at the wine in the bottle. However, my concerns were laid to rest.  The color is definitely a nice shade of red.  The wine did have aromas of fresh berry fruit, particularly raspberry with perhaps some strawberry.  The winemakers also suggest that there is a "subtle waft" of vanilla from the aging of the wine for six months in French oak barrels.  I sensed a little of the oak, but the fruit was definitely the principal aromatic element in the wine (as it should be).  The taste of the 2010 Pinot Noir was just as the winemakers described it: "mouth-watering cherry flavors" with "creamy mocha" lingering on the finish.  The oak aging was also present in the background of the wine, although it was not very noticeable.

Overall, we thought this wine would be a little lighter than the Oregonian type of Pinot Noir and a little more fruit forward with few to no tannins.  We were correct, as it paired very well with both the shrimp and the meat, as well as tame the heat from the Thai chiles and red peppers.

Marques de Monistrol - Seleccion Especial Cava
Malaysian Banana Pancakes with Sweet Corn Ice Cream

For the third and final course, the host couple made Malaysian Banana Pancakes with Sweet Corn Ice Cream.  This course was perhaps the hardest one to pair.  What wine goes with Banana Pancakes?  My thoughts instantly turned to dessert wines, but I could not really decide which dessert wine would be the best pairing for this course.  I was also concerned that the wines may be too sweet, which may be a little too much when one considers the flavors of the banana and the ice cream.  I had to change my thought process if I was going to decide upon a wine for the last course.   

Ultimately, the thought process was as follows.  Pancakes could be served as part of a brunch.  Mimosas are often served at brunch.  Mimosas are made with Champagne or sparkling wine.  Cava is a sparking wine produced in the Catalunya region of Spain using the methode Champenoise.  As I perused the offering of Cava wines at the store, I came across the Marqués de Monistrol Cava, which I thought would work well for the final course of the Malaysian BBQ dinner.

Like the Familia Pisano, Marqués de Monistrol can trace its history back to the nineteenth century, when its winemaking operations were first established at a property in San Sadurni d’Anoia in 1882, which is located in the heart of Penedès.  This is right in the middle of the Cava region.

Cava wines are principally made with three varietals ... Macabeo, Xarel-lo and Parellada, although the rules allow winemakers to use a fourth grape -- Chardonnay -- in the production of the wine.  The Marqués de Monistrol is made with three standard grapes (Macabeo, Xarel-lo, and Parellada).

The Marqués de Monistrol Cava has a bright straw color when poured.  The aromas included apples, fresh herbs, and even a little pear.  As I tasted the wine, it was like a basket of fresh apples in every sip.  While I could not identify the exact apple, that taste element was very good and, with the carbonation, very refreshing.  There finish on the wine was a little dry, as expected.

The apples in the flavor of this Cava seemed to work very well with the flavors of the banana pancake and balanced out the sweetness in the ice cream.  This winwine has been described as having a bright straw colour, fresh aromas of herbs and apples and a full and long on the finish with a fine mousse.  A mousse finish seems appropriate for banana pancakes.

*    *     *

In the end, I think all three the pairings worked out well. I was particularly pleased with the first and second pairings, but the third pairing effectively worked too.  I have to give myself a little leeway with the third one because it is a little hard to pair wines to banana pancakes and sweet corn ice cream.  The most important thing is that everyone had a great time.  The food was amazing and the wines were very good as well.  Until next time ...

ENJOY!

Friday, June 21, 2013

Tuscan Turkey Thighs

There is something about Tuscan cooking that seems to appeal to many a chef or home cook.  When I see a recipe that includes the word "Tuscan," I give it a serious look and consideration.  That is what happened when I came across a recipe in the New York Times entitled "Tuscan Turkey Thighs."

But, what makes those turkey thighs ... "Tuscan."  Is it a particular ingredient?  Is it the method of preparation?  

As it turns out, it is Tuscan because it comes from a Tuscan chef.  The author who provided the recipe to the New York Times, Judith Liebman, visited the Villa Delia culinary school in Ripoli di Lari, a town in Tuscany.  The resident chef and instructor, Marietta Menghi, taught Liebman and the other students a recipe for turkey thighs.  Liebman took notes and re-constructed the recipe for those of us who do not have the good fortune to be Chef Menghi's pupils. 

Judith Liebman also provides some hints.  For example, she notes that she uses a food processor to chop the sage and garlic.  She also adds other vegetables, such as carrots and fennel.  If those vegetables are done before the turkey, Liebman recommends removing the vegetables and keeping them warm while the turkey continues to cook.  

I did not have any problems with cooking times.  My only difficulty was getting crispy skin.  The picture that accompanied the recipe in the New York Times showed a nice turkey thigh with brown, crispy skin.  I cooked the thigh for the recommended times, but the skin just did not crisp up.  When I make this recipe again, I think I will have to make some modifications to the method to get that crispy skin.  Perhaps searing the thigh, skin down in a pan before placing it in an oven (with a modification to the cooking time) or finishing the thigh skin up under the broiler.   That, of course, will be another post....


TUSCAN TURKEY THIGHS
An adaptation of a recipe by Marietta Menghi, as recorded by 
Judith Liebman and as printed in the New York Times


Ingredients:
1 turkey thigh, about 1½ pounds total
2-3 cloves of garlic, chopped
1/2 bunch of sage, chopped
2 potatoes, peeled and chopped into large pieces
2-4 carrots, peeled and chopped into large pieces
Sprinkle of white wine vinegar
Sprinkle of olive oil
Broth, if needed while cooking

Directions:
1.  Marinate the turkey thigh.  Cut deep slits into turkey thigh and rub sage and garlic mixture into cuts and onto surface. Marinate in refrigerator for 5 or 6 hours. 

2.  Roast the turkey thigh.  Remove thigh from refrigerator about 30 minutes before cooking. Preheat oven to 400 degrees. Put thigh skin side down in roasting pan. Put pan, uncovered, into oven for about 30 minutes. 

3.  Add the vegetables.  Then turn thighs over, add potatoes and vegetables, sprinkle all with salt, pepper, white wine vinegar, olive oil, and broth and continue roasting until thighs are done and potatoes are tender, adding broth if needed, about 30 more minutes. Stir the potatoes once or twice during roasting. 

4.  Let the thigh rest.  Remove from oven, let the thigh, potatoes and vegetables sit covered and untouched for about 20 minutes before serving.

As with most "Tuscan" recipes, you should consider a Tuscan wine.  Chianti is perhaps the best known, but look for some other lesser known wines, such as a Vino Nobile di Montepulciano or a Rosso di Montalcino.

ENJOY!

Tuesday, June 18, 2013

The "Rye" of the Tiger

Rye.  It is a maligned grain.  Pliny the Elder once referred to rye as "a very poor food" that "only serves to avert starvation." Although grown in the wild in Anatolia and domestically by the Romans in a few hinterlands, rye nearly disappeared from the archaeological record for quite a while.  It reappeared in the Middle Ages, when farmers began to cultivate the grain in Central and Northern Europe.  Once harvested, people found a variety of uses for the grain, from bread to whiskey.

It would only be a matter of time until someone would try to brew beer with rye.  The "someone" was the Bavarians, who began to use rye in the Middle Ages to produce "Roggenbier" or a "Rye Beer."  However, a few bad harvests led to the decision that rye should be used to make bread rather than beer.  Then there was the Reinheitsgebot, or the Bavarian purity law.  That law declared that beer could be made only with barley, water, yeast, and hops, and rye nearly disappeared from the beer-making scene.  And that absence lasted for centuries.

More recently, craft brewers have revived the use of rye to produce beers.  One such brewer is Great Lakes Brewing Company, which incorporated rye malts in the production of a rye India Pale Ale that they called, the "Rye of the Tiger IPA."  Puns aside, brewers use rye with a purpose.  The grain provides a grainy, somewhat spicy flavor that contributes to the complexity of a beer. 

This spicy character is what Great Lakes sought to provide to the Rye of the Tiger.  It is all in the label: "[t]his kitty has claws.  Named for its one-two punch of fierce hops and sharp rye content, our Rye of the Tiger Pale Ale is a thrilling ale with bit, handcrafted for the fighter in all of us."  The brewers also describe the beer has being full bodied and loaded with hops, with the rye malt "adding a spicy complexity to every sip."

Great Lakes produces the Rye of the Tiger with four malts and three hops. The brewers use Harrington 2-Row Base Malt, Crystal 45, Biscuit and, of course, Rye malts.  They also use Columbus, Simcoe and Warrior hops. 

The Rye of the Tiger looks like any IPA, pouring an orange color with a light, off-white foam.  The aroma of this beer clearly suggests the hops, and, the contribution of the rye is a little difficult to sense.  There is some rye aroma, along with some grass or grain elements, but the hops clearly predominate.  The hops also prevail in the taste, with a combination of piny and citrusy elements at the forefront.  There is a malty background to the beer, and, in that malt one could get that spicy, grainy flavor from the rye.  The rye is definitely more present in the taste than the aroma.

When  it comes to pairing this beer, the brewers suggest fried chicken, milder blue cheeses and spiced desserts.  I think that this beer could generally be paired like any India Pale Ale, including grilled dishes like grilled steak, turkey or hamburgers.

A six pack of this beer runs about $9.99.  If you are interested in trying a different IPA, then this beer is definitely one to consider.

ENJOY!

Sunday, June 16, 2013

Turkish Sirloin

Steak Nights are more than opportunities to cook steak; rather, they provide chances for me to be adventurous and creative. On this particular occasion, I decided to make a steak rub based upon spices that help define a particular cuisine.  I did this once before, but it was not a steak dish.  I made a Turkish-Spiced Rockfish.  I decided to take that idea and apply it to steak, making a Turkish Sirloin.

Making a steak rub based upon spices that define Turkish cuisine presented some problems for me.  I am neither Turkish nor an expert on Turkish cuisine.  My only qualification  is my love of Turkish food.  Given a lack of first-hand experience, I had to do some research into the spices that provide Turkish food with its unique character and flavors. This meant that I would have to rely upon the Internet, and, therefore, have to double-check everything for its veracity.

My research led me to select five spices from the wide array of ingredients used by Turkish chefs and home cooks.  The five spices are:

(1) Oregano: This herb or spice is found throughout the Aegean Sea, leaving its mark on both Greek and Turkish cuisine.  It provides a warm, slightly bitter taste and contributes to the aroma of the rub.  

(2) Paprika: This is the Turkish sweet red pepper powder that, by its name, provides a little sweetness to offset the bitterness from the other ingredients.  It also provides the rub with a bright red color.

(3) Cumin: The Turks call it kimyon, and this spice is often used in meat dishes.  Cumin provides a very strong earthiness and a small amount goes much further than other spices, such as oregano.

(4) Aleppo pepper: Turkish cuisine uses a lot of different peppers to spice the dishes.  Aleppo pepper is grown in both Turkey and Syria.  It is the principal source of heat for this rub.  

(5) Sumac: Ordinarily, sumac is used by Turkish chefs and home cooks as a garnish.  However, I wanted to use its burgundy hues to give the rub a darker color, and, I wanted its tangy, citrusy flavor to provide some depth and complexity to the rub.

I think that these spices make a wonderful rub for steaks.  The rub is not too spicy, but it is full of flavor.  I think that I can mark this as one of my more successful, creative endeavors!


TURKISH SPICED SIRLOIN
A Chef Bolek Original
Serves 2-3

Ingredients:
1 grass-fed sirloin, about 1 pound
1/2 teaspoon of paprika
1/2 teaspoon of sumac powder
1/2 teaspoon of Aleppo powder
1/4 teaspoon of cumin
1/4 teaspoon of oregano
1/2 teaspoon of salt
1/4 teaspoon of freshly ground black pepper
1/4 cup of canola oil

Directions:
1.  Marinate the steak.  Combine all of the ingredients in a Ziploc bag.  Add the steak and work the marinade around the steak.  Seal the bag and allow the steak to marinate for at least one half hour to overnight.  

2.  Grill or broil the steak.  Grill the steak on medium high heat or under the broiler for about four minutes per side, rotating the steak ninety degrees after a couple of minutes and then flip and repeat. 

Now, if only I could get my hands on a red wine from one of the vineyards in the Marmara or Aegean regions of Turkey.  If you are like me and do not have access to any of those wines, I good Californian Syrah or Chilean Carmenere would probably pair well this dish.

ENJOY!

Monday, June 10, 2013

Privé Vineyard Le Sud (2008)

Recently, I opened a bottle of Pinot Noir wine and noticed a saying on the cork.  "Le vin fait a la main."  This saying translates literally as "wine made by hand" or "handmade wine."  Those words got me to thinking about the hands of the individuals who are responsible for this particular wine ... the Le Sud Pinot Noir (2008) from Privé Vineyard.  I got to thinking about the hands of those who cultivated the Pinot Noir vines, picked the grapes, fermented the juice, and ultimately bottled this particular wine.

Fortunately, I know whose hands are involved in the making of Privé Vineyard's wines.  They are the hands of husband and wine, Mark and Tina Hammond.  They are also the proprietors of the family-owned vineyard and winery in Willamette Valley, Oregon.  Privé Vineyard is located on Chehalem Mountain, which can be found within the Chehalem Mountain American Viticultural Area ("AVA").  It is also located within the Ribbon Ridge AVA, which is the smallest AVA in the State of Oregon.  

Coincidentally, Privé Vineyard is perhaps one of the smallest vineyards in the State of Oregon.   It has only about two or three acres of Pinot Noir vines.  Those acres are divided into two vineyards, which are like the front yard and backyard of the Hammond's property.  The vineyards are dubbed Le Nord and Le Sud.  The Le Nord is at a higher elevation, while the Le Sud is at a lower elevation. The vines growing in both vineyards are about twenty-two years old, and, they produce Pommard (Burgundian) clones. Pommard clones, such as the UCD4 Pommard, are known for producing wines with a velvety texture along with a little spice.  These grapes are also stand-alone grapes, capable of producing wines without having to be blended with other grape varietals.  In the case of Privé Vineyard, the Hammonds use their Pommard clone to produce Pinot Noir in the French style. And, those Pinot Noir wines are among the best wines that Clare and I have had the fortune of trying.

I have previously reviewed two vintages of Privé Vineyard's Le Nord.  They were the 2006 and 2008 vintages of Le Nord. Those wines were produced exclusively with the Pinot Noir grapes from the Le Nord vineyard.  This represents my first opportunity to review a bottle of the Le Sud (2008).

The Le Sud pours a crimson color, with purplish tones showing through depending upon the light.  The wine reveals aromas of dark red berries, like dark cherries or blackberries.  A little oak can be found lingering around the edges of the aroma, reminding the drinker of the fact that the wine is aged in all new French oak barrels. 

As for the taste, the Le Sud is full of fruit, such as those dark cherries. As I continued to enjoy this wine, I began to pick up on different types of fruit.  To be sure, there was the dark cherries, but, as time went on, there was a sense of strawberry in the background.  As more fruit seemed to be added into the mix, it was all well tied together by a hint of black pepper or spice. There was also a hint of minerality, although I could not exactly pinpoint the exact flavor.  Taken together, the fruit with the spice (and that minerality or earthy component), came together for one of the best Pinot Noir wines that I've tasted in a long time (probably since the last time Clare and I enjoyed the Le Nord).

This wine is very food friendly.  The Le Sud pairs easily with grilled or broiled chicken dishes, roast pork dishes, and, of course, seafood dishes, including but not limited to almost any preparation of salmon.  I paired the Le Sud with a Copper River Salmon dish served with an orange-saffron sauce.  The wine worked extremely well with the dish, although I found myself not drinking much of the wine during the dinner.  Instead, I was saving the wine to enjoy by itself after the meal. 

The estate grown wines of Privé Vineyard are very limited.  Only about three hundred cases of the Le Nord and Le Sud are produced annually.  Nevertheless, these wines are worth the effort of trying to obtain them.  When they are available, they can be purchased by contacting Privé Vineyard.

ENJOY!

Sunday, June 9, 2013

Three Bean Dal

The dal is an important part of the cuisine in Southern Asia.  A dal is a preparation of different types of legumes (such as lentils, peas or beans, that is often made in the form of a stew.  The stew is often served with rice and different vegetables.  A variety of dals an be found in cuisines of Bangladish, India, Nepal, Pakistan and Sri Lanka.

Dal dishes serve an important function in the cuisine of each of these countries.  Many of the people in countries eat vegetarian diets, whether by necessity (because they don't have access to meat or cannot afford to buy it) or by choice.  Whatever benefits a vegetarian diet may have, it has one significant drawback ... a lack of protein.  This is where the dal plays an important role.  The legumes, such as lentils or beans, are full of protein.  And, while they may not pack as much protein as a chicken thigh or a pork chop, they nevertheless provide an important source of protein for the daily diet of millions, if not billions of people.

This recipe comes from Chef Vikram Sunderam, the executive chef at Rasika, which is a restaurant in the Washington, D.C. metropolitan area.  The name Rasika is derived from the Sanskrit word for "spices."  Chef Sunderam's dal recipe definitely includes spices -- jalapeno, cumin, cayenne pepper, ginger and garlic.  I made only two change to this recipe.  First, I used canned beans rather than rehydrating dry beans.  I just did not have the time to rehydrate the beans.  Second, instead of using yellow split peas, because I did not have any handy, I used a can of great northern beans.  Another substitute could be canellini beans. Notwithstanding these substitutions, this dish turned out very well.


THREE BEAN DAL
Recipe adapted from one by Vikram Sunderam
and available at Food & Wine 
Serves 4 to 6


Ingredients:
1 15-ounce can of canellini or great northern beans
1 15-ounce can of chickpeas, drained and rinsed
1 15-ounce can of red kidney beans, drained and rinsed
3 tablespoons of canola oil
2 tablespoons of fresh ginger, minced
1 jalapeno, seeded and minced
2 large garlic cloves, minced
1 teaspoon cumin seeds
1/2 teaspoon cayenne pepper
2 tablespoons of unsalted butter
3/4 cup heavy cream
1/2 cup water


Directions:
1.  Begin the dal.  In a large, deep skillet, heat the oil.  Add the ginger, garlic, jalapeno, cumin adn cayenne and cook over moderate heat until softened about 6 minutes.

2.  Add the tomato.  Add the tomato and tomato paste.  Cook until the tomato is slightly broken down, about 5 minutes.

3.  Add the liquid and the beans.  Add the cream, butter and water. Bring to a boil.  Stir in the beans and chickpeas.  Season with salt.  Simmer over low heat until thickened, about 15 minutes.

You can serve this dal with basmati rice and naan.

ENJOY!

Friday, June 7, 2013

A Freudian Slip

The year was 1901 and pen was put to paper.  The writer was recording and analyzing a substantial number of what seemed to be trivial, bizarre, or nonsensical errors and slips.  An intended word spoken.  A thought substituted with a completely different one.  The writer was puzzled by the origin of those mistakes and made it his goal to analyze how those errors occurred.  The result was Sigmund Freund's The Psychopathy of Everyday Life.  It is also the origin of what would be come known as "Freudian slips."

A "Freudian slip" is described as an error in speech, memory or conduct that occurs because of some unconscious, subdued wish, conflict, or train of thought guided by the super-ego and the rules of correct behavior.  More than a century later, it is also the description of a barleywine produced by Evil Twin Brewing.  And, the mind behind Evil Twin is Jeppe Jarnit-Bjergsø, who is the brother of Mikkel Borg Bergsø, the brewer of Mikkeller fame.

Like his brother, Jeppe Jarnit-Bjergsø is what is commonly referred to as a "gypsy brewer."  He does not have his own brick and mortar brewery.   Instead, he travels from brewery to brewery, utilizing their equipment to produce his beers. 

For the Freudian Slip, Bjergsø found himself at Westbrook Brewing, in Mount Pleasant, South Carolina.  The Freudian Slip is a barleywine and, according to what I could find, it is often classified as an American barleywine.  The American style tends to place greater emphasis on hops in both the aroma and flavor of the beer.  By contrast, an English barleywine is much more malt-centric, relying upon bready or biscuity elements of different malts to enhance the aroma and flavor.

For me, the Freudian Slip seemed to swing back and forth between the English style than the American style.   Before I explain why, I should note that the Freudian Slip poured like both barleywines, a dark amber color with a nice, thick, off-white foam.  The aroma of the beer does suggest hops, which swings the pendulum toward the American style, but there is also a traditional, malty aroma as well, which swings back toward the English style.  A nice caramel, sugar aromatic element wraps both hop and malt aromas together.  As for the taste, this beer definitely has a boozy element front and center.  (After all, it has an ABV of 10.3%.)  There are also dark caramel and toffee elements in the flavor of the beer, which are joined by some dark fruits, like raisins or prunes.  As for hops and malts, the barleywine provides an even balance between the two in the taste of the beer.  With some sips, I could sense the hops used to produce the beer, while in other sips, the bready flavors of the malts shone through. 

I have tried many American and English barleywines, and, in my mind, this is one of a few that is able to bridge between the two styles.  It is available in large twenty-two ounce bottles.  It sells for about $14.99 a bottle.  

ENJOY!

Monday, June 3, 2013

An Eschatological Ale

Somewhere, there is a department that deals with four things ... death, judgment, heaven and hell.  If it were a department of a university, it might have had a list of professors, thinkers or writers that include Saint Augustine, who first conceived of the City of God; Ibn al-Nafis, an Arab physician who first described the pulmonary circulation of blood; Albert Camus, who wrote The Stranger, and José Guilherme Merquior, a Brazilian academic who wrote about the history of ideas.  All of these very different individuals dealt with eschatology -- those four things -- at some point in their works.

But what if eschatology was not a matter of thought, but of substance.  A substance like a liquid.  A liquid such as a beer.  An Eschalological Ale.  That is the idea of the brewer behind Stillwater Artisinal Ales.  A brewer without a brewery, Stillwater travels to other brewers, borrows their equipment (presumably for a fee) and brews its own beers.

The Eschatological Ale pours a golden in color, as if it is a saison or Belgian pale. The most suprising aspect of this beer comes right out of the bottle ... a large amount of foam.  Indeed, it took quite a while to be able to pour the glass as shown above.  The foam eventually recedes, leaving big puffy clouds on the surface of the beer.  Clouds that resemble some of the large puffy clouds in the sky as this post is being written.

As for the aroma and taste, the Eschatological Ale presents some of the best features of a Belgian beer.  The aromatics, for example, exhibit yeast, some sweet malts and a little, light citrus wrapped in a light biscut-like aroma.  The taste also reflects these aromatics, along with a slight sweetness and a little spice from something like white pepper.  There is a citrus flavor that somewhat resembles grapefruit.  Other fruit are also present, like peaches, grapes and applies.  There is the alcohol from the 9.0% ABV hides in the background, but it slowly becomes more noticealbe with each sip.

Overall, this beer is very good.  I found it at a local grocery store for about $11.99 for a twenty-two ounce bottle.

ENJOY!

Saturday, June 1, 2013

Flounder en Papillote

Two words -- en papillote or al cartoccio -- provide, at least for me, one of the most interesting and tasty ways to prepare fish.  It is a method baking fish in small paper parcels or packet of parchment paper or aluminum foil.  The paper or foil is folded, and the fish is inserted along with some vegetables, spices and aromatics.  A little liquid -- whether stock, wine or even beer -- is also added, which allows for the fish to be steamed and helps keep the fish moist during the cooking process. The process seems relatively straightforward, but the key is making sure that the packet is completely sealed when it goes into the oven.  This ensures that the fish cooks properly.

The history of this cooking method is something that has always intrigued me.  It is most commonly referred to as en papilotte or al cartoccio, which would suggest that the method originated in Western Europe.  To be sure, it has been used by cooks and chefs in France and Italy since at least the 17th century.  However, it has also been used by cooks and chefs around the world.  In Latin America, cooks and chefs use corn husks or plantain leaves.  In Malaysia and Indonesia, they use banana leaves.  It is water lotus leaves in China.  Regardless of what is used, the method of cooking is the same.  For this recipe, I did not have any access plantain leaves or water lotus leaves, so I decided to use parchment paper. 

With respect to what would be steamed, I decided to use flounder fillets.  I have not cooked very much with this fish and I thought it would be a good opportunity to gain some more experience.  Flounder is a flatfish species, that live on the sea floor, usually around bridge piles, docks, coral reefs and other formations.  When it comes to sustainability, flounder is one of those fish that can be difficult to monitor.  There are several different types of flounder -- such as Pacific Flounder, Summer Flounder, Yellowtail Flounder and Witch Flounder -- and, in most stores, the differentiation is not noted on any labels.  They are all sold as "flounder."  Therefore, when it comes to buying flounder, it is important to focus on where it was caught.  Generally speaking, flounder in the bay of Maine or the Northern Atlantic are considered to be threatened, as are flounder caught around Iceland.  Flounder caught in the mid-Atlantic or the Pacific Ocean are generally considered to be better alternatives, at least according to Seafood Watch.

After choosing the cooking method and the fish, I had to select the ingredients to use in the baking and steaming process.  I decided to buy whole flounder, and, use the heads and backbones to make a stock.  This stock would be the liquid that would steam the fish.  I also found a recipe that called for the fish to be steamed with oregano, fennel, tomatoes and black olives, which gave this dish a definite Mediterranean flavor.    I found this recipe on a website called Figs, Bay & Wine.  I bought everything, but forgot the fennel bulb called for in the recipe.  I decided to substitute a teaspoon of fennel seeds, which are obviously not the same as fresh fennel, but worked in this case. 


FLOUNDER EN PAPILLOTE
Recipe adapted from Figs, Bay & Wine
Serves 2

Ingredients:
2 large flounders, filleted, with heads and backbones reserved
1 onion, peeled and quartered
3 carrots, peeled
3 stalks of celery, with leaves
1 tablespoon of whole black peppercorns
1 teaspoon of fennel seeds
Extra virgin olive oil
Kosher salt
Freshly ground black pepper
Leaves from 1 or 2 stems of fresh oregano
2 lemons, sliced thinly across into circles
4 tablespoons of flounder stock (see below)
1 pint cherry tomatoes
A handful good olives

Directions:
1.  Prepare the flounder stock. Place the heads and backbones in a pot and cover with water.  Add the onion, carrots, celery and black peppercorns.  Bring to a boil.  Allow for a light to moderate boil for about one hour.  Strain and set aside the flounder stock.

2.  Prepare the packets of fish.  Preheat the oven to 350 degrees Fahrenheit.  Cut two lengths of baking parchment, each about 18 inches in length or as long as needed to have enough room for the fish and vegetables, plus extra for folding. Fold each length in half with a sharp crease. Arrange on one or two baking sheets.  Rinse the flounder fillets and pat dry. 

3.  Continue preparing the packets of fish.  Open each piece of parchment as you would a book. Divide the fennel between the four pieces, placing it on the right hand side of the parchment. Season generously with olive oil, salt, and black pepper. Arrange a flounder fillet in the center of the packet, tucking under the thinner end of the fillet to create a more uniform thickness – this way the fish will cook evenly. Drizzle the fish with a little more olive oil and season again with salt and pepper. Tear over oregano leaves and sprinkle some fennel seeds. Arrange three lemon slices on top each fillet and add the tomatoes and olives.  For this recipe, I diced the olives and sprinkled them over the fish.

4.  Seal the packets of fish.  To seal the parchment packets, make one fold on the diagonal at the bottom left hand corner, creasing it sharply by pressing with your finger, as you would when you fold paper.   Add a second fold following a curve so that your packet will eventually form a half moon. Continue adding sharply creased folds, following a curve up and around the ingredients. When you reach the top, pour in two tablespoons of the flounder stock, and twist the remaining paper to seal. Repeat the process with the other packet.

5.  Bake the fish.  Place the baking sheet in the oven and bake for about 10 to 15.  When they’re finished the fish will just be flaky. 

6.  Finish the dish.  Gently slide each packet onto a plate and serve immediately, allowing each diner to open his or her own packet.  Alternatively, you could open the packets yourself and plate the fillets, topping them with the tomatoes, oregano and olives, as well as spooning any liquid in the pouch over the fish.  

ENJOY!