Sunday, December 30, 2018

Tidewater Mushrooms

These are not the prettiest things to ever grace a plate.  My guess is that the cooks at Mount Vernon were not interested in the appearance when they made Tidewater Mushrooms. Medium sized mushroom caps, topped with an overflowing oyster, and drizzled with a combination of white wine and butter before being placed in a fire. With the edges of the oysters curled and the meat slightly firmed, the mushrooms would be removed and put on a plate for service.  

Nothing more.  Not even a sprinkle of chopped parsley or chives.

If there was ever a challenge to my general (lack of) ability to photograph food, there is this recipe.  However, the look belies the flavor of these little bites. At first, I did not think that oysters and mushrooms would be a good flavor combination (except when they are oyster mushrooms), even with butter and wine tying the two ingredients together. I checked my Flavor Bible, and, to be sure, for every category of mushroom, there was no mention of oysters.  Then, I checked oysters, and, interestingly enough, there was a reference to oysters.  That got me to thinking a little more.

Mushrooms are perhaps the quintessential ingredient for earthy tones; and, oysters have a briny characteristic that could work well with mushrooms.  To be sure, there are briny oysters that can be found along the Chesapeake Bay.  Fishermen would have brought those oysters to shore and to market, and, they would have made their way to kitchens along the the Bay. The best oysters would be small to medium-sized, briny bivalves.  

Unfortunately (or fortunately, depending upon your view), the only oysters I had were "smalls" that, in reality, were "larges."  (Someone may have had an off day at the packing facility.)  That was a problem when it came to perching the oysters on their mushrooms  I was able to overcome that by using a muffin tray, placing one mushroom in each cup and plopping an over-sized oyster on top. 

TIDEWATER MUSHROOMS
Recipe from Mount Vernon
Serves 4

Ingredients:
1 pound of medium large fresh mushrooms
Salt , to taste
Freshly ground black pepper
1 pint oysters (medium size)
White wine or sherry

Directions:
Remove stems from mushrooms, wipe clean.  Drain oysters and pet dry with toweling.  Dip mushrooms in melted butter and place cup side up on a well greased shallow pan.  Put an oyster in each cup, sprinkle with salt and pepper, dot with butter and 1/2 teaspoon white wine or sherry.  Broil under moderate heat until edges of oysters curl. Serve round a dish of cocktail sauce and horseradish for those who wish it.

ENJOY!

Tuesday, December 25, 2018

Merry Christmas!

Christmas is probably my favorite time of year. It is definitely not the presents.  I already have everything that I have ever wanted with my beautiful Angel and my two little kids.  It is definitely not the snow, because we have not had a white Christmas in a couple of years.  

The reason why I love Christmas is the food.  In my family, there were strong and abiding food traditions. Some of those traditions were based on family history, such as the Christmas Eve dinner based upon traditions that originated in Abruzzo, Italy. Each meal opened with a plate of antipasti.  There was a selection of meats and cheeses, carefully sliced and placed on the platter, with garnishments that usually included olives and anchovies.  There was also the baccalao, salted cod fish, prepared by my grandfather because he loved it. Everyone else ate some of that cod as well.  While I initially liked it, I grew to dislike it a lot.  (It is one aspect of the family food tradition that I am happy to say has been relegated to memory.)

Once the antipasti course was completed, there was the traditional minestra maritata or Italian wedding soup.  As the link above suggests, I have previously posted the recipe to this dish.  The central ingredients in this dish, at least from my perspective are the whole chicken and the little meatballs. Traditionally, those meatballs were made from beef.  My beautiful Angel does not eat either beef or chicken.  So, for this year, I made an all turkey version of the soup.  The first problem was one of logistics: I could not boil a whole turkey.  But, I could boil a deconstructed turkey.  So, I bought a packages of thighs, wings and legs, as well as some breast meat.  I also used ground turkey for the meatballs.  The end result was just as good as the original. 

And, for the finale, there was the traditional pasta with tomato sauce, meatballs and sausage. I made a few alterations to the tomato sauce, borrowing inspiration from the Sunday Sauce in the Godfather movie. There was an all turkey version, with turkey sausage that helped to flavor the sauce.  However, there was also Sunday gravy with the beef/pork/veal meatballs and Italian pork sausage (both spicy and mild). 

All of this preparation and cooking was for Christmas Eve.  For the holiday itself, there is a 10 pound bone-in ribeye roast awaiting me.  As I tend to that project, I just want to wish everyone ...

A VERY MERRY CHRISTMAS!

Monday, December 17, 2018

Project Maryland BBQ: Part 3, The Sauce

Barbecue styles are not just about the protein, but, also about the sauce (or, in some cases, the lack of sauce).  Many well established barbecue styles have a particular sauce that helps to define that style. The best example of a sauce that defines a barbecue style can be found in northern Alabama. Think Big Bob Gibson's Barbecued Chicken with White Sauce.  Chicken smoked low and slow, finished off in a bath of a barbecue sauce that is part vinegar, part apple juice and part mayonnaise. 

And, in some cases, the sauce can draw the borders of the barbecue. The Carolinas provide the best example of those borders.  Carolina barbecue is pork centric, usually whole hog or pulled pork.  Nevertheless, there is Eastern Carolina barbecue, which is known for its thin, peppery vinegar sauce. If one traveled west toward Lexington, North Carolina, pitmasters add tomatoes to that vinegar sauce or, as they call it, the "dip," That tomato/vinegar sauce is the defining characteristic of Lexington style or Piedmont style barbecue.  And, if that person then travels south, he or she will find that pitmasters use mustard, which is thinned with the vinegar.  That mustard sauce is the cornerstone of South Carolina style barbecue.

Yet, all of the sauces that I have discussed are not even the most well known sauces.  When most people think about barbecue sauce, they think of Kansas City.  A thick sauce, with both sweet and tangy characteristics, that is often slathered on ribs. The sauce is usually made with ketchup, molasses, vinegar, and brown sugar (which gives you an idea where both the sweet and tangy come from), along with a variety of spices to add depth.   A variant of Kansas City style barbecue sauce could be found in Memphis, where the sauce is thinner, and more vinegar based.

With all of this said, the question is, if there was a Maryland style of barbecue, what sauce would be part of that style?

Eastern Carolina BBQ Sauce
One would think that, due to its proximity to the Carolinas, a Maryland-style sauce would be, at the very least, influenced by the use of vinegar, if not vinegar based. Vinegar base sauces have made their way, to differing extents, into Virginia.  So, it is not too difficult to imagine vinegar based sauces in Maryland.  Indeed, if one were to check out local BBQ joints in the Delmarva, he or she would probably fine examples of a vinegar BBQ sauce.  The sauce is not a true vinegar sauce as one would find in eastern Carolina.  Rather, it is probably closer to a Lexington barbecue sauce, because there is usually tomato in the sauce.

With the use of tomatoes (whether sauce or ketchup), I think that brings us closer to what the barbecue sauce would be with a Maryland style of barbecue. But, I don't think that the sauce would go so far as to be a thick, sweet or smoky sauce that one would find in Kansas City barbecue, or even in Memphis barbecue.  I think that the sauce would be a little more basic; tomatoes, apple cider vinegar, and spices.  In this regard, I think I would go there and add some Old Bay, because that spice mix is quintessential Maryland.

So, in the end, I decided to make a Maryland barbecue sauce.  I started with a simple sauce from the New York Times.  That sauce had good proportions of tomato (ketchup), vinegar (apple cider) and sugar (I used dark brown sugar, which I prefer in sauces), along with the use of smoked paprika, which gives a little hint of smoke to the finished product. The original recipe also provides for the use of cumin, and, it is a very cumin-forward sauce.  I decided to swap out the cumin with the Old Bay, which, surprisingly enough, does not stick out as much as the cumin did. The end result is pictured below and it worked out very well.


MARYLAND-STYLE BARBECUE SAUCE
Recipe adapted from NYT Cooking
Makes 1 1/2 cups

Ingredients:
2/3 cup ketchup
1/2 cup cider vinegar
1/4 cup brown sugar
2 teaspoons pimenton (smoked Spanish paprika)
1 teaspoon Old Bay
1 teaspoon kosher salt
1 teaspoon freshly cracked black pepper

Directions:
Combine all ingredients in a small saucepan, bring to a simmer over medium heat and cook for 5 minutes.

ENJOY!

Thursday, December 13, 2018

Linden Petit Verdot (2013)

Linden Vineyards is definitely located in a beautiful place.  Perched on a high spot in northern Virginia's Blue Ridge mountains, there are beautiful views of the rolling hills, with rows of vines near and forests afar.  Even on a gloomy day, such as the one last February when my beautiful Angel and I visited the winery, cannot put a damper on the vistas. 

A visit to Linden is not without its rules.  I've been to many tasting rooms, but none with all of the rules of Linden.  For example, the winery discourages you from bringing your kids, but the rules preclude, among other things, parties of more than 4 people and food from outside the winery.  (Most wineries that we have visited usually allow children, especially where there is space for them to run around, and have no issue with outside food).  Still, the rules did not matter to us, as it was just my Angel and myself.  

We did the wine tasting, tasting four wines, including a 2016 Viognier and 2016 Petit Manseng, as well as the 2013 and 2014 vintages of the Petit Verdot.  After the tasting, we decided to buy a couple of bottles to take home, including that 2013 vintage of the Petit Verdot.  This wine is made with 96% Petit Verdot grapes and 4% Cabernet Franc grapes. 

Interestingly, I have reviewed two Petit Verdot wines in the past, and both came from Virginia.  The first was the 2010 Vintage of the Petit Verdot from Gallino Cellars.  The second was the 2014 vintage from Pearmund Cellars.  Both got very positive reviews because both were very good wines.  They set the bar for the consideration of a Petit Verdot wine from Linden Vineyards.

The Petit Verdot pours a dark ruby red. As the wine sits in the glass, one is greeted by aromas reminiscent of a small basket full of fruit, particularly cherries and raspberries.  There were also some floral notes, that I had a little difficulty placing.  But, the one thing that I had no problem with identifying is the brightness that could be found in the aroma. The Linden Petit Verdot was brighter than I would have expected for a wine based principally, if not entirely, upon this varietal.

That brightness carried over to the taste of the Linden wine. Each sip revealed a bowl of ripe cherries, completed by a few raspberries and/or blackberries. There is also just a hint of earthiness in the back, a faint reminder of the reason why winemakers use Petit Verdot in the blending of Bordeaux red wines. Those faint reminders could not overcome the bright, full-bodied nature of this wine, as if its aroma and flavor were intended to make this wine stand out.  They succeeded in that regard. 

To be sure, I liked this wine as much as I liked the Petit Verdot wines from Gallino Cellars and Pearmund Cellars.  All three were good wines and, rather than say which one is better or the best, I will close this post by pointing out that these wines demonstrate why Petit Verdot may be one of the best wines to come out of the State of Virginia.  Until next time, 

ENJOY!

Thursday, December 6, 2018

Kansas City Style Burnt Ends

Brisket and me have not had it always so easy.  I have smoked brisket a couple of times; but, despite my efforts, the end result isn't always so great. I've tried different ways to preserve the tenderness of the meat, such as injections of beef broth or mops of beef stock and ingredients, but the finished product is far from what I want or expect.  

I think the problem is that I have worked exclusively with the brisket flat. That piece is long, flat and very lean. It is difficult to smoke because it dries out and can become tough.  But the flat is just one part of the brisket; there is also the point.  The point is thicker and fattier.  It is far more forgiving to a amateur pitmaster like myself.  Together, the flat and point constitute an entire "packer brisket."  However, that packer typically weighs between 8 to 12 pounds.  I don't have the time, patience or appetite to eat an entire brisket point, at least right now. 

A while back, I decided to check out a local butcher cshop called Chop Shop Butchery.  I went there expecting to buy some pork, like a Boston butt, to smoke.  However, as I stared into the glass case, I saw brisket points.  My mind began to race. Do I want to do brisket?  How long had it been since I smoked a brisket? What I can I do with brisket point? I decided to answer that last question with a quick Google search.  The answer was simple: burnt ends. The quintessential Kansas City barbecue.

The history of burnt ends begins with that packer brisket. Some pitmasters removed and set aside the brisket points. The points were, so thought the pitmasters, too fatty to serve, caramelized and burnt.  The pitmasters and restaurants, like Arthur Bryant's, set aside the points and ends on the counter, offering them as a treat to customers while they waited for their brisket sandwiches. Customers ate  those fatty, caramelized pieces of brisket.  One such customer, a food writer and Kansas City native, Calvin Trillin, wrote, "I dream about those burnt ends."  Trillin further dubbed Arthur Bryant's "the best single restaurant in the world." After that, some restaurants took notice, and, collected the end pieces to sauce them once more time and serve them on bread.  Burnt ends made it on to menus and are now as BBQ as the brisket sandwiches themselves.

Although I have not made it to Kansas City (yet) or had the opportunity to eat at KC BBQ joints like Arthur Bryant's (yet), I have had burnt ends.  Those barbecue joints that are closer to where I live, and who strive to provide different kinds of barbecue, inevitably have burnt ends on the menu.  This at least gave me some idea of what the end result should look like.  Now, I had to try to make it myself.

Overall, I think that my first effort at making burnt ends was successful. It may not have been Arthur Bryant's successful, but it was amateur pitmaster in the Mid-Atlantic successful. The burnt ends had the smoke rings, along with some of the expected caramelization and bark that defines these little one-bite wonders. If there was anything that I could improve upon,  I think that the burnt ends could have been a little more caramelized.  That might require some additional time in the smoker at the end, or,m some refinement to the sauce recipe.

(You can learn a lot more about burnt ends from Burnt Legend, the Story of Burnt Ends, available at PBS.) 


KANSAS CITY STYLE BURNT ENDS
Recipe adapted for Brisket and Sauce from Hey Grill Hey
Serves several

Ingredients (for the Burnt Ends):
1 6 to 8 pound brisket point
2 teaspoons coarse ground kosher salt
2 teaspoons coarse ground black pepper
2 teaspoons garlic powder
1 cup beef stock
1 cup Kansas City Style BBQ Sauce (see below)
1/2 cup dark brown sugar

Ingredients (for the Kansas City Style BBQ Sauce):
14 ounce can crushed tomatoes
1 cup ketchup
3/4 cup brown sugar
1/2 cup apple cider vinegar
1/2 cup molasses
1 tablespoon smoked paprika
1 tablespoon salt
2 teaspoons ground black pepper
1 teaspoon chili powder
1 teaspoon garlic powder
1/2 teaspoon red pepper flakes
1/2 teaspoon ground mustard

Directions:
1.  Prepare the cook.  Preheat the smoker to 225 degrees Fahrenheit using wood charcoal.  

2.  Prepare the brisket point.  combine the salt, pepper and garlic powder.  Shake liberally on all sides of the brisket point.

3.  Smoke the brisket point.  Place the brisket point in the smoker, close the lid and smoke until the internal temperature of the meat reads 165 degrees Fahrenheit.  This step usually takes 6 to 8 hours depending upon the size and thickness of the meat.  Spritz with 1 cup of beef stock every hour during the initial smoke period. 

4.  Continue smoking the brisket point.  Once the brisket reaches 165 degrees, wrap tightly in butcher paper (or aluminum foil) and return to the smoker.  Smoke until the internal temperature reaches 195 degrees and then remove to a cutting board.  This typically takes another three hours

5.  Make the sauce.  Combine all of the ingredients in a medium sauce pan.  Whisk to combine.  Bring to a boil and then reduce heat to a simmer.  Simmer for 20 minutes.  Allow to cook completely before transferring to an air tight container.  You can refrigerate it overnight to get the best flavor. 

6.  Create the brisket ends.  Once the temperature of the meat reaches 195  degrees Fahrenheit, unwrap the meat and drain any liquid into an aluminum pan.  Cut the brisket point into cubes about 1 1/2 inches thick.  Place the cubes into the aluminum pan and toss with the BBQ sauce and brown sugar.  Work quickly during this step to prevent your brisket from cooling down too much.

7.  Finish the cook.  Set the uncovered pan back on the smoker and close the lid.  Continue smoking at 225 degrees Fahrenheit for 1-2 more hours, or until the burnt ends have started to absorb the BBQ sauce and caramelize on all sides and are very tender.

ENJOY!

Saturday, December 1, 2018

Grilled Mahi Mahi with Tomatillo Sauce

This post has been in the queue for a very long time.  Every time I look at it, I remember how much work I have to do on presentation.  I think the food that I cook is good, but it is not always very pretty looking.  This picture reminds me of that, namely because of how the sauce was ladled onto the Mahi-Mahi fillet.  This tomatillo sauce is very delicious, and it is something that could go well with not just fish fillets, but other seafood as well.  As delicious as this sauce is, I think I do it some disservice when it came to the presentation of the dish.  

In any event, I have previously blogged about the Mahi Mahi, but I have not really discussed the tomatillo. A green little fruit encased somewhat in a papery husk.  The fruit start out with a tangy note, but, as it ripens, the tomatillo becomes sweeter.  That is why you what to find and buy green tomatillos, and, preferably ones that are still in their husks.  The quality of the tomatillo can, in many ways, be shown by the state of the husk.  The husk should be a light brown, and it should not be dry or shriveled.  If you can find small tomatillos still in a husk, you are good to go when making a sauce such as the one that went with this Mahi-Mahi.

This recipe comes from a book entitled Wine & Food, which was written by Joshua Wesson.  The book provides recipes along with wine pairings, such as a Sauvignon Blanc or a white Rioja, which were the pairings suggested for this recipe.  


GRILLED MAHI MAHI WITH TOMATILLO SAUCE
Recipe from Wine & Food, pg. 61
Serves 4

Ingredients:
3 or 4 tomatillos
4 green onions, about 6 inches of the green tops
1 tablespoon plus 1 teaspoon of extra virgin olive oil, 
     plus oil for brushing
1 small clove garlic, finely chopped
1/2 small avocado, peeled and coarsely chopped
1/2 cup lightly packed chopped fresh cilantro leaves and tender stems
1 tablespoon fresh lime juice
1 teaspoon honey
1 teaspoon finely chopped jalapeno chile 
Kosher salt
4 mahi mahi filets (6-7 oz each)
Freshly ground black pepper

Directions:
1.  Prepare the grill.  Prepare a charcoal or gas grill for direct heat cooking over high heat or preheat the broiler.

2.  Prepare the vegetables.  Discard the papery husks from the tomatillos, rinse them under cold water and pat them dry with paper towels.  Brush the tomatillos and green onions with 1 teaspoon of oil and place on the grill rack.  Cook the vegetables, turning once or twice, until lightly charred on both sides, 4-5 minutes total for the onions, and 6-8 minutes total for the tomatillos.  The tomatillos will have softened and started to release their juices.  

3.  Prepare the sauce.  Transfer the tomatillos to a food processor and the green onions to a cutting board.  Coarsely chop the onions and add to the food processor along with the garlic, avocado, cilantro, and 1/2 teaspoon salt.  Process until the mixture is smooth.  Transfer to a bowl, then taste and adjust the seasoning with lime juice and/or salt. 

4.  Prepare the fish.  Lightly brush the fish fillets on both sides with oil and then season on both sides with salt and pepper.  Place the fillets on the grill rack.  Cook, turning once about halfway through cooking until opaque throughout when tested with a knife tip, 8-10 minutes total.    

5.  Finish the dish.  Transfer the fillets to warmed individual plates.  Spoon the sauce over the fish, dividing evenly and serve right away.

ENJOY!

Saturday, November 24, 2018

Roast Heritage Turkey with Sausage, Apple and Pecan Dressing

Maybe it is the times that we live in, maybe its because I love history.  Either way, I find myself drawn to earliest days of our Republic, when people such as George Washington, Alexander Hamilton, Thomas Jefferson and James Madison were walking and talking. I often enjoy trips to Mount Vernon, Monticello, or colonial Williamsburg. And, with each trip, I ultimately find myself fixated on, not the founding fathers, but the enslaved who served them. The reason is that I am almost always interested in the kitchens. Those kitchens were staffed by slaves, who were responsible for preparing and serving each course to the hosts and guests.  (My interest actually goes far beyond what may have been served to the guests of George Washington and focuses on what the slaves often prepared for themselves with what little they had. If you are looking for a good book that touches on this subject, check out The Cooking Gene by Michael Twitty.)

For Thanksgiving 2018, I decided to prepare a meal that would have prepared during the colonial times. I drew from my cookbooks, such as The Colonial Williamsburg Tavern Cookbook, and, online, such as the recipes provided by Mount Vernon.  Nearly all of the dishes -- from the appetizer to the main course -- were recipes that could find some connection to America's colonial past. (The only exception was the roasted vegetable dish, which I had made in the past.)

When it came to the turkey and dressing recipes, I decided upon the a Roast Turkey with Sausage, Apple and Pecan Dressing.  This recipe comes from the Tavern Cookbook.  One would like to think that this recipe was served back in the colonial era, such as to George Washington, but I have nothing to support that theory.  And, given that Thanksgiving itself did not become a recognized holiday until another one of the great American Presidents (President Lincoln), this turkey and dressing recipe certainly wasn't served to celebrate any holiday. 

As for the actual turkey itself, Thanksgiving 2018 also featured a first in my cooking adventures ... roasting a heritage turkey. My beautiful Angel and my family were going to be celebrating Thanksgiving at home with her parents. This sparked an interest in sourcing a local turkey from a Maryland farm and, even further, a heritage bird that represents the history of this bird.  There are several farms across the Old Line State that raise heritage turkeys, such as Narragansett and Bourbon Red breeds. Ultimately, I chose Nick's Organic Farm, in part because of its location and the variety of products beyond turkey that the farm sells.  (In a way, this was a test of buying directly from a farm; I am looking to procuring more of the meat that I cook with from a farm as opposed to a grocery store.)

I purchased a ten (10) pound Bourbon Red turkey from Nick's Organic Farm. This 10 pound weight makes the the turkey the smallest one that I ever prepared. (I usually have cooked birds between 12 and 16 pounds, and, occasionally, up to 20 pounds in the past.) Given this was the first time that I was cooking with a heritage bird, I did a lot of research into the bird itself, including the white meat to dark meat ratio and the cooking times.  This is where the Internet, for all of its information, can fail someone. There are literally recipes for cooking this bird in two opposite ways: (1) low and slow; and (2) hot and fast. For someone who is new to cooking heritage birds, this is not helpful. Needless to say, I choose the low and low method in the hopes that I could err on the side of caution. It would be far less frustrating (or so I thought) to cook the bird for an additional 15 minutes than to have a bird as dry as the paper upon which the recipe is printed. I cooked it at 325 degrees for approximately 3 hours. Otherwise, I cooked the bird according to the recipe's instructions.  The lower cooking temperature meant that the cooking time was a longer.  For purposes of this recipe, however, I have left the cooking times from the Tavern Cookbook because those cooking times are more appropriate for store-bought birds).

The stuffing recipe also provided a first, in terms of the ingredients that were used and the style of preparing the stuffing. In an effort to produce a stuffing as close as possible, my beautiful Angel baked both French bread and corn bread. As for the principal ingredients, I bought some bulk turkey sausage.  (My Angel only eats turkey, she does not eat pork or beef.) The apples were a combination of Granny Smith and Honeycrisp apples. The pecans were, well, pecans.

Typically, when preparing stuffing, I was always told to dip the day-old bread in some turkey stock.  This dipping is to help the stuffing remain moist during the cooking process.  The recipe that I worked with did not call for the dipping of anything in turkey stock.  Instead, the only liquid that was added to the stuffing was 1 stick of melted butter.  This naturally created a drier stuffing.  Given I was working with a smaller bird, I could not put much of the stuffing in the cavity of the bird. The rest went into a greased, glass baking dish and baked separately. I put the dish in at the end of the cooking time for the bird.

Overall, I found the heritage bird to be the best turkey that I have ever eaten, both in terms of flavor and texture. (And, in this regard, I strongly recommend using Nick's Organic Farm.)  The Bourbon Red really does provide a stark contrast to the rather bland meat and texture of a mass produced, broadbreasted white bird.  In fact, the bird is so much better than any other turkey that I have had, that it more than justified the additional cost of the heritage bird. I definitely plan on using heritage birds in the future.  The only change I would make is to stick with the instructions or go with my gut when cooking the bird


ROAST HERITAGE TURKEY WITH
SAUSAGE, APPLE AND PECAN DRESSING
Recipe adapted from The Colonial Williamsburg Tavern Cookbook, pg .116-117
Serves Many

Ingredients (for the dressing):
1 pound bulk fresh mild or hot sausage
     (I used mild turkey sausage)
2 large onions, finely chopped
2 celery ribs, finely chopped
3 cups cooked corn bread, cut into 1/2 inch dice
2 cups day old French or Italian bread, 
     crusts removed and cut into 1/2 inch dice
2 large cooking apples, preferably Granny Smith,
     peeled, cored, and cut into 1/2 inch dice
     (I used a combination of Granny Smiths and Honeycrisps)
1 1/2 cups chopped pecans
1/2 cup (1 stick) unsalted butter, melted
2 tablespoons finely chopped fresh parsley
1 teaspoon salt
1/2 teaspoon ground black pepper

Ingredients (for the turkey):
1 trimmed turkey (12 to 14 pounds)
     (I used a 10 pound Bourbon Red heritag eturkey)
Salt and freshly ground black pepper, to taste
1/4 cup (1/2 stick unsalted butter, softened
3 tablespoons flour
1 1/2 cups turkey stock

Directions:
1. Prepare the dressing. In a large skillet over medium-high heat, place the sausage and cook, stirring often, until no trace of pink remains. Use a slotted spoon to transfer the sausage to drain on paper towels. Pour off all but 1 tablespoon of the fat from the skillet. And the onions and celery to the skillet and cook, stirring often, until softened about 5 minutes. In a large bowl, combine the drained sausage, onions, celery, corn bread, day old bread, apples and pecans. Stir in the melted butter, parsley, salt and pepper. 

2. Prepare the turkey.  Dry the turkey inside and out with paper towels. Season the inside the cavity with salt and pepper. Fill the breast and neck cavities with the dressing. Truss the turkey securely with a trussing needle and kitchen string.

3. Roast the turkey.  Preheat the oven to 400 degrees Fahrenheit. Rub the turkey with the butter and season well with salt and pepper. In a large roasting pan, place the bird on its side. Cook for 15 minutes and then turn on the other side for fifteen minutes. Turn, breast side down, in the pan and cook until the back is golden brown, about 30 minutes.  Reduce the oven temperature to 325 degrees Fahrenheit, and turn breast side up. Continue to roast for 18 minutes per pound, basting every 20 minutes, until a meat thermometer inserted into the thickest part of the thigh registers 165 degrees Fahrenheit. Transfer the turkey to a warmed platter and let sit, loosely covered with foil for 10-15 minutes.  

4. Prepare the gravy.  Skim the fat from the surface of the roasting pan juices.  Pour off the clear juices and reserve.  Place the roasting pan on top of the stove and sprinkler over the flour. Cook over medium high heat, stirring constantly until the flour is lightly brown, about 2-3 minutes. Pour in the turkey stock and increase the heat to high. Stir or whisk constantly until the gravy comes to a boil.  Reduce the heat to low and simmer for 5 minutes. Add the clear pan juices and season with salt and pepper. Strain through a sieve and pour into a warmed gravy boat. Carve the turkey and pass the gravy on the side.

ENJOY!

Wednesday, November 21, 2018

The Heritage Turkey

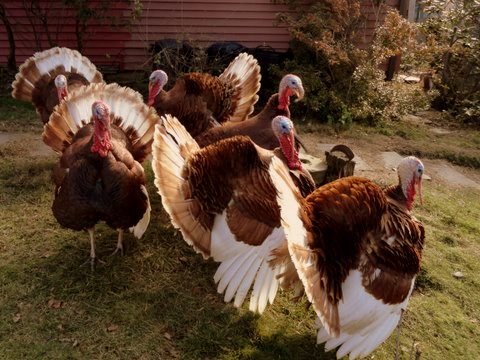
The Bourbon Red.  A descendant from the Buff, a historic breed of turkey from the Mid-Atlantic states.  In the late 1800s, the Buff was brought to Kentucky and Ohio.  J.F. Barbee cross-bred the Buff with Bronze and White Holland breeds of turkeys.  Barbee's goal was to produce a turkey breed that could rival the Mammoth Bronze turkey (a precursor to today's mammoth double breasted white turkeys).  The result was what Barbee dubbed, "the Bourbon Butternut."  Apparently, the butternut was not like a "Butterball" (which, as a name for turkeys, was not recognized until 1940).  The breed got a rebranding as the Bourbon Red.

With a new name, the Bourbon Red rose in prominence. The breed's rise peaked during the 1930s and 1940s. A Bourbon Red can grow to be a large and hardy bird, with mature toms getting as large as 33 pounds while hens grow to be 18 pounds. Its large size helped in its rise, but, the breed eventually was eclipsed by broad-breasted varieties,  which became the darling of the commercial turkey industry and, eventually, of American consumers.  The Bourbon Red stock declined, and, today, it is one of the rarer breeds of turkeys.  There are only about 5,000 breeding Bourbon Reds in the United States right now.  The breed is so endangered that it found itself on the Slow Food's USA Ark of Taste (which is a list of heritage foods in danger of extinction.

But, the rumors of the Bourbon Red's demise may be premature.  This heritage breed of turkey has made a rebound, with organic farms raising these turkeys specifically for the Thanksgiving table. One of those farms is Nick's Organic Farm, which is a certified organic farm of 165 acres located near Buckeystown, Maryland. Nick's Organic Farm raises both Narrangansett and Bourbon Reds.  After doing some research into organic farms in Maryland, I chose Nick's and ordered two good sized Bourbon Red turkeys (one for myself and one for my father-in-law) for the Thanksgiving holiday.

I have spent a lot of time researching the cooking of heritage birds, deciding between roasting or smoking the bird, what kind of stuffing to use, how to prepare the birds, and the sides.  The theme for this Thanksgiving is a nod to Colonial America, with recipes being based on dishes from Mount Vernon, Monticello and Colonial Williamsburg.  Those recipes will be posted in the coming days and weeks, so stay tuned!

ENJOY!

Thursday, November 15, 2018

Beaujolais Nouveau 2018

Thursday, November 15, 2018.  It is World Philosophy Day.  If you happen to be in Belgium, then it is Koningsfeest or King's Feast. In Germany, it would be Feestday Duitse Gemeenschap or German Community Day. If you happen to be in France, or, more specifically, just outside of Lyon, it would be Beaujolais day ... or, the day that George DeBoeuf releases "the first wine of the harvest."

This is not the first time that I have tried and reviewed a Beaujolais Nouveau. In that post, I discussed how the wine was made, using Gamay Noir à Jus Blanc grapes or Gamay grapes. The laws governing the wine require the grapes to be picked by hand.  The whole grapes are fermented in a carbon dioxide rich environment, which results in the juice being fermented inside the grapes. The resulting wine is then "aged" for a brief period of time and bottled 6 to 8 weeks after the harvest. This is as young as a wine can get and one of the few reds that comes with the instructions, "drink on sight." 

The Beaujolais Nouveau pours a dark berry in color, with garnet or ruby tones. Those dark hues fade quickly toward the edges of the glass, turning a light maroon and even becoming a very light red along the edges.  

The aromatic elements of this wine start with a little tart cherry or cranberry, which subside as the wine opens. There is a slight earthiness, trending towards slate or pebble.  There is also perhaps some pencil shaving in the nose of the wine. 

They say that the Beaujolais Noveau may change a little from year to year. Back in 2012, I found some tart and sour cherries, which, as the wine opened, ripened into more full cherries. The complete opposite of what may have found, such as cherries, raspberries and other light red fruits. For 2018, the wine was not as tart.  Rather, the most prominent note was that cranberry. The wine is kind of a reminder that Thanksgiving in the United States, which often features a cranberry dish on the table, is just one week away. There are some other elements, such as some raspberry, that become more pronounced. As with the 2012 vintage, the tartness fades and the fruit ripens as the wine sits in the glass.  

Since it was released today and it is Beaujolais Nouveau Day, it is available at many wine stores. I paid a little more than $11.00 per bottle.  

ENJOY!

Monday, November 12, 2018

Smoked Ribeye Roast, Uruguayan Asado Style

I have a fascination with the country of Uruguay.  The relatively smallish country bordered by Brazil to the north and, across the Rio de la Plata, within sight of Argentina. My fascination as entirely to do with the country's cuisine.

It all began a few years ago with my personal culinary challenge to prepare a main course from Uruguay as part of my Around the World in 80 Dishes challenge.  I made Chivitos al Pan, a sandwich loaded with meat, cheese and eggs. That stands as perhaps my favorite challenge to date. After that time, I have wanted to learn more about the cuisine of Uruguay.

And, this post provides that opportunity.  Uruguayan cuisine is perhaps the most meat centric cuisine in at least the Western hemisphere, if not the world. The country has a population of just little more than 3.4 million people in 2016, but consumes more than 427 million pounds of  meat during that same year.  That is 124 pounds per person that year.  With the average weight of a person around 137 pounds, that means that, on average, an Uruguayan eats as much meat as the average person weighs.  That is quite the feat.

But it is not just about eating meat, it is the grilling of the meat. In many ways it defines Uruguayan cuisine. The chicken, beef, pork and chorizo on the parilla, carefully watched and tended to by the asador. There is nothing like taming the coals and cooking ungodly amounts of meat for an asado. (If I did not have my current job, my dream job would be that of an asador.  Perhaps upon retirement, a move to Uruguay and I could start a second career as an asador, cooking untold amounts of meats while casually sipping one of Uruguay's wines, like a Tannat or a Cabernet Sauvignon.)

It is this tradition of grilling that inspired me to make a ribeye roast over coals.  To be sure, this is not the parilla true style of cooking.  I did not have the arrangement for that.  Instead, I used my smoker, with its grill (and without the liquid bowl) to create a direct charcoal grilling. The one significant difference is that I decided to use some hickory wood to add smoke to the ribeye roast.  

To underscore the Uruguayan inspiration, I prepared a classic Uruguayan chimichurri for this ribeye roast. Like its Argentinian neighbor, this chimichurri is full of fresh parsley, garlic and oregano, mixed with olive oil and vinegar to create what is perhaps the most amazing accompaniment for grilled beef.  The vinegar helps to cut through the fat of the ribeye roast.  The crushed red pepper flakes, along with the freshly ground black pepper and the peppery nature of the oregano, add a slight hint of heat.  These additional layers of flavor create an artistic masterpiece on the canvas that is the beef itself.

I have cooked a lot with ribeye roasts, and some of the recipes have made it on to this blog.  However, this is perhaps my favorite ribeye roast that I have done. Maybe it is the effort to draw inspiration from Uruguayan cuisine.  Maybe it is just that I love beef.  Either way, I am going to make this recipe again. 


SMOKED RIBEYE ROAST, URUGUAYAN ASADO STYLE
Recipe adapted from Saveur
Serves several

Ingredients (for the ribeye roast):
1 ribeye roast (5 to 6 pounds)
1 tablespoon kosher salt
1 tablespoon freshly ground black pepper
1 teaspoon granulated garlic powder
1 teaspoon dried oregano
Hickory wood chunks

Ingredients (for the Uruguayan chimichurri):
1 tablespoon kosher salt
1 cup finely chopped parsley
3/4 cup finely chopped oregano
1 1/2 teaspoon red pepper flakes
1/3 cup olive oil
1/4 cup red wine vinegar
8 cloves garlic, finely chopped
Freshly ground black pepper to taste

Directions:
1.  Prepare the roast.  Combine the salt, black pepper, oregano and garlic powder and mix well.  Spray some olive oil over the roast.  Apply the salt and pepper mixture to all sides of the roast.  

2.  Prepare the smoker.  Soak the hickory chunks in water for 1 hour.  Prepare a fire for a 300 degree smoker.  Once the temperature is right, oil the grates and add the roast.  Smoke for about 3 to 3 1/2 hours until the temperature in the roast registers 145 degrees Fahrenheit. Remove the roast from the smoker and let it rest, covered, for about 15 to 30 minutes. 

3.  Prepare the chimichurri.  Bring 1 tablespoon of salt and 1 cup of water to a boil in a 1 quart saucepan.  Let cool.  Whisk parsley, oregano, chile flakes, oil, vinegar, garlic and pepper in a bowl.  Stir in salt water mixture.  Let chimichurri sit for at least 30 minutes.

4.  Finish the dish.  Slice the ribeye roast and serve immediately with the chimichurri.

ENJOY!